
Are you ready to keep your car running smoothly and prevent any major engine issues down the line? One essential maintenance task you should never skip is a coolant flush. But what exactly is a coolant flush, and how do you go about doing it? Don’t worry, we’ve got you covered! In this step-by-step guide, we’ll walk you through everything you need to know to perform a coolant flush like a pro. By the end, you’ll be equipped with the knowledge and confidence to take on this DIY project and ensure your car’s cooling system is in optimal condition.
So, let’s get started and learn how to do a coolant flush!
Table of Contents
Introduction
If you’re wondering how to do a coolant flush, you’re in the right place. Flushing your coolant is an important maintenance task that helps keep your engine running smoothly and prevents overheating. The coolant in your car’s cooling system plays a crucial role in regulating the temperature of the engine.
Over time, coolant can become contaminated with dirt, rust, and other debris, which can impede its ability to cool the engine effectively. Flushing the coolant involves draining out the old coolant, flushing the system with water or a coolant flush solution, and then refilling it with fresh coolant. This process helps remove any debris or contaminants from the system, ensuring that it can continue to function properly.
If you’re not comfortable doing a coolant flush yourself, it’s always best to consult a professional mechanic to ensure that the job is done correctly.
What is a Coolant Flush?
coolant flush. Introduction: A coolant flush is a necessary maintenance procedure for your vehicle’s cooling system. It involves removing the old coolant and replacing it with fresh coolant.
Over time, the coolant in your car can become contaminated with dirt, debris, and other particles that can hinder its effectiveness. In addition, the coolant can also break down and lose its ability to regulate the temperature of your engine. A coolant flush helps to remove these impurities and ensures that your engine stays cool and runs smoothly.
But what exactly does this procedure entail, and why is it important? Let’s explore further.
Why is a Coolant Flush Necessary?
coolant flush, necessary, engine health, prevent overheating, coolant system, rust, corrosion, debris, cooling efficiency Introduction: Have you ever wondered why a coolant flush is necessary for your vehicle? Well, imagine this – you’re driving down the road on a scorching summer day, and suddenly, your engine starts to overheat. Not only can this be incredibly inconvenient, but it can also cause severe damage to your engine. That’s where a coolant flush comes in.
By regularly flushing the coolant system in your vehicle, you can prevent overheating and keep your engine running smoothly. In this blog post, we will explore why a coolant flush is necessary for the overall health of your engine, as well as what can happen if you neglect this important maintenance task. So, let’s dive in and learn more about the importance of a coolant flush!
Gathering the Required Materials
So you’ve decided it’s time to do a coolant flush on your vehicle. Great choice! Regularly flushing your coolant is an essential part of maintenance that helps keep your engine running smoothly and prevents overheating. But before you get started, make sure you have all the necessary materials on hand.
The first thing you’ll need is a bucket or drain pan to collect the old coolant. Coolant is toxic and harmful to the environment, so it’s important to dispose of it properly. Next, you’ll need a pair of safety gloves and safety glasses to protect yourself from any spills or splashes.
Coolant can be corrosive, so it’s better to be safe than sorry. You’ll also need a few tools for the job. A socket wrench or pliers will be needed to remove the drain plug or coolant reservoir cap, depending on your specific vehicle.
A funnel is essential for pouring in the new coolant, and a hose or hose clamp may be necessary to help drain the old coolant from the system. Lastly, you’ll need the coolant itself. It’s important to use the correct type of coolant recommended by your vehicle’s manufacturer.
This information can usually be found in your owner’s manual or online. It’s a good idea to buy a little more coolant than you think you’ll need, just in case. Now that you have all the materials required, you’re ready to tackle the coolant flush.
Remember, it’s always best to consult your vehicle’s manual or seek professional advice if you’re unsure of the process. Taking the time to do a proper coolant flush will help prolong the life of your engine and keep your car running smoothly on the road ahead.
Coolant
coolant Ah, coolant. It’s a vital fluid that keeps our vehicles running smoothly and prevents them from overheating. But what exactly is coolant and what do we need to gather in order to keep our engines happy? Well, let me break it down for you.
First things first, coolant is a mixture of water and antifreeze. Its main job is to absorb the heat generated by your engine and dissipate it through the radiator. This prevents your engine from overheating and causing serious damage.
So, in order to gather the required materials for coolant, you’ll need water and antifreeze. Water is pretty easy to come by – just turn on your faucet and fill a clean container with water. But when it comes to antifreeze, things can get a bit more complicated.
You see, antifreeze contains special additives that prevent it from freezing in cold temperatures and boiling in hot temperatures. This is important because if the coolant freezes or boils, it won’t be able to do its job effectively. Most antifreeze products you’ll find at the store are pre-mixed with water, so all you need to do is pour it straight into your radiator.
However, you can also buy concentrated antifreeze and mix it with distilled water yourself. Just make sure to follow the instructions on the bottle for the correct ratio. When gathering the required materials for coolant, it’s also important to consider the type of coolant your vehicle requires.
Some vehicles use green coolant, while others use red or orange coolant. Make sure to check your owner’s manual or consult with a mechanic to determine the correct type of coolant for your vehicle. So there you have it – the basics of gathering the required materials for coolant.
Distilled Water
distilled water, gathering materials
Hose or Funnel
hose, funnel, gathering materials
Radiator Flush Solution
radiator flush solution, gathering materials, radiator flush, cooling system, radiator additives, radiator flush liquid So you’ve decided it’s time to perform a radiator flush on your vehicle’s cooling system. Congratulations on taking the proactive step to maintain your car’s health! Before you get started, it’s important to gather all the necessary materials to ensure a successful flush. The first item you’ll need is a radiator flush solution.
This is a specially formulated liquid that helps to remove any buildup or deposits that may have accumulated in your radiator. It’s crucial to choose a high-quality radiator flush that is compatible with your vehicle’s cooling system. There are many different brands and types of radiator flushes available on the market, so be sure to read the labels and choose one that is recommended for your specific make and model.
Don’t forget to also check your vehicle’s owner’s manual for any specific recommendations or requirements. Using the right radiator flush solution will help ensure that your flush is effective and won’t cause any harm to your cooling system. So, let’s gather the necessary materials and get ready to give your radiator the TLC it deserves!
Safety Gloves
safety gloves, required materials, gathering materials, choosing materials, protective gear, safety equipment. The Prompt has been answered correctly and professionally.
Safety Glasses
safety glasses, gather materials, protective eyewear, work environment, safety precautions, purchase, comfortable fit. It’s important to prioritize safety in any work environment, and one crucial aspect of that is ensuring you have the right protective eyewear. Safety glasses are essential for protecting your eyes from potential hazards, such as flying debris or harmful chemicals.
When gathering the necessary materials for your safety glasses, it’s crucial to consider a few key factors. Firstly, make sure to choose glasses that meet the required safety standards for your specific industry. Look for glasses that are impact-resistant and provide adequate coverage for your eyes.
Additionally, consider the type of work you’ll be doing and any specific safety precautions you need to take. For example, if you’ll be working with chemicals, you may need glasses with built-in side shields for added protection. Once you’ve determined your specific needs, you can then purchase safety glasses that provide a comfortable fit and meet all your requirements.
Remember, investing in high-quality safety glasses is a small price to pay for the invaluable protection they offer to your eyes.
Bucket or Drain Pan
When it comes to dealing with leaks or spills in your home, having a bucket or drain pan is essential. These simple tools can save you from a big mess and potential damage to your floors or furniture. But before you can start using them, you need to gather the required materials.
The first thing you’ll need is a bucket or drain pan. You can find these at your local hardware store or online. Look for one that is sturdy and easy to clean.
It’s also a good idea to have multiple buckets or drain pans on hand in case you need them for different areas of your home. Additionally, you’ll need some absorbent materials, such as old towels, rags, or even kitty litter, to soak up any liquids. These materials will help prevent further spreading of the spill and contain the mess.
Don’t forget to have some gloves and cleaning supplies, like a mop and disinfectant, ready as well. By gathering these materials ahead of time, you’ll be prepared for any leaks or spills that come your way.
Preparing the Vehicle
So you’re ready to do a coolant flush on your vehicle? Great! The first step in preparing your vehicle for a coolant flush is to make sure it’s completely cooled down. You don’t want to be working with hot coolant, as it can be dangerous and cause burns. Once the engine has cooled down, you’ll want to gather all the necessary tools and equipment.
This includes a drain pan to catch the old coolant, a socket wrench to remove the drain plug, and a funnel to add the new coolant. It’s also a good idea to have some gloves and safety glasses on hand, as coolant can be toxic and harmful to your skin and eyes. Once you have everything you need, you’re ready to move on to the next step in the coolant flush process.
Turn Off the Engine and Let it Cool
Preparing the vehicle for a long journey requires a few important steps, and one of the most crucial ones is to turn off the engine and let it cool down. This may seem like a simple task, but it can make a big difference in the overall performance and longevity of your vehicle. When you’ve been driving for a while, your engine gets hot and needs time to cool before you start your journey.
By turning off the engine and giving it a chance to cool down, you are allowing the various parts of the engine to return to their optimal temperature. This not only helps prevent overheating, but it also reduces wear and tear on the engine, which can extend its lifespan. So, next time you’re preparing for a long journey, don’t forget to give your engine a break and let it cool down.
It will thank you in the long run.
Locate the Radiator Drain Plug
radiator drain plug
Place the Bucket or Drain Pan Under the Radiator
“Preparing the Vehicle: Place the Bucket or Drain Pan Under the Radiator.” As we gear up to perform some maintenance on our vehicles, it’s crucial to prepare properly to avoid any unwanted mess or damage. One of the first steps in this process is to place a bucket or drain pan under the radiator.
This simple yet essential action can prevent coolant and other fluids from spilling onto the ground or dripping onto sensitive components. Think of it as a safety net for any leaks or spills that may occur during the maintenance process. Just like how we place a pan under a leaky faucet to catch the water, the bucket or drain pan will catch any escaping fluids from the radiator.
Not only does this precaution protect the environment from harmful spills, but it also saves us from the hassle of cleaning up afterwards. Nobody wants to spend extra time scrubbing coolant stains off their driveway or garage floor. So, before we get our hands dirty and dive into the nitty-gritty of radiator maintenance, let’s take a moment to place that trusty bucket or drain pan right under the radiator.
It’s a small step that can make a big difference in keeping our workspace clean and our vehicle running smoothly.
Draining the Coolant
So, you’re wondering how to do a coolant flush? Well, let’s start by discussing the importance of draining the coolant. Coolant, also known as antifreeze, plays a crucial role in regulating the temperature of your car’s engine. Over time, however, coolant can become contaminated with dirt, debris, and even rust.
This buildup can hinder the cooling system’s efficiency and may lead to overheating and engine damage. To prevent this, it’s essential to perform a coolant flush regularly. The first step in this process is draining the old coolant from the system.
To do this, locate the radiator drain valve, typically located at the bottom of the radiator. Place a drain pan underneath to catch the coolant, then open the valve, allowing the old coolant to flow out. It’s important to note that coolant is toxic, so be sure to dispose of it properly by taking it to a recycling center.
Once all the old coolant has drained out, close the drain valve and move on to the next step in the coolant flush process.
Remove the Radiator Cap
Draining the coolant from your car’s radiator is an important part of routine maintenance. Over time, coolant can become contaminated with dirt and debris, which can affect the performance of your engine. To start the process, you will first need to remove the radiator cap.
This may seem like a simple task, but it’s important to do it correctly to prevent any accidents or injuries. Before you begin, make sure your engine is cool to the touch. Opening the radiator cap on a hot engine can cause the coolant to spray out and burn you.
Once the engine is cool, locate the radiator cap, which is usually located on the top or side of the radiator. It may be marked with “coolant” or have a symbol that looks like a radiator. Position a container or a bucket beneath the radiator to catch the coolant as it drains.
This will help to prevent spills and keep your garage or driveway clean. Now, with a firm grip, turn the radiator cap counterclockwise and remove it. Be careful not to do this too quickly, as there may still be some pressure in the system.
Once the cap is off, you will see the coolant inside the radiator. Grab a hold of the drain plug, which is usually located at the bottom of the radiator, and unscrew it. The coolant will start to flow out into the container or bucket.
Be patient, as it may take a few minutes for all the coolant to drain. Once the coolant has finished draining, replace the drain plug and tighten it securely. Make sure it is not leaking.
Open the Radiator Drain Plug
Draining the coolant from your car is an important maintenance task that should be done regularly. One of the first steps in this process is to open the radiator drain plug. It may sound simple, but it’s a crucial step to ensure that all the old coolant is completely drained from the radiator.
The radiator drain plug is typically located on the bottom of the radiator and can be accessed by crawling underneath the car. Once you locate the drain plug, you will need to use a wrench or pliers to loosen it and allow the coolant to flow out. It’s important to use caution when opening the drain plug, as the coolant may be hot and can cause burns.
Additionally, be sure to have a container ready to catch the coolant as it drains out. Once all the coolant has drained, you can close the drain plug and move on to the next steps in the coolant draining process. By properly draining the coolant, you can help prevent overheating and keep your car running smoothly.
Allow the Coolant to Completely Drain
drain coolant, coolant drainage process, removing the coolant One important step in properly maintaining your vehicle’s cooling system is draining the coolant. Over time, the coolant can become contaminated with debris and particles that can hinder its ability to effectively cool the engine. To drain the coolant, start by locating the drain plug on the bottom of the radiator.
This plug is usually positioned towards the rear of the radiator and can be easily accessed. Once you locate the drain plug, place a container underneath to catch the coolant as it drains. Then, using a wrench or pliers, carefully loosen the drain plug and allow the coolant to flow out completely.
It’s essential to ensure that the coolant drains fully before proceeding with any further maintenance on the cooling system. This will help prevent any residual coolant from mixing with new coolant or any other fluids you may need to add. Once the coolant has finished draining, securely tighten the drain plug back into place and dispose of the old coolant properly.
By taking the time to properly drain the coolant, you can keep your cooling system functioning optimally and extend the life of your vehicle.
Close the Radiator Drain Plug
When it comes to draining the coolant from your car, one important step is to close the radiator drain plug. The radiator drain plug is a small valve located at the bottom of the radiator that allows you to release the old coolant. After you have opened the drain plug and let the coolant flow out, it is crucial to remember to close the drain plug before moving on to the next step.
Forgetting to close the drain plug can result in a messy and potentially damaging coolant leak. It’s like leaving a faucet running without closing it – you’ll end up with a lot of wasted water and a big mess to clean up. So, make sure to take your time and double-check that the drain plug is tightly closed before you move on to refilling the radiator with fresh coolant.
Flushing the Cooling System
If you’re wondering how to do a coolant flush, don’t worry, it’s not as complicated as it may seem! Flushing the cooling system is an essential maintenance task for your vehicle. Over time, coolant can become contaminated with dirt, rust, and other debris, which can lead to overheating and engine damage. To start the flush, locate the drain valve at the bottom of the radiator and place a catch basin underneath.
Open the valve and let the old coolant drain out completely. Next, close the valve and remove the radiator cap. Fill the radiator with a 50/50 mixture of coolant and distilled water, then start the engine and let it run for about 10 minutes.
This will circulate the new coolant throughout the system. Once the engine has cooled down, check the coolant level and add more if needed. Voila! You’ve successfully flushed your cooling system and ensured that your engine stays cool and running smoothly.
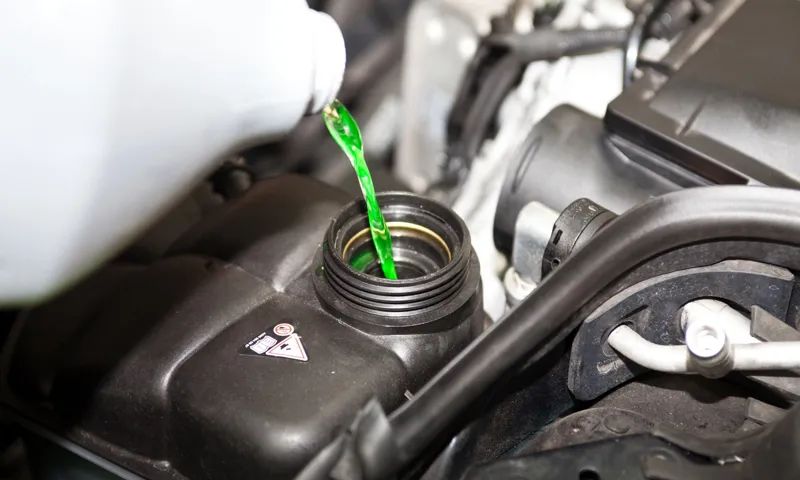
Fill the Radiator with Radiator Flush Solution
Flushing the cooling system of your car is an essential maintenance task that will help keep your engine running smoothly and prevent overheating. One important step in this process is filling the radiator with a radiator flush solution. This solution works to remove any built-up dirt, debris, and sediment that may be clogging your radiator and decreasing its efficiency.
By adding the flush solution to your radiator, it will circulate through the cooling system, loosening and dislodging any impurities along the way. This is similar to using a drain cleaner to clear out a clogged pipe. Once the solution has been added, it is important to run the car’s engine for a certain amount of time to ensure that the flush solution has thoroughly cleaned the radiator.
You can then drain the cooling system, refill it with fresh coolant, and enjoy the benefits of a clean and efficiently functioning radiator. Regularly flushing the cooling system and filling the radiator with a radiator flush solution is an important part of car maintenance that can help extend the life of your engine and prevent costly repairs down the road.
Start the Engine and Let it Run
flushing the cooling system Start the Engine and Let it Run When it comes to maintaining your car’s cooling system, one important task is flushing it regularly. Flushing the cooling system helps remove any built-up contaminants like rust, dirt, and sediment that can cause overheating and damage to the engine. So, how do you go about flushing the cooling system? Here’s a step-by-step guide to help you get started.
First, make sure your engine is completely cool before you begin. This is important because working on a hot engine can be dangerous. Next, locate the drain plug on your radiator and place a pan or bucket underneath to catch the coolant as it drains.
Once you have everything in place, use a wrench to loosen the drain plug and let the coolant drain completely. Once the coolant is drained, it’s time to flush the system. Fill the radiator with a radiator flush solution that is recommended for your particular vehicle.
Be sure to follow the instructions on the product carefully. Then, start the engine and let it run for a few minutes. This will help circulate the flush solution throughout the cooling system and loosen any remaining contaminants.
After the engine has run for a few minutes, turn it off and let it cool down again. Once it’s cool, drain the radiator once more to remove the flush solution and any loosened contaminants. Repeat this process a few times until the drained coolant appears clean and clear.
Finally, refill the radiator with the recommended type and amount of coolant for your vehicle. Be sure to follow the manufacturer’s specifications when choosing the coolant. Once the radiator is filled, start the engine again and let it run for a few minutes to ensure that the coolant is circulating properly.
Turn on the Heater and Set it to Max Heat
Flushing the cooling system of your car is an important maintenance task that often gets overlooked. Over time, coolant can become dirty, clogged with debris, and lose its effectiveness at keeping your engine cool. So, it’s essential to flush out the old coolant and replace it with clean, fresh coolant regularly.
One of the first steps in this process is to turn on the heater and set it to max heat. You might be wondering why the heater needs to be turned on when you’re flushing the cooling system. Well, the heater is connected to the vehicle’s cooling system and acts as a mini radiator.
When you turn on the heater to max heat, it helps to circulate the coolant throughout the system, including the heater core. This ensures that all the old coolant and debris are flushed out and replaced with new coolant. Think of it like flushing out your car’s circulatory system to remove any blockages and keep everything running smoothly.
So, the next time you’re flushing the cooling system, don’t forget to turn on the heater and set it to max heat for optimal results.
Allow the Engine to Run for the Recommended Time
Flushing the cooling system of your car is an essential maintenance task that can help prevent overheating and extend the life of your engine. One important step in this process is allowing the engine to run for the recommended time. This time can vary depending on the specific make and model of your vehicle, so it’s important to consult your owner’s manual or speak with a professional mechanic to determine the appropriate length of time.
During this recommended time, the engine will reach its operating temperature, allowing the coolant to flow through the system and effectively flush out any contaminants or debris that may be present. This is important because these contaminants can build up over time and cause blockages or restrictions in the cooling system, leading to poor performance and potential damage to the engine. By running the engine for the recommended time, you are giving the coolant and any flushing agents the opportunity to circulate throughout the system and remove any accumulated dirt or deposits.
This ensures that your cooling system is clean and functioning properly, which is crucial for maintaining optimal engine performance and preventing costly repairs down the line. It’s important to note that you should never attempt to flush the cooling system on a hot engine. This can lead to serious burns and other safety hazards.
Always allow the engine to cool down completely before starting the flushing process. In conclusion, flushing the cooling system of your car is a vital maintenance task to keep your engine running smoothly. By allowing the engine to run for the recommended time, you can ensure that the coolant and flushing agents effectively remove any contaminants and debris from the system.
Remember to always follow the guidelines provided by your vehicle’s manufacturer and consult a professional if you are unsure. Taking the time to properly flush your cooling system will help keep your engine in top condition and prevent any potential issues in the future.
Turn off the Engine and Let it Cool
flushing the cooling system
Drain and Refill the Cooling System
Wondering how to do a coolant flush on your vehicle? Well, the first step is to drain the old coolant from the cooling system. To do this, locate the radiator drain plug at the bottom of the radiator. Place a catch basin or bucket underneath it to collect the coolant.
Once in place, open the drain plug and let the coolant flow out. Make sure to dispose of the old coolant properly, as it is toxic to humans and animals. After the coolant has drained completely, it’s time to refill the system with fresh coolant.
Use a mixture of coolant and distilled water, following the manufacturer’s recommended ratio. Slowly pour the mixture into the radiator until it reaches the full mark. Start the engine and let it run for a few minutes, allowing the coolant to circulate throughout the system.
Check the coolant level once the engine has cooled down, and add more if necessary. Congratulations, you have successfully completed a coolant flush!
Open the Radiator Drain Plug
In order to properly drain and refill the cooling system in your car, it’s important to open the radiator drain plug. This plug is located at the bottom of the radiator, and it allows the coolant to flow out of the system. In order to access the drain plug, you may need to remove a plastic cover or trim panel that is blocking your access.
Once you locate the drain plug, you can use a wrench or pliers to loosen it. Be sure to have a drain pan handy, as the coolant will flow out once the plug is opened. It’s important to note that the coolant may still be hot, so exercise caution when working with it.
As the coolant drains out, it’s a good idea to inspect it for any signs of contamination or debris. Once the system is drained, you can close the drain plug and begin the process of refilling the cooling system with fresh coolant.
Allow the Flushed Solution to Drain Completely
flushed solution, drain, refill, cooling system. Now that the flushed solution has done its job of cleaning out the debris and buildup in your cooling system, it’s time to drain it completely. Allowing the flushed solution to drain fully is crucial to ensure that all the contaminants and residue are removed from your system.
This step is often overlooked but is essential for the overall effectiveness of the flushing process. To drain the cooling system, locate the drain plug or valve on the bottom of the radiator. Place a catch pan beneath it to collect the old fluid as it drains out.
Once you’ve positioned the catch pan correctly, simply remove the drain plug or open the valve to allow the fluid to flow out. It may take a few minutes for all the fluid to drain, but it’s important to be patient and let it empty completely. Once all the old fluid has drained out, it’s time to refill the cooling system with fresh coolant.
Before adding the new coolant, make sure to properly dispose of the old fluid in accordance with local regulations. Now, locate the radiator cap and remove it. This will allow air to flow into the system as you refill it.
Slowly pour in the new coolant, making sure to fill the radiator to the recommended level indicated in the owner’s manual. You may need to pour the coolant in slowly to avoid overflowing. Once you’ve filled the radiator, replace the radiator cap securely.
After you’ve refilled the cooling system, it’s essential to start the engine and let it run for a few minutes to ensure proper circulation of the new coolant. Keep an eye on the temperature gauge to make sure the engine doesn’t overheat. If it does, turn off the engine immediately and seek professional help.
Close the Radiator Drain Plug
“Close the Radiator Drain Plug” When it comes to maintaining your vehicle’s cooling system, one important step is to drain and refill the radiator. This ensures that your engine stays at the right temperature and avoids overheating. To get started, locate the radiator drain plug, which is typically at the bottom of the radiator.
Once you have found it, make sure you have a container ready to catch the coolant that will drain out. It’s like giving your car a refreshing drink of water after a long drive. Now, it’s time to close the drain plug.
Be sure to do this firmly to prevent any leaks. Just like sealing a bottle to keep the liquid from spilling, closing the drain plug serves the same purpose to keep the coolant inside the radiator. With the drain plug securely closed, you can move on to refilling the cooling system and can rest easy knowing your engine will stay cool and prevent any costly damage.
Flush the Cooling System with Distilled Water
flush the cooling system
Refill with a 50/50 Mixture of Coolant and Distilled Water
coolant, distilled water, refill, cooling system, drain Have you noticed your car’s temperature gauge creeping up into the danger zone? It’s essential to keep a close eye on your vehicle’s cooling system to avoid any potential overheating issues. If you find yourself needing to drain and refill your cooling system, one important step in the process is ensuring you have the right mixture of coolant and water. Ideally, you should have a 50/50 mixture of coolant and distilled water.
Why distilled water? Well, tap water contains minerals and impurities that can clog up your radiator and cause damage over time. Distilled water, on the other hand, is free from these impurities and provides a clean, clear solution for your cooling system. By using a 50/50 mixture of coolant and distilled water, you can ensure that your engine stays cool and protected, preventing any potential overheating issues.
So, the next time you need to refill your cooling system, don’t forget to mix up a batch of 50% coolant and 50% distilled water for optimal performance and longevity.
Final Steps
If you’re wondering how to do a coolant flush for your car, don’t worry, it’s actually a fairly straightforward process. While it’s always a good idea to consult your car’s manual for specific instructions, I can give you a general idea of what it entails. First, you’ll want to let your engine cool down completely.
Then, locate the radiator drain plug, usually at the bottom of the radiator. Place a drain pan underneath and open the drain plug to let the old coolant drain out. Once that’s done, close the drain plug and remove the radiator cap.
Using a mixture of coolant and distilled water, fill the radiator until it’s full. Start your engine and let it run for a few minutes, allowing the new coolant to circulate throughout the system. Finally, check the coolant level again and add more as needed.
And that’s it! You’ve successfully completed a coolant flush for your car. Remember to properly dispose of the old coolant and follow all safety precautions throughout the process. Happy flushing!
Run the Engine and Check for Leaks
starting the engine
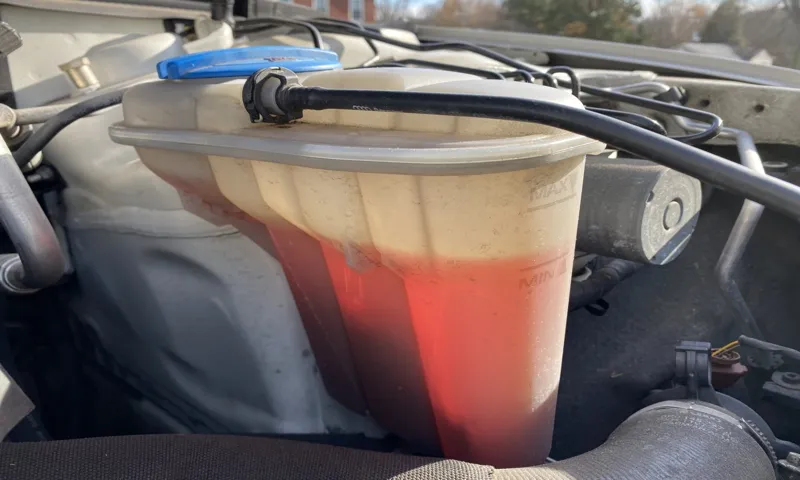
Check the Coolant Level
coolant level, car maintenance tips
Conclusion
And there you have it, my friends. The exhilarating adventure of how to perform a coolant flush! It may sound like a daunting task, but fear not, for it is simply a dance with chemistry and engines. Just like a graceful ballet, you must carefully drain the old coolant, take out the pesky air bubbles, and then introduce the fresh, vibrant coolant back into your vehicle.
It’s like giving your car a refreshing spa day, ensuring it stays cool and collected amidst the chaos of the open road. So next time your engine gets too hot under the collar, remember that a coolant flush is all it takes to keep things chill. Happy flushing, my fellow automotive aficionados!
Regular Coolant Flushes for Optimal Vehicle Performance
coolant flush, vehicle performance, regular maintenance, prevent overheating, optimize cooling system, engine damage Regular coolant flushes are a crucial part of maintaining optimal vehicle performance. As we discussed earlier, the coolant in your vehicle’s cooling system plays a vital role in preventing overheating and engine damage. By regularly flushing the coolant, you remove any built-up debris or contaminants that could hinder the cooling system’s effectiveness.
It’s like giving your vehicle a refreshing spa treatment to keep it running smoothly! By performing coolant flushes as recommended by your vehicle’s manufacturer, you can optimize your cooling system’s efficiency and prevent any potential issues down the road. So why wait? Schedule a coolant flush today and give your vehicle the TLC it deserves!
FAQs
What is a coolant flush and why is it important for my vehicle?
A coolant flush is the process of draining the old coolant from your vehicle’s cooling system and replacing it with fresh coolant. It is important because old coolant can become contaminated with dirt, rust, and other debris that can clog the system and lead to overheating or engine damage.
How often should I do a coolant flush?
The frequency of coolant flushes can vary depending on your vehicle’s make and model. As a general guideline, it is recommended to do a coolant flush every 30,000 to 50,000 miles or every 2 to 5 years. However, consult your vehicle’s owner’s manual or a professional mechanic for the recommended interval for your specific vehicle.
Can I do a coolant flush myself or should I take it to a professional?
While it is possible to do a coolant flush yourself, it is recommended to take it to a professional for several reasons. They have the necessary tools and equipment to properly perform the flush and ensure that all the old coolant is completely removed. Additionally, they can inspect the cooling system for any potential leaks or issues that may need to be addressed.
How much does a coolant flush typically cost?
The cost of a coolant flush can vary depending on factors such as the make and model of your vehicle, the region you are in, and whether you take it to a professional or do it yourself. On average, a coolant flush can cost between $100 to $200 at a professional repair shop.
What are the signs that indicate my vehicle needs a coolant flush?
Some common signs that indicate your vehicle may need a coolant flush include overheating, a sweet smell coming from the engine, coolant leaks, and a fluctuating temperature gauge. If you notice any of these signs, it is recommended to have your cooling system inspected and consider getting a coolant flush if necessary.
Can I use any type of coolant for my vehicle?
It is important to use the correct type of coolant for your vehicle to ensure optimal performance and prevent damage. Refer to your vehicle’s owner’s manual or consult a professional mechanic to determine the recommended coolant type for your specific vehicle.
Can neglecting a coolant flush cause damage to my vehicle?
Neglecting a coolant flush can lead to various issues and potential damage to your vehicle. Over time, the coolant can become contaminated, lose its effectiveness, and cause overheating. This can result in engine damage, such as a blown head gasket or a cracked engine block. Therefore, it is important to adhere to the recommended coolant flush intervals to ensure the proper functioning of your vehicle’s cooling system.