
Is your car’s engine coolant reaching its boiling point? Over time, engine coolant can become contaminated with debris and sediments, which can lead to overheating and engine damage. To prevent this from happening, it’s important to regularly flush your engine coolant. But how exactly do you go about it? In this step-by-step guide, we’ll walk you through the process of flushing engine coolant, so you can keep your car running smoothly and efficiently.
So, put on your DIY hat and let’s get started!
Table of Contents
Introduction
Do you find yourself wondering, “How do you flush coolant?” Well, you’re in the right place! Flushing coolant is an important maintenance task that helps keep your car’s engine running smoothly. Coolant, also known as antifreeze, is responsible for regulating the temperature in your engine and preventing it from overheating. Over time, coolant can become contaminated with dirt, debris, and other impurities that can hinder its effectiveness.
Flushing the coolant involves completely draining the old coolant from the system and replacing it with fresh coolant. It’s important to follow the manufacturer’s instructions when flushing coolant, as different car models may have different procedures. Generally, it involves locating the coolant drain plug, draining the old coolant, flushing the system with water, and then filling it back up with the right mixture of fresh coolant and water.
Regularly flushing the coolant can help prolong the lifespan of your engine and prevent costly repairs down the line. So, if you’ve been wondering how to flush coolant, now you know the basics!
Understanding the Importance of Flushing Coolant
flushing coolant Introduction: Flushing coolant is an essential maintenance task that many vehicle owners overlook. Just like any other fluid in your car, the coolant can become contaminated over time, which can lead to issues with your engine’s performance and potentially cause costly damage. Coolant works to regulate the temperature of your engine, preventing it from overheating.
Over time, however, dirt, debris, and rust can accumulate in the coolant system, compromising its effectiveness. Flushing the coolant involves replacing the old coolant with fresh, clean fluid, ensuring optimal engine performance and longevity. In this blog post, we will dive deeper into the importance of flushing coolant and why it should be a regular part of your vehicle maintenance routine.
Signs that Your Coolant Needs to be Flushed
coolant flush, signs coolant needs to be flushed Introduction: Your vehicle’s coolant plays a crucial role in keeping the engine cool and preventing it from overheating. Over time, however, the coolant can become contaminated with debris, rust, and other particles that can impair its performance. This is when a coolant flush becomes necessary.
A coolant flush involves draining the old coolant and replacing it with fresh coolant. But how do you know when your coolant needs to be flushed? In this blog post, we’ll discuss some common signs that indicate it’s time for a coolant flush. By being aware of these signs, you can take timely action and ensure your engine stays cool and protected.
Preparing for Coolant Flush
If you’re wondering how to flush your coolant, don’t worry – it’s not as complicated as it may seem. Flushing your coolant is an important part of regular maintenance for your vehicle, as it helps to remove any buildup or contaminants that may be present in the system. To get started, you’ll need a few basic tools such as a coolant drain pan, a funnel, and some distilled water.
First, make sure your engine is completely cool before you begin. Then, locate the drain plug on the bottom of the radiator and place the drain pan underneath. Remove the plug, allowing the coolant to drain fully.
Once the coolant has stopped draining, close the drain plug and move onto the next step. Using the funnel, slowly pour the distilled water into the radiator until it’s full. Start the engine and let it run for a few minutes, allowing the water to circulate through the system.
After this, repeat the draining process, but this time, allow the water to flush out any remaining contaminants. Finally, refill the radiator with a mixture of coolant and water, as specified by your vehicle’s manufacturer. It’s important to follow the proper flush and fill procedure to ensure that your coolant system is clean and ready to function properly.
Gathering the Necessary Tools and Materials
coolant flush, necessary tools, materials
Safely Raising and Supporting Your Vehicle
coolant flush, safely raising and supporting your vehicle
Flushing the Coolant
Flushing the coolant is an essential maintenance task that should be done regularly to keep your vehicle running smoothly. So, how do you flush coolant? Well, it’s actually quite simple. First, make sure your car is turned off and cool before you begin.
Locate the radiator drain plug, which is usually on the bottom of the radiator. Next, place a container under the drain plug to catch the coolant as it drains. Open the drain plug and let the coolant drain completely.
Once the coolant has drained, close the drain plug and fill the radiator with a coolant flush solution. This solution will help remove any rust, debris, or old coolant that may be trapped in your cooling system. After adding the flush solution, top off the radiator with water.
Then, start your car and let it idle for about 10 minutes to circulate the flush solution. Once the solution has circulated, turn off your car and let it cool completely. Finally, drain the flush solution from the radiator and refill it with fresh coolant.
And there you have it – you’ve successfully flushed your coolant! Remember to always follow your vehicle’s manufacturer guidelines for the proper coolant type and replacement intervals.
Locating the Drain Plug
“coolant flushing” When it comes to maintaining your car’s engine, one essential task is flushing the coolant. Over time, coolant can become contaminated with dirt, debris, and rust particles, which can hinder its ability to cool your engine effectively. To flush the coolant, you’ll need to locate the drain plug.
This can vary depending on the make and model of your vehicle, but it is typically located on the bottom of the radiator. To find it, you may need to use a flashlight and get down underneath your car. Once you’ve located the drain plug, you’ll need to ensure you have a catch pan ready to collect the old coolant.
Gently loosen the drain plug, allowing the coolant to flow out. Be careful not to unscrew it completely, as this could result in a messy situation. Once the coolant has drained, you can then proceed with flushing the system with a hose by running water through the radiator until it runs clear.
This will help remove any remaining contaminants. Remember to properly dispose of the old coolant and secure the drain plug tightly when you’re finished. Regularly flushing the coolant is an important maintenance task that will help keep your engine running smoothly and prevent overheating.
Draining the Old Coolant
coolant flushing, draining coolant, old coolant, flushing process, coolant system, automotive maintenance, radiator coolant, coolant replacement, engine overheating, coolant contamination. In order to ensure the optimal performance of your vehicle’s cooling system, it is important to regularly flush and replace the coolant. Over time, the coolant in your car can become contaminated with debris, dirt, and other impurities that can hinder its ability to effectively regulate the temperature of your engine.
This can lead to overheating and potentially cause serious damage to your engine. To avoid this, it is essential to drain the old coolant and flush the system before refilling it with fresh coolant. But how exactly do you go about draining the old coolant? Well, it’s actually quite a straightforward process.
First, you’ll need to locate the drain plug on your radiator. This plug is usually located on the bottom of the radiator and can be unscrewed by hand. Once the plug is loosened, place a drain pan beneath the radiator to catch the old coolant as it drains out.
Then, simply remove the plug completely and allow the coolant to drain fully. Be sure to dispose of the old coolant properly, as it can be harmful to the environment. Once all of the old coolant has been drained, it’s time to move on to the next step in the flushing process.
Removing the Old Coolant Filter
flushing the coolant. Now that we’ve removed the old coolant filter, it’s time to move on to the next important step in maintaining your vehicle’s cooling system – flushing the coolant. Flushing the coolant is essential to keep your engine running smoothly and prevent any potential overheating issues.
But why is it necessary to flush the coolant? Well, over time, the coolant in your vehicle can become contaminated with dirt, rust, and other debris. This can lead to clogs in your radiator and coolant lines, restricting the flow of coolant and causing your engine to overheat. Flushing the coolant helps to remove these impurities and keep your cooling system in top shape.
So, how do you go about flushing the coolant? Well, it’s a relatively straightforward process that you can do at home with a few simple tools. Firstly, you’ll need to locate the drain plug on your radiator, which is usually located at the bottom. Once you’ve found it, place a drainage pan underneath and remove the plug to drain the old coolant.
Once the coolant has drained, it’s time to flush the system. This can be done by using a garden hose to run water through the radiator and coolant lines. Be sure to flush it thoroughly to remove any remaining debris.
Once the water runs clear, it’s time to refill your cooling system with fresh coolant. Be sure to follow the manufacturer’s instructions and mix the coolant with the appropriate amount of water. Once you’ve filled the system, check for any leaks and make sure the coolant level is topped up.
And that’s it – you’ve successfully flushed the coolant and kept your engine running cool. Remember, regular coolant flushes are essential to maintaining your vehicle’s cooling system, so be sure to schedule this maintenance task regularly to keep your engine in top shape.
Flushing the System with Water
flushing coolant, coolant system, engine coolant, clean coolant system, radiator, cooling system, coolant flush. The key to keeping your engine running smoothly and preventing overheating is a well-maintained coolant system. Over time, the coolant in your radiator can become contaminated with dirt, rust, and other impurities that can clog up the system and reduce its effectiveness.
That’s where a coolant flush comes in. Flushing the coolant involves draining the old coolant from the system and replacing it with fresh, clean coolant. This process helps to remove any built-up debris and restore the cooling system to optimal performance.
It’s like giving your engine a refreshing drink of water! By flushing the system, you’re essentially giving it a clean slate, ensuring that the coolant can flow freely and do its job of regulating the engine’s temperature. So, if you notice that your engine is running hotter than usual or if it’s been a while since your last coolant flush, it’s definitely time to give your coolant system some TLC. By taking the time to flush the coolant, you’ll be helping to prevent costly engine damage and keeping your car running smoothly for years to come.
Refilling the Coolant
So, you’re wondering how to flush your coolant? Well, let me tell you, it’s actually a pretty simple process. First, you’ll want to locate the radiator in your vehicle. It’s usually in the front of the engine compartment and has a cap on top.
Once you’ve found it, make sure the engine is cool before removing the cap. Safety first, right? Once you have the cap off, you’ll need to locate the drain valve. It’s typically located on the bottom of the radiator.
Open the valve and allow the coolant to drain into a suitable container. It’s important to properly dispose of the old coolant, as it can be harmful to the environment. Once the radiator is empty, close the drain valve and refill the radiator with a coolant/water mixture according to your vehicle’s specifications.
Don’t forget to replace the cap when you’re done! And boom, you’ve successfully flushed your coolant!
Choosing the Right Type of Coolant
Coolant is an essential component of a car’s cooling system that helps prevent the engine from overheating. Over time, the coolant can become depleted or contaminated, which can lead to engine damage if not addressed. When it comes to refilling the coolant, it’s crucial to choose the right type for your vehicle.
Different vehicles require different types of coolant, so it’s essential to check your owner’s manual or consult with a professional to determine the correct coolant for your specific make and model. Using the wrong type of coolant can lead to issues such as coolant leaks, corrosion, or reduced overall cooling system performance. Additionally, it’s important to ensure that the coolant is mixed with the correct ratio of water, as using straight coolant can be damaging to the engine.
Taking the time to refill the coolant correctly can help keep your engine running smoothly and protect it from potential damage.
Mixing the Coolant Properly
“Mixing the Coolant Properly: Refilling the Coolant” When it comes to maintaining your car’s engine, one of the most important things you can do is properly refill the coolant. The coolant helps regulate the temperature of the engine and prevents it from overheating. But how exactly do you mix the coolant properly? Well, first and foremost, you need to make sure you have the correct type of coolant for your vehicle.
Each car manufacturer has their own specifications for coolant, so it’s crucial to check your owner’s manual or consult with a professional to ensure you’re using the right one. Once you have the correct coolant, it’s time to start mixing it. The first step is to check the coolant tank and see if it needs to be emptied or topped up.
If it needs to be emptied, make sure to do so in a proper container to avoid any spills. Once the coolant tank is ready, you can start mixing the coolant. To do this, you need to dilute the coolant with water.
The ratio of coolant to water varies depending on the manufacturer’s recommendations, so be sure to follow the instructions carefully. Generally, a 50/50 mix of coolant and distilled water is recommended. Mix the coolant and water together in a clean container until it is well blended.
Once the coolant is properly mixed, you can begin pouring it into the coolant tank. Be sure to pour slowly and avoid any spills. Once the tank is full, secure the cap tightly and wipe away any excess coolant.
And there you have it – your coolant is now properly mixed and ready to keep your engine cool and running smoothly. Remember, proper maintenance is key to keeping your car in top shape, so make sure to check your coolant levels regularly and refill as needed.
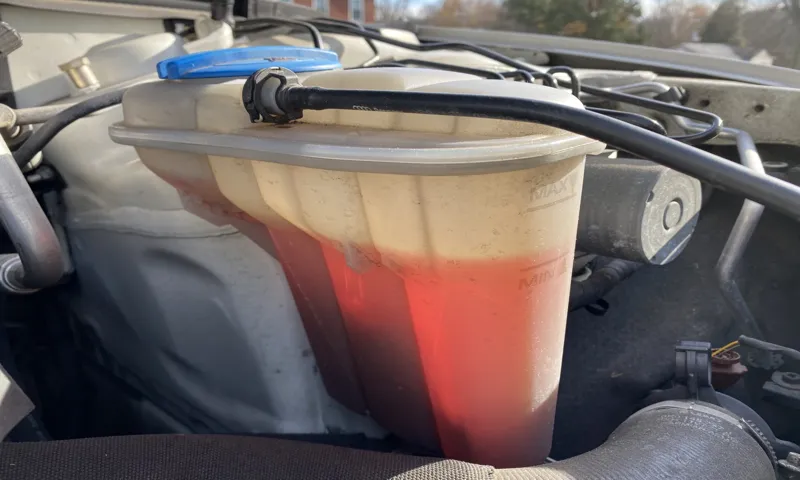
Refilling the Coolant Reservoir
“How to Refill the Coolant Reservoir: A Step-by-Step Guide” Is the temperature gauge in your car climbing higher than usual? Are you noticing steam coming from under the hood? These could be signs that your engine is overheating, and one of the first things you should check is the coolant level. The coolant, also known as antifreeze, is what helps regulate the temperature of your engine and prevent it from overheating. So, if the coolant level is low, it’s important to refill the reservoir as soon as possible.
To begin, make sure your engine has cooled down completely. It’s always best to handle the coolant when it’s cool to avoid any burns. Then, open the hood and locate the coolant reservoir.
It’s usually a translucent plastic tank with a cap labeled “coolant” or “engine coolant.” Before opening the cap, you want to make sure the system is depressurized to avoid any injuries. To do this, place a cloth over the cap and slowly turn it counterclockwise until you hear a slight hissing sound.
This means the pressure is releasing. Once the hissing stops, fully remove the cap and set it aside. Now it’s time to refill the reservoir with coolant.
You can find coolant at any auto parts store or even at some gas stations. Make sure to use the correct type of coolant for your vehicle, as different cars require different formulations. Refer to your vehicle’s owner’s manual for the specific coolant type recommended for your car.
Slowly pour coolant into the reservoir until it reaches the “full” or “max” line. Be careful not to overfill it, as this can cause leaks and other issues. If you accidentally overfill the reservoir, you can use a clean rag or sponge to soak up the excess coolant.
Checking for Leaks and Proper Functioning
So, you’re wondering how to flush coolant from your car? Well, it’s actually a pretty important maintenance task that shouldn’t be overlooked. Flushing the coolant helps to prevent engine damage and keeps your car running smoothly. First, you want to make sure your engine is completely cooled down before starting the process.
Then, locate the radiator drain plug, which is usually located at the bottom of the radiator. Place a pan underneath to catch the coolant as it drains out. Once the coolant is drained, it’s time to flush the system.
This can be done by using a coolant flush kit, which usually includes a cleaning solution and a hose attachment. Simply attach the hose to the radiator and the cleaner solution, then turn on the engine and let it run for the designated amount of time. After the system has been flushed, it’s important to check for any leaks and make sure everything is functioning properly.
This can be done by inspecting all hoses and connections, and also by checking the coolant levels. If everything looks good, you can refill the system with fresh coolant. And that’s it! You’re done flushing the coolant and your car should be good to go.
Remember, it’s always a good idea to consult your car’s manual for specific instructions and guidance.
Inspecting for Leaks
leaks, checking for leaks, burstiness Leaky pipes or faucets can lead to a lot of wasted water and expensive water bills. That’s why it’s important to regularly inspect your plumbing system for any leaks and ensure everything is functioning properly. But how exactly do you check for leaks? Well, it’s not as complicated as you might think.
To start, you can visually inspect all of your pipes and faucets for any signs of water or dampness. If you notice any, that could be an indication of a leak. You can also check your water meter by turning off all the faucets and appliances that use water and then keeping an eye on the meter.
If the meter is still running, that means you have a leak somewhere. Another method is the burstiness test, where you turn on a faucet and then suddenly turn it off. If the water continues to flow for a few seconds after you’ve turned it off, then you have a bursty pipe.
Burstiness is a common problem that can lead to leaks, so it’s important to address it as soon as possible. By regularly checking for leaks and burstiness in your plumbing system, you can save yourself from expensive repairs and wasted water. It’s a small effort that can make a big difference.
Verifying Proper Coolant Circulation
Coolant Circulation, Leaks, Proper Functioning One of the most important aspects of maintaining your vehicle’s engine is ensuring that the coolant is circulating properly. Coolant, also known as antifreeze, plays a crucial role in keeping your engine at the right operating temperatures and preventing it from overheating. To ensure that the coolant is circulating properly, it is important to check for leaks and ensure that all components are functioning correctly.
The first step in verifying proper coolant circulation is checking for any leaks. Coolant leaks can occur in various parts of the cooling system, such as the radiator, hoses, or water pump. One way to check for leaks is by inspecting the ground under your parked vehicle for any signs of coolant puddles.
Additionally, you can inspect the engine bay for any visible leaks or signs of coolant residue. If you notice any leaks, it is important to address them promptly to prevent further damage to your engine. Once you have checked for leaks and addressed any issues, the next step is to ensure that all components of the cooling system are functioning correctly.
This includes checking the radiator, water pump, thermostat, and hoses. Start by inspecting the radiator for any signs of damage or clogs. Make sure that the fins are clean and free from debris.
Next, check the water pump for any leaks or unusual noises. The water pump is responsible for circulating the coolant, so it is important that it is in good working condition. In addition to the radiator and water pump, it is important to check the thermostat and hoses for any signs of wear or damage.
The thermostat regulates the flow of coolant through the engine, so if it is not functioning properly, it can lead to overheating. Inspect the thermostat for any signs of corrosion or blockage. Finally, check the hoses for any cracks or leaks.
Conclusion
In conclusion, flushing coolant is like giving your car’s radiator a refreshing spa treatment. It’s a process that involves draining out the old, tired coolant and replacing it with fresh, rejuvenating fluid. Just like how a spa treatment can detoxify your body and leave you feeling revitalized, flushing coolant helps remove any gunk, debris, or contaminants that may have built up over time.
It’s like hitting the reset button on your car’s cooling system, ensuring optimal performance and preventing any potential overheating meltdowns. So, go ahead and give your radiator the TLC it deserves – because a happy radiator means a happy car!”
Maintaining a Regular Coolant Flush Schedule
coolant flush schedule, coolant system leaks, proper functioning of coolant system. One important aspect of vehicle maintenance that is often overlooked is the regular flushing of the coolant system. This is a crucial step in keeping your engine running smoothly and preventing any major issues down the line.
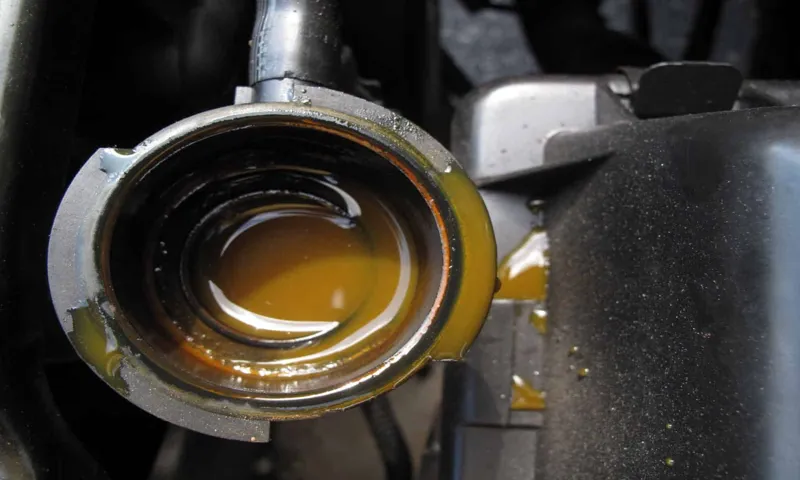
A coolant flush involves draining the existing coolant from the radiator and replacing it with fresh coolant. By doing this, you not only remove any contaminants that may have built up in the system, but you also ensure that the coolant is at the proper level and has the right mix of water and antifreeze. But how do you know when it’s time for a coolant flush? One telltale sign is if you notice any leaks in the coolant system.
Leaks can occur in various parts of the system, such as the radiator, hoses, or water pump. If you spot any puddles of coolant under your vehicle or notice a decrease in coolant levels, it’s a clear sign that something is amiss. Ignoring these leaks can lead to overheating, engine damage, and costly repairs.
Another important factor to consider is the proper functioning of the coolant system. Over time, the coolant can become contaminated with rust, dirt, and other debris. This can hinder the coolant’s ability to regulate the engine temperature, leading to overheating and potential engine failure.
Regular coolant flushes help to remove these contaminants and ensure that the coolant can do its job effectively. So how often should you schedule a coolant flush? It’s generally recommended to have a coolant flush every 30,000 to 50,000 miles, or every 2 to 3 years, depending on your vehicle’s make and model. However, it’s always best to consult your owner’s manual or check with a trusted mechanic to determine the specific guidelines for your vehicle.
In conclusion, maintaining a regular coolant flush schedule is essential for the proper functioning of your vehicle’s coolant system. By checking for leaks and ensuring the coolant is free from contaminants, you can prevent overheating, engine damage, and costly repairs. So don’t forget to include a coolant flush in your regular maintenance routine to keep your engine running smoothly for years to come.
Tips for Safe Coolant Flush
coolant flush
Final Thoughts
“Checking for Leaks and Proper Functioning” is an essential step in maintaining the health and efficiency of any system, whether it’s in our homes or in the technologies we use every day. Just like a small leak in a pipe can lead to major water damage, even minor issues in our appliances or equipment can have a domino effect on their performance. That’s why it’s crucial to regularly inspect and test our devices to ensure they’re working as they should, free from any leaks or malfunctions.
Think of it as a routine check-up for your tech! By taking the time to address any potential leaks or flaws before they escalate into bigger problems, we can save ourselves from unnecessary headaches and costly repairs down the line. Plus, it’s a proactive way to ensure our devices are operating at their best and providing us with the optimal experience. So, whether it’s checking for leaks in your plumbing or ensuring your laptop is running smoothly, taking a few minutes to inspect for any issues is a simple yet effective way to keep things functioning properly.
FAQs
How do you flush coolant from a car’s cooling system?
To flush coolant from a car’s cooling system, you will need to follow these steps:
1. Make sure the engine is cool and the car is in a safe area.
2. Locate the radiator drain valve and place a drain pan under it.
3. Open the drain valve and let the coolant drain completely.
4. Close the drain valve and dispose of the old coolant properly.
5. Mix a coolant flush solution with water as per the manufacturer’s instructions.
6. Pour the flush solution into the radiator and fill the rest with distilled water.
7. Start the car and idle it for the specified time mentioned in the flush solution instructions.
8. Turn off the engine and let it cool down.
9. Open the drain valve once again and let the flush solution drain completely.
10. Close the drain valve and refill the cooling system with the recommended coolant.
11. Check for any leaks and ensure the coolant is at the proper level.
What is the purpose of flushing coolant?
Flushing coolant is necessary to remove any built-up debris, rust, or contaminants that can accumulate in a car’s cooling system over time. This helps maintain the system’s efficiency, prevent corrosion, and extend the lifespan of crucial components.
How often should coolant be flushed?
The recommended interval for coolant flushes varies depending on the vehicle’s make, model, and manufacturer guidelines. However, a general rule of thumb is to have the coolant flushed every 30,000 to 50,000 miles or every 3 to 5 years.
Can I flush coolant myself, or should I take my car to a mechanic?
Flushing coolant can be done as a DIY project if you have some mechanical knowledge and the necessary tools. However, if you’re unsure or uncomfortable with performing the task, it’s always recommended to take your car to a trusted mechanic to ensure it is done correctly.
What happens if I don’t flush my coolant regularly?
If the coolant is not flushed regularly, it can lead to the buildup of contaminants, rust, and scale within the cooling system. This can result in poor heat dissipation, reduced cooling efficiency, overheating, and potential damage to the engine or other components.
Can I use tap water for mixing with coolant flush solution?
It is not recommended to use tap water when mixing with coolant flush solution. Tap water often contains minerals and impurities that can be harmful to the cooling system. It is best to use distilled water to avoid any potential issues.
Are there any signs that indicate a coolant flush is necessary?
Some signs that indicate a coolant flush may be necessary include:
– Overheating of the engine
– Coolant leaks
– Rust or sediment in the coolant
– Restricted flow of coolant
– A sweet smell inside the car
If you notice any of these signs, it is important to have your cooling system checked and flushed if needed.