Are you looking to power larger appliances or tools while on the go? A 2000 watt inverter might be just what you need. Whether you’re planning a camping trip or need backup power during a blackout, hooking up a 2000 watt inverter can provide the electricity you need. But how exactly do you go about it? Don’t worry, we’ve got you covered.
In this blog post, we’ll guide you through the steps of hooking up a 2000 watt inverter, ensuring that you can enjoy the convenience of portable power wherever you go. So grab your tools, and let’s get started!
Table of Contents
Introduction
If you’re looking to hook up a 2000 watt inverter to your power source, it’s important to do it correctly for optimal performance and safety. Firstly, you’ll need to select the appropriate power source, such as a car battery or a deep cycle battery, that can handle the power requirements of the inverter. Next, you’ll need to connect the positive terminal of the inverter to the positive terminal of the battery and the negative terminal of the inverter to the negative terminal of the battery.
It’s crucial to follow the manufacturer’s instructions and use appropriate gauge cables to ensure proper voltage and current flow. Additionally, it’s a good idea to install a fuse or circuit breaker in the positive wire between the battery and the inverter as a safety precaution. Once everything is connected, you can then plug in your devices or appliances into the inverter’s outlets and start enjoying the benefits of portable power.
What is a Power Inverter?
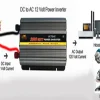
A power inverter is a device that can turn the DC (direct current) power from a battery or solar panel into AC (alternating current) power that is used in household appliances and electronic devices. So, if you have a battery-powered device like a car or a recreational vehicle, a power inverter can come in handy when you need to run a device that requires AC power. But how does a power inverter work? Well, think of it like a translator.
It takes the language of DC power and translates it into the language of AC power, so your devices can understand and use it. Just like a translator helps you communicate with someone who speaks a different language, a power inverter helps your devices communicate with your battery by converting the power.
Benefits of Using a Power Inverter
power inverter Introduction: If you have ever been in a situation where you needed to power your electronic devices on the go, then a power inverter could be the solution you’ve been looking for. A power inverter is a device that converts DC power from a battery into AC power that can be used to run appliances, gadgets, and even household items. Whether you’re on a road trip, camping in the great outdoors, or experiencing a power outage at home, a power inverter can come in handy.
In this blog post, we will explore the benefits of using a power inverter and how it can make your life easier in various situations. So, let’s dive in and explore the advantages of this versatile device.
Choosing the Right Inverter
If you’re looking to hook up a 2000 watt inverter, there are a few things you should keep in mind to make sure you choose the right one. First of all, you’ll want to make sure the inverter is compatible with the type of power source you plan to use. For example, if you’re planning to use a car battery as your power source, you’ll need an inverter that is designed for DC-to-AC power conversion.
Additionally, you’ll want to consider the surge capacity of the inverter. This refers to its ability to handle a sudden surge of power, such as when starting a motor or appliance. A higher surge capacity can prevent the inverter from blowing a fuse or tripping a circuit breaker.
It’s also important to consider the size and weight of the inverter, especially if you plan to use it in a portable or mobile setting. Finally, don’t forget to consider any additional features or specifications that may be important to you, such as built-in circuit protection or USB ports for charging devices.
Determining Power Needs
When it comes to determining power needs for your inverter, there are a few key factors to consider. One of the most important aspects is choosing the right inverter for your specific needs. An inverter is a device that converts DC power from your batteries into AC power that can be used to run household appliances.
The size and capacity of the inverter will determine the amount of power it can provide. It’s crucial to carefully assess your power requirements before making a decision. Consider the types of appliances and devices you will be running, as well as their power consumption.
Some appliances, such as refrigerators and air conditioners, have a higher startup power requirement, known as burstiness. Others, like lights and fans, have a lower power requirement but may be used for longer periods of time, known as perplexity. By considering both burstiness and perplexity, you can determine the optimal size and capacity of the inverter that will meet your power needs without being overkill.
It’s better to have a slightly larger inverter than necessary rather than one that is too small and unable to handle your power demands.
Types of Power Inverters
Selecting the Correct Size Inverter
selecting the correct size inverter
Considering Safety Precautions
inverter, safety precautions
Preparing for Installation
So you’ve got yourself a 2000 watt power inverter and you’re ready to hook it up, huh? Well, don’t worry because I’m here to help you out! The first thing you’ll need is a power source. You can connect the inverter directly to your car’s battery, but make sure to use heavy-duty cables to handle the high wattage. You’ll also need a fuse between the battery and the inverter to protect against any electrical faults.
Now, let’s talk about the inverter itself. Most modern inverters come with built-in overload protection, so you don’t have to worry too much about damaging your appliances. However, it’s always a good idea to check the power requirements of the devices you intend to use with the inverter.
Remember, it’s better to have a power inverter with a higher wattage rating than what you need, just to be safe. And voila, you’re all set to enjoy your new 2000 watt power inverter and all the conveniences it brings!
Gathering the Necessary Tools
Preparing for Installation
Checking the Inverter’s Requirements
One important step in preparing for the installation of an inverter is to check the requirements specific to your inverter model. In order to ensure that your inverter functions properly, it is crucial to understand its specific installation requirements. These requirements may include factors such as the input voltage and current ratings, the size and type of connections needed, and any specific mounting instructions.
By reviewing the inverter’s requirements beforehand, you can make sure that you have all the necessary equipment and tools for a successful installation. Additionally, it allows you to plan and prepare accordingly, ensuring a smoother installation process. So, before you start installing your inverter, take the time to thoroughly read through the manufacturer’s specifications and double-check that you have everything you need.
By doing so, you’ll be taking an important step towards the successful installation of your inverter.
Installing the Inverter
If you’re wondering how to hook up a N Power 2000 watt inverter, don’t worry. I’ve got you covered! Installing an inverter can seem intimidating at first, but it’s actually a relatively simple process. First, you’ll want to find a location for your inverter that’s close to your battery.
This will make it easier to connect the cables. Next, you’ll need to connect the positive cable from your battery to the positive terminal on the inverter. Make sure to tighten the connection to prevent any potential issues.
Then, connect the negative cable from your battery to the negative terminal on the inverter in the same manner. Double-check all your connections to ensure they’re secure. Finally, connect any additional devices you want to power with the inverter to the appropriate outlets.
And that’s it! You’re all set up and ready to enjoy the benefits of your N Power 2000 watt inverter.
Locating a Suitable Location
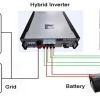
installing the inverter, solar power system, residential solar panel installation So you’ve done all the research and made the decision to install a residential solar power system. Congratulations! It’s a big step towards reducing your carbon footprint and saving money on your energy bills. One of the key components of any solar power system is the inverter.
The inverter is what converts the direct current (DC) electricity generated by your solar panels into alternating current (AC) electricity that can be used to power your home. But where should you install the inverter? Ideally, it should be located near your main electrical panel to minimize the length of the DC wiring. This will help optimize the performance of your system and reduce the risk of energy loss.
Additionally, the inverter should be installed in a cool and well-ventilated area to ensure proper heat dissipation. It’s important to keep in mind that the inverter will produce some heat during operation, so you don’t want to place it in a confined space where it could overheat. Lastly, consider the aesthetics of the location.
While it’s important to prioritize functionality, you also want to choose a spot that blends well with the overall look of your home. After all, solar power systems are becoming increasingly popular, and you want to make sure your installation looks sleek and stylish. So take the time to carefully consider the best location for your inverter, and consult with a professional if you’re unsure.
With the right placement, your solar power system will be set up for success!
Connecting the Battery
Installing the inverter is a crucial step in connecting the battery to your system. The inverter is responsible for converting the direct current (DC) power from the battery into alternating current (AC) power that can be used to power your appliances and devices. It’s like the translator between the battery and your home’s electrical system, ensuring that the power is compatible and usable.
To install the inverter, you’ll first need to identify the right location for it. Ideally, it should be installed in a well-ventilated area away from direct sunlight. This will help prevent overheating and ensure optimal performance.
Once you’ve found the perfect spot, you’ll need to securely mount the inverter using the provided mounting brackets. Next, you’ll need to connect the DC input cables from the battery to the inverter. These cables are usually color-coded, with red indicating positive (+) and black indicating negative (-).
Make sure to double-check the polarity before making any connections to avoid any potential damage. It’s also a good idea to use cable connectors or terminal lugs to ensure a secure connection. Once the battery is connected to the inverter, you can proceed with connecting the AC output cables to your home’s electrical system.
This step may require the assistance of a licensed electrician, as it involves working with high voltage wiring. It’s important to follow all local electrical codes and regulations to ensure a safe and compliant installation. After all the connections are made, it’s time to test the system.
Switch on the inverter and check if it’s functioning properly. You should be able to see the AC power being generated and used by your appliances. If everything is working as expected, congratulations – you’ve successfully installed the inverter and connected the battery to your system! Remember, if you’re not confident in your electrical skills, it’s always best to consult a professional.
Connecting the Inverter
installing the inverter
Testing the Inverter
If you’re wondering how to hook up a 2000-watt inverter to your power supply, don’t worry, I’ve got you covered! The first thing you’ll need to do is determine the best location for your inverter. It should be close to your battery but also easily accessible. Once you’ve found the perfect spot, it’s time to start connecting the wires.
Begin by connecting the positive terminal of your battery to the positive terminal of the inverter using a appropriately-sized cable. Then, connect the negative terminal of your battery to the negative terminal of the inverter in the same manner. Make sure all connections are tight and secure to prevent any accidents or damage.
Once everything is properly connected, you can test your inverter by turning it on and plugging in a device. If everything is working correctly, you should have power! If not, double-check your connections and consult the manufacturer’s instructions. So go ahead, and get that power flowing with your new inverter!
Double-Checking Connections
inverter, connections, testing
Testing the Inverter’s Functionality
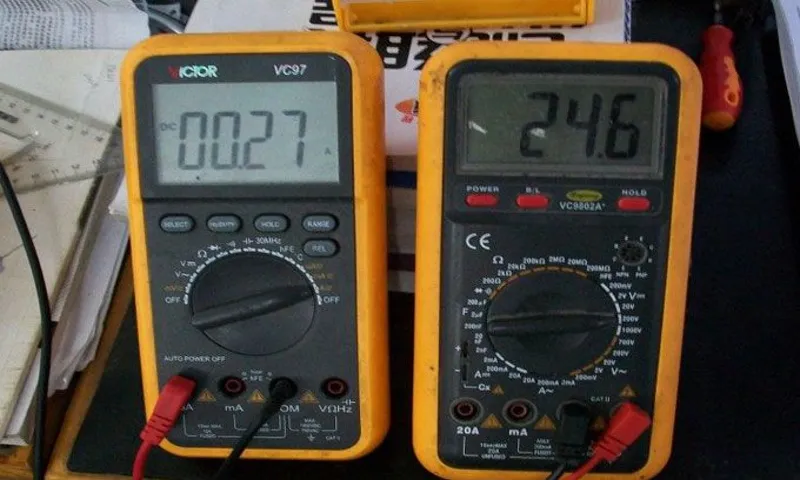
inverter, functionality, testing. In order to ensure that an inverter is functioning properly, it is essential to conduct thorough testing. One way to test the inverter’s functionality is by using a multimeter to measure the voltage output.
This can be done by connecting the positive lead of the multimeter to the positive terminal of the inverter, and the negative lead to the negative terminal. The multimeter should then display the voltage output of the inverter. Another way to test the inverter’s functionality is by connecting a small electrical device, such as a light bulb or a fan, to the inverter’s output.
If the device turns on and operates as expected, this indicates that the inverter is working properly. It is also important to check for any unusual noises or signs of overheating during the testing process. By performing these tests, it is possible to ensure that the inverter is functioning as it should and providing the required power output.
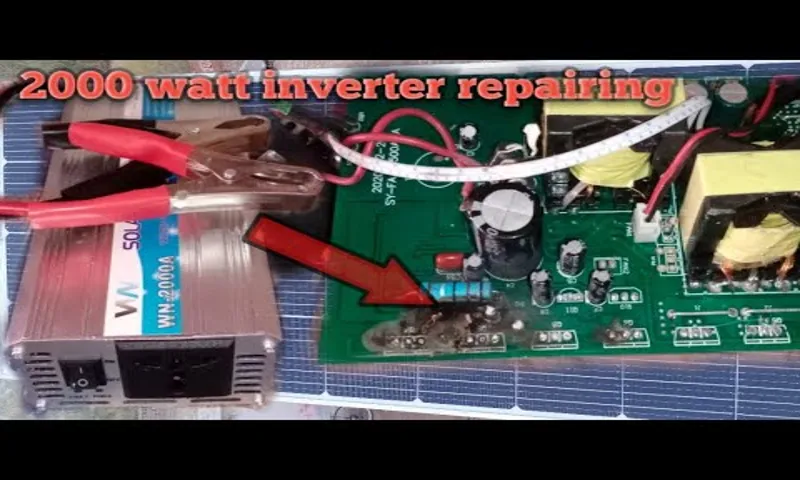
Troubleshooting Common Issues
testing the inverter, common issues, troubleshooting
Conclusion
Well, my dear friend, hooking up a 2000 watt inverter is like giving electricity a makeover – it’s the ultimate power transformation! Just picture yourself as an electrical fashionista, dressing up your power source in the most stylish and efficient way possible. But don’t worry, I won’t leave you in the dark when it comes to this electrifying process. To hook up your N Power 2000 watt inverter, follow these electrifying steps:
Find a suitable power source: Look for a battery with enough juice to handle the high-wattage demands of your inverter. Make sure to choose a battery that can handle the voltage and amperage requirements of your N Power beauty.
Connect the inverter to the battery: Using the provided cables, connect the positive (+) terminal of the inverter to the positive terminal of the battery. Similarly, connect the negative (-) terminal of the inverter to the negative terminal of the battery. It’s like creating a perfect electrical marriage – positive to positive and negative to negative.
Secure the connections: Ensure that all connections are tight and secure. We don’t want any power outages or loose ends here!
Activate the inverter: Flip the switch or press the power button on your N Power inverter, and voila! Your power source will wake up and start generating that sweet, sweet energy. Now, with your N Power inverter in place, you’ll be able to seize the power whenever and wherever you need it. Whether you’re enjoying a camping trip in the wilderness or simply wanting to be prepared for any unexpected blackouts, your inverter will be your trusty sidekick.
So, my friend, let your N Power inverter become the superhero of your electrical world, bringing light and power to even the darkest corners. With proper installation, you’ll have the power to charge your devices, run small appliances, or even save the day during those unexpected power outages. Remember, when it comes to hooking up your N Power 2000 watt inverter, it’s all about unleashing the power and making your electrical dreams a reality.
Enjoying the Power of your Inverter
When it comes to testing your inverter, it’s important to take the time to ensure that everything is running smoothly and efficiently. One of the first steps in testing your inverter is to check the connections. Is everything properly connected and secure? A loose connection can lead to poor performance and even damage to your inverter.
Once you’ve checked the connections, it’s time to test the power output. This can be done by connecting a device, such as a lamp or small appliance, to the inverter and turning it on. The device should run smoothly and without any issues.
If you notice any flickering or dimming, it could be a sign of a problem with your inverter. Additionally, it’s important to monitor the voltage and frequency. These should be within the specifications outlined by the manufacturer.
By regularly testing your inverter, you can ensure that it’s performing optimally and providing you with the power you need. So go ahead, enjoy the power of your inverter and rest assured that you’re prepared for any power outages or emergencies that come your way.
FAQs
How do you safely hook up a 2000 watt power inverter?
To safely hook up a 2000 watt power inverter, follow these steps:
1. Choose the right location: Find a well-ventilated area away from flammable materials.
2. Connect the inverter to the battery: Use appropriate cables and connectors to connect the inverter to the vehicle or battery.
3. Check the polarity: Make sure the positive and negative terminals are correctly connected.
4. Turn off the inverter: Before making any connections, ensure that the inverter is turned off.
5. Connect the AC devices: Plug in the AC devices directly into the inverter’s outlets.
6. Test the system: Verify that the inverter is working properly by testing the connected devices.
7. Secure the inverter: Use clamps or brackets to securely mount the inverter in place.
What size wire do you need to hook up a 2000 watt power inverter?
The size of wire needed to hook up a 2000 watt power inverter depends on the distance between the inverter and the battery, as well as the maximum current draw of the inverter. Generally, you should use at least 4 AWG (American Wire Gauge) wire for a 2000 watt inverter, but it’s best to consult the manufacturer’s recommendations or an electrical professional to determine the appropriate wire size for your specific setup.
Can a 2000 watt power inverter run a refrigerator?
It depends on the power consumption of the refrigerator. A typical household refrigerator consumes around 100-600 watts, so a 2000 watt power inverter should be able to handle most refrigerators. However, it’s important to consider the starting surge of the refrigerator compressor, which can temporarily exceed its rated power consumption. In such cases, it may be safer to use a higher wattage inverter to accommodate the surge power.
How long can a 2000 watt power inverter run?
The runtime of a 2000 watt power inverter depends on the capacity of the connected battery. If you have a fully charged 200 ampere hour (Ah) battery, a 2000 watt power inverter can theoretically run at full power for approximately 6-8 hours. However, the actual runtime can vary based on factors such as the efficiency of the inverter, the load connected, and the condition of the battery.
Can a 2000 watt power inverter power a microwave?
Yes, a 2000 watt power inverter can power most microwave ovens. However, it’s important to check the power consumption of your specific microwave. Microwaves typically range from 600-1500 watts, so a 2000 watt inverter should be able to handle them. Keep in mind that running a microwave for an extended period of time may deplete your battery quickly, so it’s important to have a sufficient power source.
Can a 2000 watt power inverter be connected to a car’s cigarette lighter?
No, a 2000 watt power inverter should not be connected to a car’s cigarette lighter. Most car cigarette lighters are designed for low power devices and can typically handle 100-150 watts at most. To use a 2000 watt power inverter, you will need to connect it directly to the car battery using appropriate cables and connectors.
What appliances can a 2000 watt power inverter run?
A 2000 watt power inverter can run a variety of appliances, including smaller household devices such as laptops, TVs, DVD players, game consoles, fans, and lights. It can also handle some larger appliances like refrigerators, microwaves, and power tools, depending on their power consumption. Make sure to check the power rating of each appliance before connecting it to the inverter to ensure it doesn’t exceed the inverter’s capacity.