
Do you love spending time outdoors, enjoying the fresh air and sunshine? If so, then you know how important it is to have a comfortable and relaxing outdoor space. One way to enhance your outdoor living area is by installing a slide out awning. But what exactly is a slide out awning? Imagine this: you’re sitting outside on your patio, enjoying a good book or a cup of coffee, when suddenly, the sky darkens and rain starts pouring down.
Without a slide out awning, you would have to scramble to gather all your belongings and rush to find shelter. But with a slide out awning, you can simply press a button or crank a handle, and within seconds, a protective canopy extends over your patio, shielding you from the rain and providing you with a cozy space to stay dry and comfortable. A slide out awning is a retractable canopy that can be attached to the exterior of your home or RV.
It is typically made of durable fabric that is resistant to UV rays and water, ensuring that it can withstand the elements and provide you with long-lasting protection. When not in use, the awning can be retracted back into its housing, keeping it safe and out of sight. Not only does a slide out awning provide shelter from rain, but it also offers shade from the harsh sun.
This is particularly beneficial during hot summer days when you want to enjoy your outdoor space without being exposed to direct sunlight. By blocking out the sun’s rays, the awning helps to keep your patio or deck cool and comfortable, allowing you to spend more time outside without getting overheated. In addition to providing protection from the weather, a slide out awning can also enhance the aesthetic appeal of your outdoor space.
With a wide range of colors and patterns available, you can choose an awning that complements your home or RV’s exterior and adds a touch of style. Whether you prefer a sleek and modern look or a more traditional and rustic design, there is an awning available to suit your taste. So, if you’re looking to create a comfortable and versatile outdoor living area, consider installing a slide out awning.
Not only will it provide you with protection from the elements, but it will also add style and functionality to your outdoor space. Say goodbye to scrambling for cover when the rain starts pouring or hiding indoors on hot sunny days. With a slide out awning, you can enjoy the outdoors in comfort and style, all year round.
Table of Contents
Benefits of Installing a Slide Out Awning in an RV
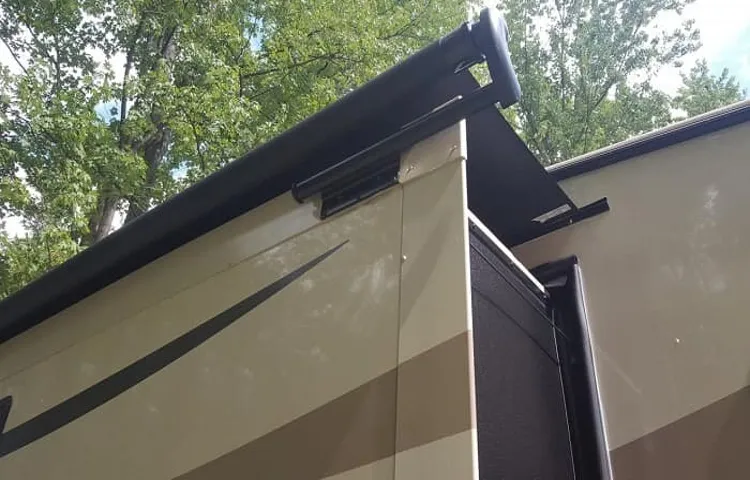
If you own an RV, you may be familiar with the annoyance of debris and water collecting on top of your slide out when it is extended. This is where a slide out awning can come in handy. By installing a slide out awning, you can protect your slide out from the elements, preventing water damage and reducing the need for constant cleaning.
The process of installing a slide out awning in your RV is relatively simple, and many RV owners choose to do it themselves. However, if you are not comfortable with DIY projects, you can always hire a professional to install it for you. Once installed, the slide out awning provides a shaded area outside your RV, allowing you to enjoy the outdoors comfortably.
It also helps to keep the interior cooler by blocking out the sun’s rays. Overall, installing a slide out awning in your RV can greatly enhance your camping experience and protect your slide out from the elements.
Protection from the Elements
RV owners looking for added protection from the elements should strongly consider installing a slide out awning. These awnings serve as a shield against rain, snow, and falling debris, ensuring that the slide out remains dry and free from damage. By keeping the slide out covered, RV owners can also prevent leaks and water damage, extending the lifespan of their RV.
In addition to protecting the slide out, slide out awnings also provide shade and keep the interior cooler on hot summer days. This not only increases comfort but also reduces the need for excess air conditioning, saving energy and money. Furthermore, slide out awnings can prevent leaves, branches, and other debris from accumulating on the slide out, making it easier to clean and maintain.
Overall, installing a slide out awning in an RV offers numerous benefits, including protection from the elements, increased comfort, and reduced maintenance.
Enhanced Comfort
slide out awning, RV, enhanced comfort
Reduced Energy Consumption
slide out awning, RV, reduced energy consumption, benefits, installing One of the key benefits of installing a slide-out awning in your RV is the reduced energy consumption it provides. How does it work? Well, when your RV is parked in direct sunlight, the interior can quickly heat up, making it uncomfortable and causing your air conditioning system to work overtime. But with a slide-out awning, you can provide shade and protection to the slide-out section of your RV, effectively reducing the amount of heat that enters.
This means that your air conditioning system doesn’t have to work as hard to cool down the interior, resulting in a significant reduction in energy consumption. Not only does this save you money on your energy bills, but it also helps to lessen your carbon footprint. So, whether you’re camping off-grid or staying at a campground with limited electrical hookups, installing a slide-out awning can be a game-changer when it comes to conserving energy and staying comfortable in your RV.
Materials and Tools Needed for Installation
So, you’ve decided to install a slide-out awning in your RV, and you’re wondering what materials and tools you’ll need for the job. Well, you’re in the right place! The first thing you’ll need is the slide-out awning kit, which typically includes the fabric, roller, and arms. You’ll also need some sealant to ensure a watertight installation.
In terms of tools, you’ll need a drill with a bit set, a ladder or step stool, a tape measure, and a utility knife. Additionally, having a caulking gun and a screwdriver on hand will come in handy during the installation process. Remember, it’s important to read the instructions that come with your slide-out awning kit carefully and follow them closely to ensure a successful installation.
With the right materials and tools, you’ll be able to enjoy the benefits of a slide-out awning in no time!
Slide Out Awning Kit
slide out awning kit, materials and tools, installation
Measuring Tape
measuring tape, installation materials and tools When it comes to installing a measuring tape, having the right materials and tools is essential. First and foremost, you’ll need the measuring tape itself. There are various types and lengths available, so choose one that best suits your needs.
Next, you’ll need a sturdy surface to attach the tape to. This could be a wall, a piece of furniture, or even the edge of a table. Make sure that the surface is clean and free of any dust or debris.
In addition to the measuring tape and surface, you’ll also need a level to ensure that the tape is straight and accurate. This will help you get precise measurements and avoid any potential errors. Finally, you’ll need some basic tools such as a hammer, nails, and a screwdriver to secure the measuring tape in place.
These tools will ensure that the installation is secure and the tape remains in place for accurate measurements. With the right materials and tools, installing a measuring tape can be a breeze.
Drill
“The Drill: Must-Have Materials and Tools for Installation” When it comes to installing anything, having the right materials and tools can make all the difference. And when it comes to using a drill, you want to make sure you have everything you need to get the job done smoothly and efficiently. So, what are the must-have materials and tools for drill installation? First and foremost, you need a good quality drill.
There are many different types of drills out there, so it’s important to choose one that suits your specific needs. Whether you opt for a corded drill or a cordless one, make sure it has enough power to tackle the task at hand. Look for a drill with variable speed settings as well, as this will give you more control and versatility.
Next, you’ll need the right drill bits. Different projects require different types of drill bits, so it’s important to have a variety on hand. For drilling into wood, a standard twist bit will do the trick.
However, if you’re working with metal or masonry, you’ll need specific drill bits designed for these materials. It’s always a good idea to have extra bits in case one gets dull or breaks. In addition to drill bits, you’ll also need some essential accessories.
A drill chuck key is necessary for changing out drill bits, so make sure you have one that fits your drill. A magnetic bit holder is also handy for keeping your bits in place and preventing them from getting lost. And don’t forget about safety glasses and ear protection – drilling can create flying debris and loud noises, so it’s important to protect yourself.
Last but not least, you’ll need some basic materials for installation. This might include screws, anchors, or other hardware depending on the project. Make sure you have the right size and type of fasteners for your specific needs.
Screwdriver
screwdriver, installation, materials, tools. In order to successfully install or fix something using a screwdriver, there are a few materials and tools you’ll need to have on hand. First and foremost, you’ll obviously need a screwdriver.
There are many different types and sizes of screwdrivers, so it’s important to choose the right one for the job. Flathead screwdrivers are great for straight slots, while Phillips screwdrivers are best for cross-head screws. You may also want to consider getting a set of interchangeable screwdriver bits, which can be used with a screwdriver handle to cover a wider range of screw types and sizes.
In addition to the screwdriver, you’ll also need the screws themselves. It’s important to choose the right size and type of screws for your project. There are different types of screws available, including wood screws, machine screws, and sheet metal screws.
Make sure to choose screws that are suitable for the material you’ll be working with. Other tools that are useful for screwdriver installation include a tape measure or ruler, to ensure accurate spacing and alignment, and a level, to make sure everything is straight. You may also need a drill and drill bits, especially if you’re working with wood or other materials that require pre-drilled holes for the screws.
A hammer may also come in handy for gently tapping screws into place or for removing stubborn screws. Having the right materials and tools for screwdriver installation can make your project go much more smoothly and efficiently. By choosing the right screwdriver and screws, and having any additional tools you may need, you’ll be well-prepared to tackle any installation or repair job that comes your way.
So gather your materials, grab your screwdriver, and get ready to tackle your next project with confidence!
Level
When it comes to installing a level, there are a few materials and tools that you’ll need to have on hand. First and foremost, you’ll need a level itself. This is the tool that will help you ensure that whatever you’re installing is perfectly level and straight.
There are different types of levels available, such as a traditional bubble level or a laser level. You’ll also need a pencil or marker to make any necessary marks or lines on your surface. Additionally, you may need a tape measure or ruler to measure the distance or size of the area you’re working on.
Another important tool to have is a drill, especially if you’ll be installing something like shelves or hooks. And last but not least, you’ll need some suitable hardware, such as screws or nails, to securely attach the level to the surface. With all of these materials and tools in hand, you’ll be well-prepared for a successful installation and a perfectly level outcome.
Step-by-Step Guide to Installing a Slide Out Awning
Are you looking to enhance the functionality of your RV and protect your slide-out from the elements? Installing a slide out awning is a great solution! Not only does it provide shade and reduce heat buildup, but it also prevents leaves, debris, and water from accumulating on your slide-out. Plus, it adds a stylish touch to your RV. So, how do you go about installing a slide out awning in your RV? Here’s a step-by-step guide to help you get started.
First, you’ll need to measure the width of your slide-out and choose an awning that fits properly. Next, gather the necessary tools and materials, including a ladder, tape measure, power drill, screwdriver, and the awning kit. Then, locate the mounting brackets on your RV and align them with the holes on the roller assembly of the awning.
Secure the brackets using the provided screws or bolts. Finally, extend the awning and check for any adjustments that need to be made. Congratulations, you’ve successfully installed a slide-out awning on your RV! Enjoy the added protection and convenience it offers.
1. Measure the Slide Out
If you’re looking to add a slide out awning to your RV, you’ll want to start by measuring the slide out. This step is essential to ensure that you purchase the correct size awning for your RV. To measure the slide out, extend it fully and measure the width from one end to the other.
Take note of this measurement as you will need it when selecting your awning. Additionally, measure the height of the slide out from the top to the bottom. This will help you determine how long the awning needs to be.
By measuring your slide out accurately, you can ensure that the awning you choose will fit properly and provide you with the shade and protection you desire.
2. Prepare the Slide Out for Installation
slide out awning installation
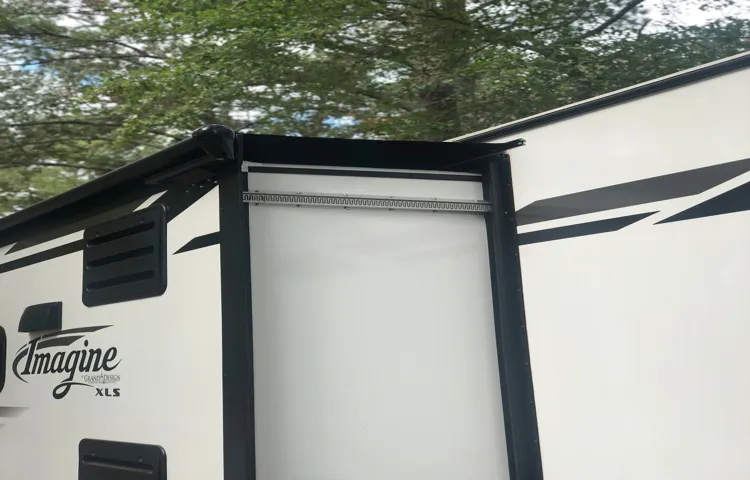
3. Attach the Awning Rail
slide-out awning installation So, you’ve decided to add a slide-out awning to your RV, and now you’re ready to get started. One of the first steps in the installation process is to attach the awning rail. This is the piece that the awning fabric will slide into, allowing you to extend and retract the awning as needed.
To begin, you’ll need to locate the desired position for the awning rail on the RV. Typically, this will be just above the slide-out area where you want the awning to cover. Once you’ve chosen the spot, make sure to measure and mark it accurately to ensure the rail is perfectly aligned.
Next, you’ll want to prepare the area for attaching the rail. Clean off any dirt, debris, or old sealant that may be present. This will ensure a clean and secure attachment.
Now it’s time to actually attach the awning rail to your RV. Apply a generous bead of sealant along the marked area, being careful to cover the entire length where the rail will be installed. Then, align the rail with the markings and press it firmly onto the RV.
To secure the rail in place, you’ll need to use screws or rivets, depending on the type of awning rail you have. Make sure to use the recommended size and type of fasteners for your specific rail and RV. Attach the screws or rivets evenly along the rail, ensuring a tight and secure fit.
Finally, give the sealant some time to cure before proceeding with the rest of the installation. This will help to create a waterproof seal and ensure that your awning rail stays firmly in place, no matter the weather conditions. Attaching the awning rail is just one step in the process of installing a slide-out awning.
4. Install the Slide Out Awning
Preparing to install a slide out awning can be an exciting project for RV owners looking to add extra shade and protection to their rig. In this step-by-step guide, we will walk you through the process of installing a slide out awning. These awnings are designed to extend and retract with your slide outs, providing shade and keeping debris away from the slide out mechanism.
They are a great addition to any RV, and with a few tools and some patience, you can have your slide out awning installed in no time. To begin, gather all the necessary tools and materials for the installation. This typically includes a tape measure, drill, screwdriver, level, caulk, and the slide out awning kit.
It’s important to have all the necessary equipment on hand before starting to ensure a smooth installation process. Next, locate the mounting brackets on the RV. These brackets will hold the slide out awning in place.
Measure the distance between the brackets and mark the locations for the awning rail. This will ensure that the awning is installed at the correct height and properly aligned with the slide out. Using a caulk gun, apply a generous bead of caulk to the back of the awning rail.
This will help create a watertight seal and prevent any leaks. Attach the awning rail to the RV using the screws provided in the kit. Be sure to use a level to ensure the rail is straight and properly aligned.
Once the rail is securely attached, it’s time to install the fabric. Start by sliding the fabric bead into the rail, making sure it is fully seated. Then, extend the slide out and unroll the fabric, allowing it to hang down over the slide out.
5. Secure the Awning Fabric
slide out awning, installing a slide out awning, secure the awning fabric Installing a slide out awning is a great way to improve your RV or camper and protect it from the elements. One crucial step in the installation process is securing the awning fabric. This not only ensures that the fabric remains in place but also prevents any damage caused by wind or other weather conditions.
To secure the awning fabric, begin by positioning the fabric on the roller tube, making sure it is evenly distributed. Then, use the provided screws to attach the awning fabric to the roller tube. It’s important to make sure the fabric is taut but not overly tight to allow for movement.
Once the fabric is attached, carefully roll it up onto the roller tube, making sure it rolls evenly and smoothly. Finally, secure the fabric in place using the provided tension knobs, ensuring they are tight enough to hold the fabric firmly in place but not too tight to cause damage. By following these steps, you can securely install your slide out awning and enjoy the added protection and convenience it provides during your travels.
6. Test the Awning Operation
slide out awning installation, testing awning operation
Tips and Precautions
Installing a slide-out awning in your RV can greatly enhance your outdoor living space and provide much-needed shade on hot sunny days. Before beginning the installation process, there are a few tips and precautions to keep in mind. First and foremost, it’s important to measure the width of your slide-out before purchasing an awning to ensure a proper fit.
Additionally, make sure to check the manufacturer’s instructions for any specific requirements or recommendations regarding the installation process. Gather all the necessary tools and materials beforehand to streamline the installation process. It’s also a good idea to have a helping hand available, as installing an awning can be a two-person job.
Prior to installation, thoroughly clean the slide-out area to remove any debris or dirt that may hinder the awning’s adhesive or mounting brackets. Finally, take your time during the installation process and follow all instructions carefully to ensure a secure and reliable installation. By following these tips and taking the necessary precautions, you can successfully install a slide-out awning in your RV and enjoy the benefits of added shade and comfort during your outdoor adventures.
Ensure the Slide Out is Clean and Dry
Slide out cleaning is an essential part of RV maintenance. It’s crucial to ensure that your slide out is clean and dry to prevent any potential damage and prolong its lifespan. Here are some tips and precautions to follow when cleaning your slide out.
First, always start by removing any debris or dirt that may have built up on the slide out. Use a brush or broom to sweep away any particles, paying close attention to the crevices and corners. Next, use a damp cloth or sponge to wipe down the entire slide out, making sure to remove any stuck-on dirt or grime.
Avoid using harsh chemicals or abrasive cleaners, as they can damage the slide out’s surface. Instead, opt for a mild soap or RV-specific cleaner. After cleaning, thoroughly dry the slide out to prevent any moisture-related issues, such as mold or rust.
Use a clean cloth or towel to wipe down the surface and ensure it is completely dry before retracting the slide out. Regular slide out cleaning and maintenance will not only keep it looking its best but also help prevent any costly repairs down the line. So, don’t overlook this important task when it comes to RV upkeep.
Follow the Manufacturer’s Instructions
Follow the Manufacturer’s Instructions When it comes to using any product or equipment, it’s crucial to follow the manufacturer’s instructions. These instructions are designed to ensure the safe and proper use of the item, whether it’s a household appliance or a power tool. Ignoring the instructions or not fully understanding them can lead to accidents, damage to the product, or even injury.
Manufacturers spend a lot of time and effort in designing their products and developing instructions that are clear and concise. They know their product better than anyone else, so it’s essential to trust their expertise and follow their guidelines. Before using any product, take the time to read through the instructions carefully.
Pay attention to any warnings or cautions mentioned, as these could highlight potential safety hazards. Make sure you understand how to operate the product correctly and what precautions to take. If you have any questions or are unsure about something, don’t hesitate to reach out to the manufacturer’s customer support for clarification.
It’s better to be safe than sorry. Following the manufacturer’s instructions also helps to prolong the lifespan of the product. They provide valuable information on how to maintain and clean the item, preventing any premature wear or damage.
By following these instructions, you can ensure that you get the most out of your purchase and avoid costly repairs or replacements down the line. In conclusion, always follow the manufacturer’s instructions when using any product or equipment. They have designed the item and know how to operate it safely and effectively.
By adhering to their guidelines, you can prevent accidents, prolong the lifespan of the product, and have a hassle-free experience. So take the time to read those instructions, and don’t hesitate to reach out if you have any questions. Your safety and satisfaction are worth it!
Work with a Helper for Safety
“work with a helper for safety” When it comes to safety, having a helper by your side can make a world of difference. Whether you’re working on a construction site, tackling a home improvement project, or even just doing some heavy lifting, having an extra set of hands can help prevent accidents and ensure that everything goes smoothly. Here are a few tips and precautions to consider when working with a helper for safety.
First and foremost, communication is key. Before you begin any task, take the time to clearly explain what needs to be done and any potential hazards involved. Make sure your helper understands their role and knows how to stay safe.
It’s also important to establish a system of communication so that you can easily communicate with each other while working. Next, always prioritize safety equipment. Provide your helper with any necessary protective gear, such as hard hats, safety glasses, gloves, and earplugs.
Make sure these items fit properly and are in good condition. Don’t forget to demonstrate how to use each piece of safety equipment correctly. Additionally, it’s important to assess the physical capabilities of your helper.
While having an extra pair of hands is helpful, it’s crucial to consider the physical strength and abilities of your helper. Avoid tasks that may be too physically demanding or require specialized training. Instead, assign duties that your helper is comfortable with and ensure they are properly trained before undertaking any potentially hazardous tasks.
Furthermore, always be aware of your surroundings. When working with a helper, it’s important to constantly be aware of your surroundings and the actions of others. This includes being mindful of potential trip hazards, moving machinery, and any other potential dangers on the job site.
Perform Regular Maintenance
Regular maintenance is an essential part of keeping your vehicle running smoothly and preventing costly repairs down the line. By following a few simple tips and precautions, you can ensure that your car stays in top condition for years to come. Firstly, it’s important to regularly check your vehicle’s fluids, such as engine oil, coolant, and transmission fluid.
These fluids help to lubricate and cool various components of your car’s engine and transmission, so it’s important to keep them at the proper levels. Additionally, you should regularly inspect your car’s tires for signs of wear and tear, as well as checking the tire pressure to ensure safe and efficient driving. Another important aspect of regular maintenance is changing your car’s filters, such as the air filter and oil filter, as these can become clogged over time, reducing engine efficiency.
Finally, don’t forget to schedule regular inspections and maintenance with a qualified mechanic, who can identify any potential issues before they become major problems. By following these tips and precautions, you can keep your car in optimal condition and avoid unexpected breakdowns on the road.
Conclusion
So, there you have it – the simple and genius solution to achieving the ultimate RV awning experience. Installing a slide-out awning in your RV is like giving it a stylish makeover that also happens to provide some much-needed shade and protection from the elements. Not only will it make your rig stand out in the RV park, but it will also enhance your outdoor living space and give you more freedom to enjoy the great outdoors.
Just imagine sipping your drink under the cool shade of your new awning, while your neighbors envy your cleverness and style. So, don’t let the fear of a complicated installation deter you from upgrading your RV. With a little bit of know-how and the right tools, you can easily transform your mobile home into a stylish oasis.
Plus, the sense of satisfaction and accomplishment that comes from installing it yourself is worth every minute spent in the process. So, go forth, my friend, and channel your inner DIY enthusiast. Embrace the adventure of installing a slide-out awning in your RV, because a life on the road should always come with a touch of style and a whole lot of convenience.
Happy awning-ing!”
Enjoy the Benefits of a Slide Out Awning in Your RV
slide out awning, RV
FAQs
How do I install a slide out awning in my RV?
Installing a slide out awning in your RV can be done in a few simple steps. First, measure the length of your slide out and purchase an awning of the appropriate size. Next, remove any dirt or debris from the area where you will be installing the awning. Then, attach the awning rail to the top of your RV using screws or adhesive. Finally, carefully slide the awning fabric into the rail and secure it in place using the provided hardware.
What tools do I need to install a slide out awning in my RV?
To install a slide out awning in your RV, you will need a few basic tools. These may include a tape measure, a drill or screwdriver, a level, a ladder or step stool, and possibly a caulking gun if you plan to seal any gaps or seams. It is always a good idea to have a helper present to provide assistance as well.
Can I install a slide out awning on my own, or do I need professional help?
While it is possible to install a slide out awning on your own, it is recommended to have some level of handyman skills or experience. If you are not confident in your abilities or have never attempted a project like this before, it may be best to hire a professional. They will have the necessary tools, knowledge, and experience to ensure the installation is done correctly.
How long does it take to install a slide out awning in an RV?
The time it takes to install a slide out awning in an RV can vary depending on a few factors, such as your level of experience, the size of the awning, and any unforeseen challenges that may arise. In general, it can take anywhere from a couple of hours to half a day to complete the installation.
Are there any special considerations or precautions to keep in mind when installing a slide out awning in an RV?
When installing a slide out awning in your RV, it is important to follow the manufacturer’s instructions carefully. Make sure to properly secure the awning rail and fabric to prevent any potential damage or accidents. Additionally, be aware of any obstacles or obstructions near the installation area, such as vents or loose wiring, and take necessary precautions to avoid damaging them.
Can I install a slide out awning on any type of RV?
Slide out awnings can typically be installed on most types of RVs, including motorhomes, travel trailers, and fifth wheels. However, it is important to check the specifications of both your RV and the awning to ensure compatibility. Some RVs may require additional modifications or adaptations to accommodate the installation of a slide out awning.
How do I maintain and clean my slide out awning?
To maintain and clean your slide out awning, it is recommended to regularly inspect it for any signs of wear, tear, or damage. Clean the awning fabric using mild soap and water, avoiding any harsh chemicals or abrasive cleaning tools. It is also important to periodically check the tension of the awning and adjust it if necessary to ensure proper operation.