
Looking to keep your AC unit running smoothly this summer? One important task you’ll need to add to your to-do list is adding coolant to your AC unit. Coolant, also known as refrigerant, is what allows your AC unit to cool the air and keep your home comfortable. But how exactly do you add coolant to your AC unit? Don’t worry, it’s easier than you might think.
In this blog post, we’ll guide you through the process of adding coolant to your AC unit, step by step. So grab your gloves and let’s get started!
Table of Contents
Why is Adding Coolant Important?
Adding coolant to an AC unit is essential for its optimal performance and efficiency. Coolant, also known as refrigerant, is responsible for absorbing heat from the indoor air and transferring it outside, which ultimately cools down the air inside your home. Over time, the coolant in your AC unit may become depleted or leak out, resulting in reduced cooling capacity.
By adding coolant, you ensure that your AC unit is able to maintain the desired temperature and provide a comfortable indoor environment. It’s important to note that adding coolant is not a task you can do yourself, as it requires specialized knowledge and equipment. Therefore, it is recommended to hire a professional HVAC technician to inspect and recharge the coolant levels in your AC unit.
Regular maintenance and proper care of your AC unit, including adding coolant when necessary, can prolong its lifespan and save you money on energy bills. So, don’t neglect this important aspect of AC maintenance and keep your home cool and comfortable all summer long.
Helps Maintain Optimal Cooling
coolant, optimal cooling

Prevents Damage to the Unit
Adding coolant to a cooling unit is crucial for its proper functioning and longevity. Coolant, also known as antifreeze, plays a vital role in preventing damage to the unit. Without coolant, the cooling system can overheat and cause serious issues.
Coolant helps to regulate the temperature of the engine and prevent it from getting too hot, which can lead to engine failure. It also lubricates the various parts of the cooling system, reducing friction and wear. By adding coolant regularly, you can ensure that the cooling unit is working efficiently and effectively, preventing any potential damage and extending its lifespan.
So, next time you check your cooling unit, don’t forget to top up the coolant to keep it running smoothly.
Increases Energy Efficiency
coolant, energy efficiency
Check the Current Coolant Levels
If you’re noticing that your AC unit isn’t performing as well as it used to, it might be time to check the coolant levels. Coolant is essential for your AC unit to function properly and keep your home cool. To check the coolant levels, you’ll need to locate the access valve on your AC unit and remove the cap.
You can then use a coolant gauge to measure the current levels. If the levels are low, you can add coolant to your AC unit by attaching a can of coolant to the access valve and slowly releasing it into the system. It’s important to follow the manufacturer’s instructions and not overfill the unit.
Adding coolant to your AC unit can improve its performance and keep your home comfortable during the hot summer months.
Safety Precautions
To ensure the safety of your vehicle, it’s important to check the current coolant levels regularly. Coolant, also known as antifreeze, plays a crucial role in maintaining the temperature of your engine. It prevents the engine from overheating and freezing, which can cause significant damage.
So, how can you check the current coolant levels? It’s as simple as popping open the hood of your car and locating the coolant reservoir. The coolant reservoir is typically a transparent plastic container with minimum and maximum marks on the side. Ensure the coolant level is between these marks.
If it’s below the minimum mark, it’s time to top it up. This can be done by adding a mixture of coolant and water to the reservoir. Remember, it’s essential to check the coolant levels when the engine is cool to avoid any burns or injuries.
So, be diligent and regularly check your coolant levels to keep your engine running smoothly.
Identifying the Type of Coolant
identifying the type of coolant
Locating the Coolant Line
coolant line, current coolant levels
Preparing to Add Coolant
Adding coolant to your AC unit is an important part of regular maintenance to ensure optimal performance. If your AC is not blowing cold air or if you notice a decrease in cooling efficiency, it may be time to add coolant. Before you begin, make sure to turn off your AC unit and disconnect the power supply.
Locate the coolant access valve, which is usually located near the condenser unit. Using a wrench, carefully remove the cap from the access valve. Now it’s time to add the coolant.
Connect the charging hose to the coolant canister and the access valve. Slowly open the valve on the canister and allow the coolant to flow into the AC system. Be sure to refer to the manufacturer’s instructions for the correct amount of coolant to add.
Once the coolant has been added, close the valve on the canister and remove the charging hose from the access valve. Replace the cap on the access valve and recheck the performance of your AC unit. Adding coolant to your AC unit can help restore its cooling power and keep your home comfortable.
So, don’t forget to include this important task in your regular maintenance routine.
Gather the Necessary Tools
coolant, preparing, add coolant. When it comes to adding coolant to your vehicle, it’s important to gather all the necessary tools and materials beforehand. This will ensure a smooth and efficient process.
So, what exactly do you need? First and foremost, you’ll need coolant. Be sure to check your vehicle’s owner manual to determine the correct type and amount of coolant to use. Next, you’ll need a funnel.
This will help you pour the coolant into the reservoir without making a mess. You’ll also need a rag or towel to wipe up any spills or drips. Additionally, it’s a good idea to have a pair of gloves on hand to protect your hands from the coolant.
Lastly, make sure you have a bucket or container to catch any excess coolant that may overflow during the process. By gathering these tools in advance, you’ll be well-equipped to prepare and add coolant to your vehicle.
Turn off the AC Unit
Preparing to add coolant to your AC unit? One of the first steps you should take is to turn off the AC unit. This is important for the safety of both you and the unit itself. When the AC unit is running, it can be dangerous to open it up and work on it.
Turning it off ensures that there is no power running through the unit and reduces the risk of injury. Additionally, you want the AC unit to be completely still when adding coolant so that the coolant can be evenly distributed throughout the system. So, before you begin adding coolant, don’t forget to turn off the AC unit and give it a rest.
Locate and Open the Access Panel
“One of the first steps in preparing to add coolant to your system is locating and opening the access panel. In most cases, the access panel is located on the back or side of the appliance. It may be secured with screws or clips, so be sure to have the appropriate tools on hand.
Once you’ve located the panel, carefully remove any screws or clips and set them aside in a safe place. With the panel removed, you will have access to the inner components of the appliance, including the coolant reservoir. It’s important to open the access panel in order to properly add coolant to your system and ensure that it is functioning optimally.
By following these steps and taking the time to properly prepare, you can help extend the lifespan of your appliance and prevent any potential issues down the road.”
Adding the Coolant
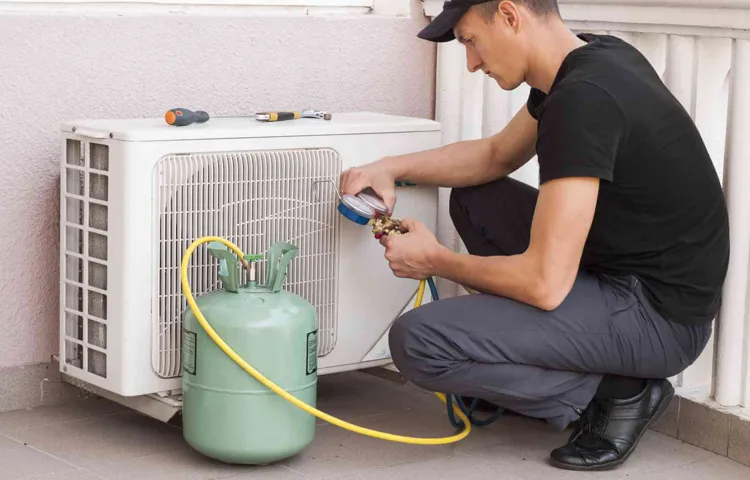
If your AC unit is not cooling properly, one possible reason could be a low level of coolant. Adding coolant to an AC unit is a fairly simple process, but it’s important to follow the correct steps to ensure the safety and efficiency of your unit. First, you’ll need to locate the access valve on the refrigerant lines.
This valve is typically located near the outdoor unit of your AC system. Once you’ve found the valve, you’ll need to attach the coolant canister to it. Make sure to wear gloves and protective eyewear before proceeding.
Next, slowly and carefully open the valve on the coolant canister to release the coolant into the system. Monitor the pressure gauge on the canister, as you do not want to overfill the unit. Once the pressure gauge reaches the appropriate level, close the valve on the coolant canister and carefully detach it from the access valve.
It’s important to note that adding coolant to an AC unit should only be done by a trained professional, as there are potential risks and safety precautions to consider. Always consult with a qualified HVAC technician if you are unsure about adding coolant to your AC unit.
Attach the Coolant Canister
coolant canister, adding coolant Adding coolant to your vehicle is an important part of regular maintenance and ensuring the engine stays cool during operation. To do this, you’ll need to attach the coolant canister. The coolant canister is a reservoir that holds the coolant until it’s needed.
It’s typically located near the radiator and has a cap that allows you to open and close it. When adding coolant, it’s essential to follow the manufacturer’s instructions and use the recommended type of coolant for your vehicle. Before you begin, make sure the engine is cool to the touch to avoid any burns.
Once you’ve located the coolant canister, simply unscrew the cap and pour the coolant into the reservoir until it reaches the appropriate level. Be careful not to overfill, as this can cause excessive pressure in the cooling system. Once the coolant is added, securely fasten the cap back onto the canister.
It’s always a good idea to double-check for any leaks or spills before starting your engine. Remember, proper coolant levels are crucial for maintaining the engine’s temperature and preventing overheating, so be sure to check and top up regularly.
Follow the Manufacturer’s Instructions
coolant, manufacturer’s instructions
Inject the Coolant into the Line
“Adding the Coolant to Keep Things Running Smoothly” Now that you’ve prepared the system and removed any air pockets, it’s time to inject the coolant into the line and ensure that everything runs smoothly. The coolant is a crucial component in keeping the engine cool and preventing it from overheating. It works by absorbing excess heat generated during combustion and transferring it away from the engine.
To add the coolant, locate the coolant reservoir, which is typically labeled with a blue cap or a similar marking. Open the cap and carefully pour the coolant into the reservoir. Make sure to use the correct type and mixture of coolant specified by the manufacturer, as using the wrong one can lead to engine damage.
As you pour the coolant in, you may notice some bubbles or foam forming. This is normal and is simply air being released from the system. Continue pouring the coolant until the reservoir is filled to the recommended level indicated on the markings.
After adding the coolant, it’s important to check for any leaks or signs of damage. Inspect the reservoir and surrounding hoses for any cracks or leaks. Additionally, check the coolant level regularly to ensure it doesn’t drop below the minimum level.
If you notice any issues, it’s best to have a professional mechanic inspect and repair the system. Adding the coolant is an essential step in maintaining the health and performance of your engine. It helps regulate temperature and ensures that your vehicle runs smoothly without any overheating issues.
By following these steps and regular maintenance, you can keep your engine cool and avoid any costly repairs down the road. So, go ahead and add that coolant and keep your engine running smoothly!
Monitoring Coolant Levels
If you own an AC unit at home or work, it’s important to check and monitor the coolant levels regularly. Adding coolant to your AC unit can help ensure that it runs efficiently and continues to cool your space effectively. So, how do you add coolant to your AC unit? Well, it’s not as complicated as it may seem.
First, you’ll need to locate the service valve on the unit. This valve is typically a brass or metal fitting with a cap on top. Once you’ve found the valve, you’ll want to unscrew the cap.
Next, you’ll need to attach a refrigerant hose to the service valve. Make sure the hose is securely connected. Now comes the important part: adding the coolant.
You’ll need a can of refrigerant, which can be purchased at most hardware stores. Carefully attach the can to the other end of the refrigerant hose. Slowly open the valve on the can to release the coolant into the AC unit.
You’ll want to monitor the pressure gauge on the hose as you do this, making sure not to overfill the unit. Once the pressure is at the desired level, you can disconnect the refrigerant hose and replace the cap on the service valve. It’s always a good idea to consult the manufacturer’s instructions or seek professional help if you’re unsure about adding coolant to your AC unit.
Check for Leaks
monitoring coolant levels, check for leaks
Regularly Monitor Coolant Levels
monitor coolant levels, regular coolant maintenance, importance of coolant monitoring Regularly monitoring coolant levels is an essential part of vehicle maintenance that is often overlooked. Coolant, also known as antifreeze, plays a crucial role in regulating the temperature of the engine. It circulates through the radiator and engine, dissipating excess heat and preventing the engine from overheating.
Without sufficient coolant, the engine can overheat, leading to serious damage and potentially costly repairs. To avoid this, it is important to regularly check the coolant levels and top up if necessary. But why is monitoring coolant levels so important? Well, just like the oil in your engine, coolant can become depleted or contaminated over time.
By monitoring the coolant levels, you can ensure that there is enough coolant to protect your engine from overheating. It also allows you to catch any potential leaks or issues early on, preventing further damage and ensuring the longevity of your vehicle. So, the next time you pop the hood, don’t forget to check on your coolant levels.
Your engine will thank you for it!
Conclusion
Adding coolant to an AC unit is a bit like giving your air conditioner a refreshing cocktail to cool down with. Just like a tropical drink on a hot summer day, coolant is the key ingredient that keeps your AC system chilling out and staying cool. So, grab your AC unit a cold one (of coolant, that is) and follow these steps to rejuvenate its performance.
Cheers to a comfortably cool home!”
Regular Maintenance is Key
“Monitoring Coolant Levels” Regular maintenance is crucial when it comes to keeping your car running smoothly, and one area that should never be overlooked is the coolant levels. Coolant, also known as antifreeze, is responsible for regulating the temperature of your engine, preventing it from overheating or freezing. Without the proper amount of coolant, your engine could suffer serious damage.
So, how do you monitor your coolant levels? It’s actually quite simple. Start by locating the coolant reservoir, which is usually a transparent plastic tank found near the radiator. The reservoir should have markings indicating the minimum and maximum levels of coolant.
With the engine off and cool, take a look at the coolant level. If it’s below the minimum mark, it’s time to add more coolant. But what if the coolant level is consistently low? This could be a sign of a leak or another underlying issue with your cooling system.
In this case, it’s best to have your car inspected by a professional mechanic. They will be able to locate and fix the problem before it leads to more serious and costly repairs. Regularly monitoring your coolant levels is an important part of car maintenance that shouldn’t be overlooked.
It ensures that your engine stays cool and prevents damage from overheating. So, next time you pop the hood, take a few seconds to check your coolant level. It could save you from a major headache down the road.
Consult a Professional if Needed
coolant levels, professional, monitoring
FAQs
Why is it important to add coolant to an AC unit?
Adding coolant to an AC unit is important because it helps to regulate the temperature and ensures that the unit operates efficiently.
How often should coolant be added to an AC unit?
The frequency of adding coolant to an AC unit depends on various factors, such as the size of the unit and its usage. However, on average, coolant should be added every 2-3 years.
Can I add coolant to my AC unit myself?
Adding coolant to an AC unit is a complex process that requires technical knowledge and specialized tools. It is recommended to hire a professional HVAC technician to perform the task.
Will adding coolant improve the cooling performance of my AC unit?
Yes, adding coolant to an AC unit can improve its cooling performance. When the coolant levels are low, the unit may struggle to cool effectively. Adding coolant can help restore optimal cooling.
How can I tell if my AC unit needs coolant?
Some signs that your AC unit may need coolant include reduced cooling performance, warm air blowing from the vents, and increased energy consumption. If you notice these signs, it is best to call a professional for an inspection.
What happens if an AC unit runs low on coolant?
When an AC unit runs low on coolant, it can cause the unit to work harder to cool the space, leading to increased wear and tear on the system. This can result in higher energy bills and potential damage to the unit.
Can I use any type of coolant in my AC unit?
No, not all AC units use the same type of coolant. It is crucial to use the specific coolant recommended by the manufacturer to ensure proper operation and prevent damage to the unit.