Adding grease to Bearing Buddy is a crucial step in maintaining your trailer’s wheel bearings. However, not everyone knows how to do it. If you’re a first-time boat trailer owner or have recently upgraded to a model with Bearing Buddy, you may find yourself wondering how to add grease to this critical component.
Fortunately, it’s not as complicated as it might seem. With a few straightforward steps, you can protect your bearings and keep them running smoothly for years to come. So, let’s dive in and discover how to add grease to Bearing Buddy like a pro!
Table of Contents
Introduction
If you’re new to boating, maintaining your boat can seem overwhelming, but one important aspect you don’t want to overlook is adding grease to your bearing buddy. This simple task can prolong the life of your trailer bearings, saving you money and hassle in the long run. First, make sure the grease you’re using is compatible with your bearing buddy and is of good quality.
Then, remove the rubber cover from the bearing buddy and fill it with grease until it comes out the sides. Clean up any excess grease and reattach the rubber cover. Remember to check your bearing buddy frequently, especially before and after long trips.
Regular maintenance will keep your bearings in top shape and ensure the safety of your boat on the road. With the right technique and equipment, adding grease to your bearing buddy is an easy and essential task to keep your boat running smoothly.
– Brief explanation of what a Bearing Buddy is
Introduction: If you are an avid boater, you certainly understand the importance of maintaining your boat trailer. One of the key components of trailer maintenance is ensuring the wheel bearings are adequately lubricated to reduce friction and wear. However, it is not always easy to tell if the grease is evenly distributed throughout the bearing.
This is where a Bearing Buddy comes in handy. A Bearing Buddy is a device that replaces the dust cap and fits directly over the wheel hub. It allows you to add grease to the wheel bearing quickly and easily, ensuring that the hub stays lubricated and protected against water and corrosion.
With a Bearing Buddy, you can maintain the longevity and effectiveness of your boat trailer without any hassle.

– Importance of adding grease to Bearing Buddy
Bearing Buddy Bearing Buddy is a critical component of boat trailers, and adding grease to it is essential to keep it running smoothly. The Bearing Buddy acts as a pressure relief system that prevents water and other contaminants from entering the bearings, which can cause them to rust and corrode over time. Without proper maintenance, the bearings can fail, leading to costly repairs and even worse, potential accidents.
By adding grease to the Bearing Buddy regularly, you can ensure that it remains lubricated and protected from the harsh marine environment. This simple yet essential step can extend the life of your boat trailer and keep you safe on the water. So, don’t overlook the importance of adding grease to your Bearing Buddy and keep your boat trailer in tip-top shape.
Materials Needed
Adding grease to your Bearing Buddy is an easy and important maintenance task. You’ll need some basic materials, including a tub of waterproof marine grease, a small scraper or screwdriver, and a rag. First, remove the Bearing Buddy’s outer cap using your scraper or screwdriver.
Take the rag and clean out any old grease or debris from the Bearing Buddy. Next, use the grease gun to pump new grease into the Bearing Buddy until you see a slight bit of grease come out of the center cap. Replace the outer cap, and you’re done! Keep in mind that over-greasing can cause damage to your bearings, so only add enough grease to fill the Bearing Buddy cavity about 75%.
Regularly adding grease to your Bearing Buddies will prolong the life of your trailer’s bearings, saving you time and money in the long run.
– List of tools and materials needed for the job
When it comes to tackling a DIY project, having the right materials can make all the difference. For this particular job, you will need a few key items to ensure success. The first thing you’ll need is a good quality paintbrush.
It’s important to choose a brush that is appropriate for the type of paint you’ll be using, so be sure to check the label before making your purchase. You’ll also need a roller and tray if you’re planning to cover large areas. Don’t forget to pick up some painter’s tape to protect any areas you don’t want to accidentally paint over.
To prep the surface, you’ll need sandpaper and a scraper or putty knife to smooth out any rough spots. You may also need a cleaning solution and rags to wipe down the surface before you begin. Depending on the project, you may also need primer, spackling paste, and drop cloths to protect your floors from any paint spills.
With these materials on hand, you’ll be ready to tackle any painting project like a pro!
Step-by-Step Guide
Adding grease to a bearing buddy is vital in maintaining the performance and lifespan of your trailer’s wheel bearings. Doing it manually is not as complicated as it may seem, and you can do it conveniently with our step-by-step guide. First, remove the bearing buddy carefully using a flathead screwdriver, then clean it with a solvent and a clean rag.
This will ensure that there is no residue grease left on it. Next, take your high-temperature wheel bearing grease and add it to the bearing buddy’s open end, continuously squeezing it until it fills completely. Make sure not to overfill it as it could cause damage to the bearings.
After that, replace the bearing buddy by simply tapping it back into the dust cap until it locks in place, and wipe off any excess grease that may be left over. Doing this regularly will keep your bearings lubricated and protected, saving you from costly repairs in the future. It’s a simple task that anyone can do and will undoubtedly extend the life of your trailer’s wheel bearings.
– Step 1: Inspect the Bearing Buddy
When inspecting the Bearing Buddy as part of your trailer maintenance routine, there are a few crucial things to look out for. Firstly, check the grease level, making sure it sits at the inner ring’s level and is pliable and clean. The grease should be free from water and dirt, as this can lead to corrosion and damage.
Additionally, check for any cracks or damage on the Bearing Buddy itself, particularly around the rubber seal. If there are any signs of wear and tear, it’s best to replace the Bearing Buddy as soon as possible. Ensuring that the Bearing Buddy is in top condition prevents any costly damage to your trailer axle, and also makes for smoother towing on the road.
– Step 2: Clean the Bearing Buddy
After removing the Bearing Buddy from your trailer, it’s essential to give it a thorough cleaning. First, wipe the excess grease with a rag. Then, you can use a degreasing solution or warm, soapy water to clean the Bearing Buddy.
To ensure that every part of the Bearing Buddy is clean, use a soft-bristled brush to scrub it gently. Rinse the Bearing Buddy with clean water and dry it carefully. Even a small amount of dirt or debris left inside can harm the bearings, so be sure that it’s entirely clean before reinstalling it.
Proper cleaning of the Bearing Buddy is crucial to keep it functioning smoothly and prolong its lifespan. With great care and regular maintenance, your trailer will be ready to hit the road whenever you are.
– Step 3: Attach the Grease Gun to the Grease Fitting
Now that you’ve found the grease fitting, it’s time to attach the grease gun. First, make sure your grease gun is loaded with the correct type of grease for your machinery. Then, remove the cap or cover from the grease fitting.
Place the tip of the grease gun over the fitting and press it firmly onto the opening. You may need to wiggle it slightly to get a tight fit. Listen for a “click” or “pop” to indicate that the grease gun is securely attached to the fitting.
Once it’s attached, you can begin pumping the grease into the machinery. Remember to be careful not to over-grease as this can cause just as many problems as under-greasing. Following these simple steps will help keep your machinery running smoothly and extend its lifespan.
– Step 4: Pump the Grease Gun
Pumping the grease gun is an essential step in the maintenance and upkeep of any equipment that requires grease. To begin, place the nozzle of the grease gun onto the fitting of the equipment and lock it into place. Once the nozzle is secure, compress the lever of the grease gun until the grease begins to flow out of the nozzle.
As you pump the grease gun, make sure to keep an eye on the pressure gauge to ensure that you are applying the correct amount of pressure. Over-greasing equipment can cause damage, so it’s vital to keep track of how much grease has been applied. Once you have finished pumping, detach the nozzle from the fitting, and wipe any excess grease off the equipment.
Remember to store the grease gun in a cool, dry place until its next use. By following these steps, you can ensure that your equipment is well-maintained and runs smoothly, minimizing the risk of costly repairs and downtime.
– Step 5: Release the Pressure
After patiently waiting for the Instant Pot to cook, it’s finally time to release the pressure. But this step requires caution, as the pressure inside the pot is extremely high and could cause burns. First things first, make sure the steam valve is set to “venting” to allow all the steam to escape.
For extra safety measures, use a long-handled tool like tongs to push the valve instead of your hand. If there’s still pressure left in the pot after a few minutes, try releasing it in short bursts to avoid any accidents. Once all the pressure has been released, it’s now safe to open the lid and enjoy your delicious meal.
So go ahead and try this easy Instant Pot recipe today and impress your family and friends with your cooking skills!
– Step 6: Wipe Off Excess Grease
After performing the previous steps of lubricating the bike chain, it is essential to take a rag or towel and wipe off any excess grease left on the chain. This is important because if excess grease is left on the chain, it can attract dirt and other particles, leading to a buildup that makes shifting difficult. Moreover, it can also soil clothing or get onto other bike parts.
To wipe off the excess grease, fold the rag over the top of the chain and pedal slowly backward. You should do this until no more visible grease is left. By doing this, your chain will be clean and free of excess grease, which can help prolong the life of your chain, and your bike will be in tip-top condition.
Tips and Tricks
If you’re looking to add some grease to your bearing buddy, it’s a simple process that can be done in just a few steps. First, remove the bearing buddy from the hub and wipe it down to remove any excess dirt or old grease. Next, using a grease gun, pump fresh grease into the bearing buddy until it starts to come out from the sides.
This ensures that the entire cavity is filled with grease. Finally, wipe away any excess grease and reattach the bearing buddy to the hub. It’s important to regularly add grease to your bearing buddy to ensure that your trailer’s bearings are properly lubricated and protected from wear and tear.
By keeping your bearings in good condition, you can extend the life of your trailer and avoid costly repairs down the road. With just a little bit of know-how and some simple tools, adding grease to your bearing buddy is a quick and easy task that anyone can do.
– Additional tips for adding grease to a Bearing Buddy
When adding grease to a Bearing Buddy, there are a few tips and tricks to ensure a smooth process. First, make sure to choose the correct type of grease for your Bearing Buddy, as not all greases are created equal. You should also clean the Bearing Buddy thoroughly before adding new grease, using a degreaser or soap and water.
Additionally, try to add grease slowly and evenly to prevent any air pockets from forming. It’s important not to overfill the Bearing Buddy, as this can lead to seal failure and grease leakage. Finally, be sure to monitor the level of grease in your Bearing Buddies regularly and top off as needed to keep them functioning properly.
By following these tips, you can ensure your Bearing Buddies are well-maintained and have a long lifespan.
– Importance of periodic maintenance
Periodic maintenance is crucial to keeping your equipment running smoothly and efficiently. It involves a series of routine checks and repairs designed to prevent breakdowns and keep your equipment in good condition. Regular maintenance ensures that your equipment lasts longer, operates safely, and performs optimally.
To achieve the best results, you should follow a regular maintenance schedule and stick to it. This includes checking fluid levels, changing filters, inspecting belts and hoses, replacing worn parts, and cleaning components. By investing in regular maintenance, you can avoid expensive repairs, avoid downtime, and increase the lifespan of your equipment.
So, don’t neglect your equipment; take care of it regularly, and it will take care of you.
Conclusion
And there you have it – adding grease to your Bearing Buddy is as easy as pie! Just remember to keep your bearings well-lubricated to ensure smooth sailing on your next boating adventure. Now go forth and conquer the seas (or lakes, or rivers) with your newly-greased and ready-to-roll Bearing Buddies!”
– Recap of the importance of adding grease to a Bearing Buddy
Adding grease to a Bearing Buddy is an important step to ensure longevity and smooth operation of your boat trailer. The Bearing Buddy is designed to maintain a constant pressure of grease in the hub, which keeps water and other contaminants out. Without the proper amount of grease, the bearings can overheat and wear out quickly, leading to costly repairs.
Regularly adding grease to the Bearing Buddy will extend the life of your bearings and prevent the need for replacement. Think of it like changing the oil in your car, it’s a simple task that can save you a lot of headaches in the long run. So, don’t forget to add grease to your Bearing Buddy before hitting the road for your next boating adventure!
– Additional resources for boat maintenance
When it comes to boat maintenance, there are a plethora of tips and tricks that you can utilize to ensure your vessel is in tip-top shape. One essential maintenance tip is to regularly clean your boat, as this not only keeps it looking good, but also helps to prevent corrosion and damage from saltwater. Additionally, it’s important to inspect your boat’s electrical systems, checking for any frayed wires or loose connections that could potentially cause accidents or malfunctions.
Another helpful trick is to invest in high-quality materials for repairs, as this can save you money and headaches in the long run. And if you’re unsure about any aspect of your boat’s maintenance, don’t hesitate to consult with professionals or fellow boaters for advice and guidance. With these tips and tricks, your boat will stay in great condition and provide you with endless hours of boating enjoyment.
FAQs
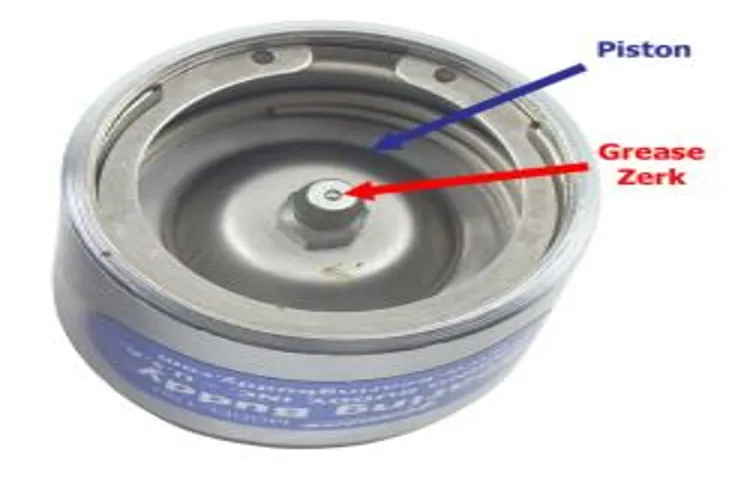
What is a Bearing Buddy and how does it work?
A Bearing Buddy is a device that ensures proper lubrication of boat trailer wheel bearings by adding grease through a spring-loaded piston. When the wheel turns, the Bearing Buddy pumps the grease into the bearings, maintaining their integrity and reducing the risk of failure.
How often should I add grease to my Bearing Buddy?
The frequency of adding grease to your Bearing Buddy is dependent on the frequency of use and the environment in which it is used. Generally, it is recommended to add grease every 1000 miles or once every year, whichever comes first.
How much grease should I add to my Bearing Buddy?
You should fill the Bearing Buddy with enough grease to fill the hub cavity to approximately one-third full. Adding too much grease may cause damage to your trailer wheel bearings.
Is it necessary to clean out old grease before adding new grease to my Bearing Buddy?
Yes, it is recommended to clean out old grease before adding new grease to your Bearing Buddy, as this ensures that the new grease is not contaminated with old or dirty grease. You can clean out the Bearing Buddy by pumping fresh grease into it until the old grease is purged.
Can I add too much grease to my Bearing Buddy?
Yes, over-greasing your Bearing Buddy may cause the spring-loaded piston to malfunction, leading to damaged bearings and increased resistance in the wheel’s rotation. Therefore, it’s important to fill the Bearing Buddy with the appropriate amount of grease.
What type of grease should I use for my Bearing Buddy?
You should use a high-quality, multi-purpose, marine-grade grease that is designed to resist water and protect against corrosion. It is important to avoid using lithium or automotive greases, as they can break down over time and reduce the effectiveness of the Bearing Buddy.
How do I know if my Bearing Buddy needs more grease?
You can check the level of grease in your Bearing Buddy by observing the clear plastic sight cover on the device’s end. If the sight cover is clear, the Bearing Buddy is adequately greased. However, if the cover is cloudy or there is no grease visible, it’s time to add more grease.