Are you struggling to tow your trailer smoothly, feeling every bump and sway on the road? An equalizer hitch could be the solution you need. By distributing the weight evenly between your tow vehicle and trailer, an equalizer hitch helps maintain stability and control while towing. But in order to experience the full benefits of this hitch, it’s essential to properly adjust it.
In this step-by-step guide, we’ll walk you through the process of adjusting an equalizer hitch, ensuring a safer and more comfortable towing experience. So, buckle up and let’s get started!
Table of Contents
Introduction
Have you ever struggled with towing a trailer? If you’re familiar with towing, you may have heard of an equalizer hitch. It’s a handy device that helps distribute the weight between your towing vehicle and the trailer, making the whole towing experience much safer and smoother. But here’s the thing – adjusting an equalizer hitch can be a bit tricky if you don’t know what you’re doing.
Luckily, I’m here to help. In this blog post, I’ll guide you through the steps on how to adjust an equalizer hitch properly. So let’s get started and make your towing adventures a breeze!
What is an Equalizer Hitch?
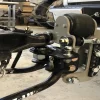
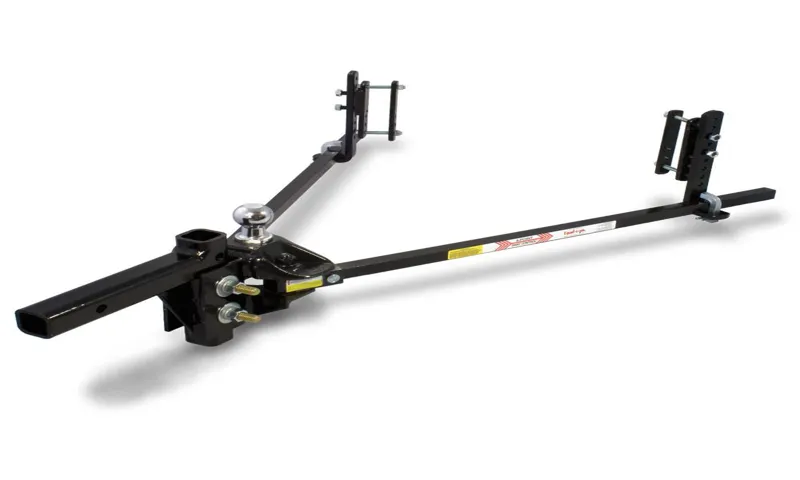
Equalizer hitch An equalizer hitch is a type of towing accessory that helps distribute the weight between the towing vehicle and the trailer it is pulling. It is designed to create a more stable and balanced towing experience by keeping the weight of the trailer evenly distributed over the axles of both the towing vehicle and the trailer. This helps to prevent the towing vehicle from sagging in the rear and improves steering and braking control.
It also reduces the amount of sway or fishtailing that can occur when towing a heavy load. In essence, an equalizer hitch acts as a bridge between the towing vehicle and the trailer, ensuring that weight is properly distributed and making the towing experience safer and more comfortable.
Why is it important to adjust an Equalizer Hitch?
Equalizer Hitch, adjust, important
Step 1: Measure the Trailer Tongue Weight
When it comes to towing a trailer, having the proper hitch is crucial for ensuring a safe and smooth ride. One popular type of hitch is the equalizer hitch, which helps distribute the weight evenly between your vehicle and trailer. Before you can adjust your equalizer hitch, you need to know the tongue weight of your trailer.
This is the downward force exerted on the hitch by the trailer tongue. To measure the tongue weight, you can use a specialized scale that attaches to the hitch, or you can use a bathroom scale and a length of pipe. Simply place the scale or pipe under the hitch, then lift the tongue of the trailer off the ground until it is level.
The scale or pipe will give you a reading, which is the tongue weight of your trailer. Once you have this measurement, you can then adjust your equalizer hitch accordingly for optimal towing performance.
Why is measuring the tongue weight important?
measuring the tongue weight
How to measure the tongue weight
tongue weight, measure, trailer, steps, guidelines, safety, equipment, scale Measuring the tongue weight of your trailer is an essential step in ensuring safe towing. Tongue weight refers to the amount of weight being exerted on the hitch ball by the trailer. It is important to know this weight to properly distribute the load and prevent swaying or instability while on the road.
So, let’s get started with step one: measuring the trailer tongue weight. To measure the tongue weight, you will need a few basic tools and equipment. First, you will need a tongue scale or a weight distribution hitch with an integrated scale.
These tools are specifically designed to accurately measure the weight being exerted on the hitch ball. Alternatively, you can use a commercial scale or a bathroom scale with a higher weight capacity if it allows for accurate readings. Once you have the necessary equipment, you can proceed to measure the tongue weight.
Start by ensuring that your trailer is on a level surface. Next, lower the trailer jack until the hitch ball is at the same level as the scale. If you are using a tongue scale, simply place it between the hitch ball and the trailer coupler.
If you are using a weight distribution hitch with an integrated scale, follow the manufacturer’s instructions to properly set up and calibrate the scale. Now it’s time to get an accurate reading of the tongue weight. Slowly raise the trailer jack to remove the weight from the scale.
Once the weight is fully off the scale, carefully lower it back down until the weight is re-applied to the scale. Read the scale or gauge to determine the tongue weight. Repeat this process a few times to ensure consistency in your measurements.
Step 2: Adjust the Hitch Head Angle
Once you’ve installed your weight distribution hitch, the next step is to adjust the hitch head angle. This is an important step to ensure that your trailer is level and properly balanced when being towed. To adjust the hitch head angle, begin by loosening the bolts or brackets that hold the hitch head to the shank.
This will allow you to move the head up or down to achieve the desired angle. Keep in mind that the angle you choose will depend on the weight distribution needs of your particular trailer. A general rule of thumb is to have the hitch head parallel to the trailer tongue when the trailer is level.
Once you have adjusted the angle, tighten the bolts or brackets to secure the hitch head in place. It’s a good idea to recheck the angle once your trailer is loaded to ensure that it is still level. Adjusting the hitch head angle may take some trial and error, but it is an important step in achieving a smooth and stable towing experience.
Why is adjusting the hitch head angle necessary?
adjusting the hitch head angle, trailer towing
How to adjust the hitch head angle
hitch head angle, adjusting hitch head angle, how to adjust, hitch head adjustment, proper hitch head angle. When towing a trailer, it is crucial to have the hitch head angle properly adjusted. This ensures that the weight of the trailer is evenly distributed between the tow vehicle and the trailer, allowing for safe and stable towing.
Adjusting the hitch head angle may sound complicated, but it can be easily done with a few simple steps. First, start by disconnecting the trailer from the tow vehicle and placing it on a level surface. Next, loosen the bolts or screws that hold the hitch head in place.
With the help of a jack or a second person, adjust the height of the tow vehicle’s hitch receiver to match the height of the trailer hitch coupler. Once properly aligned, tighten the bolts or screws to secure the hitch head in place. It is important to double-check the adjustment and make any necessary tweaks.
Remember, a properly adjusted hitch head angle is essential for safe and smooth towing, so take the time to get it right. With a little patience and attention to detail, you’ll be ready for your next towing adventure.
Step 3: Set the Spring Bar Tension
Now that you’ve hooked up your equalizer hitch and made sure the trailer and tow vehicle are level, it’s time to adjust the spring bar tension. This step is crucial to ensure that the weight of the trailer is evenly distributed between the axles of the tow vehicle. To adjust the spring bar tension, start by releasing the tension on the bars.
This can typically be done by removing the weight distribution chains. Once the bars are free, you can adjust the tension by either adding or removing links from the chains. If you find that the rear of your tow vehicle is sagging, you’ll want to increase the tension on the spring bars.
This will transfer more weight to the front of the tow vehicle and level it out. On the other hand, if the front of your tow vehicle is being lifted and the rear is squatting, you’ll need to decrease the tension on the spring bars. It’s important to note that you may need to make multiple adjustments to find the right tension for your specific setup.
Taking the time to properly adjust the spring bar tension will not only improve the handling of your tow vehicle but also ensure a safer towing experience.
Why is setting the spring bar tension important?
Setting the spring bar tension is an important step in ensuring the proper functioning of a watch. The spring bars are small metal bars that hold the watch strap or bracelet in place on the lugs of the watch case. By adjusting the tension of these spring bars, you can ensure that the strap or bracelet is securely attached and will not come loose during normal wear.
But why is this important? Well, think about it like this: imagine you’re wearing a beautiful watch, and suddenly, the strap comes loose and falls off. Not only is this embarrassing, but it can also potentially damage the watch, especially if it hits a hard surface. By setting the spring bar tension correctly, you can avoid such accidents and ensure that your watch stays securely fastened to your wrist.
Setting the spring bar tension is also important for comfort. If the tension is too tight, the strap or bracelet can dig into your wrist and cause discomfort. On the other hand, if the tension is too loose, the watch can slide around and become annoying to wear.
By finding the right tension, you can ensure that your watch fits comfortably and stays in place throughout the day. In addition to comfort and security, setting the spring bar tension is important for the overall longevity of the watch. Excessive movement and shifting of the watch can put strain on the spring bars and lugs, potentially causing them to wear down or break over time.
By properly adjusting the tension, you can minimize this strain and extend the lifespan of your watch. So how do you set the spring bar tension? It’s actually quite simple. Most watches have adjustable spring bars that can be tightened or loosened using a specialized tool.
By gently turning the tool, you can increase or decrease the tension until you find the perfect fit. Just remember not to overtighten or overtighten the spring bars, as this can also cause damage. In conclusion, setting the spring bar tension is an important step in ensuring the security, comfort, and longevity of your watch.
How to set the spring bar tension
spring bar tension Setting the spring bar tension is an important step in watch maintenance and repair. The tension of the spring bars determines how securely the watch strap or bracelet is attached to the watch case. If the tension is too loose, the strap may become detached, risking the loss of the watch.
On the other hand, if the tension is too tight, it may be difficult to remove or attach the strap, causing unnecessary strain on the spring bars. To set the spring bar tension, start by removing the watch strap or bracelet from the case. Then, locate the spring bars on either side of the case lugs.
These spring bars are typically made of metal and have small notches or holes at the ends. The tension can be adjusted by compressing or expanding the spring bars using a spring bar tool or a small screwdriver. To increase the tension, gently compress the spring bar using the tool and insert it back into the case lug.
The increased compression will create a tighter fit, ensuring a more secure attachment for the strap or bracelet. However, be careful not to compress the spring bar too much, as this can cause it to snap or break. On the other hand, if you need to decrease the tension, gently expand the spring bar by inserting the tool into the small notch or hole at the end and pulling it away from the case lug.
This will create a looser fit, making it easier to remove or attach the strap. Again, be careful not to expand the spring bar too much, as it may lose its tension and become ineffective. Once you have adjusted the tension to your desired level, reattach the watch strap or bracelet to the case by aligning the spring bars with the corresponding holes or notches on the strap and pushing them back into the case lugs.
Setting the spring bar tension may take some practice and trial and error, but with patience and attention to detail, you can ensure a secure and comfortable fit for your watch strap or bracelet. Remember to handle the spring bars with care to avoid any damage, and consult a professional if you are unsure or uncomfortable with the process.
Step 4: Check the Level of the Tow Vehicle and Trailer
Once you’ve hooked up your equalizer hitch and adjusted the tension, it’s important to check the level of both your tow vehicle and your trailer. This step is crucial to ensure that your setup is properly balanced and that the weight is evenly distributed. To check the level, start by parking your towing vehicle and trailer on a flat surface.
Next, measure the height of your tow vehicle’s front and rear wheels using a tape measure or a leveling device. The goal is to have both the front and rear wheels at the same height. If the rear wheels are lower than the front wheels, it means that too much weight is being transferred to the tow vehicle, which can put stress on the rear axle and reduce your steering and braking control.
On the other hand, if the rear wheels are higher than the front wheels, it means that not enough weight is being transferred to the tow vehicle, which can lead to reduced traction and stability. Adjust the height of your equalizer hitch accordingly to achieve the desired level for both your tow vehicle and trailer, ensuring a safe and smooth towing experience.
Why is checking the level important?
“Why is checking the level important?” Checking the level of your tow vehicle and trailer is a crucial step in ensuring a safe and smooth towing experience. When your vehicle and trailer are not properly leveled, it can lead to various issues on the road. Firstly, an unlevel setup can put excess stress on certain parts of your vehicle, such as the suspension, tires, and axles.
This added stress can lead to premature wear and tear, reducing the lifespan of these components. Additionally, an unlevel tow setup can affect the stability and handling of your vehicle and trailer. This can make it more difficult to control your vehicle, especially when making turns or driving at high speeds.
It can also increase the risk of swaying, fishtailing, or even jackknifing, which can be extremely dangerous. Lastly, an unlevel setup can impact the distribution of weight between your vehicle and trailer. This can affect the braking performance of your vehicle, making it harder to stop in emergency situations.
Overall, checking the level of your tow vehicle and trailer is essential for both your safety and the longevity of your equipment.
How to check the level
how to check the level
Step 5: Test the Hitch Setup
So, you’ve installed your equalizer hitch and tightened everything up, but now it’s time to put it to the test. Adjusting a equalizer hitch is crucial to ensure that your trailer is properly balanced and your towing experience is safe and smooth. Here’s how to do it.
First, you’ll need to hitch up your trailer to your tow vehicle. Make sure your trailer is on level ground and that the weight distribution bars are properly attached to the hitch head. Once everything is secured, attach the trailer’s coupler to the ball on your hitch and lock it in place.
Next, take a few moments to inspect the overall setup. Check for any loose connections or parts that may need tightening. Ensure that the weight distribution bars are parallel to the trailer frame and that they are all adjusted to the same height.
Now it’s time to test the setup. Drive your tow vehicle and trailer to a flat, open area where you can safely make some maneuvers. Start by driving in a straight line and monitoring the behavior of your trailer.
Does it sway or fishtail? Does it feel heavy or unstable? Pay attention to any signs of poor weight distribution or improper balance. If you notice any issues, it’s time to make some adjustments. Begin by adjusting the tension on the weight distribution bars.
This can be done by loosening or tightening the chains or bolts that connect the bars to the trailer frame. Remember, you want to achieve a nice balance of weight between your tow vehicle and trailer, so make small adjustments and test the setup again. As you make adjustments, keep in mind that you want the trailer to ride level.
Why is testing the hitch setup necessary?
hitch setup, testing, necessary, safety precautions, towing, ensure stability, prevent accidents When it comes to towing, ensuring the stability and safety of your hitch setup is absolutely necessary. Testing the hitch setup is an important step that should not be overlooked. By testing the setup, you can identify any potential issues or weaknesses that could lead to accidents or failures on the road.
After all, no one wants to experience a sudden hitch failure while driving down the highway! Testing the hitch setup allows you to take the necessary safety precautions and make any adjustments needed to ensure a secure connection between your vehicle and the trailer. Think of it as a way of double-checking that everything is properly aligned and locked into place before hitting the road. By testing the hitch setup, you can have peace of mind knowing that you’ve taken the necessary steps to prevent any mishaps or accidents while towing.
Your safety, as well as the safety of others on the road, should always be a top priority. So, take the time to test your hitch setup and make any necessary adjustments before embarking on your towing journey. It’s better to be safe than sorry!
How to test the hitch setup
hitch setup testing Once you have installed the hitch on your vehicle and connected it to the trailer, it is crucial to test the setup before hitting the road. Testing the hitch setup ensures that everything is secure and functioning properly, helping to prevent any accidents or damage while towing. So, what steps should you take to test the hitch setup? First, you should inspect the hitch and all its components, including the coupler, safety chains, and electrical connections.
Look for any signs of wear or damage, and make sure everything is securely attached. A loose or damaged component could lead to the trailer disconnecting from the vehicle while driving, which is extremely dangerous. Next, it’s time to check the weight distribution.
Load the trailer with the appropriate amount of weight, making sure to evenly distribute it. Uneven weight distribution can cause the trailer to sway or become unstable while driving. You can use a trailer scale or consult the manufacturer’s guidelines to determine the correct weight distribution for your setup.
Once the weight distribution is set, it’s time to connect the trailer to the hitch. Make sure the coupler is properly secured and that the lock or latch is engaged. Give the trailer a firm shake to see if it feels secure.
If there is any movement or rattling, you may need to tighten the hitch or make adjustments to ensure a snug fit. Now, it’s time to test the electrical connections. Check that all the lights on the trailer are working properly, including the brakes, turn signals, and taillights.
If any lights are not functioning, you may need to troubleshoot the wiring or replace bulbs or fuses. Finally, take the setup for a test drive. Start slowly and gradually increase your speed, paying close attention to how the trailer feels behind your vehicle.
Conclusion
In conclusion, adjusting an equalizer hitch is not rocket science, but it does require a touch of finesse and a dash of know-how. Think of it as the Maestro of your towing symphony, ensuring that your rig and trailer are in perfect harmony. With a few simple steps and a keen eye for detail, you can dial in the right amount of weight distribution and sway control, turning your towing experience from a tumultuous cacophony into a smooth and melodious journey.
Just like a master chef expertly balances flavors to create a delectable dish, adjusting an equalizer hitch involves finding that sweet spot where all the elements come together perfectly. It’s a delicate dance of adjusting tension, tweaking angles, and making sure everything is in proper alignment. But fear not, intrepid hitch adjuster! Armed with the knowledge of how to properly measure tongue weight, adjust weight distribution bars, and fine-tune sway control, you can become the virtuoso of towing.
Each turn of the wrench, each slight adjustment, brings you one step closer to trailer-towing nirvana. So, next time you find yourself facing the daunting task of adjusting an equalizer hitch, don’t fret. Embrace the challenge, put on your conductor’s hat, and orchestrate the perfect balance between your towing vehicle and trailer.
And remember, just like a well-tuned instrument, a properly adjusted equalizer hitch will ensure that every note of your journey is played in perfect harmony. Happy towing, fellow adventurers!”
Quick tips for adjusting an equalizer hitch efficiently
adjusting an equalizer hitch, efficiently testing the hitch setup
Final thoughts
testing hitch setup Final thoughts: Testing the hitch setup is an essential step to ensure the safety and functionality of your towing system. Before hitting the road, it’s crucial to make sure that all the components of the hitch, such as the receiver, ball mount, and safety chains, are securely attached and properly aligned. By doing a thorough test, you can identify any potential issues or weaknesses in the setup and address them before they cause any problems on the road.
One important aspect of testing the hitch setup is checking the weight distribution. It’s important to ensure that the weight of the trailer is evenly distributed and properly balanced. This can be done by using a weight distribution hitch, which helps to evenly distribute the weight between the trailer and the towing vehicle.
By properly distributing the weight, you can prevent issues such as swaying and instability while towing. In addition to checking the weight distribution, it’s also important to test the trailer brakes. Make sure that the brakes are working effectively and can bring the trailer to a stop smoothly.
This is crucial for maintaining control of the trailer and ensuring your safety while on the road. Another aspect of testing the hitch setup is ensuring proper electrical connections. Make sure that the trailer lights, brake lights, and turn signals are all working correctly.
This not only ensures your safety but also helps other drivers on the road to see your intentions and react accordingly. Overall, testing the hitch setup is a crucial step in ensuring the safety and functionality of your towing system. By checking the weight distribution, testing the trailer brakes, and ensuring proper electrical connections, you can have peace of mind knowing that your setup is in tip-top shape.
So before you embark on your towing adventure, take the time to thoroughly test your hitch setup and make any necessary adjustments. Happy towing!
FAQs
How does an equalizer hitch work?
An equalizer hitch works by evenly distributing the weight between the towing vehicle and the trailer, improving stability and control.
What are the benefits of using an equalizer hitch?
Using an equalizer hitch can provide improved weight distribution, reduced sway and fishtailing, increased stability and control while towing, and a smoother ride.
How do I choose the right equalizer hitch for my trailer?
To choose the right equalizer hitch, you need to consider the weight of your trailer, the tongue weight, and the towing capacity of your vehicle. It is recommended to consult with a professional or refer to the manufacturer’s guidelines.
Can I adjust an equalizer hitch myself?
Yes, you can adjust an equalizer hitch yourself. However, it is important to follow the manufacturer’s instructions and guidelines for proper adjustment to ensure optimal performance and safety.
How often should I adjust my equalizer hitch?
The frequency of adjustment may vary depending on factors such as road conditions, weight distribution changes, and usage. It is recommended to check and adjust your equalizer hitch before each towing trip and periodically throughout the towing season.
What are some common signs that my equalizer hitch needs adjustment?
Common signs that your equalizer hitch may need adjustment include excessive bouncing, trailer sway or fishtailing, uneven tire wear, and reduced steering control or stability.
Can I use an equalizer hitch with any type of trailer?
Equalizer hitches are designed to be compatible with various types of trailers, including travel trailers, campers, and boat trailers. However, it is important to ensure that the hitch is suitable for the specific weight and towing capacity of your trailer.