Imagine driving in heavy rain, and despite your windshield wipers working at full speed, your visibility is still compromised. Rain droplets smear across your windshield, making it difficult to see the road ahead. This can be a dangerous situation for any driver.
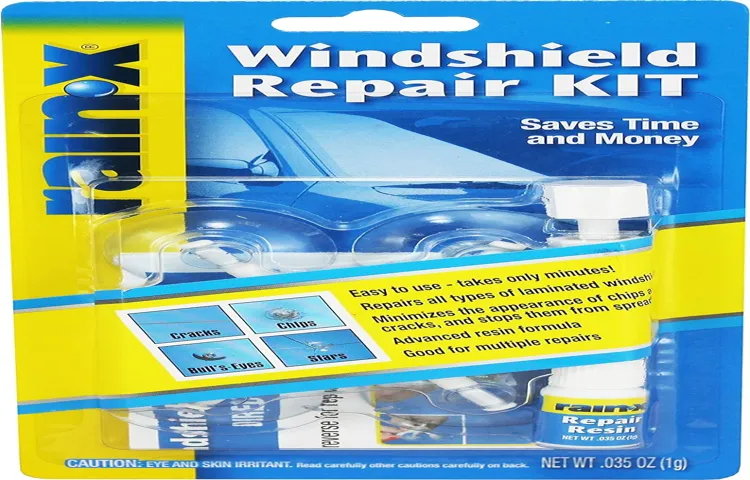
But fear not, because there is a solution – the Rain-X Windshield Repair Kit. The Rain-X Windshield Repair Kit is a convenient and easy-to-use product designed to repair small chips and cracks in your windshield. It works by filling in the damaged area with a clear resin that helps to restore the structural integrity of your windshield.
Not only does this repair kit prevent further spreading of the damage, but it also improves visibility by minimizing the appearance of any cracks or chips. Applying the Rain-X Windshield Repair Kit is a simple process that you can do yourself at home. It comes with all the necessary tools and step-by-step instructions to guide you through the repair process.
First, you need to clean the damaged area with the provided alcohol wipe to ensure a clean surface for the resin to adhere to. Then, apply the resin to the damaged area, making sure to completely fill in the chip or crack. After that, place a curing film over the repaired area and use the provided UV light to cure the resin.
One of the great things about the Rain-X Windshield Repair Kit is that it requires no special skills or tools. Anyone can do it, even if you have never repaired a windshield before. The kit is designed to be user-friendly, making it accessible to anyone who wants to fix their windshield themselves.
By using the Rain-X Windshield Repair Kit, you not only save money by avoiding expensive professional repairs, but you also extend the lifespan of your windshield. Small chips and cracks can quickly worsen over time, leading to costly replacements. Repairing them as soon as possible with the Rain-X Windshield Repair Kit prevents further damage and ensures your windshield remains in top condition.
Table of Contents
Introduction
Are you tired of dealing with a blurry or cracked windshield? Rain-X Windshield Repair Kit is here to save the day! This incredible product allows you to fix minor damages on your windshield quickly and effectively, without the need for professional help. Applying the Rain-X Windshield Repair Kit is a simple process that anyone can do. Just follow these easy steps: Prepare the damaged area by cleaning it thoroughly with the provided alcohol wipe.
Then, place the applicator over the damaged spot and inject the resin into the cracks. Use the provided curing strip to remove any excess resin and cover the area with the plastic strip. Finally, let it dry under direct sunlight or a UV lamp, and voila! Your windshield will look as good as new.
So don’t let a small crack ruin your visibility on the road. Grab a Rain-X Windshield Repair Kit today and say goodbye to those annoying windshield imperfections.
What is Rain X Windshield Repair Kit
Rain X Windshield Repair Kit Welcome to our blog section, where we bring you the latest information about Rain X Windshield Repair Kit. You may be wondering what exactly is a Rain X Windshield Repair Kit and how it can benefit you. Well, you’ve come to the right place! In this article, we will introduce you to this handy product and give you all the information you need to know.
Picture this: you’re driving down the road on a beautiful sunny day, when suddenly a stone hits your windshield and leaves a small chip or crack. It can be frustrating and potentially dangerous to drive with a damaged windshield, not to mention the cost of replacing it. But fear not, because Rain X Windshield Repair Kit is here to save the day! This innovative product allows you to repair minor chips and cracks in your windshield without the need for costly professional help.
The kit comes with everything you need to perform the repair, including a special resin that fills in the damaged area and a curing strip that helps it set and harden. With just a few simple steps, you can restore your windshield to its former glory. The Rain X Windshield Repair Kit is designed for use on laminated windshields, which are the most common type of windshield found in vehicles today.
These windshields are made up of two layers of glass with a layer of vinyl in between, which helps to keep them from shattering upon impact. The repair kit works by injecting the resin into the damaged area, which bonds with the glass and helps to prevent further damage. Not only does the Rain X Windshield Repair Kit save you money on expensive windshield repairs, but it also helps to maintain the structural integrity of your windshield.
By repairing minor chips and cracks promptly, you can prevent them from spreading and causing more serious damage. This not only extends the life of your windshield but also keeps you and your passengers safe on the road. So, if you find yourself with a chipped or cracked windshield, don’t panic.
Just grab a Rain X Windshield Repair Kit and get to work. It’s a simple and affordable solution that can save you time, money, and a whole lot of frustration. Give it a try and see the difference it can make!
Why should you use Rain X Windshield Repair Kit
Rain X windshield repair kit is a fantastic product that every car owner should have. If you have ever had a cracked or chipped windshield, you know how frustrating and expensive it can be to get it fixed. But with Rain X windshield repair kit, you can easily fix those small chips and cracks yourself, saving you time and money.
This kit comes with everything you need to repair your windshield, including a resin formula that fills in the damaged area and prevents it from spreading. It also includes a special applicator and curing strips that help ensure a professional and long-lasting repair. Whether you have a small chip or a larger crack, Rain X windshield repair kit can help restore your windshield’s integrity and visibility.
Don’t let a cracked windshield ruin your day, get a Rain X windshield repair kit and take care of it yourself. It’s easy, affordable, and will give you peace of mind knowing that your windshield is in good shape.
Preparation
So, you’ve got a crack or chip in your windshield and you’re wondering how to fix it? Well, you’re in luck because applying a Rain-X windshield repair kit is a quick and easy solution for small damage. But before you go ahead and start the repair process, there are a few things you should do to prepare. First, make sure you have all the necessary tools and materials from the Rain-X kit.
This will typically include a special resin, adhesive strip, curing film, and other accessories. Next, you’ll want to clean the damaged area of your windshield thoroughly. Use a glass cleaner to remove any dirt, dust, or debris that may be present.
This will ensure that the repair is smooth and effective. Once you’ve cleaned the area, make sure it is completely dry before starting the repair. Taking these steps to prepare will help ensure a successful application of the Rain-X windshield repair kit and keep your windshield looking clear and crack-free.
Gather the materials
In order to successfully complete any project or task, it’s important to gather all the necessary materials beforehand. This holds true for any DIY project, whether it’s something simple like assembling a piece of furniture or something more complex like remodeling a room. Being prepared with all the materials you need can save you time, frustration, and extra trips to the store.
So, before you start any project, take the time to make a list of all the materials you’ll need. This can include things like tools, hardware, supplies, and any other items necessary to complete the project. By gathering all your materials in advance, you’ll be able to jump right into the project and avoid any unnecessary delays.
Clean the windshield
clean windshield
Read the instructions
preparation for following instructions When it comes to carrying out any task, whether it’s assembling a piece of furniture or preparing a recipe, the first step is always to read the instructions. It may seem simple and straightforward, but many people often overlook this crucial step, eager to jump right into the task at hand. But taking the time to read and understand the instructions can save you a lot of time, effort, and frustration in the long run.
Preparation is key when it comes to following instructions. Before you even start reading the instructions, make sure you have everything you need to complete the task. Gather all the tools, materials, and resources required and have them within easy reach.
This way, you won’t waste time searching for things later on, and you can focus on understanding and following the instructions. Once you have everything you need, it’s time to sit down and read the instructions carefully. Take your time to digest the information, and don’t be afraid to read them multiple times if necessary.
Look for any warnings, precautions, or special notes that are highlighted. Pay attention to the order of the steps and any specific measurements or settings mentioned. If the instructions are unclear or if you’re unsure about something, don’t hesitate to seek clarification.
You can refer to online resources, instructional videos, or even ask for help from someone who has experience with the task. It’s better to be safe than sorry and risk making a mistake that could be costly or dangerous. In addition to reading and understanding the instructions, it’s important to have a mindset of openness and flexibility.
Sometimes, the instructions may not be perfect or may not account for every possible scenario. In such cases, it’s crucial to use your judgment and adapt the instructions accordingly. Trust your instincts and make the necessary adjustments to ensure the successful completion of the task.
Application Steps
Applying the Rain-X Windshield Repair Kit is a straightforward process that anyone can do at home. Once you have your kit, start by cleaning the damaged area of your windshield with the provided alcohol wipe. Next, place the adhesive disc from the kit over the chip or crack, making sure it is centered.
Take the syringe and screw it onto the adhesive disc, then slowly inject the repair resin into the chip or crack. Be sure to follow the instructions in the kit for the correct amount of resin to use. Once the resin is in, remove the syringe and place a curing strip over the repaired area.
Press down firmly to remove any excess resin and to ensure a good seal. Leave the strip on for at least one hour to allow the resin to cure. After the curing time is up, peel off the strip and use the provided razor blade to scrape away any excess resin.
Finally, use the included polish and cloth to buff the repaired area for a clean, clear finish. Now your windshield is ready to take on the road with a professional-looking repair that will help prevent further damage.
Step 1: Apply the resin
resin application, epoxy resin, applying resin, resin coating, resin layer In the exciting world of crafting and DIY projects, working with epoxy resin has become increasingly popular. Whether you’re creating beautiful resin art or giving new life to old furniture, applying resin is a crucial step to achieve a professional and glossy finish. So, let’s dive right into the application steps! The first step is to prepare the resin by following the instructions provided by the manufacturer.
Once your resin mixture is ready, it’s time to apply it to your surface. Using a brush or a spatula, start by spreading a thin and even layer of resin over the entire area. Work in small sections to avoid the resin drying out before you can spread it evenly.
Take your time and apply gentle pressure to ensure the resin smooths out perfectly. Keep in mind that the resin may have a certain working time before it starts to harden, so be mindful of the temperature and follow the instructions accordingly. Once you’ve covered your surface with the first layer of resin, make sure there are no bubbles trapped underneath.
You can use a heat gun or a toothpick to gently pop any bubbles that may have formed. Remember, this is just the first layer, so don’t worry if it doesn’t look perfect yet. Allow the resin to partially cure according to the instructions before moving on to the next steps.
And there you have it, the first step in applying resin is complete! Now you can move on to adding additional layers to build up the desired thickness and achieve that stunning, glossy finish you’ve been dreaming of.
Step 2: Place the curing strip
Step 2 of the application process involves placing the curing strip on the affected area. The curing strip is a small adhesive strip that helps to hold the wound together and promote healing. To place the strip, start by cleaning the wound with mild soap and water, then pat it dry with a clean towel.
Make sure the area is free of any debris or foreign objects. Next, carefully remove the backing from the adhesive strip and gently press it onto the wound, making sure it is centered over the injury. Smooth down the edges of the strip to ensure it stays in place.
The curing strip will provide support and protection to the wound as it heals. Be sure to follow any additional instructions provided by your healthcare provider, such as changing the strip regularly or adding an antibacterial ointment. With proper care, the curing strip can help your wound heal quickly and effectively.
Step 3: Let it cure
curing epoxy resin Once you have applied your epoxy resin, it is essential to let it cure properly. Curing is the process in which the resin hardens and becomes a solid, durable surface. This step is crucial to ensure the strength and longevity of your epoxy project.
During the curing process, the epoxy resin undergoes a chemical reaction known as cross-linking. This reaction causes the resin to transform from a liquid to a solid state. The time it takes for the epoxy to cure can vary depending on several factors, including the type of epoxy, temperature, and humidity levels.
To ensure a successful cure, it is important to follow the manufacturer’s instructions. The instructions will provide you with specific information on the curing time required for your epoxy resin. It is essential to give the resin enough time to fully cure before using or handling the finished project.
During the curing process, it is important to create a clean and dust-free environment. Any dust or debris that comes into contact with the epoxy resin during the curing process can become trapped and mar the final finish. It is also important to avoid touching or disturbing the resin until it has fully cured.
In addition to following the manufacturer’s instructions, you can also take certain steps to promote proper curing. Keeping the temperature and humidity levels within the recommended range can help accelerate the curing process. Additionally, ensuring proper ventilation in the curing area can help prevent air bubbles from forming in the resin.
Overall, allowing your epoxy resin to cure properly is crucial for achieving a strong and durable finish. By following the manufacturer’s instructions and taking proper precautions, you can ensure the success of your epoxy project. So, be patient and let your epoxy cure to enjoy the beautiful and long-lasting results!
Finishing Touches
If you’re tired of dealing with pesky water spots and streaks on your windshield, then the Rain-X Windshield Repair Kit might just be your answer. This simple yet effective kit allows you to easily repair small chips and cracks in your windshield, improving its clarity and overall appearance. But how exactly do you apply the Rain-X Windshield Repair Kit? Well, it’s actually quite simple.
First, start by cleaning the damaged area with the provided alcohol wipe and allow it to dry completely. Then, apply the repair resin to the damaged area using the provided syringe. Make sure to fill the entire crack or chip with the resin, and use the provided curing strips to cover the repair.
Leave it to cure under sunlight or UV light for about 5-10 minutes, and then remove the strips and scrape off any excess resin with the included razor blade. Finally, use the glass cleaner provided in the kit to clean the repaired area and voila! Your windshield will be as good as new. So why wait? Give the Rain-X Windshield Repair Kit a try and see the amazing results for yourself!
Remove excess resin
In the process of resin art, one important step in achieving a smooth and flawless finish is to remove any excess resin. This step is crucial to ensure that your artwork looks polished and professional. Excess resin can result in unsightly drips, uneven surfaces, and even fingerprints.
To remove excess resin, there are a few methods you can try. One option is to use a heat gun or a torch to carefully heat the surface of your artwork. The heat will cause the resin to become more fluid and easier to manipulate.
You can then use a brush or a spatula to remove any excess resin. Another method is to use a sharp blade or a craft knife to carefully scrape away any drips or uneven areas. Just be sure to take your time and be gentle, as you don’t want to accidentally damage your artwork.
Additionally, you can also use sandpaper to smooth out any rough spots and create a perfectly smooth surface. By taking the time to remove excess resin, you can ensure that your resin art looks professional and visually appealing.
Polish the surface
“Polish the surface” is all about those finishing touches that give a project the wow factor. Just like adding the perfect accessories to an outfit or the final brushstroke on a painting, these little details make all the difference. When it comes to any creative endeavor, whether it’s writing, design, or even cooking, the finishing touches are what separate the great from the good.
It’s those extra touches that show attention to detail and a commitment to excellence. The surface might be smooth and shiny, but it’s the polish that really makes it shine. So, what are some ways to polish the surface and make your work stand out? One way is to pay attention to the layout and visual aspects of your project.
Is everything aligned properly? Are the colors and fonts cohesive? Another way is to carefully proofread and edit your work. Nothing spoils the image quite like a glaring typo or grammatical error. Lastly, don’t forget about the little extras that can elevate your work, like adding in a thoughtful quote or creating an interactive element.
These finishing touches show that you’ve gone the extra mile and put time and effort into perfecting your work. So, take a step back and put on the finishing touches. Your work will thank you for it.
Conclusion
In conclusion, using the Rain-X Windshield Repair Kit is like giving your windshield a spa day – it exfoliates and rejuvenates, leaving it looking fresher than ever. Just like a professional manicure, this kit fixes those small windshield cracks and chips with precision and finesse. You may think it sounds like magic, but it’s actually all about science.
The specially formulated resin fills in the damaged areas, creating an invisible barrier that prevents further spreading and restores clarity. It’s like having your own personal wizard giving your windshield a makeover! But wait, there’s more! This repair kit is so easy to use, even a technologically-challenged toddler could master it. With just a few simple steps, you’ll have your windshield looking flawless in no time.
It’s like a DIY project that gives your car an instant facelift! The Rain-X Windshield Repair Kit is not only practical but also cost-effective. You’ll be saving money by avoiding expensive windshield replacements and tedious trips to the mechanic. Plus, you’ll have the satisfaction of knowing that you fixed it yourself, proving once again that you’re a DIY superhero.
So, whether your windshield has a tiny chip or a seemingly insurmountable crack, fret not! The Rain-X Windshield Repair Kit is here to save the day. With its magical resin and easy-to-follow instructions, you’ll be amazed at how quickly and effortlessly you can transform your windshield from drab to fab. So go ahead, grab your Rain-X Windshield Repair Kit, embrace your inner DIY magician, and let your windshield shine bright like a diamond! It’s time to show those pesky cracks who’s boss and make your car the envy of the road.
Enjoy a Clear Windshield with Rain X
Rain X, a popular automotive product, offers a simple solution to the challenge of maintaining a clear windshield in wet weather. Applying Rain X to your windshield can help to repel rain, sleet, and snow, ensuring optimal visibility and safety while driving. This easy-to-use product forms a protective barrier on the glass, enabling water to bead up and roll off quickly.
With Rain X, you won’t have to worry about the annoyance and danger of water droplets obstructing your view. Instead, you can enjoy a clear and unobstructed view of the road ahead, even in the harshest weather conditions. So, why struggle with foggy or streaky windshields when Rain X can provide the finishing touch to your car’s exterior maintenance routine? Give it a try and experience the difference for yourself.
FAQs
How do I apply Rain-X windshield repair kit?
To apply Rain-X windshield repair kit, start by cleaning the damaged area thoroughly using a glass cleaner. Then, apply the repair solution using the provided applicator, making sure to fill in the crack or chip completely. Allow the solution to dry for at least 10 minutes, and then use a razor blade to remove any excess solution. Finally, buff the area using a soft cloth to achieve a smooth finish.
Can Rain-X windshield repair kit fix all types of cracks and chips?
Rain-X windshield repair kit is designed to fix small cracks, chips, and bullseye damage that is less than 1 inch in diameter. It may not be suitable for larger or more severe damage. If you have a larger or more complicated windshield damage, it is recommended to consult a professional repair service.
How long does it take for Rain-X windshield repair kit to dry?
After applying the repair solution from the Rain-X windshield repair kit, it is recommended to let it dry for at least 10 minutes. This allows the solution to bond and harden, ensuring a strong and durable repair. However, it is advisable to check the specific instructions provided with the kit, as drying times can vary slightly depending on the product.
Will Rain-X windshield repair kit make the crack or chip invisible?
While Rain-X windshield repair kit is designed to improve the appearance of cracks and chips, it may not make them completely invisible. The repair solution helps to fill the damaged area, reducing its visibility and preventing further spreading. However, depending on the severity and type of damage, there may still be slight traces of the repair visible.
Can Rain-X windshield repair kit be used on all types of windshields?
Rain-X windshield repair kit can be used on most types of laminated windshields, including those made of glass or plastic. However, it is not suitable for use on cracked or damaged windshields that have weakened structural integrity. If you are unsure about the compatibility of the kit with your windshield, it is best to consult the manufacturer or a professional.
How many repairs can I expect from one Rain-X windshield repair kit?
The number of repairs you can achieve with one Rain-X windshield repair kit depends on the size and severity of the damage. On average, the kit should be able to perform multiple repairs, ranging from 3 to 10, depending on the specific kit and the size of the cracks or chips. It is always recommended to read the packaging or instructions to determine the expected number of repairs.
Can Rain-X windshield repair kit be used on other glass surfaces, such as mirrors or windows?
While Rain-X windshield repair kit is primarily designed for windshields, it can also be used on other glass surfaces, such as mirrors or windows, as long as they are made of laminated glass. However, it is important to consider the manufacturer’s instructions and recommendations, as the durability and compatibility may differ for different glass surfaces.