
Are you experiencing issues with your car’s cooling system? Is your engine overheating or giving off strange smells? It might be time to bleed your coolant system. Bleeding your coolant system is an essential maintenance task that helps remove trapped air bubbles and ensure proper circulation of coolant throughout your engine. In this step-by-step guide, we will walk you through the process of bleeding your coolant system, so you can keep your engine running smoothly and prevent any further damage.
So, grab your tools and let’s get started!
Table of Contents
- 1 What is a Coolant System and Why is Bleeding Necessary?
- 2 Tools and Materials Needed for Bleeding the Coolant System
- 3 Step 1: Safety Precautions
- 4 Step 2: Preparation
- 5 Step 3: Locate the Radiator Cap
- 6 Step 4: Locate the Bleeder Valve
- 7 Step 5: Open the Bleeder Valve and Fill the Coolant
- 8 Step 6: Purging the Air from the System
- 9 Step 7: Checking for Leaks and Repeating the Process
- 10 Step 8: Closing the Bleeder Valve and Reinstalling the Cap
- 11 Step 9: Cleaning Up and Final Checks
- 12 Conclusion
- 13 FAQs
- 14 Additional Resources
- 15 FAQs
What is a Coolant System and Why is Bleeding Necessary?
A coolant system is an important component of a vehicle’s engine that helps regulate its temperature. It circulates coolant, usually a mixture of water and antifreeze, through the engine to absorb excess heat and prevent it from overheating. Over time, air bubbles can get trapped in the coolant system, which can hinder its effectiveness.
Bleeding the coolant system involves removing these air pockets to ensure optimal performance. It’s similar to when you have a blockage in a straw and need to blow air through it to clear it out. By bleeding the coolant system, you’re essentially removing any air bubbles that may be obstructing the flow of coolant and preventing it from properly cooling the engine.
So, if you’re experiencing unusual heating or cooling issues with your vehicle, it might be time to bleed the coolant system.
Overview of a Coolant System
coolant system, bleeding, overview
Importance of Bleeding the Coolant System
bleeding the coolant system, importance of bleeding the coolant system In order to understand the importance of bleeding the coolant system, we first need to know what a coolant system is and why it needs to be bled. The coolant system in a vehicle is responsible for keeping the engine cool and preventing it from overheating. It consists of various components such as the radiator, thermostat, water pump, and hoses.
When the coolant system is filled or drained, air can become trapped in the system, leading to air pockets or bubbles. These air pockets can hinder the flow of coolant throughout the system, preventing it from effectively cooling the engine. This can cause the engine to overheat and potentially lead to serious damage.
Bleeding the coolant system is the process of removing these air pockets and ensuring the proper circulation of coolant. It involves opening the bleeder valve or removing the radiator cap and allowing the trapped air to escape. This ensures that the coolant can reach all areas of the engine and help maintain its optimal operating temperature.
Importantly, not bleeding the coolant system can have detrimental effects on your vehicle. The trapped air pockets can cause uneven cooling, leading to hotspots in the engine. This can result in decreased engine performance, increased wear and tear, and even engine failure.
In addition, a poorly functioning coolant system can also impact other components of your vehicle. For example, if the coolant is not circulating properly, it may not effectively cool the transmission, leading to transmission problems. Overall, bleeding the coolant system is a crucial maintenance task that should not be overlooked.
It helps ensure the proper functioning of your vehicle’s engine and prevents potential damage and costly repairs. So, the next time you service your vehicle, don’t forget to bleed the coolant system to keep your engine running smoothly.
Tools and Materials Needed for Bleeding the Coolant System
When it comes to bleeding the coolant system, there are a few tools and materials that you’ll need to get the job done. First and foremost, you’ll need coolant. Make sure to choose the type of coolant that is recommended for your specific vehicle.
Additionally, you’ll need a funnel to pour the coolant into the system. This will help to prevent spills and make the process easier. A screwdriver or wrench may also be required to remove any necessary components in order to access the coolant reservoir.
Finally, you’ll need a container to catch any excess coolant that may overflow during the bleeding process. It’s important to have all of these tools and materials on hand before you begin, as they will make the process much smoother and more efficient. So, gather up your tools and let’s get started on bleeding the coolant system!
List of Tools
bleeding coolant system, tools and materials
List of Materials
coolant system, tools and materials, bleeding, engine coolant, radiator cap, funnel, distilled water, antifreeze coolant, screwdriver, wrench, towel, safety glasses, gloves When it comes to bleeding the coolant system of your car, it’s important to have the right tools and materials on hand. To successfully bleed the coolant system, you will need a few essential items. First and foremost, you’ll need a container to catch the coolant that will be drained from the system.
This can be a large bucket or a drain pan. You will also need a screwdriver or a wrench, depending on the type of radiator cap your vehicle has. This will be used to remove the radiator cap and release any trapped air in the system.
Additionally, you’ll need a funnel to pour new coolant into the system. It’s important to use a funnel to prevent spills and make the process easier. Another crucial item is distilled water.
This will be used to dilute the antifreeze coolant and ensure a proper mixture. Make sure to have a bottle of antifreeze coolant on hand as well. Other items that will come in handy during the bleeding process include a towel to clean up any spills or messes, safety glasses to protect your eyes, and gloves to keep your hands clean and safe.
By having all of these tools and materials ready, you’ll be prepared to bleed your car’s coolant system successfully.
Step 1: Safety Precautions
When it comes to bleeding your coolant system, safety should always be your top priority. Failure to take the necessary precautions can result in serious injuries or damage to your vehicle. Before you begin, make sure your engine is turned off and has had time to cool down.
This will prevent any potential burns from hot coolant. Additionally, it’s a good idea to wear gloves and eye protection to protect yourself from any spills or splashes. Remember, coolant is toxic and should never be ingested or come into contact with your skin.
Keep a bucket or container nearby to catch any excess coolant and avoid any spills. By taking these safety measures, you can ensure a smooth and accident-free coolant system bleeding process.
Protective Gear
Protective gear is essential when participating in activities that may pose a risk to our safety. Whether it’s sports, construction work, or even household chores, wearing the right protective gear can help prevent injuries and keep us safe. Before we even begin our activity, it’s important to take safety precautions.
This means assessing the risks involved and ensuring we have the necessary protective equipment. So, what are some steps we can take to ensure our safety? First and foremost, we need to identify the potential hazards associated with the activity. Is it a contact sport where there’s a high risk of being hit or tackled? Or is it a construction site with falling debris? Once we understand the potential risks, we can then determine the appropriate protective gear needed.
This may include helmets, goggles, gloves, knee pads, or even footwear with steel toe caps. By taking these safety precautions and wearing the right protective gear, we can greatly reduce the chances of injury and ensure a safer experience. So, the next time you engage in any activity that may pose a risk, ask yourself, “Do I have the necessary protective gear to keep me safe?”
Proper Work Environment
workplace safety precautions
Step 2: Preparation
So you’re ready to tackle the task of bleeding your coolant system? Great! The first step in this process is making sure you have all the necessary tools and equipment on hand. You’ll need a pair of pliers, a clean container to catch any coolant that may leak out, and of course, the coolant itself. It’s important to use the right type of coolant for your specific vehicle, so be sure to check your owner’s manual or consult with a professional if you’re unsure.
Once you have everything you need, it’s time to move on to the next step: preparing your vehicle. Park your car in a safe and level location, and make sure the engine is completely cooled down before you begin. Open the hood and locate the coolant reservoir, which is usually a translucent plastic tank.
Depending on your vehicle, you may also need to locate and open the radiator cap. Refer to your owner’s manual for specific instructions on how to access these components. Now that you’re prepared and ready to get down to business, let’s move on to the next step: bleeding the coolant system.
Park the Vehicle
Parallel parking can be a challenging task for many drivers, but with the right preparation, it can become a breeze. Before attempting to park your vehicle, it is important to make sure you have everything you need to park safely. Start by checking your mirrors to ensure you have a clear view of the parking space.
Adjust them if necessary to get the best angle. Next, turn on your signal to indicate to other drivers that you intend to park. This will help prevent any misunderstandings or accidents.
Remember to check for oncoming traffic before pulling into the parking space. It is important to be mindful of pedestrians and other vehicles in the area. Once you have safely entered the space, slowly start to turn the steering wheel in the opposite direction.
This will help guide your vehicle into the parking spot. As you maneuver into the space, keep an eye out for any obstacles or obstructions. Take your time and make small adjustments as needed to ensure a perfect park.
By following these preparation steps, you can approach parallel parking with confidence and ease.
Gather Tools and Materials
“Step 2: Preparation – Gather Tools and Materials” Now that you have a clear plan in mind for your project, it’s time to gather the tools and materials you’ll need to bring your vision to life. This step is crucial because having the right tools and materials on hand will make the entire process much smoother and more efficient. First, take stock of what you already have.
Look through your toolbox and see if you have any of the tools you’ll need. It’s always a good idea to have a variety of basic tools like a hammer, screwdrivers, a measuring tape, and various types of pliers. If you don’t have these tools, consider borrowing or renting them from a friend or neighbor.
Next, make a list of the specific materials you’ll need for your project. This could include things like lumber, paint, nails, screws, and any other supplies that are necessary. Take your time to carefully measure and calculate how much of each material you’ll need to avoid any last-minute trips to the hardware store.
Once you have your list, head to your local hardware or home improvement store to gather everything you need. Don’t be afraid to ask for help from the store employees if you’re unsure about anything. They can often offer valuable advice and guidance to ensure you’re getting the right tools and materials for your particular project.
Remember, having the right tools and materials is essential for any successful DIY project. So take the time to gather everything you need before getting started. This will not only save you time and frustration in the long run but also ensure that your finished project is of the highest quality.
Open the Hood
“preparation for opening the hood” Before you can begin inspecting the engine bay of your car, it’s essential to prepare yourself and the vehicle. Just like you wouldn’t jump into a pool without checking the water first, you shouldn’t dive into the engine without taking a few important precautions. First, make sure the car is turned off and the keys are safely out of the ignition.
This will prevent any accidents or mishaps while you’re working under the hood. Next, find a clean, dry and well-lit area to park your vehicle. This will allow you to easily access the engine and see any potential issues more clearly.
Finally, take a moment to familiarize yourself with the layout of your engine. Each vehicle can have a slightly different arrangement, so it’s important to know where key components such as the battery, oil dipstick, and coolant reservoir are located. By taking these simple steps, you’ll be well-prepared to open the hood and begin your engine inspection.
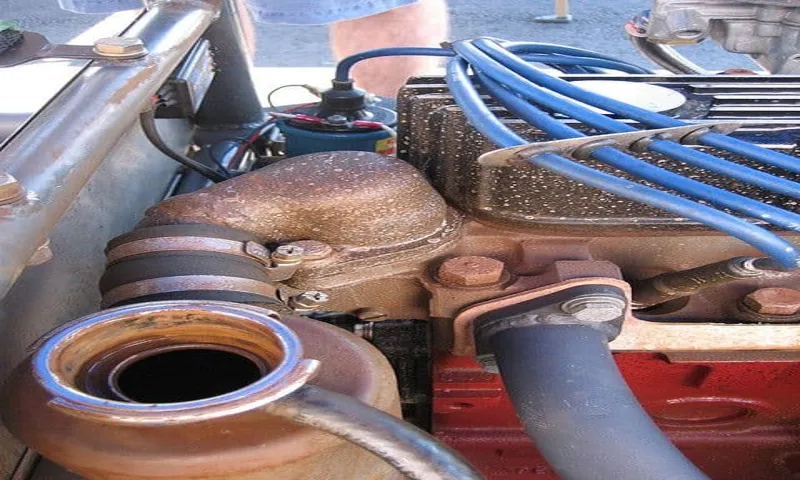
Step 3: Locate the Radiator Cap
Now that you’ve found the radiator, the next step in bleeding your coolant system is to locate the radiator cap. This cap is usually located on top of the radiator and is marked with a symbol or word that indicates it is the cap for the coolant system. It’s important to note that the radiator cap can be hot, so it’s a good idea to wait until the engine has fully cooled down before attempting to remove it.
Once the engine has cooled, carefully twist the radiator cap counterclockwise to remove it. Be prepared for some pressure to be released when you remove the cap, as the coolant may be under pressure. It’s a good idea to place a rag or towel over the cap as you remove it to catch any excess coolant that may spurt out.
With the radiator cap removed, you’re now ready to move on to the next step in bleeding your coolant system.
Identifying the Radiator Cap
radiator cap. Now that we’ve located the radiator, it’s time to find the elusive radiator cap. The radiator cap is a small, round metal or plastic cap that sits on top of the radiator.
It is usually located near the front of the engine compartment, but the exact position can vary depending on the make and model of your vehicle. Look for a cap that is attached to a small cylindrical tube, which is connected to the radiator. The cap may have markings or labels on it, indicating that it is the radiator cap.
It is important to note that the radiator cap is not the same as the cap on the coolant reservoir. The coolant reservoir is a separate container that holds excess coolant and is used for topping up the radiator if needed. So, don’t confuse the two.
Once you’ve located the radiator cap, you’re one step closer to checking and maintaining your vehicle’s cooling system. Remember, if you’re unsure about anything, always consult your vehicle’s owner’s manual for guidance.
Removing the Radiator Cap
radiator cap removal, step 3, locating the radiator cap Alright, so we’ve covered the first two steps of removing the radiator cap, and now it’s time to move on to step three: locating the radiator cap. Now, you might be thinking, “Isn’t it just right there on top of the radiator?” Well, yes and no. While in some cars, the radiator cap is indeed easily visible on top of the radiator, in others, it may be hidden or covered by a plastic shroud or engine cover.
So, let’s dive deeper into this step and find out exactly where your radiator cap might be hiding. First, pop open the hood of your car and secure it with the hood latch. Now, take a look at the engine compartment.
Start by locating the radiator itself. It’s usually a large aluminum or plastic component situated at the front of the engine bay. Once you’ve spotted the radiator, take a closer look around it.
If you see any plastic covers or shrouds, it’s likely that the radiator cap is underneath one of them. To remove these covers, you might need to use a combination of tools such as a screwdriver or a ratchet set. Carefully remove the fasteners or screws that hold the covers in place, being mindful not to strip or break anything.
Once you’ve removed the cover, take a moment to locate the radiator cap. It should be a small, round metal cap, usually painted black or marked with a radiator symbol. If you’re having trouble locating the radiator cap, don’t worry! Every car is different, and it can sometimes be a bit of a treasure hunt.
You can refer to your car’s owner’s manual for specific instructions or consult with a mechanic for guidance. Now that you’ve successfully located the radiator cap, you’re one step closer to removing it. Stay tuned for the next step, where we’ll guide you through the process of actually removing the cap and releasing any built-up pressure safely.
Step 4: Locate the Bleeder Valve
Once you’ve identified the radiator cap and removed it, the next step in bleeding your coolant system is to locate the bleeder valve. The bleeder valve is typically located on or near the radiator and can sometimes be difficult to find. It is usually a small valve or screw that can be opened to release any trapped air in the system.
Look for a valve that is similar in appearance to a tire valve stem or a small screw with a slot for a screwdriver. If you’re having trouble locating the bleeder valve, consult your vehicle’s owner’s manual for specific instructions. It’s important to find the bleeder valve before proceeding, as it is necessary to release the trapped air in order to properly bleed the coolant system.
Understanding the Bleeder Valve
bleeder valve The next step in understanding the bleeder valve is to locate it. The bleeder valve is an essential component in various systems, such as hydraulic or pneumatic systems. It is primarily used to release excess pressure, air, or gas from the system.
The valve is usually located at the highest point in the system, as this is where air or gas tends to accumulate. You can often find the bleeder valve near the top of the system, attached to a pipe or a storage tank. Sometimes it may be hidden or situated in a hard-to-reach area, so you may need to refer to technical diagrams or manuals to help you locate it.
Once you find the bleeder valve, you’ll be ready to move on to the next step in the process.
Finding the Bleeder Valve
bleeder valve When it comes to bleeding a hydraulic system, one crucial step is to locate the bleeder valve. The bleeder valve is a small valve that is designed to release trapped air or excess fluid from the hydraulic system. It is usually located at the highest point of the system, allowing air or fluid to escape easily.
However, finding the bleeder valve can sometimes be a bit challenging, especially if you are not familiar with the system. One way to locate the bleeder valve is by consulting the system’s manual or documentation. These resources often provide detailed information on the location of the bleeder valve, making it easier for you to find it.
Another way to locate the bleeder valve is by visually inspecting the system. Look for any small valves or fittings that are located higher than the rest of the system. Often, the bleeder valve will be positioned in such a way that it allows air or fluid to escape without causing any damage to the system.
Once you have located the bleeder valve, make sure to have the necessary tools and equipment ready to bleed the system properly.
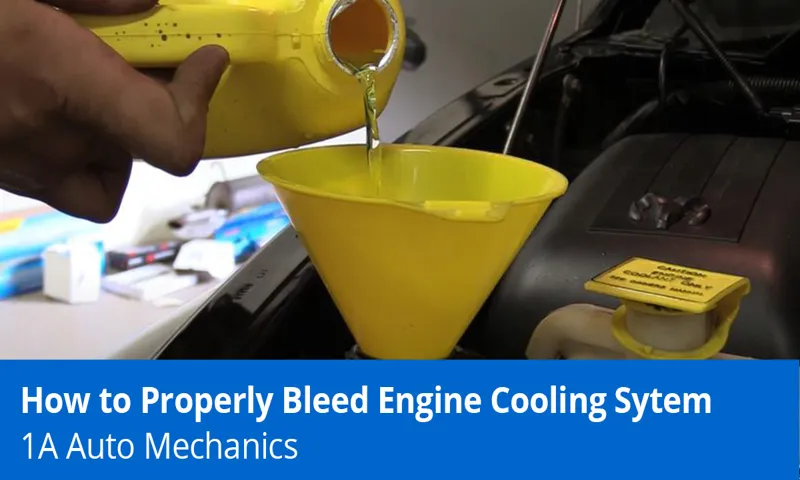
Step 5: Open the Bleeder Valve and Fill the Coolant
Now that you’ve properly prepared your vehicle for bleeding the coolant system, it’s time to move on to the next step: opening the bleeder valve and filling the coolant. The bleeder valve is usually located on the radiator or on a coolant hose near the top of the engine. Once you locate it, grab a wrench and position it over the valve.
Before you open the valve, make sure you have a catch container ready to collect any coolant that may come out. Now, slowly loosen the valve with the wrench. As you do this, you may hear a hissing sound, which is the air escaping from the system.
Once you’ve opened the valve, it’s time to start filling the coolant. Grab your pre-mixed coolant and slowly pour it into the radiator or coolant reservoir. As you pour, keep an eye on the bleeder valve.
Once a steady stream of coolant starts coming out of the valve, you can close it with the wrench. Continue pouring coolant until the radiator or reservoir is full. Make sure to check the manufacturer’s recommended coolant level for your specific vehicle.
Once the coolant is at the proper level, replace the cap on the radiator or reservoir. Lastly, start the engine and let it run for a few minutes. This will help circulate the coolant throughout the system.
Keep an eye on the temperature gauge to ensure it doesn’t overheat. If everything looks good, congratulations! You’ve successfully bled the coolant system and your vehicle should be good to go. Remember, it’s important to regularly check and maintain your coolant system to prevent overheating and potential engine damage.
Positioning the Bucket
“Step 5: Open the Bleeder Valve and Fill the Coolant” Now that you have properly positioned the bucket underneath your car’s radiator, it’s time to move on to the next step in the coolant flushing process. This step involves opening the bleeder valve and filling the coolant to ensure that your radiator is running smoothly. Once you have located the bleeder valve, which is usually located near the top of the radiator, you can start the process by using an appropriate tool to turn it counterclockwise.
As you do this, you may notice a small amount of air or liquid escaping from the valve. This is normal and nothing to be alarmed about. With the bleeder valve open, it’s now time to replenish your coolant supply.
Make sure you have the correct type and amount of coolant for your specific vehicle, as using the wrong coolant can cause serious damage to your radiator. Slowly pour the coolant into the radiator, being careful not to spill any on the engine or surrounding components. As you fill the coolant, keep an eye on the radiator to make sure it doesn’t overflow.
If the coolant level gets too high, you can always use a funnel or a siphoning tool to remove any excess liquid. Once you have filled the radiator to the appropriate level, you can close the bleeder valve by turning it clockwise. By following these steps and properly filling your coolant, you are ensuring that your radiator is functioning at its best.
This will not only help to prevent overheating issues, but it will also prolong the life of your engine. So, take the time to properly fill your coolant and give your car the care it deserves.
Opening the Bleeder Valve
“bleeder valve”
Filling the Coolant Reservoir
After you have connected the coolant hose to the radiator, it’s time to move on to the next step: filling the coolant reservoir. This is an essential part of the cooling system as it helps regulate the engine’s temperature and prevents it from overheating. To do this, you will need to open the bleeder valve, which is usually located near the top of the radiator.
This valve allows any air trapped in the system to escape, ensuring that the coolant can flow freely. Once you have located the bleeder valve, use a wrench or pliers to open it. As you do this, you may hear a hissing sound as the air is released.
This is normal and nothing to worry about. Proceed to fill the coolant reservoir with the appropriate coolant mixture. Be sure to pour slowly and carefully to avoid any spills.
Keep filling the reservoir until the coolant reaches the “full” or “max” level indicator. Once you have reached the desired level, close the bleeder valve and check for any leaks. If you notice any leaks, tighten the valve or hose connections.
And there you have it – your coolant reservoir is filled and ready to go! So, don’t forget to give your cooling system some love and attention to keep your engine running smoothly.
Step 6: Purging the Air from the System
Once you have refilled your coolant system with fresh coolant, you will need to purge any air that may have become trapped in the system. This is an important step to ensure that your engine stays cool and operates efficiently. To bleed the coolant system, start by locating the bleeder valve.
This valve is usually located near the top of the radiator or on one of the coolant hoses. Use caution when opening the valve, as hot coolant may spray out. With the valve open, start the engine and allow it to run until the coolant starts to flow steadily from the bleeder valve.
This indicates that all of the air has been purged from the system. Be sure to close the bleeder valve securely to prevent coolant from leaking out. It’s also a good idea to double-check the coolant level in the reservoir and top up if necessary.
By properly bleeding the coolant system, you can ensure that your engine stays cool and prevent any potential overheating issues. Remember to always refer to your vehicle’s owner manual for specific instructions on bleeding the coolant system, as different vehicles may have different procedures.
Turning on the Engine
purging the air from the system
Allowing the Coolant to Flow
coolant flow
Step 7: Checking for Leaks and Repeating the Process
Alright, so you’ve gone through the process of bleeding your coolant system, but now it’s time to check for leaks and make sure everything is working properly. Checking for leaks is a crucial step that shouldn’t be skipped, as even a small leak can lead to big problems down the road. To start, visually inspect the hoses and connections for any signs of coolant leakage.
Look for wet spots, drips, or puddles around the hoses, radiator, and water pump. If you spot any leaks, you’ll need to identify the source and fix it before proceeding. Additionally, you can use a pressure tester to pressurize the coolant system and check for leaks.
Attach the pressure tester to the radiator or coolant reservoir and pump it up to the recommended pressure. Keep an eye out for any drops in pressure, as this could indicate a leak. If you find a leak during this test, carefully inspect the area to locate the source and repair it.
Once you’ve confirmed that there are no leaks, it’s time to repeat the bleeding process. This is especially important if you had to drain the coolant entirely or replace any components. Follow the same steps as before, making sure to burp the system and check the coolant level.
Repeat this process until you’re confident that your coolant system is free of air bubbles and functioning properly. And there you have it, a step-by-step guide on how to bleed your coolant system, check for leaks, and repeat the process if necessary. With a properly functioning coolant system, you can ensure that your engine stays cool and performs at its best.
Inspecting the System for Leaks
When it comes to inspecting the system for leaks, step 7 is crucial. Checking for leaks is essential to ensure the proper functioning and efficiency of the system. Leaks can lead to wasted resources, increased costs, and potential damage to the system.
So, how do you go about checking for leaks? Firstly, it’s important to visually inspect the entire system, looking for any signs of leakage such as puddles or damp areas. Additionally, you can use specialized tools such as pressure gauges or thermal imaging cameras to detect leaks that may not be immediately visible. Once you have identified a leak, it’s important to take immediate action to repair it.
This can involve replacing a faulty component, tightening fittings, or applying sealants. Finally, after completing the repairs, it’s important to repeat the process to ensure that all leaks have been resolved. By thoroughly inspecting the system and addressing any leaks, you can ensure optimal performance and longevity of your system.
So, don’t overlook this important step in maintaining your system’s efficiency.
Repeating the Bleeding Process if Necessary
bleeding process, repeating, checking for leaks, necessary In order to ensure that your hydraulic system is functioning optimally, it is important to check for leaks and repeat the bleeding process if necessary. After you have completed the bleeding process, it is crucial to inspect the system for any signs of leaks. Even a small leak can lead to a decrease in performance and eventually cause damage to the system.
Take some time to carefully examine all the connections and fittings to make sure that they are tightly secured and there are no visible signs of leakage. If you notice any leaks, it is important to address them immediately before proceeding. If everything looks good and there are no leaks, it is a good idea to repeat the bleeding process just to be sure that all the air has been successfully removed from the system.
This will help to ensure that your hydraulic system is in top-notch condition and ready to perform at its best.
Step 8: Closing the Bleeder Valve and Reinstalling the Cap
Now that you have successfully drained and refilled your coolant system, it’s time to close the bleeder valve and reinstall the cap. The bleeder valve is located near the top of the radiator and helps to release any trapped air in the system. To close the bleeder valve, simply turn it clockwise until it is tight.
Be careful not to over-tighten it, as this could cause damage. Once the bleeder valve is closed, you can now reinstall the cap onto the radiator. Make sure it is secure and tight to prevent any coolant from leaking out.
By closing the bleeder valve and reinstalling the cap, you have completed the final steps in bleeding your coolant system. Congratulations on a job well done! Now you can enjoy a properly functioning cooling system in your vehicle.
Closing the Bleeder Valve
Closing the bleeder valve is the final step in the process of bleeding a radiator, and it is a crucial one to ensure that the system is working properly. Once all the air has been released from the valve and only water is coming out, it is safe to close the valve. This can be done by turning the valve clockwise until it is tight.
It is important to make sure that the valve is completely closed to prevent any air from entering the system. Once the valve is closed, the next step is to reinstall the cap. The cap should be placed back on the radiator and tightened securely.
This will ensure that the system is sealed and prevent any water from leaking out. Closing the bleeder valve and reinstalling the cap may seem like a small step, but it is an important one to ensure that the radiator is functioning properly and efficiently. By taking the time to properly bleed the radiator and close the valve, you can prevent any further issues with your heating system and ensure that your home stays warm and comfortable.
Reinstalling the Radiator Cap
reinstalling the radiator cap
Step 9: Cleaning Up and Final Checks
Now that you’ve successfully flushed and refilled your coolant system, it’s time to clean up and conduct some final checks. Start by cleaning up any spills or drips you may have made during the process. Coolant is toxic, so be sure to dispose of it properly.
Next, you’ll want to double-check that all the connections are secure and tight. Give everything a quick visual inspection to ensure there are no leaks or loose parts. It’s also a good idea to check your coolant level one last time to make sure it’s at the appropriate level.
If it’s low, top it off with the necessary coolant mixture. Finally, start your engine and let it idle for a few minutes to allow the coolant to circulate throughout the system. Take note of any abnormal temperature readings or strange noises.
If everything seems to be in order, you’re all set. Congratulations on a successful coolant system bleed!
Disposing of Old Coolant and Materials
old coolant, dispose, materials, cleaning up, final checks, burstiness, perplexity
Inspecting for Proper Coolant Levels
In this final step of inspecting your coolant levels, it’s essential to take the time to clean up any mess and double-check everything before finishing up the task. Cleaning up is important because coolant spills can be hazardous for both you and your vehicle. Use a rag or paper towel to wipe up any spilled coolant, making sure not to leave any behind.
Dispose of the used towel properly to prevent environmental contamination. Once the cleanup is complete, it’s time for the final checks. Take a moment to inspect your radiator and hoses for any signs of leaks or damage.
Look for any loose connections and make sure everything is secure. This last step ensures that your coolant system is in proper working order and ready to keep your engine cool. Don’t rush through this step – take your time to ensure that everything is in good shape.
Conclusion
And there you have it, folks! Bleeding your coolant system is just like getting rid of stubborn air bubbles in your radiator’s rocket ship. Just remember, patience is key, because air bubbles are like that annoying friend who always shows up uninvited. But with a few simple steps and a little know-how, you’ll be back on the road in no time, leaving those air bubbles in your dust.
So, grab your wrench and get ready to make your coolant system run smoother than a well-oiled octopus playing a grand piano. Happy bleeding!”
FAQs
If you’re experiencing issues with your coolant system, such as overheating or a loss of coolant, it may be time to bleed the system. Bleeding the coolant system helps remove any trapped air, ensuring proper circulation and preventing further problems. To begin, make sure your engine is cool, then locate the radiator cap.
Slowly remove the cap, being cautious of any hot steam or coolant. Next, locate the bleed valve, typically found on the radiator or near the engine. Use a wrench to open the valve and allow any trapped air to escape.
You may hear a hissing sound as the air is released. Once all the air has been expelled, close the valve and replace the radiator cap. It’s important to check your coolant levels afterwards and top up if necessary.
Bleeding the coolant system can be a simple DIY task, but if you’re unsure or uncomfortable, it’s always best to consult a professional.
Additional Resources
If you’re experiencing issues with your coolant system, it may be time to bleed the system. Bleeding the coolant system involves removing any air pockets that may have developed, which can cause overheating or poor heating performance. While the process may seem intimidating, it’s actually quite simple.
To begin, you’ll need a few tools: a pair of pliers, a coolant drain pan, and a funnel. Start by locating the radiator cap and removing it – but only when the engine is cool! Then, find the bleed screw on the highest point of the coolant system. This is typically found on the thermostat housing or near the radiator.
Next, place the drain pan under the vehicle to catch any coolant that may spill. Use the pliers to loosen the bleed screw, being careful not to remove it completely. This will allow air to escape from the system as coolant is added.
Now it’s time to add coolant. Use the funnel to pour coolant into the radiator until it reaches the full mark. Keep an eye on the bleed screw as you do this; when coolant begins to leak from the screw, it means all the air has been bled from the system.
Once this happens, tighten the bleed screw and replace the radiator cap. Start your engine and let it run for a few minutes to ensure there are no leaks or further air bubbles in the system. Bleeding your coolant system is an important maintenance task that can help prevent serious engine damage.
By following these steps, you can keep your engine running smoothly and avoid any overheating issues.
FAQs
What is a coolant system and why is it important in a vehicle?
A coolant system is a system in a vehicle that helps regulate the temperature of the engine. It is important because it prevents the engine from overheating and protects it from damage.
How do I know if my coolant system needs to be bled?
Signs that your coolant system needs to be bled include fluctuating engine temperatures, coolant leaks, and a decrease in overall engine performance. If you notice any of these signs, it is important to bleed your coolant system.
What are the steps to bleed a coolant system?
The steps to bleed a coolant system include locating the bleeder valve, opening the valve, allowing the air to escape, and closing the valve once a steady stream of coolant is flowing through.
Can I bleed my coolant system on my own or do I need to take it to a professional?
It is possible to bleed your coolant system on your own if you have the necessary tools and knowledge. However, if you are not comfortable with doing it yourself, it is recommended to take your vehicle to a professional for assistance.
How often should I bleed my coolant system?
The frequency of bleeding your coolant system depends on various factors such as the age of your vehicle, the type of coolant used, and your driving conditions. It is generally recommended to bleed the system every 2-3 years or as recommended by your vehicle’s manufacturer.
What are the potential risks of not bleeding a coolant system?
Not bleeding a coolant system can lead to engine overheating, coolant leaks, decreased engine performance, and potential engine damage. It is important to regularly bleed your coolant system to avoid these risks.
Can I use any type of coolant to bleed my system?
It is recommended to use the specific type of coolant recommended by your vehicle’s manufacturer. Using the wrong type of coolant can potentially cause damage to your coolant system and engine. Always consult your vehicle’s manual or contact a professional for guidance.