
Have you ever dealt with a flat tire on your motorcycle? It’s a daunting challenge that requires a delicate touch, especially when it comes to breaking the bead. Breaking the bead on your motorcycle tire is necessary for both repairing a puncture and replacing it altogether. But where do you start? How can you break the bead without damaging the tire, rim, or yourself? We’ve got you covered.
In this blog post, we’ll explore the ins and outs of breaking the bead on your motorcycle tire. From essential tools to step-by-step instructions, you’ll learn all about this critical process and be better equipped to handle any flat tire situation that comes your way. So, strap on your helmet and let’s dive in!
Table of Contents
Understanding Your Motorcycle Tire
If you’re looking to change your motorcycle’s tire, you’ll need to know how to break the bead. The bead is the stiff part of the tire that fits tightly against the rim, providing the tire’s structure and keeping it securely in place. To break the bead, you’ll need a specialized tool called a bead breaker, which can be purchased at most motorcycle shops.
Once you have the tool, you’ll need to secure the tire and wheel in place, either using a vise or another method. Then, use the bead breaker to apply pressure to the tire’s center, breaking the bead loose from the rim. This will allow you to remove the tire and replace it with a new one.
As with any motorcycle repair, make sure to follow safety precautions and consult the owner’s manual for specific instructions. By knowing how to properly break the bead on your motorcycle tire, you can ensure a safe and successful tire replacement process.
Tire Anatomy
As a motorcycle rider, it’s essential to understand the anatomy of your tire to ensure your safety on the road. Each tire is made up of different parts, starting with the tread, which is responsible for providing traction and grip. The next layer is the carcass, which consists of cords that give the tire its strength and stability.
The sidewall is where you’ll find important information, such as the tire size, load index, and speed rating. Additionally, the bead is the part that connects the tire to the rim and keeps it in place. It’s crucial to check your tire pressure regularly and make sure it’s within the manufacturer’s recommended range.
Riding on underinflated or overinflated tires can lead to reduced traction, increased wear and tear, and even blowouts. Understanding your motorcycle tire’s anatomy and taking proper care of it can make all the difference in ensuring a safe and enjoyable ride.
Why Break the Bead?
Breaking the bead on a motorcycle tire is a task that many riders may not be familiar with. However, it is an essential part of maintaining and changing your motorcycle tires. The bead is the section of the tire that seals to the rim of the wheel, keeping the tire in place.
Breaking the bead simply means releasing the seal between the tire and the rim, to allow the tire to be removed from the wheel. This can be done using specialized tools or by using a simple tire spoon. Breaking the bead makes it possible to replace, repair, or rotate your tires, which is important for ensuring optimal traction, handling, and safety on the road.
Not breaking the bead can lead to damage to the tire or wheel, as well as potential safety hazards while riding. By understanding the basics of your motorcycle tire, including breaking the bead, you can maintain your bike’s performance, and enjoy a smoother ride overall.
Tools and Safety Precautions
Breaking the bead on a motorcycle tire can seem daunting, but with the right tools and safety precautions, it can be done safely and efficiently. To start, you will need a bead breaker tool, which can be purchased at most motorcycle supply stores. Before beginning the process, it is important to ensure that the tire is completely deflated.
Once the tire is deflated, place it on a steady surface and position the bead breaker tool on the edge of the tire where the bead meets the rim. Apply pressure to the tool to break the bead, then repeat on the opposite side. It is important to take safety precautions to avoid injury, such as using protective eyewear and gloves.
Breaking a bead on a motorcycle tire can be a challenging task, but with the right tools and precautions, it can be accomplished safely and effectively.
Tools Required
When it comes to DIY projects, having the right tools at hand is crucial. Not only does it make the job easier, but it also ensures that you get the job done properly and safely. Before starting any DIY project, it’s essential to have the necessary tools in your arsenal.
Some of the basic tools that you’ll need include a hammer, screwdrivers, pliers, and a tape measure. However, it is essential to keep in mind that different projects might require different tools, so it’s always useful to do some research beforehand. Additionally, it’s vital to practice safety precautions when using tools, including wearing protective gear such as gloves and safety goggles.
Always ensure that the tool you’re using is in good condition, and if you’re unsure of how to use a tool, don’t hesitate to ask for help. Overall, having the right tools and taking safety precautions can make all the difference in successfully completing your DIY projects.
Precautions and Safety Tips
When it comes to any DIY project, having the right tools and taking safety precautions can go a long way in preventing accidents. One key aspect is wearing appropriate safety gear like goggles, gloves, and a respirator, depending on the project. Another essential factor is using the correct tools for the job, such as a saw, drill, or hammer.
Using the wrong tool can not only damage the tool but also lead to injury. Additionally, it is essential to understand how to use each tool correctly and safely, which often includes reading the instruction manual. Before beginning any project, be sure to take the necessary precautions such as turning off the electricity, securing unstable items, and isolating the work area from children and pets.
Remember to work slowly and carefully, taking your time to ensure the project is done right. By following these tools and safety precautions, you’ll be on your way to a successful and accident-free DIY project in no time.
Step-by-Step Guide to Breaking the Bead
Breaking the bead on a motorcycle tire can be a challenging task, but with the right tools and knowledge, it can be done with ease. The first step is to remove the valve stem and deflate the tire, then use a bead breaker tool to loosen the bead from the rim. This tool can be purchased at most motorcycle shops or online retailers.
Once the bead is loosened, use tire irons to work around the rim, carefully separating the tire from the rim. It is important to work slowly and methodically to avoid damaging the tire or the rim. Once the tire is completely removed from the rim, the old tire can be replaced with a new one.
Breaking the bead on a motorcycle tire may seem daunting, but with the right approach and tools, it can be accomplished without too much difficulty.
Step 1: Remove the Wheel
Breaking the bead off a tire can be a tough job, but it’s a necessary step in order to remove the tire from the wheel. The first step in breaking the bead is to remove the wheel from the vehicle entirely, so you have easy access to all sides of the tire. Begin by loosening the lug nuts on the wheel with a lug wrench, but don’t remove them all the way just yet.
Once the lug nuts are loose, use a jack to lift the vehicle off the ground and place a jack stand underneath for safety. Then, remove the lug nuts completely, and gently pull the wheel off the hub. With the wheel off, you can now move onto the process of breaking the bead on the tire.
Remember to always exercise caution when working with heavy machinery and to follow all safety guidelines to ensure a successful and safe repair job.
Step 2: Deflate the Tire
When breaking the bead of a tire, it’s important to follow the steps correctly to avoid damaging the tire and wheel. The first step, as we covered in the previous article, is to remove the wheel from the vehicle and place it on a flat surface. Next, you’ll need to use a tire iron or pry bar to deflate the tire completely.
Ensuring that the tire is flat will help you break the bead more easily. It’s important to remember that some tires may still hold air even if it’s not enough to keep them inflated, so double-check to make sure it’s fully deflated. You can do this by pressing down on the center of the tire and listening for air escaping.
Once you’re sure the tire is deflated, you’re ready to move on to the next step of breaking the bead. By deflating the tire, you’ll be able to loosen the seal between the tire and the rim, making it easier to proceed with breaking the bead using the proper tools.
Step 3: Use Bead Breaker Tool
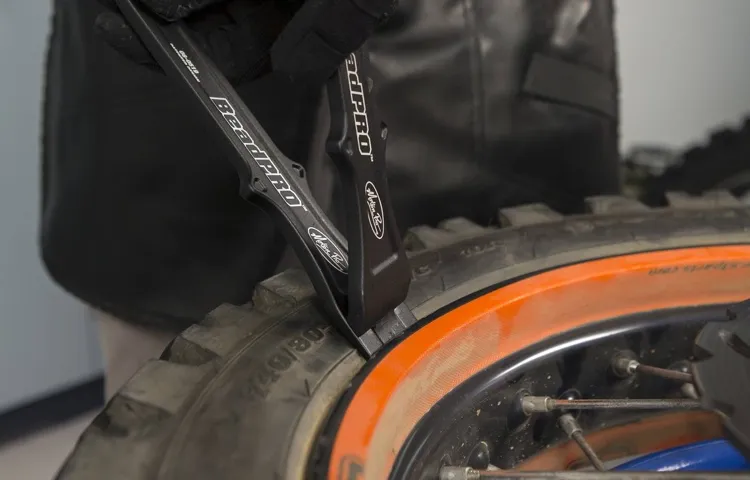
Breaking the bead on a tire can be quite a daunting task, but with the right tools and a bit of practice, it can be done with ease. The next step in the process involves using a bead breaker tool. This specialized tool is designed to apply pressure to the tire sidewall, which helps to create a gap between the rim and the tire bead.
There are various types of bead breaker tools available in the market, from manual handheld models to hydraulic-powered machines. Choose the type that best suits your needs, but keep in mind that it’s important to follow the manufacturer’s instructions when using these tools to avoid injury. Once you have the tool in hand, you’ll need to position it correctly on the tire sidewall and apply pressure slowly and steadily until you hear the satisfying sound of the bead breaking loose.
This step is crucial to the overall success of the process, as it allows you to dismount the tire from the rim without damaging either component. With a little practice and patience, you’ll be able to master the art of breaking the bead in no time.
Step 4: Work Your Way Around the Tire
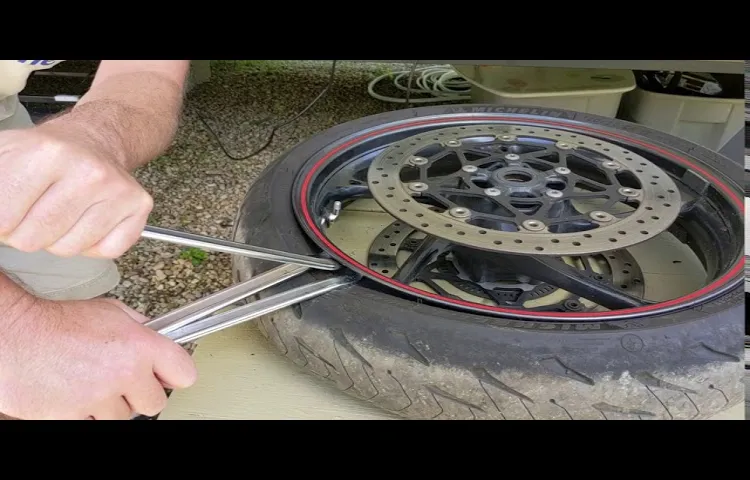
To break the bead of a tire, you need to work your way around the tire carefully. The bead is the part of the tire that sits on the rim, making sure that the tire stays in place and doesn’t slip off. The first step is to remove the valve core and then deflate the tire completely.
Once that is done, take a bead breaker or tire iron and place it between the tire and the rim. Make sure that it is sitting on the bead, and then push down repeatedly until the bead loosens. You can then move to the next part of the bead and repeat the process.
It is important to work slowly and carefully to prevent any damage to the tire or rim. Once you have broken the bead all the way around the tire, you can then take the tire off the rim. Keeping your focus while working is key, as breaking the bead can take some time and effort.
Remember to take breaks if necessary, and always prioritize your safety. With these steps, breaking the bead of a tire will be a breeze.
Step 5: Repeat on the Other Side
Now that you’ve broken the bead on one side of your tire, it’s time to repeat the process on the other side. This will ensure that the tire is evenly loosened from the rim and can be safely removed without damaging the tire or the wheel. Start by positioning the tire iron on the opposite side of the rim and pushing down with firm pressure to break the bead.
Remember to maintain a consistent angle and to use your body weight to provide extra force if needed. Wiggle the tire iron back and forth until the bead pops free, and then move on to the next section. It may take a few tries to get the hang of it, but with practice, you’ll be able to break the bead on both sides of your tire in no time.
Just remember to take your time and work carefully to avoid any accidents or mishaps. With persistence and patience, you’ll be able to change your own tires like a pro.
Putting It All Together
When it comes to motorcycle tire maintenance, one of the essential skills every rider must learn is how to break the bead on their tire. Doing this allows for easy removal of the tire from the rim, and it’s necessary for replacing or repairing the tire. To start, make sure you have the right equipment, including a bead breaker tool, rubber mallet, and valve core removal tool.
Begin by removing the valve core to release any air pressure in the tire. Next, position the bead breaker tool against the tire’s sidewall and apply pressure to break the bead loose. From there, gradually work your way around the tire with the bead breaker, ensuring you’re breaking the bead evenly.
When done correctly, the tire should easily come off the rim, and you can proceed with any necessary repairs or replacements. Remember to take your time and work carefully to avoid damaging the rim or the tire itself.
Reassembling Your Motorcycle Tire
When it comes to reassembling your motorcycle tire, it’s important to take your time and make sure all the pieces fit perfectly together. Start by placing the wheel on a stable surface and then installing the inner tube and tire onto the wheel rim. Make sure the tire is properly aligned with the rim, and then inflate the tire to the recommended pressure.
Next, reinstall any hardware that was removed during the disassembly process, such as the brake rotor or sprocket. Finally, mount the wheel back onto the motorcycle and torque the bolts to the manufacturer’s specifications. Remember, proper installation is key to ensuring your tire remains secure and performs correctly while riding.
Inflation and Testing
Inflation and Testing are two economic concepts that can have a significant impact on a country’s economy. Inflation refers to the overall increase in prices of goods and services over time. It can be caused by a variety of factors such as an increase in consumer demand, changes in the supply of goods and services, or changes in government policies.
Testing, on the other hand, is a process used to evaluate the quality and performance of products or services. This can range from product testing to software testing to ensure they meet quality standards. At first glance, these concepts may not seem related, but in reality, they are closely linked.
For example, companies that experience high inflation may have to cut costs in other areas, such as reducing their testing budget, to maintain profitability. This can have negative consequences for the quality of their products or services. Conversely, companies that invest heavily in testing may be better equipped to deal with inflationary pressures as they are likely to have more efficient processes in place to optimize their costs.
In essence, the relationship between Inflation and Testing highlights the importance of maintaining a balance between operational efficiency and quality optimization to ensure long-term success.
Conclusion
Breaking the bead on a motorcycle tire may seem like a daunting task, but with the right technique and tools, it can be done with ease. Just remember to approach it with patience and precision, and don’t be afraid to ask for help or watch some tutorial videos if you’re feeling unsure. And the next time someone asks you how to break a bead on a motorcycle tire, you can confidently say, “Well, it’s not rocket science, but it does require a little finesse – kind of like dismantling a bomb, only without the explosions (hopefully).
” Happy wrenching!”
FAQs
What tools do I need to break bead on a motorcycle tire?
You will need a tire changer or a bead breaker tool, a vehicle jack, tire irons, and a valve core removal tool.
How do I use a bead breaker tool to break the bead on a motorcycle tire?
Place the bead breaker tool onto the sidewall of the tire, correctly positioning the blade between the rim and the tire. Push the handle of the tool down to break the bead.
What is the proper way to jack up a motorcycle for tire maintenance?
Use a motorcycle stand or a vehicle jack that is designed for motorcycles to lift the bike from the ground. Make sure the bike is stable and secure before beginning any maintenance.
How much force do I need to use to break the bead on a motorcycle tire?
The amount of force required will depend on the tire and the bead breaker tool being used. Follow the instructions provided with the bead breaker tool and take care not to damage the tire or rim.
Can I break the bead on a motorcycle tire with just tire irons?
While it is possible to break the bead with just tire irons, it is not recommended as it can be difficult and potentially dangerous without the proper tools and experience.
What is the purpose of breaking the bead on a motorcycle tire?
Breaking the bead allows the tire to be removed from the rim for maintenance or replacement.
How often should I break the bead on my motorcycle tires?
The bead should be broken whenever the tire needs to be removed or replaced, which could be due to wear and tear or for seasonal storage.