
Changing a tire can be a frustrating and intimidating experience, especially if you’ve never done it before. But what happens if you’re on the side of the road with a flat tire, and no one is around to help? Knowing how to change a tire is a crucial skill for any driver, and it’s surprisingly easy to learn. In this blog post, we’ll be discussing the ins and outs of changing a tire, making it easier for you to feel confident the next time you experience a flat.
We’ve also included a helpful infographic that outlines the steps in an easy-to-understand format. Don’t let a flat tire ruin your day! By following the steps in our infographic, you’ll be back on the road in no time. So let’s dive in and learn how to change a tire like a pro!
Table of Contents
Gather Necessary Tools and Equipment
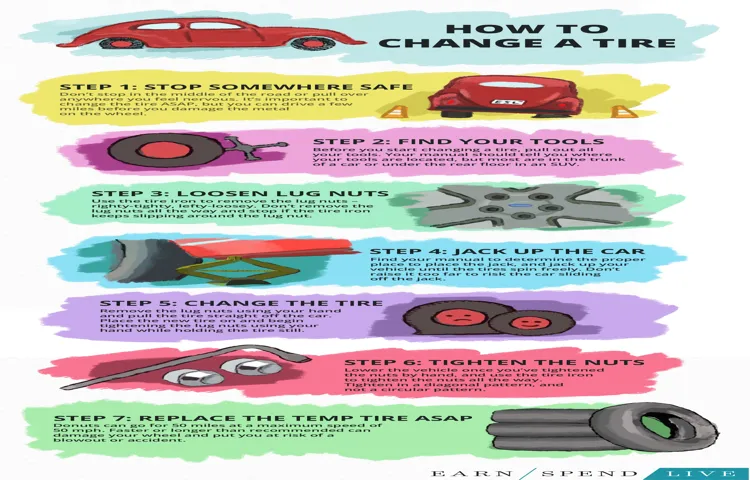
Changing a tire can be a daunting task, but having the necessary tools and equipment can make it much easier. Here’s an infographic that shows you all the tools you’ll need! You’ll need a lug wrench, a spare tire, a jack, and wheel chocks. The lug wrench is used to remove the lug nuts that hold the tire in place.
The spare tire will replace the flat tire that you will remove. A jack is crucial for lifting your car off the ground so you can replace the tire. And finally, wheel chocks are used to prevent the car from rolling while you work on it.
These are essential tools that you’ll need to successfully change a tire, so make sure you have them ready before you start!
Jack, Lug Wrench, Spare Tire
When it comes to car maintenance, one important task is to be prepared for a flat tire. This means having the necessary tools and equipment on hand to change the tire effectively. One essential item is a lug wrench, which is used to loosen and tighten the lug nuts that hold the tire in place.
Another necessity is a spare tire, which should be properly inflated and ready to use. And of course, don’t forget Jack, the device used to lift the car off the ground so the tire can be removed and replaced. All of these items make up a basic tire-changing kit that every car owner should have on hand.
It’s important to know how to use these tools properly, so consider practicing a tire change before you actually need to do it on the side of the road. With the right tools and knowledge, a flat tire doesn’t have to be a major inconvenience. Stay prepared and stay safe out there!
Park in a Safe Location
If you find yourself needing to change a tire, the first step is to find a safe location to park your car. Ideally, you want to pull over in an area with plenty of room to work, away from traffic. Look for a flat surface, as this will make the process of changing the tire much easier and safer.
Avoid parking in areas with a steep incline, as this can make the car unstable and increase the risk of an accident. It’s also important to turn on your hazard lights and engage your parking brake to ensure your car is visible and secured while you are changing the tire. By taking the time to find a safe location to change your tire, you can help to prevent accidents and injuries.
And remember, always keep a spare tire and jack in your trunk, so you’re prepared for any unexpected flat tires that may come your way. With these simple steps in mind, changing a tire can be a safe and straightforward process.
Flat Surface, Emergency Lights On
When driving, unforeseen circumstances can arise, and your safety should always come first. If your vehicle breaks down, it’s important to park in a safe location. Ensure that your car is on a flat surface, and turn on your emergency lights to warn other drivers.
Being in a safe location will protect both you and other drivers on the road. Additionally, parking in a safe area will make it easier for tow trucks or other emergency vehicles to locate and help you. So, if you ever find yourself in a situation where your car won’t start or breaks down, remember to prioritize your safety by parking in a secure location with your emergency lights on.
It’s a simple step that can potentially save lives.
Loosen Lug Nuts
If you’re ever in a situation where you need to change a flat tire, knowing the proper steps is vital to getting back on the road safely. One of the first things you’ll need to do is loosen the lug nuts on the flat tire so you can remove it. To do this, you’ll need to use a lug wrench or tire iron.
Place the lug wrench on one of the lug nuts and turn it counterclockwise to loosen it. Don’t remove the lug nut completely yet; just loosen it enough so you can remove it by hand once the car is jacked up. Repeat the process for all the lug nuts on the flat tire.
If you’re having trouble loosening any of the lug nuts, try using your body weight to help turn the wrench. Just remember to be careful and use your legs, not your back, to avoid injury. Once all the lug nuts are loosened, you’re ready to proceed with jacking up the car and removing the flat tire.
With these steps and a little practice, you’ll be a tire-changing pro in no time!
Use Force to Loosen Nuts
Loosening lug nuts can be a daunting task, especially when they’re tightened too much. This is where force comes into play. The key is using the right amount of force without damaging the lug nuts or the surrounding parts.
To start, use a lug wrench to apply a strong downward force while turning it counterclockwise. If the lug nuts won’t budge, try using a breaker bar or an impact wrench to apply even more force. Just remember to take breaks in between to avoid overheating the tool.
It’s important to note that using too much force can cause damage, so always be cautious and make sure to only use as much as needed. With patience and perseverance, you’ll be able to loosen those stubborn nuts in no time.
Turn Nuts Counter-Clockwise
Loosening lug nuts can seem like a daunting task, especially if you’re not familiar with the process. But don’t worry, it’s easier than you might think! The first step is to turn the nuts counter-clockwise. This will loosen them and make it easier to remove the tire.
But be careful not to loosen them too much, or the tire could fall off while you’re driving! A good rule of thumb is to turn each nut a quarter turn at a time until it’s loose enough to remove by hand. It’s also important to use the right tools, such as a lug wrench, to ensure you have enough leverage to loosen the nuts. With a little patience and the right technique, you’ll be able to loosen your lug nuts in no time!
Jack Up the Car
Changing a tire can seem daunting, especially if you’ve never done it before. But with the right steps and a little bit of practice, it’s actually quite easy. One of the most important steps is to jack up the car correctly.
First, locate your car’s jack points, which are usually indicated by a small bump or notch on the car’s frame. Then, place the jack under the appropriate point and elevate the car until the tire is off the ground. Be sure to use a sturdy surface like concrete or asphalt to prevent the jack from sinking into the ground.
Once the car is securely in the air, you can remove the lug nuts and change the tire. By following these steps and taking your time, you’ll be a pro at changing tires in no time. And remember, safety always comes first, so make sure you follow proper precautions and never attempt to change a tire on an incline or an unstable surface.
With this how to change a tire infographic, you can easily follow each step and change a tire on your own without needing any assistance.
Place Jack Under the Vehicle
If you need to change a tire or do some work underneath your car, the first step is to jack up the vehicle. Before you start, make sure you’re on level ground and turn on your hazard lights to ensure safety. Check your car’s owner manual to locate the correct point to position the jack.
Place the jack under the car, ensuring it’s aligned and centered with the specific location described in the manual. Once the jack is positioned properly, you can start to lift the vehicle. Depending on your jack, you may need to use a lever or a pump to lift the car.
Make sure you do so slowly and steadily, and keep an eye on the car to ensure it remains balanced. If the car seems to be leaning in one direction, adjust the jack and try again. Once the vehicle is lifted to the desired height, place a jack stand under the car, ensuring it’s positioned on a part of the frame that can bear the weight.
Use the same level of care and attention to detail when removing the jack, making sure to raise the car slowly and securely. That’s it! You’re ready to start working on your car. Remember, safety is a top priority when working on any vehicle, so always follow the correct procedures and use proper equipment.
Pump Jack Up and Secure
If you need to perform maintenance underneath your car, the first step is to jack it up and secure it properly. Using a pump jack is one of the easiest ways to do this. First, position the jack under a sturdy part of the car’s frame, such as the front or rear cross member.
Make sure the jack’s base is level on the ground and the jack’s saddle is centered on the car’s lifting point. Start pumping the handle up and down to lift the car off the ground slowly. Keep pumping until the car reaches the desired height, but make sure you don’t exceed the jack’s weight limit.
To be safe, place jack stands under the car’s frame before starting any work. When placing the stands, make sure they’re on a stable surface, such as concrete, and they’re positioned under the car’s frame rails. Lower the car onto the stands and make sure they’re securely in place before starting any work.
By jacking up and securing your car properly, you can work safely and efficiently underneath it without risking injury.
Remove the Wheel
If you ever find yourself in a situation where you need to change a tire on your own, don’t worry! With a little bit of practice, changing a tire can be a simple and straightforward process. The first step is to remove the wheel. Start by loosening the lug nuts with a lug wrench.
Once the nuts are loose, use a jack to lift the car until the tire is off the ground. Finish removing the lug nuts and carefully pull the wheel off the car. Be sure to keep the lug nuts in a safe place, as you will need them later.
With the wheel off, you can inspect it for any damage or wear and then proceed with installing the spare tire. Using this step-by-step process, you can change a tire quickly and effectively, even if you are not a mechanic. Make sure to keep the “how to change a tire infographic” handy for reference in case of emergencies.
Take Wheel off the Car
Removing the wheel of a car might sound like a daunting task, but with the right tools and techniques, it can be done with ease. First, start by loosening the lug nuts with a wrench while the car is still on the ground. Make sure to only loosen them and not completely remove them just yet.
Then, Jack up the car by placing the jack under the designated jacking point and slowly raising the car until the wheel is off the ground. Before fully removing the lug nuts, stabilize the car by using jack stands. Once the car is secure, remove the lug nuts and gently pull the wheel off.
It’s important to note that every car may have a different method for removing the wheel, so it’s always best to refer to the car’s manual for specific instructions. By taking these steps, you can easily remove the wheel and proceed with any necessary repairs or maintenance.
Place Wheel Under the Car
To place the wheel under the car, you first need to remove the wheel. This may seem like a daunting task but it’s actually quite simple. Begin by loosening the lug nuts with a lug wrench or impact wrench.
Once the lug nuts are loose, use a jack to lift the car off the ground. Place the jack under the designated spot, usually indicated by an arrow or notch on the frame of the car. With the car lifted, remove the lug nuts and carefully remove the wheel.
Make sure you keep the lug nuts in a safe place so you don’t lose them. Now that the wheel is off, it’s time to place it under the car. This may seem counterintuitive, but it’s actually an important safety precaution.
If the car were to fall off the jack, the wheel will serve as a buffer to prevent the car from crashing to the ground and causing injury or damage. Place the wheel under the car near the jack, but not directly under it. This will ensure that the weight of the car is distributed evenly and that the wheel can do its job properly.
Remember, safety is always the number one priority when working on a car. Taking the time to properly remove the wheel and place it under the car can prevent accidents and keep you and your car in good condition. So, take your time, follow the steps carefully, and always err on the side of caution.
Install the Spare Tire
If you find yourself with a flat tire, don’t panic! Changing a tire is a simple process that you can do yourself with a little know-how and some basic tools. The first step is to locate your spare tire, jack, and lug wrench in your trunk. Once you have everything you need, loosen the lug nuts on the flat tire with your lug wrench.
Next, use the jack to lift the car off the ground, making sure to place it on a sturdy and level surface. Then, remove the lug nuts and take the flat tire off. Install the spare tire in its place and hand-tighten the lug nuts before lowering the car back to the ground.
Finally, use the lug wrench to tighten the lug nuts in a star pattern, making sure they are snug. It’s important to remember that a spare tire is only meant to be a temporary solution and should be replaced with a proper tire as soon as possible. By following these simple steps, you’ll be back on the road in no time! And remember, safety should always be your top priority, so be sure to wear gloves and reflective clothing and stand away from oncoming traffic.
Line up Lug Bolts with Holes
When it comes to changing a flat tire, one of the most crucial steps is installing the spare tire. Once the tire is lifted onto the hub, it’s important to line up the lug bolts with the holes in the rim of the wheel. This step can be tricky, as the holes may not be immediately visible, especially if you’re changing the tire in low light conditions.
One helpful tip is to lightly spin the wheel as you guide the lug bolts towards the holes, allowing you to find them more easily. Once the bolts are lined up, begin tightening them with a lug wrench, using a criss-cross pattern to ensure that the tire is secured evenly. Remember to always double-check that the spare tire is properly secured before driving on it.
By taking the time to correctly install the spare tire, you can safely get back on the road. So, next time you find yourself with a flat tire, don’t panic – just remember to line up those lug bolts.
Hand Tighten Lug Nuts
When changing a flat tire, it’s important to install the spare tire properly. Begin by aligning the spare tire onto the wheel studs and tightening the lug nuts by hand. It’s crucial to make sure the spare tire is securely fastened before lowering the vehicle.
While you likely won’t have access to a torque wrench, you can still ensure the lug nuts are tightened correctly by using the “star” method. Start by tightening the lug nut at the twelve o’clock position, then tighten the nut directly across from it, followed by the nut at the three o’clock position, and so on. Once all the lug nuts are tightened, lower the vehicle to the ground and finish tightening the lug nuts with a wrench.
Remember to tighten them as much as possible, while being careful not to overtighten them and risk damaging the wheel studs. This will ensure that your spare tire is securely installed and ready to go, allowing you to continue on with your journey safely and efficiently.
Lower Car to the Ground
Changing a tire is an essential skill that every driver should have. When changing a tire, lowering the car to the ground is an important step that should always be taken. To achieve this, make sure that the car is in a safe position and put the gear shift in park.
Then use a jack to lift the car off the ground and locate the frame in the proper area. Once you have ensured that the car is in a secure position, slowly lower the car to the ground and remove the jack. It is important to remember that lowering the car too quickly can lead to damage or create a dangerous situation.
By following these simple steps for lowering a car to the ground, you can safely change a tire on your vehicle. Don’t forget that having a tire that is in good condition and properly inflated is key to staying safe on the road. Keep a spare tire and the necessary tools with you just in case of an emergency.
Stay safe and enjoy your ride!
Lower Jack Gently
Lowering your car to the ground can be a tricky and intimidating task, but it’s essential for anyone who wants to achieve an aggressive stance or improve their vehicle’s performance. One of the best ways to lower your car is by using a jack, but you have to be careful when doing so. A lowered car can be dangerous if it’s not done correctly, so you need to take your time and be patient.
Firstly, you’ll need to find the right spot to place your jack. The best spot is usually under the vehicle’s control arm or on the frame rail. Once you have the jack in place, start slowly lifting the car until you have enough clearance to place jack stands under the vehicle.
Keep in mind that you’ll need to lower the car slowly to make sure it’s done safely. It’s crucial to take it one step at a time and double-check everything as you go, making sure that everything is secure and safe. Overall, lowering your car can be a daunting task, but with the right tools and some patience, the result will make it all worth it.
Fully Tighten Lug Nuts
When it comes to the process of changing a tire, ensuring that the lug nuts are fully tightened is crucial. After you have replaced the tire, it’s important to lower your car back down to the ground before proceeding to tighten the lug nuts. Carefully lower the jack and keep an eye on the tire to make sure it is back on the ground.
Once it’s stable and on the ground, you can use your lug wrench to tighten the lug nuts. It’s important to tighten them all the way and make sure they are secure. This can prevent your tire from falling off while you are driving, which can be a major safety hazard.
Taking the time to fully tighten your lug nuts not only ensures your safety but will also give you peace of mind while you are on the road. Remember to check your owner’s manual for the recommended torque settings for your specific vehicle. By following these guidelines, you can ensure a safe and successful tire change every time.
Double Check Tightness
If you’ve ever had to change a tire, you know how important it is to make sure everything is tight and secure. One key step in the process is double-checking the tightness of the lug nuts. After you’ve replaced the flat tire with the spare, be sure to use a lug wrench to tighten the lug nuts as much as you can.
Then, take a moment to double-check them and make sure they’re all equally tight. You don’t want one lug nut to be loose while the others are tight, as this could cause your tire to wobble or even come off while you’re driving. This simple step can save you a lot of trouble down the road.
So, remember, when changing a tire, always double-check the tightness of the lug nuts before hitting the road. Check out our how to change a tire infographic for more tips on changing a tire safely and effectively.
Use a Torque Wrench if Available
When it comes to tightening bolts and nuts on your vehicle parts, it’s essential to ensure they are snug and secure. This is where a Torque Wrench comes in handy. If available, use it to effectively tighten fasteners to the manufacturer’s recommended level of tightness.
However, just using a Torque Wrench isn’t enough. It’s crucial to double-check the tightness of your fasteners after using a wrench. This is because there’s always a chance that bolts or nuts might loosen over time, even if they were tightened with a Torque Wrench.
Therefore, it’s imperative to periodically inspect and tighten your bolts or nuts to maintain the safety and reliability of your vehicle. So, avoid taking chances and use a Torque Wrench if available while ensuring the tightness of fasteners with a double-check.
Test Drive at Low Speeds
When test driving your car at low speeds, it’s important to double-check the tightness of your vehicle’s components. This means taking a little extra time to ensure that everything is properly secured, such as checking the engine compartment and undercarriage for any loose bolts or screws. It’s also a good idea to take note of any unusual noises or vibrations while driving slowly, as these could be signs of a loose or damaged component.
By doing a thorough check ahead of time, you can help prevent any potential safety hazards and ensure a smooth, comfortable driving experience. So take the time to give your car a once-over before hitting the road – it could save you a lot of trouble down the line.
Conclusion
Changing a tire may seem daunting, but with some knowledge and practice, you’ll soon be a tire-changing pro. Remember to always be prepared with the right tools and supplies, and don’t hesitate to ask for help if you need it. Being able to change your own tire is not only a useful skill, but also a great way to impress your friends and show off your mechanical expertise.
So next time you’re stuck with a flat, don’t panic – just follow these easy steps and you’ll be back on the road in no time!”
FAQs
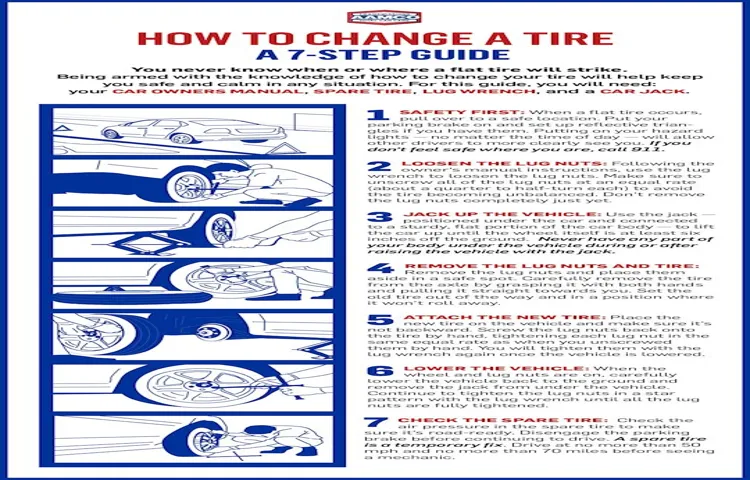
1. What are the steps involved in changing a tire? A: The steps involved in changing a tire are: – Find a safe location to change the tire – Loosen the lug nuts – Use a jack to lift the car off the ground – Remove the lug nuts and old tire – Mount the new tire on the wheel – Tighten the lug nuts – Lower the car back to the ground 2. Can I change a tire myself or should I call for help? A: It is possible to change a tire yourself if you have the right tools and knowledge, but if you are unsure or uncomfortable with the process, it is recommended to call for professional assistance. 3. What are the safety precautions to keep in mind while changing a tire? A: Some safety precautions to keep in mind while changing a tire are: – Find a safe location away from traffic – Use appropriate personal protective equipment – Make sure the car is securely supported by the jack – Follow the instructions in the owner’s manual 4. Is it okay to use the spare tire for an extended period of time? A: No, it is not recommended to use the spare tire for an extended period of time. It is a temporary solution and should be replaced with a regular tire as soon as possible. 5. How often should I check my tires for wear and tear? A: It is recommended to check your tires for wear and tear once a month and before long road trips. 6. What are some common causes of tire damage? A: Some common causes of tire damage are: – Punctures or cuts from sharp objects – Over-inflation or under-inflation – Overloading the vehicle beyond the specified weight limit – Driving on rough roads 7. How can I maintain my tires to increase their lifespan? A: Some ways to maintain your tires and increase their lifespan are: – Regularly check and adjust tire pressure – Rotate tires every 5,000 to 8,000 miles – Balance and align tires as needed – Keep tires clean and free of debris