
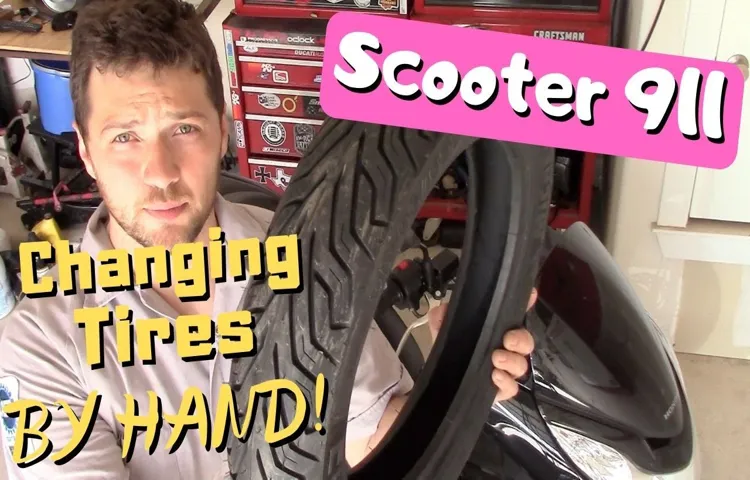
Dealing with a flat tire on a scooter can be frustrating, especially if it happens in the middle of nowhere or during rush hour on a busy street. But don’t panic just yet, changing a tire on a scooter is not as complicated as it may seem. With a little guidance and some basic tools, you can fix your tire and be back on the road in no time.
In this blog post, we will guide you through the step-by-step process of changing a tire on a scooter, giving you the confidence to handle this situation like a pro. Whether you’re a seasoned rider or a newbie, this guide will come in handy when you least expect it. So, let’s dive in and explore the ins and outs of changing a tire on a scooter.
Table of Contents
- 1 Tools and materials needed
- 2 Step-by-step guide
- 2.1 Step 1: Place the scooter on a flat surface
- 2.2 Step 2: Loosen the lug nuts using tire iron
- 2.3 Step 3: Use jack stand to lift the scooter
- 2.4 Step 4: Remove the tire using a tire iron
- 2.5 Step 5: Check the wheel hub and rim
- 2.6 Step 6: Place the new tire on the wheel hub
- 2.7 Step 7: Tighten the lug nuts back on
- 2.8 Step 8: Test drive and inspect the tire
- 3 Conclusion
- 4 FAQs
Tools and materials needed
Changing a tire on a scooter may seem daunting at first, but it’s a necessary skill to have for any scooter owner. In order to successfully change a tire, you’ll need a few tools and materials. First and foremost, you’ll need a new tire that is the correct size and type for your scooter.
You’ll also need a tire iron, which is used to remove the bolts from the wheel. A jack will also be necessary to lift the scooter off the ground and a lug wrench to remove the bolts holding the tire onto the scooter. Additional items that may come in handy include gloves to protect your hands, a flashlight if you’re changing the tire in low light conditions, and a container to hold the bolts and nuts so you don’t lose them.
With these tools and materials at hand, you’ll be ready to successfully change your scooter tire.
Tire iron
When it comes to changing a tire, having the right tools and materials on hand can make the entire process easier and less frustrating. One essential tool that you’ll need is a tire iron. A tire iron, also known as a lug wrench, is used to loosen and tighten the lug nuts that secure the tire to the vehicle.
To use a tire iron, you simply slip it over the lug nut and apply force to turn it counterclockwise to loosen the nut. Once the lug nuts are loosened, you can use a jack to lift the vehicle and remove the tire. When shopping for a tire iron, make sure to select the right size for your vehicle’s lug nuts.
Some tire irons also come with multiple sockets to fit different sizes of lug nuts, which can be a convenient option if you have multiple vehicles with different lug nut sizes. With a reliable tire iron in your trunk, you’ll be prepared to handle any unexpected flat tires that come your way.
Jack stand
One important tool every DIY mechanic should have in their garage is a reliable jack stand. Not only can a jack stand provide added safety when working on a vehicle, but it can also make certain jobs easier and more efficient. When choosing a jack stand, it is important to consider the weight capacity that will be needed for the specific vehicle or project.
It is also important to choose a jack stand that is made of durable materials, such as steel or aluminum, to ensure it can withstand heavy use over time. In addition to a jack stand, other tools and materials that may be needed include a hydraulic jack, a lug wrench, and a tire iron. By having these tools on hand and taking the necessary safety precautions, any DIY mechanic can tackle their next project with confidence.
New tire
When it comes to changing a tire, it’s important to have the right tools and materials on hand. First and foremost, you’ll need a spare tire that matches the size and specifications of your existing tires. You’ll also need a tire iron or lug wrench to remove the lug nuts that hold your current tire in place.
It may also be helpful to have a jack to lift your vehicle off the ground, as well as a tire pressure gauge to ensure your new tire is properly inflated. Additionally, consider keeping a flashlight and reflective triangle in your trunk to increase your safety and visibility while changing the tire. By having all of these tools and materials at the ready, you’ll be able to quickly and efficiently replace your flat tire with a brand new one.
Pliers
When it comes to DIY projects, having the right tools on hand can make all the difference in the final outcome. Pliers are one of the most versatile and essential tools to have in any toolbox. There are various types of pliers available, but some of the most common ones include needle-nose pliers, cutting pliers, and slip-joint pliers.
Before starting any DIY project that requires the use of pliers, it’s essential to make sure you have the right materials and tools. Apart from pliers, you may need additional materials like wire, screws, bolts, nuts, or cables, depending on the project at hand. Having quality pliers is crucial when working on projects that require a lot of handiwork, so investing in a good pair is always a smart decision.
Not all pliers are created equal, and choosing the right type and size is important for achieving the desired results. To sum it up, pliers are incredibly useful tools to have in your toolbox, and they come in handy for various DIY projects. Make sure to have the right type and size of pliers and any additional materials needed before starting a project to avoid any setbacks.
Having good quality tools and materials can make all the difference in the final outcome of your DIY project.
Screwdriver
When it comes to DIY projects or home repairs, a screwdriver is an essential tool to have in your arsenal. The first thing you will need is a good set of screwdrivers in different sizes and shapes. These can include flathead, Philips, or Torx screwdrivers.
You may also want to invest in a set of precision screwdrivers for smaller projects. Another important factor is the grip of the screwdriver. You want to make sure it is comfortable and provides a secure grip to prevent slipping.
Additionally, if you are working with electrical components, it is critical to have an insulated screwdriver to avoid any potential shock hazards. When using a screwdriver, it is essential to match the size and type of driver to the screw head to prevent stripping or damaging the screw. Overall, a good screwdriver set is a must-have for any DIY enthusiast or homeowner looking to tackle projects with confidence.
Step-by-step guide
Changing a tire on a scooter can seem daunting, but with a little know-how and the right tools, it’s a task that can be completed in no time. The first step is to locate a flat surface and secure the scooter so that it doesn’t roll away while changing the tire. Then, begin by loosening the lug nuts on the wheel you need to replace.
Next, use a jack to lift the scooter off the ground just enough to provide clearance for the tire to be removed. Carefully remove the lug nuts and place them in a safe location, along with the tire. Then, align the new tire onto the wheel hub and secure it with the lug nuts.
Finally, lower the scooter back down to the flat surface and use a torque wrench to tighten the lug nuts to the manufacturer’s specifications. Congratulations, you’ve successfully changed a tire on your scooter! Remember to check the tire pressure regularly and ensure that you always have a spare on hand in case of emergency.
Step 1: Place the scooter on a flat surface
When it comes to using a scooter for the first time, setting it up properly is crucial for both your safety and enjoyment. One of the first steps is to find a flat surface to begin assembling your scooter. This will ensure that you are able to properly align and attach all of the necessary parts.
Once you find a suitable location, remove the scooter from its packaging and make sure you have all of the necessary components. Then, lay the scooter out on the flat surface and double-check that all parts are connected securely. Remember, taking the time to set up your scooter properly can prevent accidents and provide a smoother, more enjoyable ride.
So take your time to ensure that your scooter is set up correctly, and get ready to hit the road with confidence!
Step 2: Loosen the lug nuts using tire iron
After putting on the emergency brake, the next step in changing your tire is to loosen the lug nuts using a tire iron. This is a crucial step that should not be overlooked. First, identify where the lug nuts are, which are located on the wheel hub under the center cap of your wheel.
Then, place the tire iron over the lug nuts and use your body weight to turn it counterclockwise until you feel it loosen. It’s important to make sure you have completely loosened the lug nuts before lifting the car, as this will prevent the wheel from spinning and potentially causing an accident. Remember, your safety is a top priority, so take your time and ensure you are using the correct technique.
By following this step-by-step guide, you’ll be well on your way to changing your tire in no time.
Step 3: Use jack stand to lift the scooter
When it comes to lifting a scooter, using a jack stand is a crucial step in the process. First and foremost, ensure that you have chosen a level and stable surface to place the jack stand on, as this will prevent any mishaps during the lifting process. To begin, locate the designated lifting point on your scooter, and carefully position the jack stand underneath it.
Make use of the jack handle to pump the lifting mechanism of the stand until the scooter is raised to your desired height. Remember to double-check that the scooter is balanced and secure before continuing with any further maintenance. By using a jack stand, you are taking the necessary precautions to ensure your safety and the safety of your scooter.
Don’t forget to always prioritize safety while working on your scooter to avoid any unnecessary accidents.
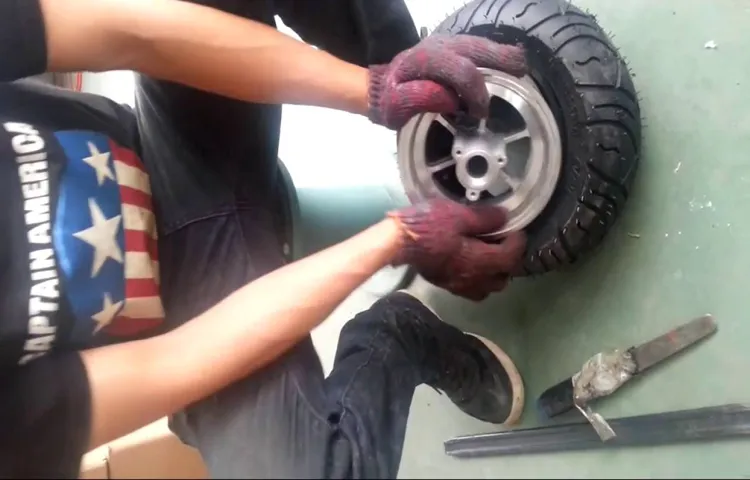
Step 4: Remove the tire using a tire iron
Removing a tire can be a daunting task, but with the right tools and technique, it can be done with ease. In this step-by-step guide, we’ll go over how to remove a tire using a tire iron. First, locate the lug nuts and loosen them by turning them counterclockwise with the tire iron.
It’s essential to loosen them before jacking up the car to avoid the tire spinning. Next, use a jack to lift the car, ensuring it’s stable before proceeding. Once the car is lifted, remove the lug nuts completely and place them in a safe spot before pulling the tire off the car.
Hold the tire with both hands, one on each side, and gently pull it towards you until it separates from the wheel hub. Finally, once the tire is removed, it’s essential to place it in a secure spot, out of the way of any traffic or passersby. Remember, safety first always.
By using this step-by-step guide, you can easily remove a tire without any fuss.
Step 5: Check the wheel hub and rim
When it comes to bike maintenance, it’s important not to overlook the wheel hub and rim. Step 5 of our guide focuses on this crucial element. Start by checking the wheel hub for any looseness, which could indicate worn bearings or a damaged axle.
If everything is tight, spin the wheel to check for any wobbling or dragging. This could signal that the rim is out of true and needs to be trued up. Truing a wheel involves gently bending the rim back into shape, using a spoke wrench to adjust the tension of each spoke until the rim runs smoothly and true.
This can be a tricky process, so it’s best to take your bike to a professional if you’re unsure. Once everything is in order, make sure the quick-release or axle is securely fastened before taking your bike out on the road. Don’t forget about the wheel hub and rim – a little bit of maintenance can go a long way!
Step 6: Place the new tire on the wheel hub
Now that you have removed the old tire, it’s time to place the new one on the wheel hub. Before you do so, make sure to double-check that the new tire matches the specifications of your vehicle. To begin, align the tire’s valve stem with the hole in the wheel hub.
This is important as it will allow for proper inflation and rotation. With the valve stem in position, lift the new tire and slide it onto the wheel hub. You may need to slightly rotate the tire to align the bolt holes with the wheel hub.
Once aligned, insert the lug nuts and tighten them by hand in a star pattern to ensure even tightening. Use a torque wrench to fully tighten the lug nuts to the manufacturer’s recommended torque specification. Finally, lower your jack and remove the wheel chocks or blocks.
Remember to test-drive your vehicle at a low speed before hitting the road to ensure that the tire has been mounted correctly. Following these simple steps will allow for a smooth and safe driving experience.
Step 7: Tighten the lug nuts back on
After successfully changing a tire, you need to tighten the lug nuts back on. Ensure that you use a criss-cross pattern to do this. That means starting with one lug nut and then tightening the opposite one next before moving to the next set of lug nuts.
Keep tightening until each lug nut is snug. Then, double-check the tightness of each one by using a lug wrench. Don’t over-tighten, though, as this could damage the tire or cause it to warp.
Instead, use your best judgment and a little muscle power to achieve the right level of tightness. With all the lug nuts in place, you’ll be ready to take your vehicle back on the road in no time. Just remember to drive slowly at first and check the tires periodically to ensure they’re secure.
Step 8: Test drive and inspect the tire
When it comes to buying a new tire, it’s important to not skip the final step of test driving and inspecting the tire to ensure it’s the right fit for your vehicle. Before hitting the road, take a few moments to visually inspect the tire for any bumps, bulges, or cuts on the tread or sidewall. Check the air pressure and make sure it matches the manufacturer’s recommended PSI.
Once you’re on the road, pay attention to the handling and comfort of the ride. Does the tire feel balanced and smooth or are there vibrations or wobbles? If you feel any irregularities, it’s best to have the tire checked by a professional to avoid any potential safety hazards. Remember, taking the time to test drive and inspect your new tire can save you money and prevent any future issues on the road.
Conclusion
In conclusion, changing a tire on a scooter may seem daunting, but with a little know-how, it’s a breeze. Remember to check your tire pressure regularly, carry a spare tire and the necessary tools, and take your time. And if all else fails, make friends with a mechanic…or a friendly AI digital assistant.
Happy scooting!”
Tips for maintaining scooter tires
Maintaining the tires of your scooter is crucial to ensure safe rides and prolong the life of your vehicle. Regular inspections and maintenance help detect any issues early on and prevent potential accidents and costly repairs. Here’s a step-by-step guide with tips to maintain your scooter tires.
First, check the air pressure regularly using a tire pressure gauge, keeping it within the manufacturer’s recommended range. Second, inspect the tread depth and look for any visible signs of wear and tear, like cracks, bulges, or punctures. Third, keep the tires clean and free from debris, as foreign materials can cause damage and punctures.
Fourth, avoid overloading the vehicle beyond its weight limit, which can put too much strain on the tires and cause them to wear out faster. Finally, during storage, keep the tires away from direct sunlight and sources of heat and keep them in a cool and dry place. These tips can help extend the life of your scooter tires and ensure smooth and safe rides for years to come.
Recap of the steps to change a tire
Changing a tire can be a daunting task, especially if it’s your first time. But don’t worry! It’s not as complicated as it may seem. In this step-by-step guide, we’ll show you how to change a tire quickly and easily.
First, make sure you have all the necessary tools: a spare tire, a jack, a lug wrench, and a wheel chock. Find a safe spot to pull over and put on your hazards. Next, use the lug wrench to loosen the lug nuts (but don’t take them off yet).
Then, jack up the car until the tire is about an inch off the ground. Remove the lug nuts and the flat tire, and replace it with the spare tire. Tighten the lug nuts by hand and lower the car back down to the ground.
Finally, use the lug wrench to tighten the lug nuts completely. And that’s it! You’ve successfully changed your tire. Remember to get your flat tire repaired or replaced as soon as possible.
With these simple steps, you’ll be back on the road in no time.
FAQs
What tools do I need to change a tire on a scooter?
To change a tire on a scooter, you’ll need a tire lever, a wrench, and a new tire.
How long does it take to change a tire on a scooter?
Changing a tire on a scooter can take anywhere from 20 minutes to an hour, depending on your experience and the complexity of the process.
Do I need to lift the scooter to change the tire?
Yes, you’ll need to lift the scooter to remove the tire. You can use a center stand or a jack to make this process easier.
What is the correct tire pressure for a scooter?
The correct tire pressure for a scooter can vary by model and manufacturer. Refer to your owner’s manual for the recommended tire pressure.
Can I change a scooter tire myself, or should I go to a mechanic?
If you have experience working with mechanics and feel confident, you can change a scooter tire yourself. However, if you’re unsure or uncomfortable, it’s best to take your scooter to a mechanic.
Can I repair a punctured scooter tire, or do I need to replace it?
Depending on the size and location of the puncture, you may be able to repair a scooter tire instead of replacing it. However, it’s important to assess the damage and determine if a repair is safe and effective.
How often do scooter tires need to be replaced?
Scooter tires typically need to be replaced every 5,000-10,000 miles, depending on usage and maintenance. Check your tires regularly for wear and tear, and replace them if necessary.