Have you ever looked at the fabric of your A&E Awning and thought it could use a change? Well, you’re not alone! Many RV owners find themselves wanting to update the look of their awning fabric at some point. Whether it’s because the fabric is faded, torn, or simply outdated, replacing it can give your RV a fresh new look. Changing the fabric on your A&E Awning may seem like a daunting task, but with a little bit of time and effort, it can be done.
Just think of it like giving your RV a makeover! And the best part is, you don’t need to hire a professional to do it. With the right tools and some patience, you can easily change the fabric yourself. So, how do you go about changing the fabric on your A&E Awning? Well, first you’ll need to measure the width and length of your existing fabric to determine the size you’ll need to replace it.
Once you have the measurements, you can order the new fabric online or from your local RV supply store. Next, you’ll want to gather your tools. You’ll need a ladder, a screwdriver or drill, and a friend to help you with the installation.
It’s always easier and safer to have someone to assist you when working at heights. Once you have everything ready, it’s time to remove the old fabric. This is where the ladder and screwdriver or drill come in handy.
You’ll need to carefully unscrew or unclip the old fabric from the awning frame. Be sure to take your time and be gentle to avoid damaging the frame or other parts of your RV. After you’ve removed the old fabric, it’s time to install the new one.
This is where having a friend to help you comes in handy. You’ll need someone to hold the new fabric while you secure it to the frame. Again, be gentle and take your time to ensure a proper fit.
Table of Contents
What is an A&E Awning?
An A&E awning is a type of awning that is commonly used on RVs or campers. It provides shade and protection from the sun and rain, allowing you to enjoy the outdoors no matter the weather. The fabric of an A&E awning can wear out over time due to exposure to the elements, and it may need to be replaced.
If you’re wondering how to change the fabric on an A&E awning, it’s actually quite simple. First, you’ll need to extend the awning fully so that you have access to the fabric. Then, you’ll need to remove any metal covers or brackets that are holding the fabric in place.
Once these are removed, you can carefully slide the old fabric out and replace it with the new fabric. Finally, reattach the metal covers or brackets to secure the new fabric in place. Changing the fabric on an A&E awning can give your RV or camper a fresh new look, and it’s a relatively easy DIY project that can save you money.
Definition of an A&E Awning
A&E awnings are a popular choice for many homeowners who want to add shade and protection to their outdoor space. But what exactly is an A&E awning? Well, an A&E awning is a type of retractable awning that can be easily extended or retracted depending on the weather conditions or your personal preference. It is typically made with a durable fabric material that is designed to withstand the elements and provide long-lasting durability.
One of the key features of an A&E awning is its ability to offer adjustable shade. This means that you can easily control the amount of shade that you have in your outdoor space by simply extending or retracting the awning. This is especially useful during hot summer days when you want to enjoy the outdoors without being exposed to the harsh sun rays.
In addition to providing shade, A&E awnings also offer protection from rain, wind, and other weather conditions. The sturdy fabric material and strong construction of these awnings make them capable of withstanding heavy winds and rain showers. This means that you can continue to enjoy your outdoor space even during a light rain shower or a windy day.
Furthermore, A&E awnings are also known for their stylish and sleek design. They come in a variety of colors and patterns, allowing you to choose one that matches your home’s exterior decor. Whether you have a modern, contemporary, or traditional style home, there is an A&E awning design that will complement your outdoor space perfectly.
Overall, A&E awnings are a great addition to any outdoor space. They provide adjustable shade, protection from the elements, and a stylish design. Whether you want to create a comfortable outdoor living space or simply enhance the curb appeal of your home, an A&E awning is a perfect solution.
So next time you’re considering adding some shade and protection to your outdoor area, consider installing an A&E awning.
Why Would You Want to Change the Fabric?
If you’re wondering why you would want to change the fabric on your A&E awning, there are a few reasons that might motivate you to do so. Firstly, the fabric on an awning can wear out over time, especially if it is constantly exposed to the elements. This can result in tears, fading, or general deterioration of the fabric.
Additionally, if you’re looking to update the look of your outdoor space, changing the fabric on your awning can give it a fresh new appearance. It’s also worth noting that some people may want to change the fabric to a different color or pattern to better match their home or personal style. Whatever your reason may be, changing the fabric on your A&E awning is a relatively simple process that can make a big difference in the overall look and functionality of your outdoor space.
Reasons for Changing the Awning Fabric
awning fabric change, reasons for changing awning fabric Changing the fabric of your awning might not be the first thing that comes to mind when you think about home improvement, but it can actually make a big difference in the overall appearance and functionality of your outdoor space. There are several reasons why you might want to consider changing the fabric on your awning. One of the most common reasons is simply wear and tear.
Over time, the fabric on your awning can become faded, torn, or damaged by the elements. This not only affects the aesthetic appeal of your awning but can also compromise its effectiveness in providing shade and protection from the sun. By replacing the fabric, you can give your awning a fresh, new look and ensure that it continues to serve its purpose in a functional way.
Another reason to change the fabric is to update the style or color scheme of your outdoor space. Just as you might change the cushions on your patio furniture or update the paint on your house, changing the fabric on your awning can help to refresh the overall look of your outdoor area. Whether you want to go for a bold, vibrant fabric to make a statement or a more neutral color to blend in with your existing decor, the options are endless.
Additionally, changing the fabric on your awning can also provide an opportunity to upgrade to a more durable or weather-resistant material. This is particularly important if you live in an area with harsh weather conditions or if your awning is constantly exposed to the elements. By investing in a higher-quality fabric, you can ensure that your awning will continue to withstand whatever Mother Nature throws its way.
In conclusion, whether it’s due to wear and tear, a desire for a new style, or the need for a more robust material, changing the fabric on your awning can be a worthwhile investment. Not only will it improve the aesthetics of your outdoor space, but it will also ensure that your awning remains functional and resilient for years to come. So why wait? Go ahead and give your awning a well-deserved upgrade!
Tools and Materials Needed
If you need to change the fabric on your A&E awning, there are a few tools and materials that you will need to get the job done. First, you will need a ladder or step stool to reach the awning. Next, gather up a tape measure, scissors, and a pencil for measuring and marking the fabric.
You will also need a screwdriver or drill to remove the awning from your RV or camper. Lastly, you will need the new fabric that you want to use for your awning replacement. Make sure to choose a fabric that is compatible with your awning and provides the level of shade and protection that you desire.
With these tools and materials on hand, you will be ready to tackle the task of changing your A&E awning fabric.
List of Necessary Tools and Materials for the Fabric Change
List of Necessary Tools and Materials for the Fabric Change When it comes to changing the fabric of a piece of furniture or undertaking a DIY upholstery project, having the right tools and materials on hand is crucial. Here is a list of the essential items you will need to successfully complete the fabric change: Upholstery fabric: The first and most important item on the list is the fabric itself.
Choose a durable fabric that suits your personal style and complements the existing décor of your space. Consider factors like color, pattern, and texture to find the perfect match.
Fabric scissors: A good pair of fabric scissors is essential for cutting the new fabric to size. Look for scissors with a sharp, pointed blade that can easily glide through fabric without snagging or tearing.
Staple gun: A staple gun will be your best friend during the fabric change process. Use it to secure the fabric to the furniture frame and create a smooth, taut finish. Make sure to invest in a high-quality staple gun that is easy to use and can hold a good amount of staples.
Staple remover: As you remove the old fabric, a staple remover will come in handy for taking out the staples holding it in place. Look for a sturdy staple remover with a sharp, curved tip that can grasp and remove staples with ease.
Foam padding: If the furniture you are working on has worn-out or sagging foam padding, it may need to be replaced. Purchase high-density foam padding in the appropriate thickness for a comfortable and supportive seat or backrest.
Step-by-Step Guide to Changing the Fabric
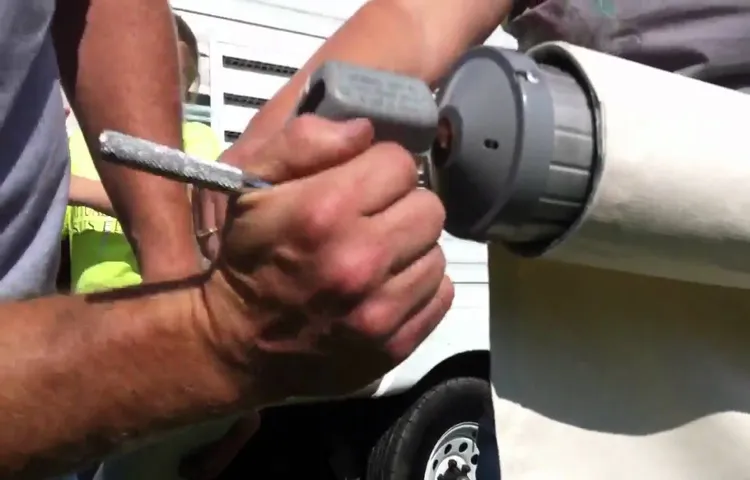
Are you tired of your worn-out A&E awning fabric and ready for a fresh new look? Changing the fabric on your awning is not as daunting as it may seem. With a few simple steps, you can give your awning a complete makeover. First, start by removing the old fabric from the roller tube.
This can usually be done by unscrewing the end caps and sliding the fabric out. Next, measure the length and width of your awning to determine the size of the new fabric you will need. Once you have the correct measurements, it’s time to install the new fabric.
Begin by sliding the new fabric onto the roller tube and ensuring that it is evenly distributed. Secure the fabric by tightening the end caps back into place. Now, it’s time to extend the awning and adjust the tension.
Use the awning’s control mechanism to extend the fabric fully and then adjust the tension to your desired level. Congratulations, you have successfully changed the fabric on your A&E awning! Now you can enjoy a fresh new look and continue to enjoy the shade and protection provided by your awning.
Preparing the Awning for the Fabric Change
preparing the awning for fabric change
Removing the Old Fabric
Changing the fabric on furniture can be a great way to freshen up your space and give your old pieces a new lease on life. If you’re considering taking on this DIY project, one of the first steps you’ll need to tackle is removing the old fabric. While it may seem like a daunting task, with a little know-how and some patience, it can be easier than you think.
Start by carefully inspecting your furniture and taking note of any upholstery staples or nails that are holding the fabric in place. Use a pair of pliers or a staple remover to gently lift and remove these fasteners. Once the old fabric is free, take your time to remove it completely, making sure to avoid tearing or damaging any underlying foam or padding.
With the old fabric out of the way, you’ll be ready to move on to the next steps of your fabric-changing adventure.
Measuring and Cutting the New Fabric
When it comes to refreshing the look of your furniture, changing the fabric can make a huge difference. But how do you go about measuring and cutting the new fabric? Don’t worry, I’ve got you covered with this step-by-step guide! First, start by measuring the dimensions of the areas of the furniture that you want to cover with the new fabric. Use a measuring tape to get accurate measurements and write them down.
Next, lay out the new fabric on a large, flat surface and use a fabric marker or chalk to mark the measurements you took earlier. Make sure to leave some extra fabric for seam allowances. Once you have everything marked out, it’s time to cut the fabric.
Use fabric scissors to cut along the marked lines, being careful to cut straight and avoid any jagged edges. Take your time and double-check your measurements before making any cuts to ensure a perfect fit. Once you have everything cut out, you’re ready to start attaching the new fabric to your furniture.
Attaching the New Fabric
When it comes to giving your furniture a fresh new look, nothing does the trick quite like changing the fabric. Whether you’re tired of the old pattern or looking to update the style, attaching new fabric is a great way to transform your furniture and give it a whole new lease on life. To start, you’ll need to gather the necessary tools and materials.
This includes your chosen fabric, a staple gun, scissors, a screwdriver (if your furniture has removable upholstery), and a seam ripper (if there are existing seams that need to be removed). Once you have everything ready, it’s time to get started. First, you’ll want to remove the old fabric from your furniture.
This may involve unscrewing any removable upholstery or using a seam ripper to carefully remove any existing seams. Take your time with this step to ensure that the old fabric is cleanly removed without damaging the furniture underneath. Next, it’s time to cut your new fabric to size.
Lay the fabric flat on a clean surface and place your furniture piece on top. Use your scissors to carefully cut the fabric to fit the shape of your furniture, leaving a few extra inches on each side to allow for stretching and stapling. Now comes the fun part – attaching the new fabric.
Start by securing one corner of the fabric to the furniture using your staple gun. Pull the fabric taut across the furniture and staple the opposite corner, making sure to keep the fabric evenly stretched. Continue this process, stapling along the edges of the fabric and working your way towards the center, until the entire piece is covered.
Once the fabric is attached, take a moment to smooth out any wrinkles or uneven areas. Use your staple gun to secure any loose edges or corners, and trim away any excess fabric as needed. If your furniture had removable upholstery, now is the time to reattach it using a screwdriver.
Finishing Touches
Changing the fabric of a piece of furniture can give it a fresh, updated look and make it stand out in your space. If you’re ready to take on this DIY project, follow this step-by-step guide to changing the fabric. First, gather all the necessary tools and materials, such as a staple gun, fabric, scissors, and a screwdriver if needed.
Next, remove the existing fabric carefully, making sure not to damage any of the underlying padding or structure. Once the old fabric is removed, measure and cut your new fabric to fit the dimensions of the furniture piece. After that, it’s time to start stapling the new fabric onto the frame, starting at one edge and working your way around, pulling the fabric taut as you go.
Finally, trim any excess fabric and secure the corners neatly for a polished finish. With a little patience and attention to detail, you can transform your furniture with a new fabric that suits your style and personal taste.
Tips and Tricks
Are you tired of looking at that old, worn-out fabric on your A&E awning? It’s time to give it a fresh new look! Changing the fabric on your A&E awning may seem like a daunting task, but with the right tools and a little know-how, you can easily tackle this DIY project. Start by measuring the existing awning fabric to ensure you purchase the correct size replacement. Once you have the new fabric, remove the old fabric by unrolling it and releasing any tension on the springs.
Next, detach the fabric from the roller tube and slide it out of the awning rail. Attach your new fabric to the roller tube using the provided screws or rivets. Make sure to align it properly and ensure it’s evenly tensioned.
Finally, slide the new fabric into the awning rail and secure it in place. Voila! Your A&E awning now has a stylish new fabric that will make your outdoor space look brand new. So go ahead, grab your tools and give your awning the makeover it deserves!
Helpful Tips and Tricks for an Easy Fabric Change
Tips and Tricks for an Easy Fabric Change Changing the fabric on furniture or home decor items can be a quick and easy way to give them a fresh new look. However, it can also be a bit intimidating if you’ve never done it before. Luckily, there are some helpful tips and tricks that can make the process go smoothly.
First, make sure you have all the necessary supplies. This includes the new fabric, a staple gun, scissors, and a screwdriver if you need to remove any hardware. Having everything you need on hand will save you time and frustration.
Next, take your time when removing the old fabric. Use a seam ripper or scissors to carefully cut away any stitching. Be careful not to damage the frame or padding underneath.
Once the fabric is removed, take note of any areas that need repair or extra padding. Before you start stapling the new fabric in place, it’s a good idea to iron it to remove any wrinkles or creases. This will help ensure a smooth and professional-looking finish.
It’s also a good idea to lay out the fabric and position the furniture or item on top of it to get an idea of how much fabric you will need. Taking accurate measurements will ensure that you have enough fabric and minimize waste. When stapling the new fabric, start at one corner and work your way around, pulling the fabric taut as you go.
It’s important to pull the fabric tight to avoid any wrinkles or sagging. Use enough staples to keep the fabric securely in place, but be careful not to use too many, as this can create a bulky and uneven look. Once the fabric is securely attached, use your scissors to trim away any excess fabric.
Conclusion
And there you have it, folks! Changing your A&E awning fabric is not as daunting as it may seem. With a little bit of time, patience, and a few tools, you can transform your old, worn-out awning into a stylish and functional addition to your outdoor space. Remember, practice makes perfect, so don’t get discouraged if your first attempt isn’t flawless.
Just keep at it, and soon you’ll be an awning fabric-changing pro! Now, you may be wondering, why go through all this trouble just to change your awning fabric? Well, let me tell you, the benefits are endless! Not only will a fresh, new fabric give your awning a brand new look, but it will also increase its durability and longevity. Plus, it’s a great way to show off your DIY skills to your friends and neighbors. Trust me, they’ll be awestruck when they see your perfectly customized awning.
So, what are you waiting for? Grab your tools, put on your DIY cap, and let’s get to work! Happy fabric changing, everyone!
Summary of the Awning Fabric Change Process
The process of changing the fabric on your awning can be a daunting task, but with a few tips and tricks, it can be a breeze. First, make sure to measure your awning properly to ensure you purchase the correct size fabric. It’s also important to choose a high-quality fabric that is UV resistant and durable, as this will ensure that it lasts for many years to come.
When removing the old fabric, be careful not to damage any of the awning’s hardware. Once the old fabric is removed, clean the awning frame thoroughly before installing the new fabric. When installing the new fabric, make sure to pull it tightly and evenly across the frame to avoid any wrinkles or sagging.
Finally, don’t forget to properly secure the fabric to the frame using the appropriate hardware. By following these tips and tricks, you’ll be able to successfully change the fabric on your awning and enjoy a fresh and updated look for your outdoor space. So why wait? Get started on your awning fabric change today and transform your outdoor area into an oasis of style.
FAQs
How often should I change the fabric on my A&E awning?
It is recommended to change the fabric on your A&E awning every 5-7 years, or sooner if you notice signs of wear and tear.
Can I change the fabric on my A&E awning myself, or do I need to hire a professional?
While it is possible to change the fabric on your A&E awning yourself, it can be a challenging and time-consuming task. It is recommended to hire a professional to ensure the job is done properly.
Where can I purchase replacement fabric for my A&E awning?
Replacement fabric for A&E awnings can be purchased from authorized dealers or online retailers that specialize in RV accessories and parts.
What tools do I need to change the fabric on my A&E awning?
The tools needed to change the fabric on an A&E awning may include a ladder, screwdriver, pliers, tape measure, and a helper to assist with removing and installing the fabric.
Are there different fabric options available for A&E awnings?
Yes, there are various fabric options available for A&E awnings, including different colors, patterns, and materials. It is important to choose a fabric that is specifically designed for awnings to ensure durability and proper fit.
Can I change the fabric on my A&E awning without removing the awning from my RV?
In some cases, it may be possible to change the fabric on an A&E awning without fully removing it from the RV. However, this will depend on the specific model and design of the awning.
What is the average cost to change the fabric on an A&E awning?
The cost to change the fabric on an A&E awning can vary depending on factors such as the size of the awning, the type of fabric chosen, and whether you hire a professional or do it yourself. On average, you can expect to spend between $200 and $500 for a fabric replacement.