Hey there RV enthusiasts! Are you looking to give your trusty home on wheels a little facelift? Well, look no further because we’re about to dive into the world of changing an RV awning. Whether you’re a seasoned pro or a newbie to the RV lifestyle, changing an awning can be a daunting task. But fear not! We’re here to walk you through the process step by step.
Picture this: you’re ready to hit the road and enjoy some much-needed outdoor adventure, but your old, worn-out awning is hanging on by a thread. It’s time for an upgrade. Just like changing the curtains in your house or getting a fresh coat of paint, changing your RV awning can breathe new life into your home away from home.
Not only will it improve the aesthetics of your RV, but it will also provide you with much-needed shade and protection from the elements. Now, you may be wondering, “Where do I even start?” Well, we’re here to break it down for you. Think of changing an RV awning as a puzzle.
Each piece fits together perfectly to create a beautiful and functional addition to your rig. From measuring and removing the old awning, to installing the new one and making sure everything is secure – it’s all about taking it one step at a time. So grab your tools and get ready to embark on this exciting DIY project.
We’ll guide you through the process, offering tips and tricks along the way. By the time we’re finished, you’ll be proud of your handiwork and ready to show off your newly transformed RV awning. So, are you ready to take your RV to the next level? Let’s get started on changing that awning and giving your home on wheels the upgrade it deserves!
Table of Contents
What is an RV awning?
Changing an RV awning may seem like a daunting task, but with the right tools and some patience, it can be a relatively simple process. First, you’ll need to gather the necessary supplies, including a replacement awning fabric, a ladder, and a power drill with the appropriate screws. Begin by extending the old awning fully and removing any attachments holding it in place.
Next, carefully remove the fabric from the roller tube, taking note of how it is attached for future reference. Once the old fabric is removed, unroll the new awning fabric, making sure it is aligned correctly with the roller tube. Use the power drill to secure the new fabric in place, taking care not to over-tighten the screws.
Finally, reattach any accessories or attachments that were removed in the first step. By following these steps and taking your time, you’ll have a new awning in no time.
Why would you need to change an RV awning?
If you own an RV, it’s likely that you’ll eventually need to change the awning. There are several reasons why you might need to do this. First and foremost, wear and tear can take a toll on the awning, especially if you frequently use your RV or have been in harsh weather conditions.
Over time, the fabric may become faded, torn, or damaged in some way. Additionally, if you’ve had an accident or collision, the awning may have been affected. In these situations, it’s important to replace the awning to maintain the functionality and aesthetics of your RV.
Changing an RV awning may sound daunting, but with the right tools and instructions, it can be a relatively straightforward process.
Before you start: Gather the necessary tools
Before you start changing your RV awning, it’s important to gather all the necessary tools. This will ensure that you have everything you need to complete the task efficiently. The tools you’ll need will vary depending on the type of RV awning you have, but some common tools include a ladder, a wrench, a screwdriver, and a measuring tape.
It’s also a good idea to have some extra screws and bolts on hand, just in case. By gathering all the necessary tools before you start, you’ll be able to tackle the job with confidence and avoid any unnecessary delays or frustration. So, take a few minutes to gather everything you need, and then you’ll be ready to get started on changing your RV awning.
List of tools needed
Before you start any DIY project, it’s essential to gather all the necessary tools so that you can work efficiently and effectively. Having the right tools on hand will save you time and ensure that the job is done correctly. Whether you’re working on a small repair or a large renovation, there are a few basic tools that every DIY enthusiast should have in their arsenal.
First and foremost, a good set of screwdrivers is a must. You’ll need different sizes and types of screwdrivers for various tasks, so it’s worth investing in a high-quality set. A tape measure is another essential tool that you’ll need for measuring and marking your materials.
A utility knife is handy for cutting through different materials, and a pair of pliers will come in handy for gripping and twisting. Other tools that you may need depending on your project include a hammer, a level, a drill, and a saw. Don’t forget about safety gear as well, such as goggles, gloves, and a face mask.
By gathering all the necessary tools before you start, you’ll be well-prepared to tackle your DIY project with confidence.
Step 1: Prepare your RV
One of the first steps in changing an RV awning is to prepare your RV for the process. This involves making sure that the area around the awning is clear of any obstacles or hazards. You will also want to make sure that you have all of the necessary tools and materials on hand, such as a ladder, a screwdriver, and the new awning fabric.
Additionally, it is recommended to have a friend or family member assist you during the process to help hold the awning in place while you work. By taking the time to properly prepare your RV, you can ensure a smooth and successful awning replacement.
Park your RV in a suitable location
“Park your RV in a suitable location” If you’re planning a road trip in your RV, it’s essential to find the perfect spot to park and set up camp. After all, your RV is not just a form of transportation, but also your temporary home on wheels. So, where should you park your RV? Well, the answer depends on your preferences and needs.
If you enjoy being close to nature, a campground or RV park with scenic views and amenities might be your best bet. On the other hand, if you prefer a more secluded and off-the-beaten-path experience, boondocking or dispersed camping in national forests or public lands could be the way to go. Whichever option you choose, make sure to consider factors like access to utilities, the levelness of the ground, and any potential restrictions or permits required.
By finding the right location to park your RV, you’ll set yourself up for a comfortable and enjoyable adventure on the road. So start exploring, and happy camping!
Clean the area around the awning
clean the area around the awning, prepare your RV
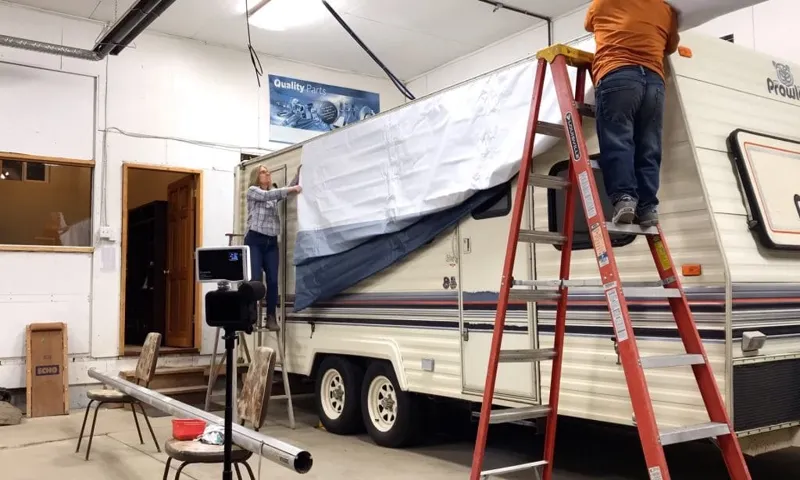
Step 2: Remove the old awning
To change an RV awning, the next step after gathering the necessary tools is to remove the old awning. This can be a bit tricky, but with some patience and careful maneuvering, it can be done. Start by locating the awning fabric and gently rolling it back up into the awning tube.
This may require some assistance to ensure it doesn’t unravel or get caught on anything. Once the fabric is safely rolled up, you can move on to removing the awning arms. These are typically held in place by screws or bolts, so use the appropriate tool to loosen and remove them.
Be sure to keep track of any hardware you remove, as you will need to reuse it when installing the new awning. Once the arms are detached, carefully lower the awning tube from its support brackets. This may require some assistance, as the awning tube can be quite bulky.
Once the old awning is completely removed, you can move on to installing the new one.
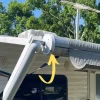
Locate the awning attachment points
To remove an old awning, the first step is to locate the awning attachment points. These attachment points are typically located on the sides of the awning, near the top. They may be made of metal or plastic and often have screws or bolts that secure the awning in place.
To easily find these attachment points, start by taking a close look at the awning itself. Look for any visible screws or bolts that may be holding it in place. You may also find small holes or indents where the attachment points are located.
Once you have located the attachment points, it is important to prepare for the removal process. This may involve gathering the necessary tools, such as a screwdriver or wrench, to loosen the screws or bolts. Before you begin removing the awning, make sure to take safety precautions.
This could include wearing gloves or safety glasses to protect yourself from any potential hazards. Once you are ready, carefully loosen and remove the screws or bolts from the attachment points. It is important to keep track of these fasteners, as you will need them when installing the new awning.
Once the attachment points are free, gently pull the awning away from the attachment points. Be cautious not to tug or force it, as this can cause damage to the awning or the structure it is attached to. Once the awning is fully detached, carefully set it aside and prepare for the next step in the installation process.
This may involve cleaning the attachment points or making any necessary repairs before installing the new awning. By following these steps and taking the necessary precautions, you can successfully remove an old awning in preparation for installing a new one.
Release the tension on the awning fabric
To successfully remove an old awning, the first step is to release any tension on the awning fabric. This is important because the tension is what holds the awning in place, and attempting to remove it without releasing the tension can lead to damage or injury. To release the tension, start by locating the awning’s control mechanism or crank.
This can usually be found on the outside of the building, near the awning. Use the crank to gradually and carefully unwind the fabric, taking care not to let it snap back quickly. As you unwind the fabric, you will start to feel the tension release, and the fabric will become looser.
Continue to unwind until there is no more tension on the fabric. Once the tension has been released, you are ready to move on to the next step of removing the old awning.
Disconnect the awning arms from the RV
In the second step of removing an old awning, you’ll need to disconnect the awning arms from your RV. Now, this may sound like a complicated task, but it’s actually quite straightforward once you know what to do. First, take a look at the awning arms and locate the screws or bolts that are holding them in place.
These screws or bolts will typically be at the top of the arms, where they attach to the RV. Grab your trusty screwdriver or wrench and start loosening them up. Once they are loose enough, you should be able to simply slide the awning arms out of their brackets.
Now, you may encounter some resistance here, especially if the awning arms have been in place for a long time. Don’t worry though, a little bit of patience and elbow grease should do the trick. Wiggle and jiggle the arms a bit while applying a bit of force, and they should eventually come free.
And just like that, your old awning arms are disconnected from your RV!
Step 3: Install the new awning
So, you’ve decided to change the awning on your RV, and now it’s time to install the new one. Don’t worry, it’s not as complicated as it may seem. Just follow these steps, and you’ll have your new awning up and ready to go in no time.
First, remove the old awning from your RV. Start by loosening the tension on the awning roll by using the awning rod. Once the tension is released, carefully slide the fabric out of the awning rail.
Be sure to keep the fabric organized and untangled as you remove it. Next, take your new awning and slide it into the awning rail. Make sure the fabric is straight and aligned properly.
Use the awning rod to roll the awning up, creating tension as you go. This will help secure the fabric in place. Once the fabric is in place, secure the awning arms to the side of your RV.
These arms will provide support and stability to the awning. In most cases, they can be easily attached using screws or bolts. Be sure to securely tighten them to ensure they don’t come loose while traveling.
Finally, test your new awning to make sure it’s working properly. Extend and retract the awning a couple of times to ensure it rolls smoothly and the fabric is properly tensioned. If everything looks good, congratulations! You’ve successfully installed your new awning.
Position the new awning fabric
“install new awning” Installing a new awning can instantly transform the appearance of your outdoor space, providing both shade and style. Once you have chosen the perfect fabric for your new awning, it’s time to position and install it. Start by laying out the fabric on a clean, flat surface, making sure it is completely unfolded and free from any wrinkles or creases.
Double-check the measurements of your awning frame to ensure the fabric is the correct size. Next, carefully position the fabric over the frame, aligning the edges and corners. It may be helpful to have a friend or family member assist you in holding the fabric in place while you secure it.
Using a staple gun or other appropriate fasteners, begin attaching the fabric to the frame. Start at one corner and work your way around, pulling the fabric taut as you go. Make sure to evenly space the staples or fasteners along the edges to ensure a secure hold.
Finally, trim any excess fabric, leaving a small margin for a clean and finished look. With the new fabric securely in place, your awning is now ready to provide both shade and style to your outdoor space.”
Reconnect the awning arms to the RV
In this step, we will reinstall the awning arms onto the RV. Once you have removed the old awning and cleaned the area, it’s time to install the new awning. Start by lining up the awning arms with the corresponding brackets on the RV.
Make sure they are aligned properly and then slide the arm into place. The awning arms should fit snugly into the brackets. Once both arms are in place, you can secure them using the provided screws or bolts.
Tighten them securely, but be careful not to over tighten and damage the arms or brackets. Once the arms are securely attached, give them a gentle tug to make sure they are secure. The awning should now be fully installed and ready to use.
Enjoy your new awning and make sure to properly maintain it to prolong its lifespan.
Attach the new awning fabric to the roller tube
The next step in installing a new awning is attaching the new fabric to the roller tube. This is an important step, as it ensures that the fabric is secured properly and will function correctly when the awning is operated. To attach the fabric, start by unrolling the new fabric along the ground, making sure it is facing the right way and positioned correctly.
Next, slide the fabric into the awning rail, being careful not to damage or tear it. Once the fabric is in the rail, you can begin attaching it to the roller tube. This is typically done by securing the fabric with screws or clips, depending on the design of your awning.
Make sure to follow the manufacturer’s instructions for properly attaching the fabric to the roller tube, as improper installation can lead to issues later on. Once the fabric is securely attached, you can begin operating your new awning and enjoying its benefits. By following these steps, you can ensure that your new awning is installed correctly and will provide shade and protection for years to come.
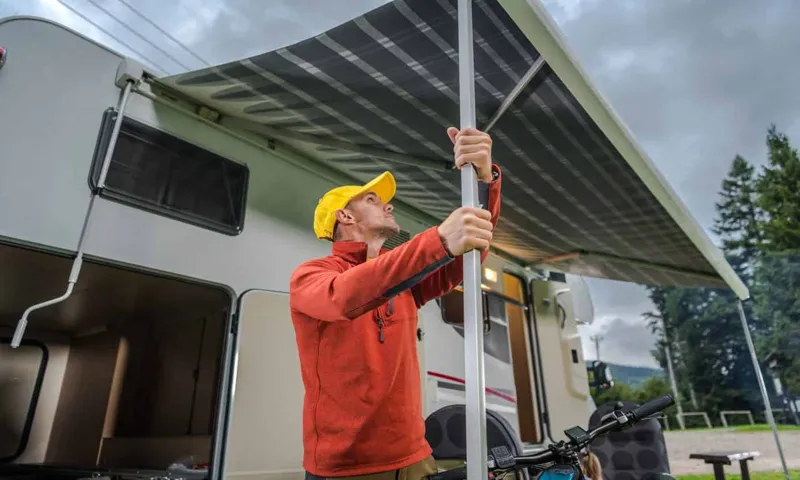
Step 4: Test the new awning
Now that you’ve successfully replaced your RV awning, it’s time to put it to the test! Step 4 is all about making sure your new awning is installed correctly and functions properly. Start by extending the awning out and double-checking that it is securely in place. Take a close look at the arms and brackets to ensure they are properly aligned and tightened.
Next, give the awning a gentle tug to make sure it is firmly attached and won’t come loose while driving. Once you’ve done that, it’s time to test the awning’s ability to provide shade and protection. Extend the awning fully and assess its coverage.
Is it providing enough shade for your needs? Is it straight and level, or does it sag in certain areas? Make any necessary adjustments to ensure the awning is positioned correctly. Finally, stand underneath the awning and observe its stability. Does it wobble or sway in the wind? If so, you may need to reinforce the supports to prevent any potential damage.
By thoroughly testing your new RV awning, you can ensure that it will perform as expected and provide you with years of enjoyment on your travels.
Extend and retract the awning
extend and retract the awning, test the new awning
Check for proper alignment and tension
awning installation, proper alignment and tension, how to test a new awning
Conclusion: Enjoy your new RV awning!
So there you have it, the ultimate guide on how to change an RV awning. By now, you should be a pro at dismantling and replacing those pesky old awnings with ease. Remember, patience is key, especially when it comes to dealing with stubborn bolts and fabric.
But fear not, for with a little bit of elbow grease and these handy tips, you can give your RV a much-needed facelift. Plus, you’ll be the envy of the campground with your newfound awning-changing expertise. So go forth, my friends, and banish those dingy old awnings from your RV.
Happy camping!”
FAQs
How do I change an RV awning?
Changing an RV awning involves a few steps. First, you will need to extend the awning fully. Then, locate the awning arms and detach them from the RV. Once the arms are detached, remove the retaining screws or bolts that hold the awning in place. Carefully slide out the old awning and replace it with a new one. Make sure to secure it properly and reattach the awning arms. Finally, test the awning by retracting and extending it a few times to ensure everything is working correctly.
Can I change an RV awning on my own?
Yes, you can change an RV awning on your own, but it’s important to be careful and follow the instructions closely. It may require some physical strength and patience, as awnings can be bulky and cumbersome to handle. If you’re not confident in your abilities, it’s always a good idea to consult a professional or seek assistance.
How often should I change my RV awning?
The lifespan of an RV awning can vary depending on various factors, such as usage, weather conditions, and maintenance. On average, an RV awning can last around 5-10 years. However, if you notice any signs of wear and tear, such as tears, holes, or fading, it’s recommended to replace the awning sooner rather than later to avoid further damage.
What tools do I need to change an RV awning?
The tools required to change an RV awning may vary depending on the specific awning model and installation method. However, some common tools that may be needed include a ladder, screwdriver or wrench, tape measure, drill (with appropriate bits), and a helper for assistance. Always refer to the manufacturer’s instructions or installation manual for the specific tools required for your RV awning.
Can I change the fabric of my RV awning without replacing the entire awning?
Yes, it is possible to change the fabric of your RV awning without replacing the entire awning frame. Many manufacturers offer replacement fabric for their awning models. To change the fabric, you will need to remove the awning arms, slide off the old fabric, and slide on the new one. Follow the manufacturer’s instructions for the specific steps and considerations for your RV awning model.
How much does it cost to change an RV awning?
The cost of changing an RV awning can vary depending on several factors, including the type and size of the awning, the brand, and any additional features. On average, the cost of a new RV awning can range from $200 to $1,000 or more. Keep in mind that this is just an estimate and prices may vary. It’s recommended to shop around and compare prices from different suppliers or RV dealerships to get the best deal.
Are there any safety precautions to consider when changing an RV awning?
When changing an RV awning, it’s important to prioritize safety. Always make sure to wear appropriate protective gear, such as gloves and safety glasses, to prevent any injuries. Use caution when handling heavy or awkwardly shaped parts, and be aware of your surroundings while working. If you’re not familiar with the process or feel unsure about anything, it’s best to consult a professional or seek assistance.