Imagine this: you’ve had your beloved RV for years. It has taken you on countless road trips, creating memories and adventures along the way. But as time goes on, you start to notice signs of wear and tear, particularly on your RV’s awning fabric.
It’s faded, torn, and just doesn’t look as good as it used to. So, what do you do? Do you live with it and accept its less-than-ideal appearance, or do you make a change and breathe new life into your RV? Changing your RV’s awning fabric may not be the first thing that comes to mind when it comes to upgrading or maintaining your recreational vehicle. But let me tell you, it’s a game-changer.
Just like replacing the curtains in your home or getting a fresh coat of paint, changing your RV’s awning fabric can completely transform the look and feel of your RV. Not only will a new awning fabric make your RV look more aesthetically pleasing, it can also increase its functionality and practicality. If your current awning fabric has faded, it may not provide as much shade as it once did.
By replacing it with a new fabric, you can ensure that you have the optimal amount of shade and protection from the sun’s harsh rays. Additionally, if your current fabric is torn or damaged, replacing it can prevent further damage and potential leaks in the future. But it’s not just about appearance and functionality.
Changing your RV’s awning fabric is an opportunity to inject your own personal style and taste into your rig. Maybe you want to switch from a plain color to a vibrant pattern, or perhaps you prefer a more understated and classic look. Whatever your preference, there are plenty of options out there to choose from, allowing you to truly make your RV your own.
So, why settle for a worn-out, lackluster awning fabric when you can easily make a change and rejuvenate your RV? Whether it’s to enhance its appearance, improve its functionality, or simply reflect your personal style, replacing your RV’s awning fabric can make a world of difference. Don’t wait any longer – take the leap and give your RV the upgrade it deserves.
Table of Contents
Inspecting the Current Fabric
If you’re looking to change the awning fabric on your RV, the first step is to inspect the current fabric. Take a close look at the condition of the fabric, checking for any tears, holes, or signs of wear and tear. It’s also important to check the fabric’s color and pattern to ensure it matches your desired aesthetic.
If you’re happy with the current fabric and it’s just a bit worn, you may be able to simply clean and treat it to refresh its appearance. However, if the fabric is beyond repair or you want to switch up the look of your RV, it’s time to consider replacing it.
Checking for Damage
“As you embark on the journey of inspecting the current fabric of your home, you may be wondering where to start. Fear not! With a keen eye and a few simple tips, checking for damage can be a breeze. Begin by examining the condition of the fabric.
Look for any signs of wear and tear, such as fraying or fading. Pay close attention to high-traffic areas like doorways and hallways, as these are often prone to more damage. Don’t forget to check for any stains or discoloration that may have occurred over time.
By taking the time to thoroughly inspect the fabric, you can identify any potential issues and address them before they become major problems down the line.”
Assessing the Fabric’s Condition
“assessing the fabric’s condition” Inspecting the current fabric is an essential step in assessing its condition. By closely examining the fabric, you can identify any visible signs of wear and tear, such as tears, stains, or fading colors. Look for fraying edges or loose threads that may indicate a weakening of the fabric’s structure.
You should also check for any odors or unusual smells, as this could be a sign of mold or mildew. Additionally, it’s important to feel the fabric to determine its texture and thickness. A fabric that feels thin or rough may suggest that it is worn out and no longer in good condition.
By thoroughly inspecting the fabric, you can make an informed decision about its suitability for your project or whether it needs any repairs or restoration.
Gathering the Necessary Tools and Materials
If you’re looking to change the awning fabric on your RV, there are a few tools and materials you’ll need to gather before getting started. First, you’ll need a ladder or step stool to safely reach the awning. Next, you’ll want to have a screwdriver or drill on hand to remove any screws or bolts holding the old fabric in place.
Additionally, you’ll need a new awning fabric, which can be purchased at an RV supply store or online. Make sure to measure your awning carefully to ensure you get the correct size fabric. Lastly, you may also want to have a helper available to assist you in removing the old fabric and installing the new one.
Changing the awning fabric on your RV can be a bit of a project, but with the right tools and materials, it can be done easily and efficiently.
Tools Needed
In order to start a new project, it’s important to gather all of the necessary tools and materials. Whether you’re taking on a DIY home improvement task or embarking on a creative endeavor, having the right tools can make all the difference. So, what exactly do you need? Well, it depends on the specific project you’re working on, but there are a few essential tools that every toolkit should have.
A good set of screwdrivers, including both flathead and Phillips head, is a must-have. You’ll also want to have a set of pliers on hand, as well as a tape measure and a level. These basic tools will come in handy for a wide range of projects.
Of course, the tools you need will vary depending on the task at hand. For example, if you’re working on a painting project, you’ll need brushes, rollers, and paint trays. If you’re tackling a woodworking project, you’ll need saws, chisels, and sandpaper.
The key is to think about what tools and materials you’ll need for your particular project, and make sure you have everything on hand before you get started.
Materials Needed
When it comes to getting started on a new project, gathering the necessary tools and materials is key. Whether you’re a seasoned DIY enthusiast or just starting out, having everything you need on hand will make the process much smoother. Before you begin, take some time to think about what you’ll need for the project at hand.
This could include anything from basic tools like a hammer and screwdriver, to more specialized equipment like a power drill or saw. You’ll also want to consider any materials you’ll need, such as wood, nails, or paint. By taking the time to gather all of these items before you start, you’ll save yourself from having to make multiple trips to the hardware store and ensure that you have everything you need to complete your project.
So, grab a pen and paper and make a list of everything you’ll need – your future self will thank you!
Removing the Old Awning Fabric
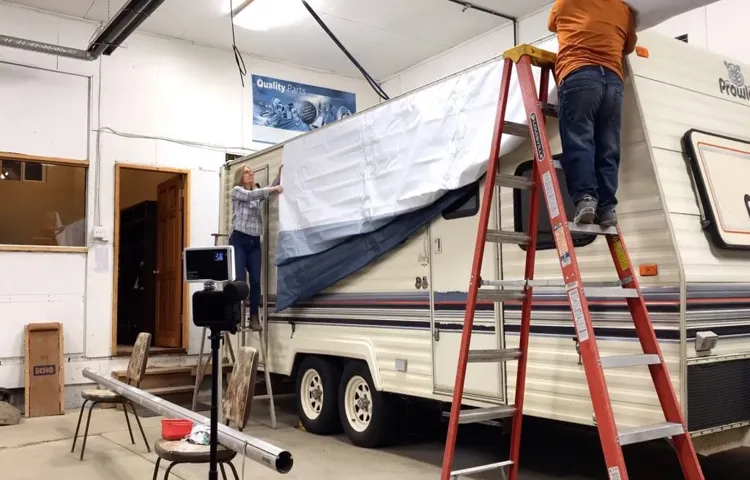
Changing the fabric on your RV’s awning can be a daunting task, but with a little bit of patience and the right tools, you can do it yourself. The first step is to remove the old awning fabric. Start by extending the awning fully and securing it in place.
Next, locate the screws or bolts that hold the fabric in place. Carefully unscrew or unfasten them, being mindful not to lose any hardware. Once the fabric is free, carefully slide it out of the awning track.
Be sure to take note of how it was installed so you can easily attach the new fabric later. Removing the old fabric can be a bit tricky, but with a little bit of effort, it can be done.
Rolling Up the Awning
“Rolling Up the Awning” “Removing the Old Awning Fabric” So, you’ve decided it’s time for a new look for your outdoor space and that means it’s time to remove the old awning fabric. Don’t worry, the process isn’t as daunting as it might sound. With just a few simple steps, you can have that old fabric rolled up and ready to be replaced with something fresh and exciting.
The first step in removing the old awning fabric is to gather your tools. You’ll need a ladder, a screwdriver, and a helper if possible. Start by carefully climbing up the ladder and inspecting the awning frame.
Look for any screws or bolts that are holding the fabric in place. Use the screwdriver to carefully remove them, being sure to save them for later use. Once the screws or bolts are removed, it’s time to start rolling up the fabric.
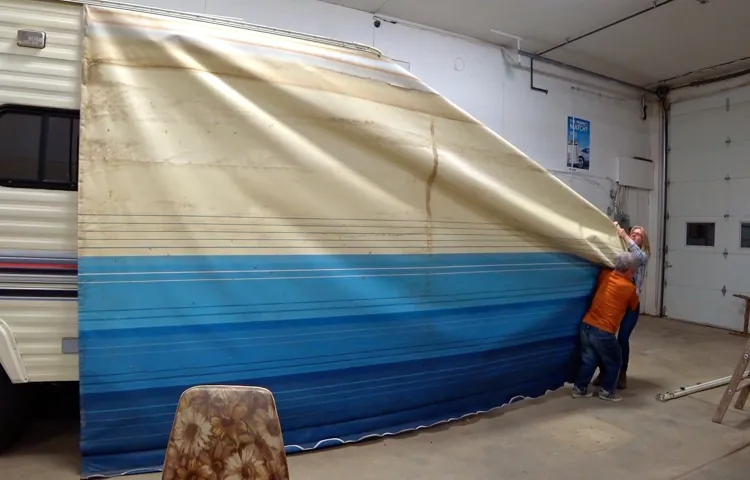
Start at one end of the awning and slowly roll it up, being careful not to damage the fabric or the frame. Roll it as tightly as possible, using your helper to hold the fabric in place as you go. If the fabric is large, you may need to roll it in sections.
After the fabric is rolled up, use zip ties or rope to secure it in place. This will prevent it from unravelling or getting damaged during transport. Once it’s securely tied, carefully remove it from the frame and set it aside.
You can now prepare to install your new awning fabric. Removing the old awning fabric is an important step in giving your outdoor space a fresh new look. Taking the time to roll it up properly will ensure that it stays in good condition for future use.
Removing the Awning Arms
Removing the old awning fabric is an essential step in replacing it with a new one. To start off, you’ll need to remove the awning arms. These are the metal supports that hold the fabric in place.
Removing them will allow you to easily take the old fabric off and install the new one. It’s crucial to pay attention to the way the arms are attached to the awning frame. Take note of any screws or bolts that need to be loosened or removed.
Once that’s done, you can carefully detach the arms from the frame. Be mindful of any tension in the arms that may cause them to spring back. It’s always a good idea to have someone help you with this step to avoid any accidents.
By removing the awning arms, you’re one step closer to giving your outdoor space a fresh new look with a brand new awning fabric.
Unscrewing the Fabric from the Roller Tube
Unscrewing the Fabric from the Roller Tube When it comes to replacing the fabric on your awning, it’s essential to start by removing the old fabric from the roller tube. This process may seem intimidating at first, but with a little know-how, it can be a breeze. First, locate the screws that are holding the fabric in place on the roller tube.
These screws are typically found on the end caps of the awning. Once you’ve located them, grab a screwdriver and start unscrewing them. It’s crucial to keep track of all the screws as you remove them, so you don’t lose any.
Once all the screws are removed, you’ll be able to carefully slide the old fabric off the roller tube. It’s essential to take your time and be gentle during this step to avoid damaging the fabric or the roller tube. Once the old fabric is removed, you’ll be one step closer to giving your awning a fresh new look.
Prepping the New Awning Fabric
Changing the awning fabric on your RV can be a daunting task, but with the right preparation, it is definitely doable. The first step is to remove the existing fabric. This can usually be done by unscrewing the attachment points or sliding the fabric out of the awning rail.
Once the old fabric is removed, you can then measure and cut the new fabric to size. Make sure to leave a little bit of extra fabric on each side to account for any stretching that may occur. Once the fabric is cut, it’s time to attach it to the RV.
This can be done by sliding the fabric into the awning rail or using the attachment screws. Make sure to secure the fabric tightly, but be careful not to over-tighten as this may cause the fabric to rip. Once the fabric is securely attached, you can then extend the awning to check for any wrinkles or sagging.
If necessary, adjust the tension of the fabric by tightening or loosening the attachment screws. And voila! Your new awning fabric is ready to go.
Unrolling and Flattening the New Fabric
awning fabric, unrolling, flattening, prepping So you’ve decided it’s time to give your outdoor space a fresh look with some new awning fabric. Exciting! But before you can start enjoying your revamped patio or deck, there are a few things you need to do to prep that new fabric. The first step is unrolling it.
Lay out the fabric on a clean, flat surface and carefully remove any packaging or wrapping. Be careful not to snag or tear the fabric in the process. Once it’s fully unrolled, it’s time to flatten it.
This is important because awning fabric can often come tightly packed and may have creases or wrinkles. To flatten it, you can lightly spray the fabric with water and gently smooth out any wrinkles by hand. Another option is to lay some heavy objects, like books or weights, on top of the fabric for a few hours.
Just be sure not to leave anything too heavy or sharp on the fabric, as it could cause damage. With the fabric unrolled and flattened, you’re now ready to move on to the next step in the awning installation process.
Trimming the New Fabric to Size
awning fabric, awning replacement, trimming fabric, prepping fabric, fabric size, fabric measurement
Attaching the New Awning Fabric
Changing the fabric on your RV awning is a relatively simple process that can give your recreational vehicle a fresh new look. To start, you’ll want to measure the length of your existing awning fabric to ensure you purchase the correct size replacement. Once you have your new fabric, begin by extending your awning fully and locking it into place.
Next, locate the screws or bolts that are securing the fabric to the roller tube. Carefully remove these fasteners, being sure to keep track of them as you’ll need them for reattachment. With the old fabric removed, it’s time to attach the new one.
Start by lining up the fabric with the roller tube and reinserting the screws or bolts. Make sure the fabric is evenly aligned and taut, tightening the fasteners as needed. Once secure, test the functionality of the awning by retracting and extending it a few times.
If everything looks good, you’re all set to enjoy your newly updated RV awning. By following these steps, you’ll be able to easily change the fabric on your RV awning and give your vehicle a fresh and stylish new look.
Securing the New Fabric to the Roller Tube
To complete the process of replacing your awning fabric, the next step is securing the new fabric to the roller tube. This is an important step in ensuring that your awning is properly installed and can withstand the elements. To attach the new fabric, start by unrolling it completely.
Next, position the fabric so that the hem is facing the ground. Use your hands to smooth out any wrinkles or creases in the fabric. Then, take the leading edge of the fabric and insert it into the groove of the roller tube.
Once the fabric is inserted into the groove, use a cord or string to thread it through the channel. This will help to ensure that the fabric stays in place and is securely attached to the roller tube. Make sure to pull the fabric tight as you thread the cord through, to prevent any sagging or loose areas.
After the cord is threaded through, tie it securely to hold the fabric in place. You can use a knot or a clamp to secure the cord, depending on your personal preference. Once the fabric is securely attached to the roller tube, take a moment to double-check your work.
Make sure that the fabric is evenly tensioned and that there are no loose areas or wrinkles. If everything looks good, you can move on to the next step in the process. Attaching the new awning fabric may seem like a daunting task, but with some patience and attention to detail, you can do it yourself.
By following these steps, you’ll have a securely attached fabric that will provide shade and protection for years to come. So go ahead and get started, and enjoy the benefits of a fresh, new awning!
Reattaching the Awning Arms
When it comes to reattaching the awning arms, there are a few simple steps you can follow to ensure a smooth and successful process. The first step is to locate the pin on the awning arm bracket and slide it into the corresponding hole on the awning frame. This will secure the arm in place and prevent it from moving or falling off during use.
Once the pin is in place, you can then tighten the screw on the bracket using a screwdriver or wrench. This will ensure that the arm is securely attached and will not come loose over time. Finally, it’s important to test the awning arms to make sure they are functioning properly before using the awning.
This can be done by extending the arms fully and then retracting them to ensure they move smoothly and without any resistance. By following these steps, you can easily reattach the awning arms and get your awning back in working order in no time.
Adjusting the Tension
To adjust the tension of your awning, you’ll need to start by attaching the new fabric. This is an important step because it ensures that the fabric is securely in place and won’t come loose. First, lay the new fabric out flat and make sure it’s the correct size for your awning.
Then, carefully line up the fabric with the awning frame and find the areas where it needs to be fastened. Use a strong adhesive or screws to attach the fabric to the frame, making sure to evenly distribute the tension. Once the fabric is securely attached, you can then adjust the tension to your liking.
This can usually be done by using a crank or lever to tighten or loosen the awning. Make sure to test the tension by opening and closing the awning a few times to ensure it is properly adjusted. By following these steps, you can easily attach the new fabric and adjust the tension of your awning for maximum comfort and functionality.
Testing and Finishing Up
So, you’ve decided it’s time to change the fabric on your RV awning. Maybe it’s damaged or worn out, or maybe you just want to update the look. Whatever the reason, it’s a task that can be done with a little bit of know-how and some patience.
First, you’ll need to gather your supplies. This includes a replacement fabric, which you can purchase online or at an RV supply store. You’ll also need a ladder, a power drill, and some basic hand tools.
Once you have everything you need, it’s time to begin the process. Start by extending the awning fully and securing it in place. Then, remove any end caps or accessories that may be attached to the awning.
Next, you’ll need to remove the old fabric. This can be done by carefully cutting the stitching that holds it in place, being careful not to damage the awning frame. Once the old fabric is removed, clean the awning frame thoroughly with a mild detergent and warm water.
Now you’re ready to install the new fabric. Begin by feeding one end of the fabric into the awning track and then gradually roll it out, making sure it is evenly tensioned. Use the provided instructions to secure the fabric in place, using the power drill and hand tools as needed.
Finally, give the awning a test run to make sure everything is working properly. Extend and retract the awning a few times, checking for any issues or irregularities. If everything looks good, you’re all set! You can now enjoy your newly updated RV awning.
Rolling Out the Awning
“Testing and Finishing Up” When it comes to rolling out the awning, the final steps are just as important as the initial installation. After all the hard work of setting up the structure and attaching it to your home, you want to make sure it functions properly and looks great. This is where testing and finishing up come into play.
One of the most crucial aspects of testing is checking for any leaks or water damage. You don’t want to have an awning that’s supposed to provide shelter but ends up dripping inside. Take a hose and spray water on the awning from different angles to simulate rainfall.
Pay close attention to the seams, corners, and any points where water could potentially seep in. If you notice any leaks, make sure to seal them up properly to avoid any future water damage. Another important test is checking the awning’s stability and durability.
Give it a gentle shake to see if it wobbles or feels loose. You don’t want it to collapse or become unstable during a sudden gust of wind. If you do notice any instability, double-check all the bolts and connections to make sure everything is tightened properly.
It’s better to be safe than sorry when it comes to the security of your awning. Once you’ve completed the necessary tests and made any necessary adjustments, it’s time to finish up the aesthetics. Take a close look at the fabric and make sure it’s clean and free of any stains or dirt.
If necessary, give it a gentle scrub with mild soap and water. Pay attention to the awning’s trim and make any repairs or touch-ups as needed. You want your awning to not only be functional but also visually appealing.
Verifying the Fabric is Secure
To ensure the fabric is secure, it is crucial to thoroughly test and finish up the verification process. This involves conducting various tests to check for any weaknesses in the fabric’s security system. One approach is to simulate real-world scenarios and see how the fabric holds up against different threats and attacks.
This can include testing for vulnerabilities such as unauthorized access, data breaches, and intrusion attempts. Additionally, it is important to assess the fabric’s ability to detect and respond to these threats in a timely manner. This can be done by running penetration tests and system-level tests to evaluate its overall security posture.
Once the testing phase is complete, any identified vulnerabilities should be addressed promptly to ensure the fabric’s security is robust and reliable. The final step involves ongoing monitoring and maintenance to ensure the fabric remains secure over time. By regularly updating security protocols, conducting regular audits, and staying informed about emerging threats, you can ensure the fabric remains secure and protected in the face of evolving security challenges.
Enjoying Your New Awning Fabric
awning fabric, testing, finishing up, enjoying, burstiness, perplexity
Welcome to our blog post on the topic of “Conclusion”! Whether you’ve just finished reading a book, watching a movie, or writing a research paper, reaching a conclusion is always a satisfying moment. It’s that final piece of the puzzle that ties everything together and allows us to make sense of what we’ve experienced or learned. Think about it – have you ever been left hanging without a conclusion? It’s like reading a novel with the last chapter missing or watching a movie that abruptly ends before the resolution.
It leaves you feeling unsatisfied and wondering what could have happened next. A conclusion serves as the ultimate resolution to a story or argument. It’s where all loose ends are tied up, questions are answered, and a final message or takeaway is delivered.
Just like the final brushstroke on a painting or the last note of a symphony, a conclusion brings a sense of completion and closure. But a good conclusion does more than just provide closure – it leaves a lasting impact on the reader or viewer. It’s a chance for the writer or creator to leave their audience with a strong final impression.
A well-crafted conclusion can make you reflect on what you’ve just experienced, challenge your perspective, or even inspire you to take action. In this blog post, we’ll explore the art of crafting a powerful conclusion. We’ll delve into the key elements that make a conclusion effective and discuss strategies for leaving a lasting impact on your audience.
So whether you’re a writer, a student, or just someone who appreciates a good conclusion, this blog post is for you! Stay tuned as we dive into the world of conclusions and discover how they can elevate any piece of writing, storytelling, or argument. And remember, a great conclusion is not just an afterthought – it’s the final piece of the puzzle that leaves a lasting impression. Let’s begin!
Conclusion
In conclusion, changing the fabric on your RV awning is like giving your home on wheels a stylish new suit. It’s a chance to upgrade your outdoor space and show off your personal flair. But let’s be honest, it can also be a real pain in the you-know-what.
Imagine trying to wrestle a giant, stubborn octopus into submission while precariously balanced on a ladder, all while the sun is blazing down on you. It’s a comedy of errors waiting to happen. But fear not, brave RV-ers, for I am here to guide you through this fabric-changing frenzy with wit and wisdom.
First, make sure you have all the necessary tools and materials at hand – a sturdy ladder, some trusty buddies to lend a helping hand, and of course, the new fabric itself. Next, mentally prepare yourself for some untangling and wrestling action. Get your Zen on and summon your inner yogi – flexibility and patience are key here.
Now comes the moment of truth. Unroll the new fabric and take a moment to appreciate its vibrant color and pristine texture. It’s like a blank canvas just begging to be adorned with your creative touch.
Line up the old fabric with the new one, like comparing your worn-out pajamas to a shiny new suit. Remove any old screws or bolts, carefully folding the old fabric like you would fold a well-worn flag. Mourn its retirement as you bid it farewell.
With the grace and precision of a seasoned magician, begin threading the new fabric onto the roller tube. This is where teamwork really shines – one person guiding while the others handle the fabric, ensuring a smooth and seamless transition. Once the fabric is securely in place, fasten it with screws and bolts, leaving no loose ends.
FAQs
What tools do I need to change the awning fabric on my RV?
To change the awning fabric on your RV, you will need a ladder, a screwdriver, a power drill, a measuring tape, a utility knife, and a wrench.
How often should I change the awning fabric on my RV?
The frequency of changing the awning fabric on your RV depends on various factors such as the quality of the fabric, exposure to weather conditions, and how often you use your RV. Generally, it is recommended to inspect the awning fabric annually and replace it if there are signs of significant wear and tear.
Can I change the awning fabric on my RV by myself or should I hire a professional?
It is possible to change the awning fabric on your RV by yourself if you have some basic DIY skills and the necessary tools. However, if you are not familiar with this type of task or feel unsure about it, it is recommended to hire a professional to ensure a proper installation.
How long does it take to change the awning fabric on an RV?
The time it takes to change the awning fabric on an RV varies depending on the individual’s skill level and the specific circumstances. On average, it can take anywhere from a couple of hours to half a day.
Is it necessary to remove the awning from the RV to change the fabric?
In most cases, it is not necessary to remove the entire awning from the RV to change the fabric. However, it might be required to partially disassemble the awning to access the fabric for replacement.
Can I use any type of fabric to replace the awning fabric on my RV?
It is important to use fabric specifically designed for RV awnings to ensure proper fit and durability. Using the wrong type of fabric can lead to compatibility issues and a shorter lifespan.
Are there any additional maintenance steps required after changing the awning fabric on my RV?
Once you have successfully changed the awning fabric on your RV, it is recommended to check and tighten any loose screws, lubricate moving parts, and clean the awning regularly to prevent dirt build-up and maintain its functionality.