
Hey there! Are you feeling a little overwhelmed about changing the coolant in your car? Don’t worry, you’re not alone. Many people find the idea of changing their car’s coolant to be a daunting task. But fear not, it’s actually a relatively simple process that you can do yourself with just a few tools and a little bit of know-how.
Think of changing your car’s coolant as giving it a refreshing drink. Just like how you would replenish your body with a glass of water on a hot day, your car needs its coolant to keep its engine cool and running smoothly. Over time, coolant can get contaminated with debris and lose its effectiveness, which is why it’s important to change it regularly.
So, how do you go about changing your coolant? First, you’ll need to gather some tools, including a drain pan, a socket set, and some new coolant. You’ll also want to make sure your car is parked on a flat surface and has cooled down completely before you begin. Safety first! Next, locate your car’s radiator and look for the drain plug.
It’s usually at the bottom of the radiator, but double-check your owner’s manual to be sure. Place the drain pan underneath the plug, unscrew it, and let the old coolant drain out. Simple enough, right? Once the old coolant has been drained, it’s time to add in the fresh stuff.
Locate the radiator cap and remove it. This will allow the air to escape as you pour in the new coolant. Slowly pour in the coolant until the radiator is full, and then replace the cap.
Easy-peasy! But wait, there’s more! To ensure that all the old coolant has been flushed out, you’ll want to run your car for a few minutes with the heater on. This will help circulate the new coolant throughout the system and ensure that everything is working properly. And that’s it! Changing your car’s coolant may have seemed like a big task at first, but now you know that it’s actually quite simple.
Table of Contents
Introduction
Changing the coolant in your vehicle is an essential maintenance task that can help keep your engine running smoothly and prevent overheating. If you’re looking to learn how to change coolant, don’t worry – it’s a relatively simple process that you can do yourself with just a few tools and some basic knowledge. Before you start, make sure you have the right type of coolant for your vehicle, as well as a drain pan, a funnel, and a hose clamp or pliers.
Begin by locating the radiator drain valve, which is typically located on the bottom of the radiator. Place the drain pan underneath the valve to catch the coolant as it drains out. Open the valve and allow the coolant to drain completely.
Once the old coolant has drained out, close the valve and remove the radiator cap. Use the hose clamp or pliers to disconnect the hose from the radiator. Attach the funnel to the radiator and pour in the new coolant.
Be sure to check your vehicle’s owner’s manual for the correct coolant-to-water ratio. Once the coolant is filled to the appropriate level, reattach the hose and tighten the clamp or pliers. Finally, replace the radiator cap and start the engine, allowing it to run for a few minutes to circulate the coolant.
Check the coolant level again and top it off if necessary. And that’s it – you’ve successfully changed the coolant in your vehicle! Regularly changing your coolant is an important part of vehicle maintenance, so be sure to keep it on your to-do list.
What is Coolant?
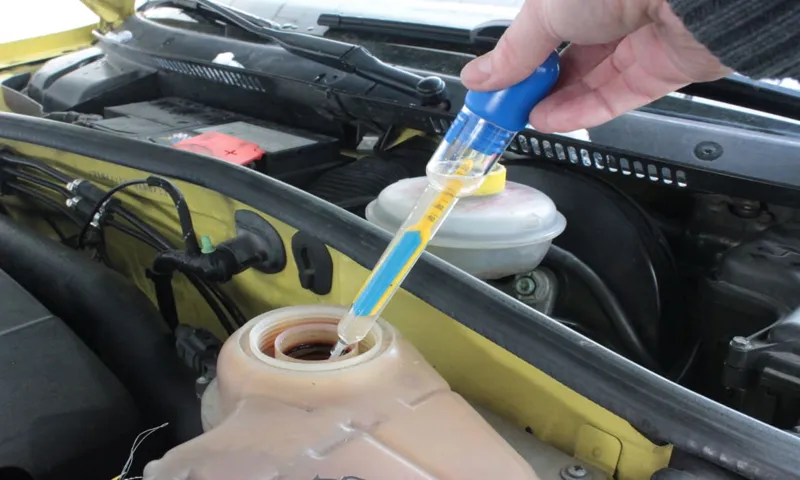
coolant cooling system radiator Introduction When it comes to keeping our cars running smoothly, one of the essential components is the coolant. But what exactly is coolant, and why is it necessary for our vehicles? Well, think of coolant as the lifeblood of your car’s engine. It helps prevent your engine from overheating, which can cause serious damage and potentially leave you stranded on the side of the road.
Coolant is a specially formulated liquid that is circulated through your engine and radiator. It absorbs the heat produced by the engine and then transfers it to the radiator, where it is dissipated into the air. Without coolant, your engine would quickly overheat and could result in costly repairs or even complete engine failure.
So, whether you’re a car enthusiast or just someone who wants to keep their vehicle in good shape, understanding coolant and how it works is essential.
Why is it Important to Change Coolant?
Why is it Important to Change Coolant? Introduction: Regularly changing the coolant in your vehicle is an essential part of vehicle maintenance. Coolant, also known as antifreeze, plays a crucial role in keeping your engine operating at the right temperature. Over time, coolant can become contaminated with particles, rust, and other debris, which can hinder its ability to effectively cool your engine.
This can lead to overheating, engine damage, and costly repairs. That’s why it’s important to understand the significance of changing your coolant and to regularly schedule this maintenance task. By doing so, you can ensure the longevity and performance of your vehicle’s engine.
Tools and Materials Needed
If you want to learn how to change coolant in your car, there are a few tools and materials you’ll need to gather first. One essential item is a drain pan or bucket to catch the old coolant as it drains out of the system. You’ll also need a socket or wrench set to remove the drain plug on the radiator.
It’s a good idea to have a funnel on hand to help you pour the new coolant into the radiator without making a mess. Additionally, you’ll need a coolant mixture that is specifically recommended for your vehicle. Make sure to check the owner’s manual or consult with a professional to determine the right coolant to use.
Finally, it’s always a good idea to have some gloves and safety goggles to protect yourself from any spills or splashes during the coolant change process. By gathering these tools and materials beforehand, you’ll be well-prepared and ready to tackle the task of changing your car’s coolant.
Coolant
tool for changing the coolant Coolant plays a crucial role in maintaining the optimal temperature of our vehicles’ engines. It helps prevent overheating and ensures that the engine runs smoothly. However, over time, coolant can become contaminated or lose its effectiveness, and that’s when it’s time to change it.
Changing the coolant is a relatively simple task that you can do yourself with the right tools and materials. Here are the essential things you’ll need for the job: Drain pan: Before you can change the coolant, you’ll first need to remove the old one.
To do this, you’ll need a drain pan to catch the coolant as it comes out of the engine. Socket and ratchet set: Some vehicles may require you to remove a drain plug or a hose to drain the coolant.
Having a socket and ratchet set will make this process much easier. Funnel: Once you’ve drained the old coolant, you’ll need to pour in the new one.
Using a funnel will help prevent spills and ensure that all the coolant goes into the system. Coolant: Of course, you’ll need fresh coolant to replace the old one.
Make sure to check your vehicle’s specifications and use the correct coolant type and mixture recommended by the manufacturer. Distilled water: Depending on the coolant mixture you’re using, you may need to mix it with distilled water.
Funnel
The tools and materials needed for a funnel vary depending on its purpose, whether it’s for cooking, DIY projects, or marketing. However, there are some common items that are essential for any type of funnel. Firstly, you will need a funnel itself, which is typically a cone-shaped device made of plastic, metal, or glass.
The size of the funnel will depend on the volume of liquid or substance you need to transfer. Additionally, a funnel will be more effective if it has a narrow spout to control the flow. Another tool that can be useful, especially for cooking or baking, is a strainer or sieve that can be placed on top of the funnel to filter out any solid particles.
This is particularly handy when transferring liquids such as soup or stock. Finally, it’s important to have a clean and stable surface to place the funnel on, as well as a receptacle to collect the liquid or substance being transferred. This could be a jar, bottle, or bowl, depending on the specific task at hand.
So, whether you’re pouring liquids, transferring ingredients, or implementing a sales funnel, having the right tools and materials will ensure a smooth and efficient process.
Radiator flush kit
radiator flush kit
Gloves
gloves, tools and materials. When it comes to DIY projects or working with your hands, having the right tools and materials is essential. And one tool that often gets overlooked but is actually quite important is gloves.
Gloves not only protect your hands but also offer a better grip and control when handling tools or materials. So what tools and materials do you need to have on hand in order to get the best out of your gloves? First and foremost, you need to have gloves that are appropriate for the task at hand. There are different types of gloves available, each designed for specific purposes.
For general DIY projects, a pair of work gloves made from durable materials like leather or synthetic fibers is a good choice. These gloves offer protection against cuts, scrapes, and abrasions, and are also comfortable to wear for extended periods of time. Next, you’ll need some basic tools to accompany your gloves.
A good pair of work gloves is only as effective as the tools you use with them. Some essential tools to consider include: Hand tools: These can be anything from screwdrivers, pliers, hammers, or wrenches.
Having a set of these handy will allow you to tackle a wide range of tasks without having to worry about damaging or injuring your hands. Power tools: If you’re working on larger projects that require more power, consider investing in some power tools like a drill, saw, or sander.
These tools can make your work more efficient and precise, and having gloves on will offer an extra layer of protection. Safety equipment: In addition to gloves, it’s important to have other safety equipment on hand.
Safety goggles
safety goggles, tools and materials needed When it comes to working with tools and machinery, safety is of utmost importance. One essential piece of equipment that should never be overlooked is a pair of safety goggles. These goggles are designed to protect your eyes from flying debris, sparks, chemicals, and other hazards that can cause serious injury.
To ensure safety goggles provide the necessary protection, it’s crucial to choose the right pair and use them correctly. When selecting safety goggles, look for ones that meet the appropriate safety standards and fit comfortably on your face. Adjustable straps and cushioning can help ensure a secure and comfortable fit, allowing you to work without the goggles slipping or causing discomfort.
In terms of materials and tools needed, safety goggles are relatively simple and straightforward. All you need are the goggles themselves, along with a clean cloth or lens cleaning solution to keep them clear and free from debris. It’s also a good idea to have a designated storage area for your goggles to prevent damage or misplacement.
When using safety goggles, it’s important to wear them consistently and correctly. Make sure they cover your eyes completely and are positioned snugly against your face. Avoid touching or adjusting them while working, as this can compromise their effectiveness.
If the goggles become scratched or damaged, replace them immediately to maintain proper protection. Remember, safety goggles are not just for professionals working in hazardous environments. Anyone who works with tools, chemicals, or objects that can potentially cause eye injury should wear safety goggles.
From DIY enthusiasts to professionals in construction, manufacturing, and various industries, protecting your eyes should never be overlooked. In conclusion, safety goggles are an essential piece of equipment that should be used whenever there is a risk of eye injury. By choosing the right pair and using them correctly, you can ensure your eyes are protected from potential hazards.
Step-by-Step Guide
Changing the coolant in your car is an important maintenance task that should be done regularly to keep your engine running smoothly. If you’re not sure how to change the coolant, don’t worry! It’s a fairly simple process that you can do yourself with just a few tools and a little bit of time. First, make sure your car is cool and parked on a flat surface.
Then, locate the radiator cap and open it carefully. Place a bucket or container underneath to catch the old coolant as you drain it. Next, locate the radiator drain plug, usually located on the bottom of the radiator.
Loosen the plug and allow the coolant to drain completely. Once all the old coolant has been drained, close the drain plug and tighten it securely. Now, it’s time to refill the system with fresh coolant.
Mix a 50/50 solution of coolant and distilled water in a clean container, then pour the mixture into the radiator until it is full. Finally, replace the radiator cap and start your car. Let it run for a few minutes, then check the coolant level again.
If it is low, add more mixture until the level reaches the appropriate mark. And that’s it! You’ve successfully changed the coolant in your car. Regularly changing the coolant is important for maintaining the health of your engine, so be sure to follow this step-by-step guide at least once a year or as recommended by your car’s manufacturer.
Step 1: Safety Precautions
When it comes to safety precautions, it’s important to prioritize your well-being before attempting any DIY projects. In this step-by-step guide, we will discuss the essential safety measures you should take to ensure a safe and accident-free environment while working on your project. First and foremost, always wear protective gear such as safety goggles, gloves, and a dust mask to shield yourself from potential hazards.
Additionally, make sure to have a clear workspace free of clutter and obstacles. It’s important to have a fire extinguisher nearby in case of any unexpected incidents, and to familiarize yourself with its usage. Lastly, if you are working with power tools, always unplug them when not in use to prevent any accidents.
Following these safety precautions will not only protect you from harm but also allow you to work on your DIY project with peace of mind.
Step 2: Locate the Radiator
radiator, car radiator, locate radiator, car maintenance Step 2 in our step-by-step guide to locate the radiator in your car is essential in maintaining your vehicle’s cooling system. The radiator is a crucial component that helps regulate the temperature of the engine, ensuring efficient performance and preventing overheating. To locate the radiator, you will need to open your car’s hood and search for a rectangular-shaped metal or plastic container.
It is usually positioned at the front of the engine bay, near the grille. The radiator is connected to hoses that carry coolant or antifreeze, which helps dissipate heat from the engine. By locating the radiator, you can easily check for any leaks or damage, as well as monitor the coolant level.
Performing regular checks and maintenance on your car’s radiator can save you from costly repairs in the long run and keep your engine running smoothly. So, let’s move on to the next step and learn how to safely check your radiator.
Step 3: Drain the Coolant
Draining the coolant is an important step when it comes to maintaining your vehicle’s cooling system. Coolant, also known as antifreeze, is responsible for regulating the engine’s temperature and preventing it from overheating. Over time, coolant can become contaminated with dirt, debris, and other impurities that can hinder its effectiveness.
That’s why it’s important to regularly drain and replace the coolant to keep your engine running smoothly. So, how do you drain the coolant? Well, the process can vary depending on the make and model of your vehicle, but here is a general step-by-step guide to get you started.
Step 4: Flush the System
flush the system
Step 5: Refill with New Coolant
In the final step of the coolant replacement process, it’s time to refill your system with fresh coolant. This step is crucial to ensure optimal performance and prevent any damage to your engine. Start by locating the coolant reservoir, which is usually a clear plastic container near the radiator or engine.
Open the cap and carefully pour in the coolant until it reaches the “Full” or “Max” mark. It’s important not to overfill the reservoir, as this can lead to overheating and potential damage. Once you’ve added the coolant, replace the cap securely.
Voila! Your coolant replacement process is complete, and your vehicle is ready to hit the road with a fresh, healthy cooling system.
Step 6: Bleed the System
bleed the system In the final step of the brake system bleeding process, you will need to bleed the system. This step is crucial for ensuring that any air bubbles trapped in the brake lines are flushed out. To bleed the system, you will need a helper to assist you.
Start by locating the bleeder valve on the caliper or wheel cylinder of each brake. The bleeder valve is a small screw-like fitting that allows air to be expelled from the system. Place a box-end wrench or a specialized bleeder wrench onto the bleeder valve and attach a flexible hose to the end of the valve.
Submerge the other end of the hose into a container filled with brake fluid. Now, have your helper press the brake pedal firmly and then slowly open the bleeder valve. As the valve is opened, you will see a stream of brake fluid and air bubbles coming out of the hose.
Close the valve quickly as soon as the stream of bubbles stops and instruct your helper to release the brake pedal. Repeat this process for each brake until all air bubbles have been drained from the system. Be sure to keep an eye on the brake fluid level in the master cylinder and add more fluid as needed.
Bleeding the brake system may take several attempts, so don’t get discouraged if the pedal still feels spongy after the first try. Once you’ve completed the bleeding process and the pedal feels firm, you can consider the brake system properly bled and ready for use.
Step 7: Check for Leaks
leaks, plumbing leaks, check for leaks
Tips and Warnings
Changing the coolant in your car is an important maintenance task that should be done regularly to prevent overheating and engine damage. To change the coolant, start by locating the coolant reservoir, which is typically a plastic tank with a cap that is labeled “coolant” or “antifreeze.” Before opening the cap, it’s important to allow the engine to cool down completely.
Once the engine is cool, place a towel over the cap and slowly twist it counterclockwise to release any pressure. Be cautious when removing the cap, as hot coolant can cause burns. Next, locate the drain plug, which is usually located on the bottom of the radiator.
Place a container or bucket underneath the drain plug to catch the coolant as it drains out. Loosen the drain plug and allow the coolant to fully drain before tightening the plug back up. Now it’s time to refill the radiator with fresh coolant.
Mix the coolant with distilled water as specified by the manufacturer, and pour it into the radiator until it is at the proper level. Finally, replace the cap on the coolant reservoir and start the engine. Let it run for a few minutes to circulate the coolant, then check the coolant level again and add more if necessary.
Changing the coolant in your car is a relatively simple task that can help keep your engine running smoothly and prevent costly repairs.
Tips for Changing Coolant
“changing coolant tips” Coolant plays a vital role in keeping your vehicle’s engine running smoothly and preventing it from overheating. Changing the coolant regularly is essential for maintaining the overall health and performance of your engine. Here are some useful tips and warnings to keep in mind when changing your coolant.
Safety first: Before you begin the coolant change process, make sure your engine is cool to avoid any burns. You should also wear gloves and goggles to protect yourself from any spills or splashes.
Gather the necessary tools and materials: To change the coolant, you will need a coolant drain pan, a funnel, a new coolant mix, a wrench to remove the drain plug, and a hose to help flush out the old coolant.
Follow your vehicle’s manufacturer guidelines: Consult your vehicle’s manual to determine the type of coolant required and the recommended coolant change interval. Different cars may have specific requirements, so it’s important to follow the manufacturer’s guidelines.
Park on a level surface: It’s crucial to park your vehicle on a flat surface to ensure a smooth coolant change process. This will help you drain out all the old coolant and prevent any air pockets from forming.
Flush out the old coolant: Use a hose to flush out the old coolant from the radiator, engine block, and hoses. This will help remove any debris or contaminants that may have built up over time.
Warnings and Precautions
warnings and precautions
Conclusion
In conclusion, changing your coolant is a scrupulous task that requires both patience and precision. It’s like performing open heart surgery on your car, but without the high stakes and the fancy medical degree. So, put on your DIY doctor hat and don’t be afraid to get your hands a little dirty.
Remember, coolant is a car’s lifeline, keeping your engine cool under pressure. By following these steps, you’ll be able to swap out your old coolant like a cool-headed magician, leaving your car refreshed and ready to conquer the open road once again. So go forth, my friends, and keep your engine running as smoothly and effortlessly as a swan gliding across a pristine lake.
And remember, true coolant greatness lies not in the power of your tools, but in the depth of your coolant-changing wisdom. Happy servicing!”
Regular Coolant Changes are Essential
coolant changes, regular coolant changes, essential tips, coolant maintenance, coolant system, engine performance Regular coolant changes are essential for maintaining the performance and longevity of your vehicle’s engine. Over time, the coolant in your vehicle’s cooling system can become contaminated with dirt, rust, and other debris. If left unchanged, this can lead to overheating and potential damage to your engine.
That’s why it’s important to follow the manufacturer’s recommendations for coolant maintenance and schedule regular coolant changes. Here are a few tips to keep in mind when it comes to coolant changes. First, make sure to use the recommended type of coolant for your vehicle.
Different vehicles require different types of coolant, so it’s important to check your owner’s manual or consult with a professional to determine which coolant is right for your car. Second, be sure to drain and flush the entire coolant system when doing a coolant change. This will remove any built-up sediment or debris and ensure that the fresh coolant can circulate properly throughout the system.
In addition, inspect the radiator and hoses for any signs of wear or leaks. Addressing these issues early on can prevent costly repairs down the road. Finally, it’s important to be aware of any warnings signs that indicate a coolant change may be necessary.
If you notice your engine running hotter than usual, a sweet smell coming from the engine bay, or coolant leaks, it’s time to have your coolant system checked. Ignoring these warning signs can lead to serious engine damage. In conclusion, regular coolant changes are essential for maintaining the performance and longevity of your vehicle’s engine.
By following these tips and keeping an eye out for warning signs, you can ensure that your coolant system is working efficiently and effectively. So, don’t neglect your coolant system – schedule regular coolant changes and keep your engine running smoothly.
Keep Your Engine Running Cool
engine cooling, car maintenance, overheating, radiator, coolant Keeping your engine running cool is essential for the health and longevity of your car. To ensure your engine stays cool, there are a few key tips to keep in mind. Firstly, regularly check your coolant level and top it up as needed.
Coolant plays a crucial role in preventing your engine from overheating, so it’s important to maintain the right levels. Additionally, make sure to inspect your radiator for any signs of damage or leaks. The radiator is responsible for transferring heat away from the engine, so any issues should be addressed promptly.
Another important step is to clean out any debris that may have accumulated in the radiator or other cooling system components. This can block airflow and lead to overheating. Finally, be mindful of any warning signs that your engine may be running hot, such as a rising temperature gauge or steam coming from under the hood.
If you notice these signs, it’s crucial to pull over and address the issue immediately. Ignoring an overheating engine can lead to costly repairs and potentially even engine damage. By following these tips and being proactive about engine cooling, you can keep your car running smoothly for years to come.
FAQs
What is coolant and why is it important to change it?
Coolant is a fluid used in the radiator of a vehicle to keep the engine cool. It is important to change the coolant regularly to prevent engine overheating and maintain optimal performance.
How often should the coolant be changed?
It is recommended to change the coolant every 30,000 to 50,000 miles or every 3 to 5 years, whichever comes first. However, it is best to consult the vehicle’s owner manual for specific recommendations.
How do I know if my coolant needs to be changed?
Signs that indicate the need for coolant change include the coolant being dirty or discolored, low coolant warning light coming on, engine overheating, or a significant drop in coolant levels.
Can I change the coolant myself or should I take it to a professional?
While changing the coolant can be done as a DIY task, it is recommended to take it to a professional for proper disposal of the old coolant and to ensure the job is done correctly.
What steps should I follow to change the coolant?
Firstly, ensure the engine is cool. Then, locate the radiator drain plug and drain the old coolant into a suitable container. Next, refill the radiator with a mixture of coolant and water as per the manufacturer’s recommendations. Finally, check for any leaks and top up the coolant if necessary.
Is it necessary to flush the cooling system before changing the coolant?
Flushing the cooling system before a coolant change can remove any buildup or contaminants, ensuring optimal performance. However, it is not always necessary and depends on the condition of the cooling system.
What type of coolant should I use to replace the old one?
It is essential to use the coolant recommended by the vehicle manufacturer to ensure compatibility and optimal performance. This information can be found in the owner’s manual or by consulting a professional mechanic.