
Are you noticing that your car’s engine temperature is consistently higher than normal? One possible cause could be an issue with your coolant. Changing the coolant in your car is an essential part of vehicle maintenance that not only helps regulate engine temperature but also prevents rust and corrosion in the cooling system. Changing the coolant may sound intimidating, but it’s a simple process that can be done at home, saving you time and money.
In this step-by-step guide, we’ll walk you through how to safely change your coolant and keep your car running smoothly. So, roll up your sleeves, grab your coolant, and let’s get started!
Table of Contents
What is Coolant in a Car?
Have you ever wondered what coolant is in your car? Coolant, also known as antifreeze, is a mixture of water and chemicals that help regulate your engine’s temperature. It keeps your engine from overheating, which can cause significant damage, and also prevents freezing in colder temperatures. Changing your car’s coolant is an essential part of routine maintenance, and it’s important to know when to do it and how.
The recommended interval for changing coolant can vary depending on the make and model of your vehicle, but it’s usually every 30,000 to 50,000 miles. To change the coolant, first, ensure the engine is cool and locate the coolant reservoir. Remove the old coolant and flush the system with water before adding new coolant.
It’s always a good idea to consult your owner’s manual or a mechanic if you’re unsure about the process. Don’t forget to properly dispose of old coolant, as it can be toxic to humans and animals. By regularly changing your car’s coolant, you’ll help your engine run smoothly and keep your car on the road.
Coolant’s importance in a car’s engine
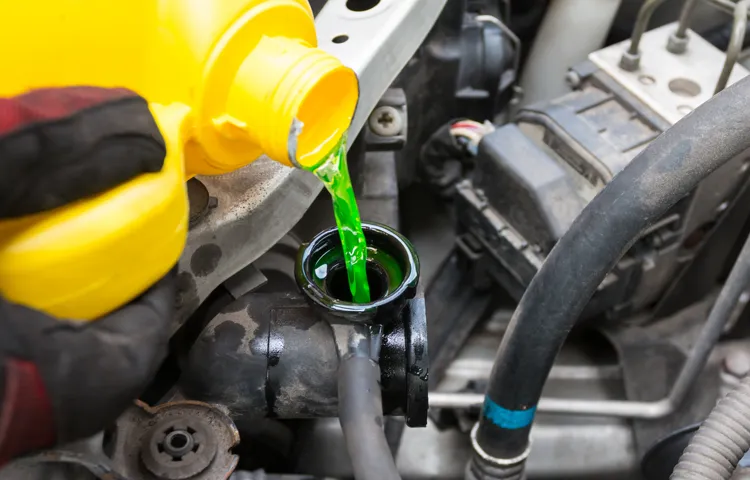
Coolant is a vital component of a car’s engine that helps regulate its temperature. It is a liquid that circulates throughout the engine and dissipates heat generated by the combustion process. Coolant is typically a mixture of water and antifreeze and is dyed green, orange, or yellow for easy identification.
Regularly checking and replacing the coolant in your car is crucial, as a lack of sufficient coolant can cause the engine to overheat and lead to serious damage. Additionally, coolant contains rust inhibitors and other additives that help protect the engine’s metal parts from corrosion. So, next time you take your car to the shop for a service, be sure to ask the mechanic to check the coolant level and top it up if necessary.
It could save you from costly repairs down the road.
When Should Coolant be Changed?
Changing your car’s coolant is important to ensure that the engine stays cool and runs smoothly. Knowing when to change the coolant depends on the type of coolant and the manufacturer’s recommendations for your specific vehicle, but a general rule of thumb is every two to five years. Over time, coolant breaks down and can become contaminated with dirt and debris, which can cause corrosion and clog up the cooling system.
Additionally, if you notice your car’s temperature gauge running hotter than usual or hear strange noises coming from the engine, it’s a good idea to check the coolant level and color. If the coolant is low or has turned brown or rusty, it’s probably time to flush and refill the system. To change the coolant, start by making sure the engine is cool and then drain the old coolant from the radiator.
Refill the radiator with fresh coolant and make sure to bleed the air out of the system before starting the engine. You may want to consider having a mechanic perform the coolant change to ensure it’s done correctly and safely. Overall, changing your car’s coolant regularly can help extend the life of your engine and prevent costly repairs down the road.
Mileage and time-based recommendations
Coolant is an essential fluid in your car’s engine cooling system that helps prevent overheating and maintaining a proper operating temperature. To ensure your engine’s longevity, it’s crucial to change the coolant regularly. The recommended interval for coolant replacement can vary depending on mileage and time.
Generally, many manufacturers suggest changing the coolant every 30,000 miles or every three years, whichever comes first. However, some newer models may enable you to go up to 100,000 miles before requiring a coolant flush. Your vehicle’s owner’s manual is the best place to check for the recommended maintenance schedule.
It’s essential to keep the coolant at the correct level and avoid mixing different types of coolant, as this can cause damage to the engine. If you notice your coolant levels are low, your engine is overheating, or if it’s been a while since your last coolant change, it’s best to take your car to a professional mechanic. By staying on top of your vehicle maintenance, including regular coolant changes, you can help ensure your car performs optimally for many years to come.
Signs that indicate a need to change coolant
Coolant change Keeping your engine cool is crucial for its proper functioning. The coolant in a car plays a vital role in regulating the engine’s temperature and preventing it from overheating. Over time, the coolant can break down, become contaminated, or lose its effectiveness, resulting in several problems that can affect your vehicle’s performance.
Some of the signs that indicate a need to change coolant include a rise in engine temperature, strange noises or smells, coolant leaking, and a change in the color of the fluid. If you experience any of these signs, it’s essential to take quick action to prevent any damage to your vehicle’s engine. Additionally, you should follow the manufacturer’s guidelines for the recommended intervals for coolant changes.
Generally, most experts suggest a coolant change every two to three years, depending on the type of coolant used, conditions in which you drive and mileage. Regular coolant changes not only maintain the cooling system’s health but also prolong the life of the engine. So, stay vigilant and keep your car’s cooling system refreshed by having the coolant changed regularly.
Supplies Needed to Change Coolant
Changing the coolant in your car is an essential task to keep your engine running smoothly and to prevent overheating. To change the coolant, you will need a few supplies. Firstly, you will need a container to collect and dispose of the old coolant.
The container must be large enough to hold all the old coolant in your engine. Next, you will need a socket wrench to loosen and remove the drain plug or the bottom radiator hose. You’ll need a funnel to refill the coolant and avoid spills.
A cooling system flush will help remove any debris or rust inside the engine. You might also need a new thermostat and gasket if worn out and provide inaccuracies in temperature regulation. Finally, you’ll need a quality coolant/antifreeze that’s compatible with your vehicle’s needs.
Using the right coolant is crucial as it helps protect the engine against freezing or overheating. Understanding the right supplies required is the start of the journey to a successful coolant change.
Safety precautions
When it comes to changing coolant in your vehicle, safety should always be a top priority. Before you begin the process, there are a few supplies that you’ll need to have on hand to ensure a smooth, safe operation. First and foremost, a pair of gloves should be worn to protect your hands from any potential burns or spills.
You’ll also need eye protection in case any coolant comes in contact with your eyes. A funnel is a crucial tool to have, as it allows you to pour the coolant into the reservoir without spilling any. Additionally, make sure you have a drain pan to catch any old coolant that comes out during the process.
And lastly, be sure to have a coolant refill kit to replenish your vehicle’s coolant levels after you’ve completed the job. By taking these safety precautions and having the right supplies on hand, you’ll be able to confidently change your vehicle’s coolant without any mishaps.
Gathering necessary tools and materials
Before you start changing the coolant in your car, you’ll need to make sure you have all the necessary tools and materials. The first thing you’ll need is a drain pan to catch the old coolant as it comes out. You’ll also need a funnel to help you pour the new coolant in without making a mess.
A pair of pliers may come in handy for removing and tightening hoses. You’ll also need a socket wrench set to remove the drain plug and any other bolts that may be in the way. Make sure to have plenty of rags or towels on hand to clean up any spills or leaks.
Finally, you’ll need the right type of coolant for your particular make and model of car. Be sure to check your owner’s manual or ask a professional mechanic for advice if you’re not sure what kind of coolant to use. Gathering all of these supplies beforehand will make the process of changing your coolant much smoother and less stressful.
How to Change Coolant in a Car
Changing coolant in a car is a task that every driver should know how to do. The coolant is responsible for regulating the temperature in your engine by absorbing the heat generated. Over time, the coolant breaks down and becomes contaminated, which can lead to engine overheating and costly damage.
To change the coolant in your car, first, locate the radiator and identify the drain plug at the bottom of it. Next, unscrew the drain plug and allow the old coolant to drain into a container. Then, flush the system with clean water to remove any remaining debris.
Finally, refit the drain plug, add a fresh mixture of coolant and water to the radiator, and run the engine for a few minutes to ensure proper circulation. With these simple steps, you can help prolong the life of your engine and keep it running smoothly.
Step 1: Prepare the car and the workspace
Changing coolant in a car may seem like a daunting task, but it’s actually straightforward if you follow the right steps. First on the list is to prepare your car and workspace. Make sure the engine is cool and the car is in a stable position, like on a flat surface.
Use safety goggles and gloves to avoid any burns or spills. Then, locate the coolant drain plug and turn it counterclockwise with pliers until the coolant starts to flow out. Make sure to collect the old coolant in a container for proper disposal later on.
Next, flush the system with distilled water to remove any remaining old coolant. Once it’s drained, tighten the drain plug, and refill the system with new coolant. It’s essential to use the correct type of coolant recommended by the car’s manual and mix it with an equal amount of distilled water.
Finally, run the engine for a few minutes with the heater on and recheck the coolant level. By taking these simple steps, you can change the coolant in your car and keep its engine running smoothly for years to come.
Step 2: Drain the old coolant
When it comes to changing your car’s coolant, one of the essential steps is draining the old coolant from the system. This ensures that any old or contaminated coolant is removed, giving your engine a fresh start. To drain the coolant, locate the radiator’s drain plug, which is usually located at the bottom of the radiator.
Place a container underneath to catch the old fluid, and then loosen the drain plug. Be careful not to burn yourself if the engine is still hot. Once all the fluid has drained, replace the drain plug and dispose of the old coolant properly.
It’s important to follow the manufacturer’s instructions on the proper disposal of used coolant as it’s toxic and harmful to the environment. With the old coolant removed, the next step is to flush the system to remove any leftover deposit or contaminants before adding fresh coolant. By regularly changing your car’s coolant, you help maintain its performance and prolong its lifespan.
Step 3: Flush the system
When changing your car’s coolant, it’s essential to flush out the old fluid thoroughly before adding the new one. To flush the system, start by removing the radiator cap and draining the old coolant into a container. Next, flush the system with water by pouring it into the radiator until it comes out clean, without any debris or discoloration.
You may also consider using a radiator flush solution to help remove any buildup or corrosion. Once the system is flushed, refill it with the new coolant mix recommended by your car’s manufacturer. Remember to check the coolant level regularly, as it can decrease over time due to evaporation or leaks.
Properly flushing the system helps ensure that your car’s cooling system operates efficiently, preventing engine overheating and potential damage. Keep in mind that ignoring the coolant change can lead to costly repairs and vehicle downtime. So, take this simple step seriously and maintain your car’s performance.
Step 4: Refill with new coolant
After draining the old coolant from your car, you can now proceed to refill it with new coolant. First, locate the coolant reservoir and open its cap. Check your car’s manual to see the specific type of coolant required for your vehicle.
Use a funnel to pour the new coolant into the reservoir until it reaches the “full” or “max” level. Take your time pouring the coolant to avoid any spills or overflow. Once you’ve added enough coolant, replace the reservoir cap and run your car’s engine for a few minutes.
This will help circulate the new coolant throughout the engine and ensure that there are no leaks. After running the engine, check the coolant level again and add more if necessary. Make sure not to overfill the reservoir as this can lead to pressure buildup and potentially cause damage to your car’s cooling system.
By following these steps, you can rest assured that your car’s engine is running smoothly with fresh coolant.
Step 5: Bleed the air out of the system
When it comes to changing your coolant, it’s essential to bleed the air out of the system. This step ensures that there are no air pockets, which can lead to overheating and other issues down the line. First, locate the bleeder valve, usually located near the thermostat housing or on the upper radiator hose.
Next, start the engine and let it run until it reaches operating temperature. Squeeze the upper radiator hose to help force out any air bubbles. Once the engine is warm, turn off the engine and open the bleeder valve slowly using a wrench.
Watch for coolant to flow out steadily and consistently, and close the valve once there are no more bubbles in the system. You may need to repeat this process a few times to ensure you remove all the air bubbles. Once you’ve bled the air out, top up the coolant level and you’re all set! Remember, changing your car’s coolant regularly is vital to keeping your engine running smoothly and avoiding costly repairs down the line.
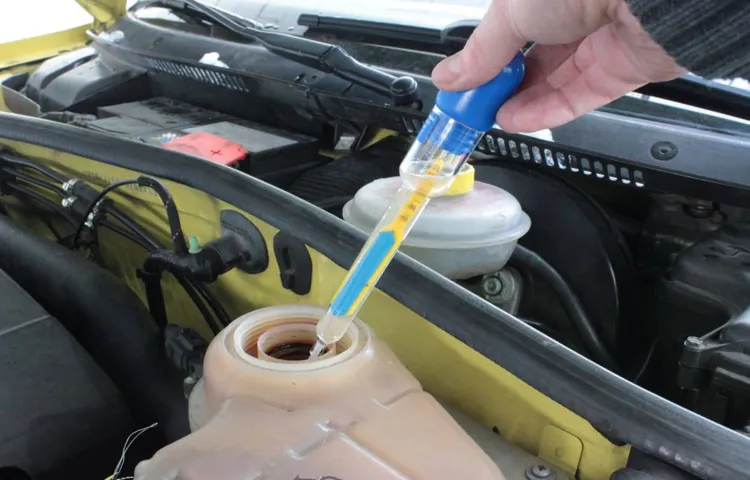
Step 6: Check for leaks and ensure proper level
After filling up your car’s radiator with new coolant, it’s crucial to check for leaks and ensure that you have the proper coolant level. A leak in the radiator or engine block can cause the engine to overheat and potentially damage vital components. So, it’s a good idea to start your car and let it run for a bit to check for any obvious leaks.
If you see any leaks, it’s important to address them before continuing. Additionally, make sure you have the proper coolant level in the radiator and overflow tank. Too little coolant can also cause overheating, resulting in expensive repairs down the line.
Keep an eye on the temperature gauge in your car to ensure the engine is running at the appropriate temperature. By taking these steps, you can rest assured that your car’s cooling system is up to the task of keeping your engine running smoothly. Remember to perform regular coolant changes to ensure optimal performance and longevity of your vehicle.
Conclusion
Congratulations! You now know how to change the coolant in your car. It’s not rocket science, but it’s not child’s play either. Taking care of your car’s engine is important for performance and longevity.
So, go ahead, whip out those tools, and swap out that old coolant for a new one. Your car will thank you, and you’ll feel like a certified mechanic. Just remember, if all else fails, YouTube always has your back.
“
FAQs
What is coolant and why is it necessary in a car?
Coolant, also known as antifreeze, is a liquid that helps regulate the temperature in a car’s engine. It is necessary to prevent overheating and potential damage to the engine.
How often should coolant be changed in a car?
It is recommended to change coolant every two to three years or every 30,000 to 50,000 miles, depending on the manufacturer’s recommendations and the type of coolant.
Can I mix different types of coolant in my car?
It is not recommended to mix different types of coolant in your car, as it can cause damage to the engine. Stick to the type of coolant recommended by your car’s manufacturer.
What are the signs that my car’s coolant needs to be changed?
Signs that your car’s coolant needs to be changed include contaminated or discolored coolant, low coolant levels, overheating engine, and strange noises or smells coming from the engine.
How do I drain and refill the coolant in my car?
To drain and refill the coolant in your car, locate the radiator drain plug and remove it to drain the old coolant. Then, refill the radiator with the recommended amount of new coolant and top off the reservoir tank if necessary.
What happens if I don’t change my car’s coolant regularly?
If you don’t change your car’s coolant regularly, it can lead to corrosion and buildup in the engine, which can cause overheating and potential engine damage.
Can I change my car’s coolant myself or should I take it to a professional?
It is possible to change your car’s coolant yourself, but if you are not familiar with the process, it is recommended to take it to a professional mechanic to ensure it is done correctly.