
Hey there! Are you ready to dive into the fascinating world of introductions? It may seem like a simple concept, but there’s so much more to it than meets the eye. An introduction is like the front door to a house – it sets the tone and gives you a glimpse of what lies ahead. Whether it’s a blog post, an essay, or even a presentation, the introduction is your chance to grab the reader’s attention and make them want to keep reading.
Think of it as the opening act of a concert. Imagine the lights dimming, the crowd eagerly waiting, and then boom! The band bursts onto the stage, setting the energy levels soaring. That’s exactly what a well-crafted introduction can do – it captures your audience’s attention and leaves them craving more.
But why is the introduction so important? Well, think about it – in today’s fast-paced world, people have short attention spans and endless distractions. If your introduction is lackluster or fails to grab their interest right away, they’ll simply move on to something else. It’s like starting a conversation with a dull, monotone voice – not exactly the best way to make a lasting impression.
So how do you create an introduction that captivates your audience from the get-go? That’s exactly what we’ll be exploring in this blog. We’ll delve into the art of crafting attention-grabbing openings, discuss different types of introductions, and provide you with practical tips to make your introductions shine. Whether you’re a seasoned writer looking to spice things up or a newbie trying to find your footing, this blog is for you.
So buckle up and get ready to embark on a journey of discovery. By the time you finish reading this blog, you’ll have all the tools you need to create compelling and irresistible introductions. Trust us, you won’t want to miss it!
Table of Contents
- 1 What is a coolant temperature sensor?
- 2 Signs that your coolant temperature sensor needs to be replaced
- 3 Tools and materials needed
- 4 Step-by-step guide on how to change the coolant temperature sensor
- 4.1 Park your vehicle on a flat surface and let the engine cool down
- 4.2 Locate the coolant temperature sensor
- 4.3 Disconnect the electrical connector
- 4.4 Remove the coolant temperature sensor
- 4.5 Install the new coolant temperature sensor
- 4.6 Reconnect the electrical connector
- 4.7 Check for leaks and test the new coolant temperature sensor
- 5 Conclusion
- 6 FAQs
- 7 References
- 8 FAQs
What is a coolant temperature sensor?
When it comes to the functioning of your car’s engine, the coolant temperature sensor plays a crucial role. This sensor is responsible for monitoring the temperature of the coolant in your vehicle’s engine. By doing so, it helps the engine control unit (ECU) determine the optimal fuel mixture and ignition timing for efficient and effective performance.
Basically, it ensures that the engine operates at the right temperature. Now, if you ever encounter issues with your coolant temperature sensor, such as faulty readings or a malfunctioning sensor, you may need to change it. Changing the coolant temperature sensor is a relatively straightforward process, but it’s important to know how to do it properly to avoid any mishaps.
To change the coolant temperature sensor, you’ll first need to locate it. In most vehicles, you’ll find it near the thermostat housing or on the engine block. Once you’ve located the sensor, you’ll need to disconnect the electrical connector and remove any clips or brackets holding it in place.
After that, you can use a wrench or socket to loosen and remove the sensor. When installing the new coolant temperature sensor, make sure it is the correct replacement for your vehicle. Apply thread sealant or Teflon tape to the threads of the sensor before installing it to prevent any leaks.
Finally, tighten the sensor to the recommended torque specifications. Changing the coolant temperature sensor can help ensure that your engine is running at optimal temperature and performance. If you’re unsure or uncomfortable with changing it yourself, it’s always best to consult a professional mechanic who can help you with the process.
Definition and function
coolant temperature sensor, function, definition
Importance of the coolant temperature sensor
coolant temperature sensor, importance of coolant temperature sensor
Signs that your coolant temperature sensor needs to be replaced
If you start noticing signs such as fluctuating temperature readings, engine overheating, or even a “check engine” light illuminated on your dashboard, it might be time to consider replacing your coolant temperature sensor. This crucial component monitors the temperature of your engine coolant and sends that information to the engine control unit. When the sensor malfunctions or fails, it can cause inaccurate temperature readings and potentially lead to engine damage.
Fortunately, changing a coolant temperature sensor is a relatively straightforward process that can be accomplished with basic tools. To get started, locate the sensor, which is typically located near the thermostat housing or on the cylinder head. Disconnect the electrical connector and use a wrench to remove the sensor from its housing.
Be careful not to damage any surrounding components, and make sure to clean the area before installing the new sensor. Finally, simply reconnect the electrical connector and double-check for any leaks after replacing the coolant temperature sensor. By following these steps, you should be able to keep your engine running at the optimal temperature and avoid any potential issues.
Overheating engine
If you’ve ever experienced an overheating engine, you know just how frustrating and alarming it can be. One of the common causes of engine overheating is a faulty coolant temperature sensor. This sensor plays a crucial role in monitoring the temperature of your engine and sending signals to the vehicle’s computer system.
When the sensor starts to fail, it can lead to inaccurate temperature readings, which can ultimately cause your engine to overheat. So, how can you tell if your coolant temperature sensor needs to be replaced? Well, there are a few signs to look out for. For starters, if you notice that your temperature gauge is constantly reading high, even when the engine is not overheating, that could be a sign of a faulty sensor.
Additionally, if you’re experiencing sudden and unexpected temperature spikes, accompanied by warning lights on your dashboard, it’s time to have your coolant temperature sensor checked. It’s essential to address these issues promptly to avoid further damage to your engine. After all, a properly functioning sensor is crucial for maintaining the health and performance of your vehicle.
Inaccurate temperature readings
coolant temperature sensor, inaccurate temperature readings
Check engine light
coolant temperature sensor
Tools and materials needed
When it comes to changing your coolant temperature sensor, there are a few tools and materials you will need to have on hand. First and foremost, you will need a new coolant temperature sensor. It’s important to make sure you have the correct sensor for your specific vehicle, so be sure to check your owner’s manual or consult with a knowledgeable professional.
You will also need a socket wrench set or adjustable wrench to remove the old sensor and install the new one. Additionally, it is recommended to have a drain pan or bucket to catch any coolant that may spill during the process. It’s also a good idea to have some rags or paper towels on hand to clean up any spills or drips that may occur.
Overall, having the necessary tools and materials ready before beginning the process will ensure a smooth and successful coolant temperature sensor replacement.
List of necessary tools
When it comes to DIY projects, having the right tools and materials is essential. Whether you’re a seasoned pro or just starting out, there are a few items that should be in every toolbox. First and foremost, a good set of screwdrivers is a must.
Having both flathead and Phillips head screwdrivers in various sizes will ensure that you can tackle any job. Another tool that is incredibly useful is a tape measure. This simple device is essential for measuring and cutting materials accurately.
Additionally, having a pair of pliers and a wrench can be extremely helpful when it comes to gripping and turning objects. Finally, it’s important to have a good set of safety equipment on hand. This includes goggles to protect your eyes, gloves to protect your hands, and earplugs to protect your hearing.
By having these essential tools and materials, you’ll be well-equipped to take on any DIY project that comes your way.
Recommended replacement parts
recommended replacement parts, tools and materials needed. When it comes to repairing or replacing parts in our everyday appliances, it can be overwhelming to figure out where to start. That’s why I’m here to help you out by providing some guidance on the recommended replacement parts for your various appliances.
Whether it’s your dishwasher, refrigerator, or washing machine, there are a few common parts that often need replacing. One of the most common replacement parts is the water filter. This is especially true for refrigerators and dishwashers, as the filter needs to be changed regularly to ensure clean and fresh-tasting water.
Another commonly replaced part is the heating element. This is typically found in dryers, ovens, and dishwashers, and is responsible for heating the air or water in these appliances. And let’s not forget about the door gasket, which is often a culprit when it comes to leaks in your refrigerator or dishwasher.
These are just a few examples of the recommended replacement parts that you may need for your appliances. Now that we’ve talked about the recommended replacement parts, let’s discuss the tools and materials you’ll need to complete these repairs. First and foremost, it’s important to have a set of basic hand tools on hand.
This includes screwdrivers, pliers, and wrenches, among other things. These tools will come in handy for removing and replacing screws, nuts, and bolts during the repair process. Additionally, you may need some specific tools that are unique to certain appliances.
For example, a multimeter can be useful for testing electrical connections in your appliances. And if you’re planning on replacing a water filter, you’ll likely need a filter wrench to help remove the old filter and install the new one. In terms of materials, it’s a good idea to have some replacement parts on hand, just in case you need them.
Step-by-step guide on how to change the coolant temperature sensor
If you’re experiencing issues with your vehicle’s temperature gauge or noticing a loss of power, it might be time to change your coolant temperature sensor. Luckily, this is a relatively simple and straightforward process that you can do yourself. First, locate the coolant temperature sensor, which is usually found near the thermostat housing or on the cylinder head.
Use a wrench or socket to loosen and remove the electrical connector attached to the sensor. Next, use a socket or wrench to remove the old sensor from its housing. Be prepared for some coolant to leak out when removing the sensor.
Once the old sensor is removed, apply a thin layer of sealant or thread tape to the threads of the new sensor, and then screw it into the housing. Finally, reattach the electrical connector to the new sensor, being sure to push it in until it clicks into place. Start your vehicle and allow it to run for a few minutes to ensure that the new sensor is working properly.
With just a few simple steps, you can change your coolant temperature sensor and get your vehicle running smoothly again.
Park your vehicle on a flat surface and let the engine cool down
changing the coolant temperature sensor
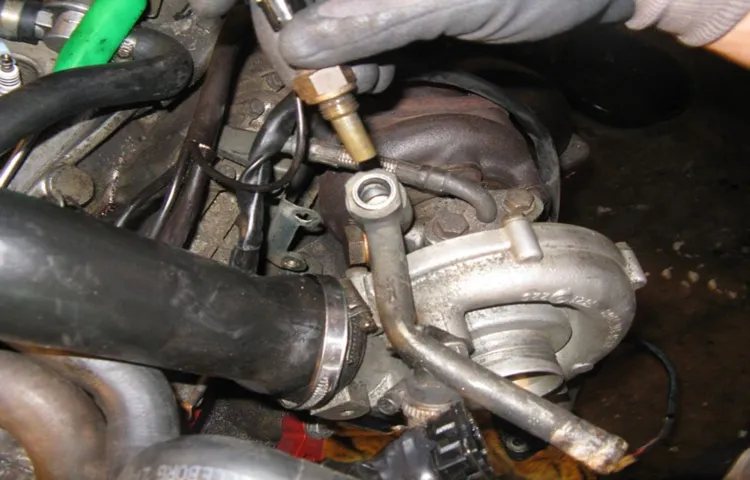
Locate the coolant temperature sensor
In order to change the coolant temperature sensor in your car, you will first need to locate it. The coolant temperature sensor is typically located near the engine, as it needs to be in close proximity to the coolant in order to accurately measure the temperature. To locate the coolant temperature sensor, you may need to refer to your car’s manual or do some research online.
The sensor is often located on the engine block or near the thermostat housing. It is usually a small, cylindrical device with wires attached to it. Once you have located the coolant temperature sensor, you can begin the process of changing it.
Start by disconnecting the negative terminal of the car’s battery to ensure your safety. Then, disconnect the wires connected to the sensor. You may need to use a wrench or socket set to remove any bolts holding the sensor in place.
After removing the old sensor, it is important to clean the area where the new sensor will be installed. Use a clean cloth or a gentle cleaning solution to remove any dirt or debris. Then, carefully install the new sensor and reattach any bolts or wires that were removed.
Finally, reconnect the negative terminal of the car’s battery. Start the engine and monitor the temperature gauge to ensure that the new sensor is working properly. If the temperature gauge reads accurately and there are no warning lights or error codes, then you have successfully changed the coolant temperature sensor in your car.
Remember, if you are unsure or uncomfortable with changing the coolant temperature sensor yourself, it is always best to consult a professional mechanic. They have the knowledge and experience to ensure the job is done correctly and safely.
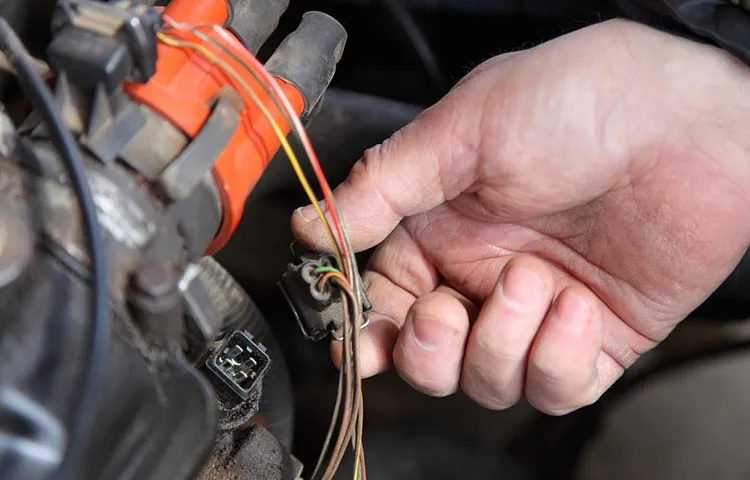
Disconnect the electrical connector
coolant temperature sensor, change, step-by-step guide, disconnect electrical connector
Remove the coolant temperature sensor
In order to change the coolant temperature sensor in your vehicle, you will first need to locate the sensor. The coolant temperature sensor is usually located near the engine block or in the thermostat housing. Once you have located the sensor, you will need to remove the electrical connector that is attached to it.
This can usually be done by pressing down on the tab and pulling the connector off. Next, you will need to use a wrench or socket to loosen and remove the sensor from its mounting location. Be sure to have a container or towel handy to catch any coolant that may leak out when the sensor is removed.
Once the old sensor is out, you can then install the new sensor by screwing it into place and reconnecting the electrical connector. Finally, don’t forget to refill your coolant if necessary and check for any leaks before starting your vehicle. Changing the coolant temperature sensor can help ensure that your engine is running at the optimal temperature and can prevent overheating issues.
So, if you’re experiencing temperature gauge issues or suspect a faulty sensor, follow these steps and get your engine back to running smoothly.
Install the new coolant temperature sensor
One crucial component of a car’s engine is the coolant temperature sensor, which helps regulate the engine’s temperature. Over time, this sensor may become faulty or worn out, leading to inaccurate readings and potential engine problems. If you’re experiencing issues with your engine temperature, it may be time to replace the coolant temperature sensor.
But don’t worry, it’s not a complicated task! In this step-by-step guide, I’ll walk you through how to install a new coolant temperature sensor in your car. By following these simple instructions, you’ll be able to ensure your engine stays at the optimal temperature and avoid any costly repairs down the line. Ready to get started? Let’s dive in!
Reconnect the electrical connector
Reconnecting the electrical connector is the final step in changing the coolant temperature sensor in your vehicle. After you have removed the old sensor and installed the new one, it’s essential to properly reconnect the electrical connector to ensure a secure and functioning connection. This connector is responsible for transmitting the temperature readings from the sensor to the engine control unit.
To reconnect the connector, locate the matching connector end on your new sensor and align it with the corresponding connector on your vehicle’s wiring harness. Gently push the two connectors together until you hear or feel a click, indicating that they are securely connected. Take care not to force the connectors together, as this could cause damage.
Once the connector is securely connected, you can proceed to reinstall any components or panels that were removed during the sensor replacement process. It’s important to carefully follow the steps provided in the specific guide for your vehicle to ensure a successful reconnection and overall sensor replacement process.
Check for leaks and test the new coolant temperature sensor
Changing the coolant temperature sensor in your car can help keep your engine running smoothly and prevent overheating. Here is a step-by-step guide to help you through the process. First, locate the coolant temperature sensor in your engine compartment.
It is usually located near the thermostat housing or on the intake manifold. Once you have found it, use a wrench or socket to remove the old sensor. Before installing the new sensor, it’s important to check for any leaks in the system.
Look for any signs of coolant leaks, such as pooling liquid or dampness around hoses and connections. If you find any leaks, address them before proceeding with the sensor replacement. Once you have confirmed there are no leaks, it’s time to install the new coolant temperature sensor.
Begin by applying a thin layer of thread sealant to the sensor threads. This will help prevent leaks and ensure a tight seal. Carefully thread the new sensor into place, being careful not to cross-thread it.
Use a wrench or socket to tighten it snugly, but be careful not to overtighten as this can damage the sensor or the housing. With the new sensor in place, it’s time to test it to ensure it is working correctly. Start your car and let it idle for a few minutes.
Monitor the temperature gauge on your dashboard to make sure it is reading accurately. You can also use an OBD scanner to check the sensor’s readings. If the temperature gauge is working correctly and there are no signs of leaks, you have successfully changed the coolant temperature sensor.
Conclusion
So, there you have it – the ultimate guide on how to change a coolant temperature sensor. Now, you might be thinking, why bother doing it yourself when you can just take it to a mechanic? Well, my friend, let me enlighten you. Changing a coolant temperature sensor is like embarking on a thrilling adventure.
It’s like solving a puzzle that only the bravest and smartest dare to tackle. It’s a quest that will test your skills and leave you feeling like the ultimate DIY warrior. Sure, you could just sit back and let someone else do it.
But where’s the fun in that? Where’s the thrill of getting your hands dirty and feeling the satisfaction of a job well done? Plus, think of all the money you’ll save by doing it yourself. That’s more cash in your pocket to spend on something truly exciting, like a life-sized cardboard cutout of your favorite celebrity (hey, I don’t judge). And let’s not forget about the bragging rights.
When you successfully change your own coolant temperature sensor, you can proudly tell your friends, family, and even complete strangers, that you conquered the mechanical beast that is your car. You can regale them with tales of your heroic deeds, and they will be in awe of your superior skills and knowledge. So, my fellow DIY enthusiasts, I implore you to take on this epic task.
Grab your tools, summon your inner mechanic, and venture into the realm of coolant temperature sensor replacement. Embrace the challenge, embrace the adventure, and bask in the glory of your triumph. Your car will thank you, and you will emerge victorious, ready to take on any automotive challenge that comes your way.
Go forth, intrepid souls, and may the coolant temperature sensor gods be with you.
FAQs
If you’re experiencing issues with your vehicle’s coolant temperature, it may be time to change the coolant temperature sensor. This sensor is responsible for monitoring the temperature of the coolant in your engine and sending that information to the vehicle’s computer. Over time, the sensor can become worn or damaged, causing inaccurate temperature readings and potentially leading to engine problems.
Changing the coolant temperature sensor is a relatively simple process that can be done at home with basic tools. First, locate the sensor, which is usually located near the thermostat housing or the cylinder head. Disconnect the sensor’s electrical connector, and then use a wrench or socket to remove the sensor from the engine block.
Be careful not to damage the threads or the sensor itself. Once the old sensor is removed, install the new sensor in its place, ensuring that it is tightened securely. Finally, reconnect the electrical connector.
After completing the replacement, it’s a good idea to check for any coolant leaks and monitor the engine’s temperature to ensure that everything is working properly.
References
Changing the coolant temperature sensor is a straightforward task that can be done by anyone with basic mechanical skills. The coolant temperature sensor is responsible for monitoring the temperature of the engine coolant and sending signals to the engine control unit (ECU) to adjust the fuel mixture and ignition timing. If the sensor is malfunctioning, it can lead to issues such as poor fuel efficiency, engine overheating, and erratic engine performance.
To change the coolant temperature sensor, start by locating the sensor, which is typically found near the thermostat housing or cylinder head. Disconnect the electrical connector connected to the sensor and remove any mounting bolts or clips. Carefully remove the old sensor and replace it with a new one, making sure to properly tighten it according to the manufacturer’s specifications.
Finally, reconnect the electrical connector and ensure that it is securely in place. It is important to note that some vehicles may require the coolant system to be drained before changing the sensor, so be sure to consult the vehicle’s service manual or seek professional advice if you are unsure.
FAQs
What is a coolant temperature sensor and what does it do?
A coolant temperature sensor is a device used to measure the temperature of the coolant in a vehicle’s engine. It provides important data to the engine control unit (ECU) to ensure optimal engine performance and fuel efficiency.
Why would I need to change the coolant temperature sensor?
There are several reasons why you may need to change the coolant temperature sensor. Common reasons include a malfunctioning sensor, inaccurate temperature readings, or a check engine light indicating a problem with the sensor.
How can I tell if my coolant temperature sensor is faulty?
Some signs of a faulty coolant temperature sensor include a constantly high or low temperature reading on the dashboard, poor fuel efficiency, difficulty starting the engine, or a check engine light indicating a problem with the sensor.
Can I replace the coolant temperature sensor myself?
While it is possible to replace the coolant temperature sensor yourself, it is recommended to have it done by a professional mechanic. They have the necessary tools and expertise to ensure the sensor is installed correctly and functioning properly.
How much does it cost to replace a coolant temperature sensor?
The cost of replacing a coolant temperature sensor can vary depending on the make and model of the vehicle, as well as the labor fees charged by the mechanic. On average, the cost can range from $50 to $200.
How long does it take to replace a coolant temperature sensor?
The time it takes to replace a coolant temperature sensor can vary depending on the accessibility of the sensor and any additional components that need to be removed. On average, it can take anywhere from 1 to 2 hours.
Are there any precautions I should take when changing the coolant temperature sensor?
When changing the coolant temperature sensor, it is important to ensure the engine is cool before beginning the replacement. Additionally, it is recommended to disconnect the negative battery cable to prevent any electrical shocks or damage to the sensor.