
If you’re an avid dirt bike rider, you know that changing a tire is a necessary evil. It’s never fun, but it’s a crucial maintenance task that needs to be done regularly to ensure your bike is performing at its best. Whether you’re a seasoned rider or a newbie, changing a dirt bike tire may seem daunting at first, but it’s actually quite easy once you get the hang of it.
In this blog post, we’ll take you through the step-by-step process of how to change a dirt bike tire, from removing the old one to putting the new one on and making sure it’s properly inflated. So grab your tools and let’s get to work!
Table of Contents
Preparing for the Job
Changing a dirtbike tire may seem like a daunting task for beginners, but with the right preparation and tools, it becomes a relatively easy process. Before you begin, make sure you have all the necessary tools such as tire irons, a valve core remover, and a torque wrench. It’s also important to have a stand to help you lift the bike off the ground, allowing you to work on the tire easily.
Once you have your tools, begin by removing the old tire from the rim. This is done by inserting the tire irons between the rim and tire to pry the tire off. Be careful not to puncture the tube during this process.
After removing the old tire, clean the rim and make sure it’s free of any debris or rust. The next step is to install the new tire by sliding it onto the rim. Use the tire irons to work the tire onto the rim, making sure it’s evenly seated.
Once the tire is on, replace the valve stem and fill the tire with air, checking the pressure with a gauge. Finally, torque the nuts on the wheel to manufacturer specifications to ensure a safe ride. By following these steps and taking your time, changing a dirtbike tire will become a simple and easy process.
Gather the necessary tools and equipment
Preparing for a DIY job requires gathering the necessary tools and equipment for the task ahead. Whether you’re fixing a leaky faucet or installing new lights, having the right tools can make all the difference. Ensure that you have the correct tools for the job by researching beforehand and making a list of what you need.
It can be frustrating to start a job and realize halfway through that you don’t have the tool you need. Additionally, borrowing tools from neighbors can lead to delays and complications. Invest in high-quality tools that will last you a long time and make DIY projects more manageable.
When preparing for a job, don’t forget to check the condition of your equipment. Worn-out tools can not only hamper your progress but also cause injury. Lastly, make sure to wear the necessary protective gear, including gloves and safety glasses, to prevent any mishaps.
By having everything you need at hand, you can approach the job with confidence and successfully tackle the task at hand.
Find a flat and level workspace to change your tire
When it’s time to change your tire, it’s crucial to set up a flat and level workspace beforehand. This ensures your safety and makes the job easier to complete. A smooth surface is vital, as it provides stability when jacking up the car and prevents the vehicle from rolling.
It’s best to choose an area away from traffic and other dangerous obstacles. A spacious spot with plenty of room to move around will make the process more comfortable and less stressful. Take a few minutes to assess the area before getting started, checking for any debris that might damage your tire.
After locating the perfect spot, double-check that your car is in park, and all safety features are engaged before proceeding. Remember, finding a flat and stable workspace is all about safety and efficiency, and it’s a critical step in preparing for the job.
Lift the bike using a jack stand or lift
When it comes to performing bike maintenance tasks, such as changing the oil or cleaning the chain, it’s crucial to lift the bike properly. Using a jack stand or lift is the ideal way to elevate the bike off the ground. This not only provides easy access to all the areas that need attention, but it also ensures your safety.
Before you begin, make sure to find a stable surface on which to place the jack or lift. Also, ensure that the bike is in neutral and that the kickstand is up. Carefully place the jack stand or lift under the bike and start lifting it.
You’ll want to make sure the bike is lifted high enough to work on it comfortably. Now that the bike is lifted, you’re ready to start working on it, whether that’s changing the oil, cleaning the chain, or any other necessary maintenance tasks. So, remember to use a jack stand or lift whenever you’re working on your bike to ensure your safety and make the task at hand much easier.
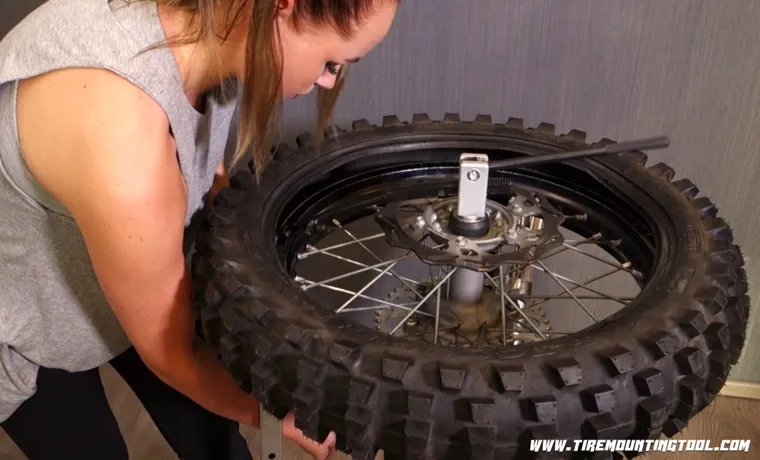
Removing the Old Tire
If you’re wondering how to change a dirt bike tire, the first step is removing the old tire. Start by deflating the tire completely, removing the valve cap, and pressing on the valve core to release any remaining air. Use a tire spoon or lever to remove the tire from the rim.
You can do this by placing the spoon between the tire and the rim, then pressing down and pushing the spoon around the circumference of the tire. As you work your way around the tire, use your other hand to push the tire down into the center of the rim. Once you’ve made it all the way around, you should be able to pull the tire off the rim with your hands.
Remember to be patient and take your time to prevent damaging the rim or tire. Now that the old tire is off, you can move on to installing the new one and preparing it for inflation.
Loosen the bolts or nuts on the wheel
When it’s time to replace a flat tire, it’s important to know how to remove the old one properly. The first step is to loosen the bolts or nuts on the wheel using either a lug wrench or a socket and torque wrench. It’s important to remember to loosen the bolts in a star pattern to ensure even pressure is released.
Once the bolts are loosened, it’s time to elevate the vehicle using a car jack or hydraulic lift. Make sure to identify the proper jacking point, as not doing so could damage the vehicle. Once the vehicle is elevated, remove the loosened bolts and pull the tire off the wheel hub.
Before installing the new tire, it’s a good idea to inspect the wheel hub and brake components for any damage or wear. By following these steps, you’ll be able to safely and efficiently remove the old tire and replace it with a new one, getting back on the road in no time.
Use tire irons to remove the tire from the wheel
When it comes time to replace your old tire with a new one, the first step is to remove the old tire from the wheel. You’ll need a few tools to complete this task, including tire irons. These come in different shapes and sizes, so you’ll need to choose the right ones for your particular tire and wheel.
Start by loosening the lug nuts with a lug wrench. Once the nuts are loose, use the tire irons to pry the tire away from the wheel. Work your way around the tire, using the irons to gradually lift and remove the old tire.
Be careful not to damage the wheel in the process. With a bit of patience and perseverance, you’ll soon have the old tire removed and be ready to install a new one. Remember, safety is key, so take your time and be sure to stay focused throughout the process.
By doing so, you’ll avoid any potential mishaps and end up with a job well done.
Inspect the rim and inner tube for damage or wear
When inspecting your bike’s rim and inner tube, it’s crucial to keep an eye out for damage or wear before removing the old tire. This will ensure that your new tire won’t be compromised or punctured from underlying issues. Take a close look at the rim to check for any dents, cracks, or sharp edges that could damage your inner tube.
If you find any of these issues, it’s best to replace the rim entirely. The next step is to remove the old tire, which can be somewhat tricky and requires patience. Start by deflating the tire completely, and then use a tire lever to pry one side of the tire away from the rim.
Work your way around the wheel, gently pulling the tire out and away until it comes free. Be sure to inspect the inner tube for any punctures or damage that may have caused the flat tire. By following these simple steps, you can ensure that your new tire is installed on a safe and secure wheel.
Installing the New Tire
Changing a dirtbike tire might seem daunting at first, but with the right tools and a little bit of know-how, it’s actually quite simple. Now that you’ve gotten the old tire off, it’s time to install the new one. Start by lining up the tire with the rim, making sure the rotation direction arrow on the tire is pointing in the right direction.
Feed the tire onto the rim slowly, working your way around until it’s evenly seated. You may need to use tire irons or levers to help with this process. Once the tire is properly seated, use a bead buddy or other tool to hold the beads in place while you inflate the tire.
It’s important to inflate the tire to the manufacturer’s recommended pressure, which should be listed on the tire itself. With the new tire securely in place, you’re ready to hit the trails again!
Apply a small amount of tire lubricant to the rim
When you’re installing a new tire, it’s important to make sure it fits snugly onto the rim. To do this, you’ll need to apply a small amount of tire lubricant to the rim. This will help the tire slide onto the rim more easily, and it will also prevent any damage to the rim or tire during the installation process.
Make sure to only use a small amount of lubricant, as too much can cause the tire to slip on the rim while you’re riding. Once you’ve applied the lubricant, carefully guide the tire onto the rim, making sure that the valve stem is properly aligned. Then, use a tire lever to help seat the tire onto the rim.
With a little patience and attention to detail, you’ll have a perfectly installed new tire in no time. Remember, a little lubricant goes a long way, and can make all the difference in ensuring a safe and comfortable ride.
Place the tire on the rim and work it into place
When it comes to installing a new tire, it may seem like a daunting task. But with a little bit of patience and some elbow grease, it can be done in a snap! First things first, place the tire on the rim. You want to make sure that the tire is set in the center of the rim, so it won’t be difficult to work the tire into place.
Start from the top of the tire and work your way down, using your hands or a tire lever to assist you. Make sure to work the bead of the tire over the rim, being careful not to damage the tire or rim in the process. Once you’ve got the tire in place, check to make sure that it’s centered properly and adjust as necessary.
And there you have it – a brand new tire, ready to roll! Remember to always be gentle when installing a tire, as damaging it could lead to costly repairs down the line.
Inflate the tire to the manufacturer’s recommendations
Inflating the tire to the manufacturer’s recommendations is crucial to ensuring safety on the road. Proper inflation ensures optimal traction and stability while driving, reducing the risk of accidents or blowouts. When installing a new tire, be sure to follow the tire manufacturer’s suggested PSI (pounds per square inch) for your specific vehicle and driving conditions.
A tire that is underinflated or overinflated can cause uneven wear or even lead to a blowout, so it’s essential to get it right. Investing in a reliable tire pressure gauge can help you keep track of your tire’s pressure and ensure it’s at the right level. It’s also a good idea to check your tire pressure regularly, especially before long drives or when carrying heavy loads.
Don’t let tire pressure be the reason for an accident, inflate your tire to the manufacturer’s recommendations and stay safe on the road.
Finishing Up
Changing a dirtbike tire can be a challenging task, but with the right tools and knowledge, it can be done quickly and easily. Once you have removed the old tire from the rim, it is time to install the new one. First, make sure the tire is facing the correct direction by checking the directional arrow on the sidewall.
Then, use tire irons to work the tire onto the rim, being careful not to damage the inner tube or sidewall in the process. Once the tire is seated on the rim, use a tire gauge to check the pressure and adjust as necessary. Finally, re-install the wheel onto the bike, making sure the axle is properly aligned and tightened to the manufacturer’s specifications.
With these simple steps, you can change a dirtbike tire with ease, allowing you to get back to riding as soon as possible.
Trim any excess rubber from the tire
As you’re finishing up changing a tire, it’s important to trim any excess rubber from the newly mounted tire. This step ensures that your tire is balanced and secure. Excess rubber can cause vibration, pulling, and lead to premature wear.
To avoid this, use a sharp knife or box cutter to carefully trim off any protruding bits of rubber. Make sure to do this with caution and precision. It’s best to start by cutting off the larger and thicker pieces of rubber, working your way around the tire, and finally smoothing out any rough edges.
By taking the time to trim any excess rubber, you’ll be able to avoid future problems with your tire and extend its lifespan. Remember to always double-check that your tire is mounted correctly and securely before heading out on the road. Safety first!
Tighten the bolts or nuts on the wheel
When it comes to finishing up the process of changing a flat tire, it’s important to tighten the bolts or nuts on the wheel properly. This step is crucial to ensure a safe and smooth ride. Simply inserting the new tire onto the vehicle isn’t enough – you need to tighten the bolts or nuts to the manufacturer’s specification.
Tightening them too much or too little can cause serious problems down the road. It’s recommended to use a torque wrench to ensure each bolt or nut is tightened correctly. Once tightened, do one final check to make sure they are all secure and then lower the vehicle off the jack.
By taking the time to properly tighten the bolts or nuts on the wheel, you can rest assured that your vehicle will be safe and ready to hit the road again.
Lower the bike and test ride to ensure stability and proper tire pressure
Lowering your bike and testing its stability and tire pressure are the final steps to completing your maintenance routine. Make sure you have all the necessary tools and equipment before starting. Begin by lowering the bike so it is closer to the ground and easier to maneuver.
Check the tire pressure to ensure that it is within the recommended range for your bike. This is vital for ensuring that you are getting the best performance from your tires and the smoothest ride possible. Once you have adjusted the tire pressure, take your bike out for a test ride.
This will help you determine whether it is properly balanced and whether the tire pressure is in the correct range. If everything feels good, you are ready to hit the road! Remember, taking care of your bike is essential for staying safe and enjoying a smooth ride, so make sure you do these maintenance tasks regularly.
Conclusion
Changing a dirtbike tire may seem daunting, but with a few basic tools and some patience, it can be accomplished by even the most inexperienced rider. Remember to always check your tire pressure and inspect your tires for damage before hitting the trails. And don’t forget, if all else fails, reach out to your local mechanic or riding buddies for a helping hand.
Now go forth and conquer those dirt roads with confidence and style!”
FAQs
What tools do I need to change a dirt bike tire?
You’ll need tire irons (2-3), a valve core remover, a tire pressure gauge, and a wrench.
How do I remove the old tire from the wheel?
Use the tire irons to work the tire off the wheel, starting at the valve stem. Be careful not to damage the inner tube.
Can I change the tire without removing the wheel from the bike?
Yes, but it may be more difficult. You’ll need to prop the bike up securely and work carefully to avoid scratching the rim.
How do I install the new tire onto the wheel?
Start by fitting the tire onto the rim, then use the tire irons to work it on evenly. Be sure to check the bead seat as you go.
What’s the proper tire pressure for a dirt bike?
It depends on the bike and the type of riding you’ll be doing. Check your owner’s manual or ask a professional for guidance.
Do I need to balance the tire after changing it?
Yes, it’s recommended. An unbalanced tire can cause vibration and wear on the bike and rider.
Can I repair a punctured dirt bike tire instead of replacing it?
It depends on the size and location of the puncture. Small punctures can often be repaired with a patch or plug, but larger or sidewall punctures may require a new tire.