
Hey there! Are you ready to dive into the exciting world of blogging? Well, you’ve come to the right place. In this blog post, we’re going to explore the concept of “Introduction” and how it plays a crucial role in captivating your readers from the very beginning. Think of an introduction as the gateway to your blog post – it’s like the front door to your house.
Just like a beautifully decorated entrance can entice guests to step inside, a well-crafted introduction can enthrall your readers and make them want to keep reading. But what exactly makes a great introduction? It’s all about grabbing the reader’s attention and setting the stage for what’s to come. You want to hook them, intrigue them, and make them eager to explore the rest of your blog post.
After all, we live in a world where attention spans are shorter than ever, so you need to make every word count. Imagine walking into a bookstore and scanning the shelves for your next great read. What catches your eye? Is it the book with a boring title and a dull cover, or is it the one that captivates you with an intriguing introduction? The same principle applies to your blog post.
You want to be the book that stands out, the one that readers can’t resist picking up. So, how do you create an introduction that captivates your readers and keeps them coming back for more? That’s exactly what we’re going to explore in this blog post. We’ll share tips, tricks, and examples to help you craft introductions that leave a lasting impression.
So, whether you’re a seasoned blogger looking to take your writing to the next level or a newbie just getting started, get ready to master the art of the introduction. Stick around, and let’s make your blog posts impossible to resist!
Table of Contents
- 1 What is engine coolant and why is it important?
- 2 Signs of a coolant problem
- 3 Gather the necessary supplies
- 4 Park the car in a safe location
- 5 Allow the engine to cool
- 6 Locate the drain plug or radiator hose
- 7 Place a drain pan under the plug or hose
- 8 Open the drain plug or loosen the hose clamp
- 9 Allow the coolant to fully drain
- 10 Close the drain plug or reattach the hose
- 11 Prepare the coolant mixture
- 12 Fill the radiator with the coolant mixture
- 13 Bleed air from the cooling system
- 14 Check the coolant level
- 15 Dispose of the old coolant properly
- 16 Inspect for any leaks
- 17 Monitor the coolant for a few days
- 18 Importance of regular coolant maintenance
- 19 Benefits of changing the coolant yourself
- 20 Conclusion
- 21 FAQs
What is engine coolant and why is it important?
Changing your engine coolant is an essential part of regular vehicle maintenance. Engine coolant, also known as antifreeze, is a liquid that circulates through your engine to regulate its temperature. It is important because it helps prevent your engine from overheating and freezing in extreme temperatures.
Over time, the coolant can become contaminated with dirt, debris, and rust, which can reduce its effectiveness in maintaining proper engine temperature. Changing the coolant at regular intervals helps ensure optimal engine performance and prevents potential damage to your engine. So, if your coolant is due for a change, it is important to follow the manufacturer’s guidelines and instructions to properly drain and refill your cooling system.
By doing so, you can keep your engine running smoothly and avoid costly repairs down the road.
Signs of a coolant problem
Changing engine coolant is an important maintenance task that can help keep your car running smoothly. Engine coolant, also known as antifreeze, is responsible for regulating the temperature of your engine by absorbing heat and preventing it from overheating. Over time, coolant can become dirty or contaminated, which can lead to cooling system problems.
Signs of a coolant problem can include a coolant leak, an overheating engine, or a sweet smell coming from under the hood. If you notice any of these signs, it’s important to check your coolant level and quality. If the coolant level is low or the coolant is dirty, it’s time to change the coolant.
Changing the engine coolant involves draining the old coolant, flushing the system with water, and then filling it up with fresh coolant. It’s important to consult your car’s owner manual or a professional mechanic for specific instructions on how to change your engine coolant, as the process may vary depending on the make and model of your vehicle. By regularly changing your engine coolant, you can help prevent costly repairs and ensure that your car stays cool and comfortable on the road.
So, keep an eye out for signs of a coolant problem and make sure to change your engine coolant as needed.
Are you ready to tackle a new DIY automotive project? If so, then it’s time to prepare yourself for changing the coolant in your car. Just like how our bodies need water to stay cool and function properly, cars rely on coolant to keep their engines from overheating. Over time, coolant can become old and ineffective, putting additional strain on the engine.
Thankfully, changing the coolant is a relatively simple task that can be done at home with a few basic tools and some know-how. So, let’s dive in and explore the steps to prepare for this essential maintenance job.
Gather the necessary supplies
When it comes to changing engine coolant, the first step is to gather all the necessary supplies. This includes a new coolant, a funnel, a container to catch the old coolant, a socket set or wrench to remove the drain plug, and a rag to wipe up any spills. It’s also a good idea to have some gloves and safety glasses to protect yourself from any potential splashes or spills.
Once you have all the necessary supplies gathered, you can move on to the next step in the process. So, are you ready to get started on changing your engine coolant?
Park the car in a safe location
If you’re looking to learn how to change your engine coolant, the first step is to park your car in a safe location. This is crucial because you’ll need to access the engine compartment where the coolant reservoir and radiator are located. It’s important to be in a well-lit and spacious area where you can comfortably work on your vehicle without any obstructions.
A flat surface, such as a driveway or a parking lot, is ideal for this task. Additionally, make sure that the car’s engine is turned off and has cooled down for at least an hour before you begin the coolant replacement process. This will ensure your safety and prevent any hot coolant from leaking or spilling while you’re working.
So find a secure spot and get ready to give your engine the cooling it needs.
Allow the engine to cool
So you’re ready to change the engine coolant in your car? Great! The first thing you need to do is allow the engine to cool down completely. This is important because working on a hot engine can be dangerous. That hot coolant can cause burns if it comes into contact with your skin.
Plus, when the engine is hot, the coolant is under pressure, which can also be dangerous. So give it some time to cool off before you start the process. Once the engine is cool, you’re ready to move on to the next step in changing your engine coolant.
Draining the old coolant from your car may not be the most glamorous task, but it is an essential part of maintaining your vehicle’s performance and longevity. Just like changing the oil or rotating the tires, flushing out the old coolant should be a regular part of your car maintenance routine. But why is it so important? Think of the coolant in your car as the lifeblood that keeps the engine running smoothly.
It helps to regulate the temperature, preventing overheating, and protects against rust and corrosion. Over time, however, the coolant can become contaminated with dirt, debris, and even small metal particles. This can affect its effectiveness in keeping your engine cool and can lead to damage if left unchecked.
Picture it like this: Imagine you’re trying to run a marathon, but your shoes are filled with pebbles and sand. It would be uncomfortable and challenging, right? The same goes for your engine. If the coolant is filled with impurities, it can’t do its job effectively, and your engine may suffer as a result.
So, how do you know when it’s time to drain the old coolant? The general rule of thumb is to do it every 2 to 3 years or as recommended by your car’s manufacturer. However, if you notice any signs of a problem, such as an overheating engine or a sweet smell coming from under the hood, it’s a good idea to check the coolant level and quality. If you’re unfamiliar with the process, don’t worry! Draining the old coolant is a relatively simple procedure that you can do at home with some basic tools.
Just make sure to follow the steps outlined in your car’s manual or consult a professional if you’re unsure. By taking the time to drain the old coolant and replace it with fresh, clean fluid, you’re giving your car the best chance at a long, healthy life. It’s a small task that can have a big impact on your vehicle’s performance and your peace of mind as a driver.
So, the next time you’re thinking about car maintenance, don’t forget about the importance of draining the old coolant. Your engine will thank you.
Locate the drain plug or radiator hose
So, you want to change your engine coolant? Well, the first step is to locate the drain plug or radiator hose. This is where the old coolant will flow out of the system. It’s important to find the right spot, as different vehicles may have different locations.
Usually, the drain plug or hose is located at the bottom of the radiator. It may be a simple screw-type plug that you can easily unscrew with a wrench, or it may be a hose that you need to disconnect. Look for a valve or a clamp that you can loosen to allow the coolant to drain out.
Remember to place a pan or bucket underneath to catch the coolant as it flows out. Once you’ve found the drain plug or hose, you’re ready to move on to the next step in changing your engine coolant.
Place a drain pan under the plug or hose
Alright, so you want to know how to change engine coolant? Well, one of the first things you’ll want to do is place a drain pan under the plug or hose. This way, when you start removing the coolant, it won’t end up all over the place and creating a mess. Trust me, I’ve made that mistake before and it’s not fun to clean up.
Plus, it’s always good to be safe and prepared. So, grab yourself a drain pan and make sure it’s positioned in the right spot before you start draining the coolant. It’ll save you a lot of hassle in the long run.
Open the drain plug or loosen the hose clamp
Changing the engine coolant in your vehicle is an important aspect of regular car maintenance. Over time, the coolant can become contaminated with dirt and debris, which can affect its ability to cool the engine effectively. If you’re wondering how to change engine coolant, one of the first steps is to open the drain plug or loosen the hose clamp.
This will allow the old coolant to drain out of the system. It’s important to place a container underneath the drain plug to catch the coolant and prevent it from spilling onto the ground. Once the old coolant has drained out, you can then proceed with refilling the system with fresh coolant.
Remember to consult your vehicle’s owner manual for specific instructions and to dispose of the old coolant properly. By regularly changing your engine coolant, you can help maintain the optimal performance of your engine and prevent overheating issues.
Allow the coolant to fully drain
Changing the engine coolant in your car is an essential part of regular maintenance. One of the crucial steps in this process is allowing the coolant to fully drain from the system. This ensures that all the old coolant, along with any impurities or debris, is completely removed.
To do this, you can place a drain pan under the radiator drain plug and open it to let the coolant flow out. It’s important to be patient and let the coolant drain completely, as leaving even a small amount of old coolant can affect the overall performance and longevity of your engine. Once the coolant has completely drained, you can proceed with the next steps of the coolant change process.
By properly allowing the coolant to fully drain, you are taking an important step towards maintaining your engine’s health and keeping your car running smoothly.
Welcome to today’s blog post, where we’re going to dive into the world of coolant replacement. Whether you’re a car enthusiast or a new driver, understanding the importance of replacing the coolant in your vehicle is crucial for maintaining its performance and longevity. But why is this task so important? And what does it actually entail? Think of your car’s coolant as its lifeline, keeping the engine cool and preventing it from overheating.
Just like you rely on a refreshing drink of water on a hot day, your car’s engine relies on coolant to keep it cool during those long drives under the scorching sun. Over time, coolant can become contaminated with dirt, rust, and other contaminants. Additionally, its performance can decline due to a loss of additives that help maintain its effectiveness.
This is where coolant replacement comes into play. By periodically flushing and replacing the coolant, you ensure that your car’s engine is always protected and operating at its best. Now you might be wondering how to know when it’s time to replace the coolant.
Well, there are a few signs to look out for. If you notice that your engine is running hotter than usual or if you experience frequent overheating, it’s a good indication that it’s time for a coolant replacement. Additionally, if you’ve had the same coolant in your vehicle for an extended period of time, it’s a safe bet to schedule a coolant flush and replacement to avoid any potential issues down the road.
Replacing the coolant is not a complex task, but it does require some basic knowledge and tools. If you’re comfortable with DIY car maintenance, you can tackle this job yourself. However, if you’re unsure or prefer to leave it to the professionals, taking your car to a trusted mechanic is always a reliable option.
In conclusion, replacing the coolant in your car is a vital maintenance task that should not be overlooked. By keeping your engine cool and ensuring optimal performance, you can prolong the life of your vehicle and avoid costly repairs down the line. So, next time you find yourself thinking about giving your car a little TLC, don’t forget about the coolant – your engine will thank you!
Close the drain plug or reattach the hose
So you want to learn how to change your engine coolant? Well, you’ve come to the right place! One of the first steps in this process is to close the drain plug or reattach the hose. This might seem like a simple task, but it’s an essential one. The drain plug or hose is what allows the old coolant to flow out of the system, making way for the fresh coolant.
If you’re working with a drain plug, you’ll want to locate it underneath your car. Depending on your vehicle, it may be on the bottom of the radiator or on the engine block. Once you find it, grab a wrench and give it a twist to close it up.
If you’re working with a hose, you’ll want to reattach it to the bottom of the radiator or wherever it came from. Make sure it’s securely fastened so that no coolant escapes when you pour in the new coolant. Closing the drain plug or reattaching the hose is an important step because it ensures that the new coolant will stay where it’s supposed to be – in your engine.
Without properly sealing off the drainage point, you’ll end up wasting coolant and potentially causing damage to your engine. So, make sure you don’t skip this step when changing your engine coolant.
Prepare the coolant mixture
When it comes to changing your engine coolant, one crucial step is to prepare the coolant mixture correctly. This is important because using the right coolant mixture will ensure proper engine performance and prevent overheating. First, you’ll need to choose the type of coolant that is suitable for your vehicle.
There are different types available, such as ethylene glycol-based or propylene glycol-based coolants, so be sure to consult your owner’s manual or a trusted mechanic to determine the right one for your specific vehicle. Once you have the right coolant, you’ll need to mix it with demineralized water. It’s important to use demineralized water instead of tap water, as tap water can contain minerals that could potentially damage your engine.
The ratio of coolant to water will depend on the specific recommendations of the coolant manufacturer. Typically, it is recommended to use a 50/50 mixture, but this can vary, so it’s essential to follow the instructions provided with the coolant. Mixing the coolant and water thoroughly is crucial to ensure a consistent mixture.
You can do this by pouring both the coolant and water into a clean container and gently stirring them together. Once the mixture is ready, you can now proceed to the next step of the coolant changing process.
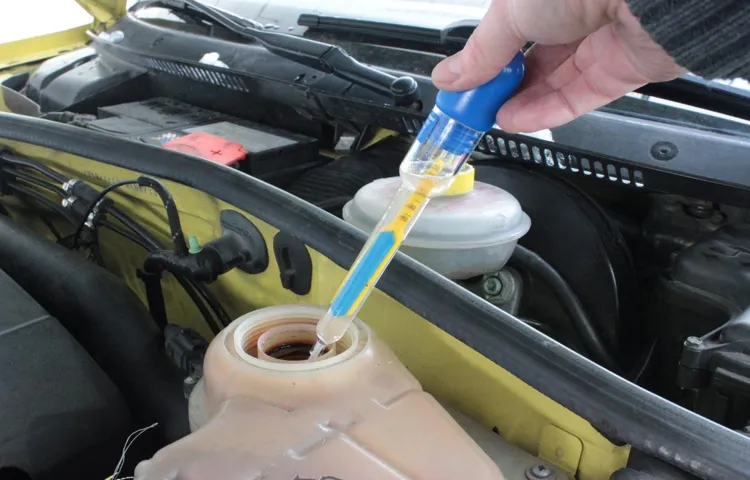
Fill the radiator with the coolant mixture
One important step in changing your engine coolant is to fill the radiator with the coolant mixture. This is crucial because the coolant helps regulate the temperature of the engine, preventing it from overheating. To do this, start by locating the radiator cap, which is usually located on top of the radiator.
Carefully remove the cap, taking caution as the engine may still be hot. Once the cap is off, you can begin filling the radiator with the coolant mixture. You can do this by using a funnel to pour the coolant into the radiator opening.
Make sure to pour slowly and steadily to avoid spills. Once the coolant level reaches the top, replace the radiator cap securely. It’s important to note that different vehicles may require different types of coolant, so be sure to check your owner’s manual for the recommended coolant for your specific vehicle.
By following these steps, you’ll be able to properly fill your radiator with the coolant mixture and ensure that your engine stays cool and runs smoothly.
Bleed air from the cooling system
Changing the engine coolant is an essential part of maintaining your vehicle’s cooling system. Over time, coolant can become contaminated with rust, debris, and other impurities that can lead to overheating or damage to the engine. To change the engine coolant, you will need to bleed air from the cooling system.
This process ensures that there are no air pockets that can prevent the coolant from flowing properly and cooling the engine effectively. Bleeding the air from the cooling system involves locating the coolant bleed valve (typically found near the radiator or thermostat housing) and opening it while the engine is running. This allows any trapped air to escape, ensuring that the coolant can circulate freely throughout the system.
It’s important to keep an eye on the coolant level during the bleeding process and top it up as needed. Once the coolant has been properly bled, you can confidently enjoy a properly functioning cooling system that will help keep your engine running smoothly. So, next time you’re changing your engine coolant, don’t forget to bleed the air from the cooling system for optimal performance and peace of mind.
So, you’ve finally reached the last steps of your project or task. Congratulations! It’s an exciting time, but it’s also important to ensure that you take the necessary precautions to wrap things up properly. In this blog, we will discuss the final steps and precautions you should take to ensure a successful completion.
You may be feeling a mix of emotions right now – relief, anticipation, and maybe even a touch of anxiety. Don’t worry, it’s completely normal. The final stages of any project often bring about a sense of urgency and pressure to get everything just right.
But with the right mindset and a few key precautions, you’ll be well-prepared to handle whatever comes your way. First and foremost, take a step back and assess the overall progress you’ve made. Look at how far you’ve come and the milestones you’ve achieved.
This will not only give you a sense of accomplishment but will also help you identify any remaining tasks or loose ends that need to be tied up. Think of it as a checklist for the final stretch. Now, let’s talk about those precautious steps.
One of the most important things to consider is communication. Make sure to keep all stakeholders informed of your progress and any changes that may have occurred along the way. This will help manage expectations and ensure that everyone is on the same page.
Whether it’s a quick email, a status update meeting, or a simple phone call, keeping the lines of communication open is crucial. Another precaution to take is to double-check your work. It’s easy to overlook small details or mistakes when you’re focused on completing a project.
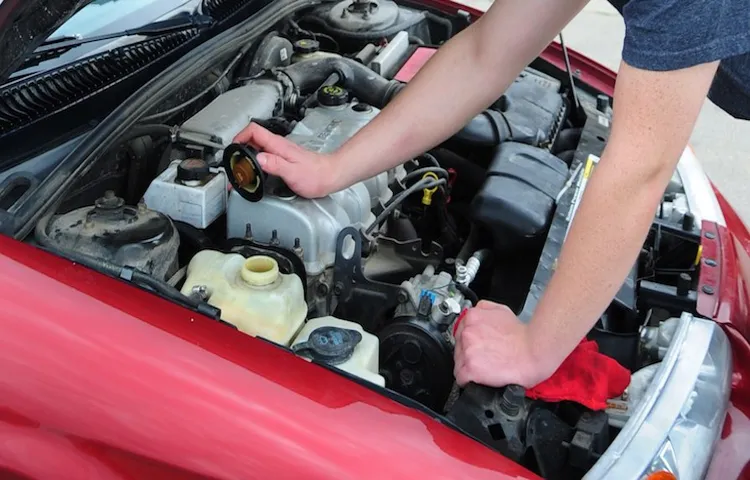
Check the coolant level
Changing the engine coolant is an essential part of vehicle maintenance. Over time, the coolant in your engine can become contaminated or lose its effectiveness, which can lead to overheating and engine damage. To keep your engine running smoothly, it’s important to know how to change the engine coolant.
One of the first steps in this process is to check the coolant level. This can be done by locating the coolant reservoir, which is usually a translucent plastic tank located near the front of the engine compartment. The coolant level should be between the minimum and maximum marks on the tank.
If the coolant level is low, you will need to add more coolant. It’s important to use the correct type of coolant for your vehicle, as different types have different additives and performance characteristics. If you’re unsure about which coolant to use, consult your vehicle’s owner’s manual or ask a professional mechanic.
It’s also worth noting that coolant should be changed regularly, as recommended by your vehicle’s manufacturer, to ensure optimal performance and prevent potential issues down the line. So, the next time you’re checking under the hood, take a moment to check the coolant level and consider if it might be time for a coolant change. Your engine will thank you!
Dispose of the old coolant properly
Changing engine coolant is an important part of regular vehicle maintenance. When it comes time to change your coolant, it’s essential to dispose of the old coolant properly. Coolant is a hazardous substance that can harm the environment if not handled correctly.
The first step in disposing of coolant is to drain it from the radiator and engine block. Make sure to have a container ready to catch the coolant and avoid spillage. Once the coolant is drained, it should be placed in a sealed container or jug.
Do not pour it down the drain or onto the ground, as this can contaminate water sources. Instead, contact your local recycling center or hazardous waste facility to find out how to properly dispose of coolant. They will be able to advise you on the best method for your area.
Remember, proper disposal of coolant is not only good for the environment but also for your own safety.
Inspect for any leaks
One important step in changing your engine coolant is to inspect for any leaks. Coolant leaks can lead to engine overheating and potential damage, so it’s crucial to catch them early on. Start by visually inspecting the engine and radiator for any signs of coolant leakage.
Look for wet spots or puddles of coolant underneath the vehicle or on engine components. If you notice any leaks, take note of their location and severity. Additionally, you can pressure test the cooling system to check for any hidden leaks.
This involves attaching a pressure tester to the radiator and pumping it up to the recommended pressure level. If the pressure drops or you can hear hissing sounds indicating a leak, you’ll need to repair or replace the faulty component. By thoroughly inspecting for coolant leaks, you can ensure a proper and efficient cooling system in your vehicle.
Monitor the coolant for a few days
Changing the engine coolant in your car is an important maintenance task that helps ensure your engine stays cool and operates efficiently. Once you’ve drained the old coolant and replaced it with new coolant, it’s essential to monitor the coolant for a few days to make sure everything is working properly. Keep an eye on the coolant level in the reservoir and check for any signs of leaks or overheating.
If the coolant level drops significantly or you notice any strange smells or smoke coming from the engine, it may indicate a problem that needs to be addressed immediately. Remember, the coolant is what keeps your engine cool and prevents it from overheating, so it’s crucial to make sure it’s doing its job effectively. Regularly monitoring the coolant can help you catch any issues before they escalate and potentially cause damage to your engine.
So take a few minutes each day to check on your coolant levels and make sure everything is running smoothly. Your engine will thank you for it!
Are you looking to wrap up your blog and provide a clear and concise conclusion to your readers? Well, you’ve come to the right place! In this blog, we will explore the importance of a well-crafted conclusion and how it can leave a lasting impact on your audience. Think of the conclusion as the finale to a musical performance or the closing scene of a movie – it’s the final opportunity to leave your readers with a lasting impression. So, let’s dive in and discover some tips and tricks to create a conclusion that will make your blog truly stand out.
Importance of regular coolant maintenance
One crucial aspect of maintaining your vehicle’s performance and longevity is regular coolant maintenance. The engine coolant, also known as antifreeze, plays a vital role in regulating the temperature of your engine. Over time, the coolant can become contaminated with debris and lose its effectiveness.
This can lead to overheating, engine damage, and decreased fuel efficiency. To ensure optimal performance, it is important to know how to change your engine coolant regularly. The process involves draining the old coolant, flushing the system to remove any remaining debris, and refilling it with fresh coolant.
It might seem daunting, but with a few basic tools and some time, you can easily accomplish this task. By regularly changing your engine coolant, you are not only ensuring the smooth functioning of your vehicle but also preventing costly repairs down the line. So, take the time to learn how to change your engine coolant and make it a regular part of your maintenance routine.
Benefits of changing the coolant yourself
Changing the coolant in your car’s engine may seem like a daunting task, but doing it yourself can have several benefits. First and foremost, it can save you money. Taking your car to a mechanic for a coolant change can be pricey, as they often charge a significant labor fee.
By doing it yourself, you can avoid this expense and put that money towards something else. Additionally, changing the coolant yourself gives you the opportunity to become more familiar with your car’s maintenance needs. You’ll gain a better understanding of how your engine works and become more aware of any potential issues that may arise.
Furthermore, changing the coolant yourself can be a rewarding experience. It allows you to take control of your car’s maintenance and gives you a sense of accomplishment knowing that you completed the task on your own. So, don’t be afraid to roll up your sleeves and learn how to change the engine coolant – it’s a valuable skill that can benefit you in many ways.
Conclusion
In conclusion, changing engine coolant is a refreshing task that requires a cool head and a steady hand. By following these steps and taking the necessary precautions, you can prevent your engine from becoming hot-headed and ensure it stays cool as a cucumber. Just remember, it’s like giving your car a spa treatment – a little pampering goes a long way in keeping your engine in tip-top shape.
So grab your gloves, put on your mechanic hat, and get ready to give your engine the coolant change it deserves. After all, a happy engine makes for a happy car, and a happy car makes for a happy driver. Cheers to cool engines and smooth drives!”
FAQs
What is engine coolant and why is it important to change it?
Engine coolant, also known as antifreeze, is a liquid that circulates through the engine to regulate its temperature. It is important to change engine coolant regularly to prevent overheating, corrosion, and engine damage.
How often should engine coolant be changed?
The recommended interval for changing engine coolant can vary depending on the vehicle manufacturer and the type of coolant used. Generally, it is recommended to change coolant every 30,000 to 50,000 miles or every 3 to 5 years.
What are the signs that engine coolant needs to be changed?
Some signs that engine coolant needs to be changed include overheating, coolant leaks, a sweet smell inside the car, and discolored coolant. It is important to address these signs promptly to prevent engine damage.
Can I change engine coolant myself or do I need to take it to a professional?
Changing engine coolant can be a DIY task for those who are familiar with basic car maintenance. However, it is recommended to consult the vehicle’s manual or seek professional assistance if you are unsure or inexperienced.
What type of coolant should I use to change my engine coolant?
The type of coolant recommended for your vehicle can usually be found in the owner’s manual. It is important to use the correct coolant type specified by the manufacturer to ensure compatibility and optimal performance.
Is it necessary to flush the coolant system before changing the engine coolant?
Flushing the coolant system before changing the engine coolant is highly recommended. Flushing helps remove any built-up contaminants, rust, or debris in the system, allowing the new coolant to work effectively.
Are there any special precautions to take when changing engine coolant?
When changing engine coolant, it is important to take certain precautions such as ensuring the engine is cool before opening the radiator cap, using gloves and eye protection, and properly disposing of the used coolant. It is also recommended to follow the specific instructions provided by the vehicle manufacturer.