Looking to spruce up your outdoor space? One way to do so is by changing the fabric on your Sunsetter awning. Whether your current fabric is worn out or you simply want to update the look of your awning, replacing the fabric is a relatively simple DIY project. In this blog post, we’ll walk you through the steps of how to change the fabric on your Sunsetter awning, so you can enjoy a fresh, new look in your outdoor oasis.
Are you ready to learn how? Let’s dive in!
Table of Contents
Introduction
Do you have a Sunsetter awning that is in need of a fabric replacement? Don’t worry, it’s easier than you might think! Changing the fabric on a Sunsetter awning is a great DIY project that can save you money and give your outdoor space a fresh, new look. To begin, you’ll need to measure and order the correct size fabric for your awning. Once you have the new fabric, remove the old fabric by carefully taking out the screws and fasteners that hold it in place.
Next, stretch out the new fabric over the frame and secure it using the same screws and fasteners. Finally, make sure the fabric is evenly tensioned and adjust as necessary. With just a few simple steps, you can have a brand new fabric on your Sunsetter awning and enjoy the shade and comfort it provides.
Overview of Sunsetter Awnings
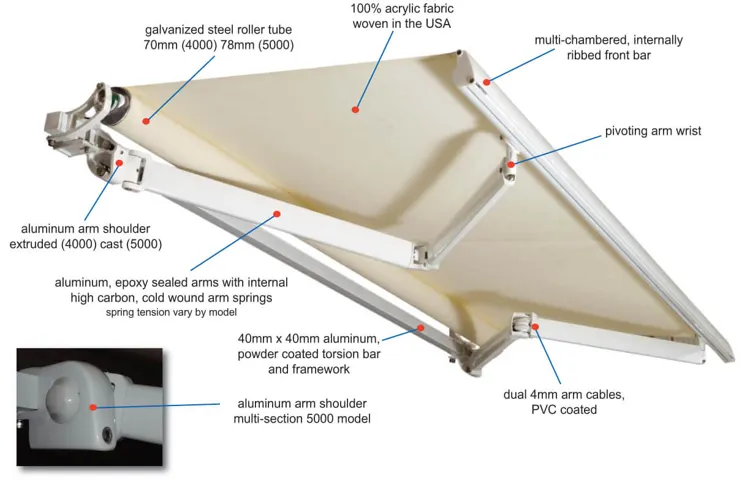
Sunsetter Awnings Introduction If you’re looking to add some shade and style to your outdoor space, Sunsetter Awnings might be just what you need. These retractable awnings are designed to provide relief from the sun’s harsh rays while also enhancing the aesthetic appeal of your patio or deck. Whether you want to relax with a book on a hot summer day or entertain guests without worrying about the weather, Sunsetter Awnings offer the perfect solution.
With their durable construction and easy-to-use features, these awnings are a popular choice among homeowners looking to enhance their outdoor living experience. So, let’s take a closer look at what makes Sunsetter Awnings a great option for your home.

Reasons for Changing the Fabric
changing the fabric, reasons for changing the fabric Introduction: Changing the fabric of a garment can have a significant impact on its overall quality and performance. Whether it’s for practical reasons or to enhance the aesthetics, there are several factors to consider when deciding to alter the fabric of a piece of clothing. In this blog post, we will explore some of the common reasons why people choose to change the fabric of their garment, and how it can lead to a better overall product.
So, if you’ve been contemplating a fabric change for your favorite clothing item, keep on reading to find out why it might be a good idea.
Choosing the Right Fabric for Your Sunsetter Awning
When it comes to choosing the right fabric for your Sunsetter awning, there are a few key factors to consider. First and foremost, you want to make sure that the fabric is durable and can withstand the elements. After all, your awning will be exposed to the sun, rain, wind, and even snow, so it needs to be able to hold up over time.
Additionally, you’ll want to think about the color and pattern of the fabric. Do you want something neutral that will blend in with your home, or do you want a bold color or fun pattern that will make a statement? Lastly, you’ll need to think about the level of UV protection you want from your fabric. Different fabrics offer different levels of protection, so it’s important to consider how much sun exposure your space gets and how important UV protection is to you.
With these factors in mind, you’ll be able to choose the perfect fabric for your Sunsetter awning that will not only look great but also stand the test of time.
Step 1: Prepare Your Awning
If you’re looking to change the fabric on your Sunsetter awning, the first step is to prepare the awning for the replacement. Start by fully extending the awning to its maximum length and then locking it in place. This will provide you with the easiest access to the fabric and make the replacement process much smoother.
Next, remove any screws or brackets that are holding the fabric in place. Carefully detach the fabric from the frame, being mindful not to damage any of the components. Once the fabric is removed, you can inspect the frame for any signs of wear or damage and make any necessary repairs before installing the new fabric.
By properly preparing your awning, you’ll set yourself up for success when it comes time to change the fabric.
Retracting the Awning
retracting the awning
Cleaning the Awning Frame
awning frame cleaning. Cleaning the awning frame is an important part of maintaining the overall appearance and functionality of your awning. Over time, dirt, grime, and other debris can accumulate on the frame, making it look dull and reduce its lifespan.
Therefore, it is essential to regularly clean your awning frame to keep it looking its best. In this blog post, we will discuss the first step in the process: preparing your awning for cleaning. Before you begin cleaning your awning frame, it is important to prepare the area properly.
Start by removing any loose dirt or debris from the surface of the awning frame using a soft-bristle brush or broom. This will help prevent scratching or damaging the frame during the cleaning process. Next, check the awning for any signs of damage or decay.
Look for loose screws or bolts, torn fabric, or rust spots. If you notice any issues, it is best to address them before proceeding with the cleaning. Once you have cleared the surface and inspected the awning, the next step is to gather the necessary cleaning supplies.
You will need a mild detergent or soap, a soft cloth or sponge, a bucket of water, and a hose or pressure washer. It is important to use a mild detergent or soap as harsh chemicals can damage the awning frame and fabric. Fill the bucket with water and add the detergent or soap as per the manufacturer’s instructions.
Mix well until the solution is foamy. With the preparation complete, it is now time to start cleaning your awning frame. Begin by wetting the surface of the frame with a hose or pressure washer.
Measuring the Fabric
awning, fabric, measuring, prepare, step 1
Step 2: Remove the Old Fabric
Now that you have gathered all the necessary materials, it’s time to start changing the fabric on your Sunsetter awning. The first step is to remove the old fabric. This may seem like a daunting task, but with a few simple steps, you’ll have it off in no time.
Start by extending the awning fully. This will allow you more space to work with. Next, locate the fabric tension knobs on each end of the awning.
Loosen these knobs to release the tension on the fabric. Once the tension is released, you can carefully remove the fabric from the roller tube. Be sure to take your time and avoid any tears or snags in the fabric.
Once the fabric is removed, you can discard it or keep it as a spare. With the old fabric out of the way, you’re one step closer to having a brand new awning.
Unscrewing the Side Rails
When it comes to replacing the fabric on your old side rails, the second step is to actually remove the old fabric. This might sound simple enough, but it’s important to be careful and thorough during this process. Start by inspecting the side rail to see how the fabric is attached.
You may find that it’s held in place with screws, staples, or some other type of fastener. Use the appropriate tool, such as a screwdriver or staple remover, to carefully remove these fasteners one by one. Take your time and be gentle to avoid damaging the fabric or the side rail itself.
Once all the fasteners have been removed, you can then peel back the old fabric, exposing the bare side rail underneath.
Removing the Fasteners
Removing the Fasteners Now that we have loosened the tension on the fabric, it’s time to move on to the next step: removing the old fabric. This is where you will need to take out the fasteners that are holding the fabric in place. The first thing you want to do is identify the type of fastener that is being used.
Some common fasteners include staples, nails, and screws. Once you have determined what type of fasteners you are dealing with, you can gather the necessary tools to remove them. If the fabric is attached with staples, you will need a staple remover or a pair of pliers.
Gently insert the staple remover or pliers beneath the staple and slowly pry it up. Be careful not to tear or damage the fabric in the process. For nails or screws, you will need a screwdriver or a drill.
Use the appropriate tool to unscrew or remove the nails or screws. Again, be cautious not to damage the fabric as you remove the fasteners. It’s important to take your time and be gentle when removing the fasteners.
Rushing or applying too much force can cause the fabric to rip or tear. If you encounter any stubborn fasteners, you can try applying a bit of lubricant or using a pair of pliers to get a better grip. Once you have removed all of the fasteners, you can carefully lift off the old fabric and set it aside.
Now you are ready to move on to the next step: attaching the new fabric.
Taking Off the Old Fabric
“Taking off the old fabric can be a daunting task, but with the right approach, it can be done smoothly. Step 2 in the reupholstering process is to remove the old fabric, and this is where all the magic happens. Carefully inspect the piece of furniture and identify any staples, tacks, or nails that need to be removed.
This may require the use of pliers or a staple remover. Once all the fasteners are removed, it’s time to peel back the old fabric. It’s like unwrapping a present, revealing the hidden potential underneath.
Take your time and be gentle as you remove the old fabric, making sure not to tear or damage it. This is a crucial step, as the quality of the new upholstery depends on a clean and smooth surface. With the old fabric finally removed, you are one step closer to giving your furniture a fresh, new look.
“
Step 3: Install the New Fabric
If you have a Sunsetter awning and it’s time to replace the fabric, don’t worry, it’s a relatively simple process. Here’s a step-by-step guide on how to change the fabric on your Sunsetter awning. First, start by removing the existing fabric from the awning frame.
Begin by opening the awning fully and securing it in place. Next, locate the latches on each side of the awning that hold the fabric in place. Release these latches and carefully remove the fabric from the frame.
Once the old fabric is removed, it’s time to install the new fabric. Start by laying the new fabric out flat on the ground or another large flat surface. Make sure the fabric is fully extended and wrinkle-free.
Next, begin attaching the new fabric to the awning frame. Start by lining up the edge of the fabric with the edge of the frame and secure it in place using the latches on each side. Make sure the fabric is evenly tensioned and centered on the frame.
Continue working your way down each side of the frame, securing the fabric in place with the latches. Take your time to ensure the fabric is evenly tensioned and wrinkle-free as you go. Once the fabric is fully attached, double-check that it is centered and properly tensioned.
Adjust as needed before fully closing the awning. That’s it! You’ve successfully replaced the fabric on your Sunsetter awning. Now you can sit back and enjoy your shade without worrying about worn-out or damaged fabric.
Attaching the New Fabric
When it comes to giving your furniture a new lease on life, installing new fabric is one of the most effective ways to achieve a fresh look. Once you have chosen your desired fabric and prepared it by washing and ironing, it’s time to attach it to your furniture. This step requires a bit of precision and patience, but with the right approach, it can be a satisfying and rewarding process.
Start by laying out the fabric on a flat surface and positioning your furniture piece on top of it. Then, carefully fold the fabric over the edges of the furniture and secure it in place using upholstery pins or a staple gun. Make sure the fabric is taut and smooth as you go, taking care to avoid any wrinkles or creases.
Once the fabric is attached to all sides, trim off any excess and secure the edges with a fabric adhesive or by sewing them together. With a little bit of effort, you can transform your furniture into a stylish new piece that will bring a fresh look to your space. So go ahead and get creative with your fabric choice and enjoy the process of giving your furniture a makeover.
Securing the Side Rails
When it comes to securing the side rails of your truck bed, one important step is installing the new fabric. This step is crucial in ensuring that the side rails are protected and in good condition. The new fabric acts as a barrier, preventing any damage or wear and tear from occurring.
It also adds an extra layer of security to your truck bed, ensuring that your cargo stays in place during transportation. Installing the new fabric is a relatively simple process, and it can be done with just a few tools and some basic DIY skills. By following the proper steps, you can have your truck bed side rails secured and ready to go in no time.
Adjusting the Tension
Once you have adjusted the tension of your window blinds, the next step is to install the new fabric. This is an important step because it determines how well your blinds will function and how they will look once they are in place. To install the new fabric, start by laying it out flat and smooth on a clean surface.
Make sure it is properly aligned and centered so that it will hang evenly when you hang it up. Then, carefully lift the fabric and start inserting it into the grooves or slots on the top of the blinds. Take your time and make sure it is inserted fully, without any wrinkles or folds.
Once the fabric is inserted, press it down firmly to ensure a secure fit. Finally, trim any excess fabric using a pair of sharp scissors, leaving about an inch of extra fabric beyond the edges of the blinds. And that’s it! Your new fabric is now installed and your blinds are ready to be hung back up.
Step 4: Test and Adjust
Once you have successfully removed the old fabric from your Sunsetter awning and have prepped the frame for the new fabric, it’s time to move on to the next step: testing and adjusting. This is an important part of the process to ensure that the new fabric is properly aligned and functioning correctly. Start by attaching the new fabric to the frame using the included fasteners or clips.
Once it is securely in place, extend and retract the awning a few times to verify that it operates smoothly and without any snags or issues. Check for any wrinkles or loose sections in the fabric and make adjustments as needed. It may take a bit of trial and error to get the fabric perfectly aligned, but be patient and take your time.
Once you are satisfied with the fit and operation of the new fabric, you can enjoy your refreshed Sunsetter awning and the shade it provides.
Extending and Retracting the Awning
extending and retracting the awning Once you have installed your awning, the next step is to test and adjust it to ensure it is working properly. To do this, start by extending the awning completely and checking for any obstructions or issues with the fabric. Make sure the fabric is taut and not sagging in any areas.
Next, retract the awning to its fully closed position and check that it folds and rolls up smoothly. If there are any issues, such as the fabric getting stuck or not retracting properly, you may need to make some adjustments. This could involve tightening or loosening the tension on the springs or adjusting the alignment of the arms.
It’s important to take your time during this step and make any necessary adjustments to ensure the awning operates smoothly and without any issues. Once you are satisfied with the operation of the awning, you can now enjoy the shade and protection it provides.
Checking for Proper Tension
tension, adjust tension, sewing machine tension, sewing machine, checking tension, proper tension, test and adjust. In the world of sewing, one of the most crucial aspects to master is achieving the proper tension in your stitches. The tension refers to the tightness or looseness of the stitch, and it can greatly affect the overall quality of your sewing project.
So, how do you check for proper tension and make any necessary adjustments? Well, it’s not as daunting as it may seem. The first step is to test the tension by sewing a sample piece of fabric. This will allow you to see if the stitches are too tight or too loose.
If the stitches are too tight, it means that the upper thread is too tight and needs to be loosened. On the other hand, if the stitches are too loose, the upper thread needs to be tightened. The tension can be adjusted using the tension dial on your sewing machine.
Remember, it’s always better to start with a slightly looser tension and gradually make adjustments until you achieve the desired result. Sewing is all about trial and error, so don’t be afraid to experiment and find what works best for you. With practice, you’ll become a pro at checking and adjusting the tension on your sewing machine.
Conclusion
Congratulations! Now you know how to change the fabric on your Sunsetter awning like a pro. Say goodbye to that old, worn-out fabric and hello to a brand new look for your outdoor space. Whether you’re looking to upgrade the color or simply need a replacement for a damaged fabric, this guide has got you covered.
Just remember to follow the steps precisely, and you’ll be enjoying your new awning fabric in no time. So go ahead, make a statement with your awning and show your neighbors what a savvy and stylish home decorator you are. Happy fabric changing!”
Maintaining and Caring for Your New Awning Fabric
To ensure the proper functioning of your new awning fabric, it’s crucial to test and adjust it as needed. Start by testing the extension and retraction of the awning to make sure it opens and closes smoothly. This will also help you identify any potential issues before they become bigger problems.
If you notice any resistance or difficulty in opening or closing the awning, it may need some adjustments. Check the tension of the springs or cables that control the movement of the fabric and make any necessary adjustments to achieve optimal tension. Additionally, test the angles at which the awning can be positioned to provide shade in different areas.
This will allow you to find the best positioning for your specific needs. By testing and adjusting your new awning fabric, you’ll ensure that it functions properly and lasts for years to come.
Enjoying Your Sunsetter Awning
Sunsetter awnings are designed for easy use and enjoyment, and once you have installed your awning, it’s time to test and adjust it to make sure it’s working perfectly. Testing your awning allows you to see how it operates and ensure that it extends and retracts smoothly. Start by opening the awning using the manual crank or motorized option, and pay attention to any unusual noises or resistance.
If everything seems to be functioning well, you can adjust the pitch of the awning by using the built-in adjusters. These allow you to control the angle of the awning, which can be handy for blocking out the sun at different times of the day. Testing and adjusting your Sunsetter awning will ensure that you can enjoy maximum comfort and shade as you relax outdoors.
FAQs
How often should I change the fabric on my Sunsetter awning?
It is recommended to change the fabric on your Sunsetter awning every 10 years or when it starts to show signs of wear and tear.
Can I change the fabric on my Sunsetter awning by myself or do I need professional help?
While it is possible to change the fabric on your Sunsetter awning by yourself, it is recommended to seek professional help for the best results. They have the experience and expertise to ensure proper installation.
What tools and materials do I need to change the fabric on my Sunsetter awning?
To change the fabric on your Sunsetter awning, you will need a ladder, a tape measure, a screwdriver, a power drill, replacement fabric, and any necessary hardware or accessories provided by the manufacturer.
How long does it take to change the fabric on a Sunsetter awning?
The time it takes to change the fabric on a Sunsetter awning can vary depending on your skill level, but it typically takes an average of 1-2 hours.
Can I choose a different color or pattern for the replacement fabric on my Sunsetter awning?
Yes, you can choose a different color or pattern for the replacement fabric on your Sunsetter awning. Sunsetter offers a variety of fabric options to choose from.
Are there any specific care instructions for the new fabric on my Sunsetter awning?
To keep the new fabric on your Sunsetter awning looking its best, it is recommended to regularly clean it with mild soap and water, and avoid using harsh chemicals or abrasive materials.
Can I change the fabric on my Sunsetter awning if it has a motorized operation?
Yes, you can still change the fabric on your Sunsetter awning even if it has a motorized operation. Just make sure to follow the manufacturer’s instructions and disconnect any electrical connections before starting the replacement process.