So you’ve invested in your dream RV and now you want to make sure every aspect of it is in tip-top shape, including the awning. After all, the awning is what provides shade and protection from the elements, making your outdoor experience more enjoyable. However, over time, the fabric of your RV awning can become worn, torn, or faded.
When this happens, it’s important to know how to change the fabric so that you can continue to enjoy your outdoor adventures without any worries. Changing the fabric of your RV awning might seem like a daunting task, but with the right tools and a little bit of know-how, it can be a fairly simple process. In this blog post, we will walk you through the steps of changing your RV awning fabric, from measuring and removing the old fabric to installing the new one.
We will also provide some tips and tricks to help make the process go smoothly. Whether you are a seasoned RVer or a newbie to the RV lifestyle, this blog post is designed to help you confidently change your RV awning fabric. So grab a cup of coffee, put on your DIY hat, and let’s get started on transforming your RV awning from tired to fabulous!
Table of Contents
- 1 What is an RV awning?
- 2 Signs that your RV awning fabric needs to be changed
- 3 Preparing to change your RV awning fabric
- 4 Step-by-step guide to changing your RV awning fabric
- 5 Tips and tricks for a successful RV awning fabric replacement
- 6 Conclusion and final thoughts about changing RV awning fabric
- 7 FAQs
What is an RV awning?
If you’re looking to upgrade your RV awning, knowing how to change the fabric is a valuable skill to have. An RV awning is a retractable cover that extends from the side of your RV to provide shade and protection from the elements. It is made up of a metal framework with fabric stretched over it.
Over time, the fabric may become worn out or damaged, making it necessary to replace it. Changing the fabric on an RV awning involves removing the old fabric, measuring and ordering the new fabric, and installing it onto the awning frame. It may seem like a daunting task, but with the right tools and some patience, it can easily be done.
So, if you’re ready to give your RV a fresh new look and increase its functionality, let’s dive into the process of changing your RV awning fabric.
Definition and purpose of an RV awning
RV awning
Different types of RV awnings
RV awnings are a popular feature on recreational vehicles that provide shade and protection from the sun and rain. They are typically made from a durable fabric material that is attached to the side of the RV and can be extended and retracted as needed. RV awnings come in a variety of sizes and styles to suit different needs and preferences.
One type of RV awning is the patio awning, which extends out from the side of the RV and creates a covered outdoor space. Another type is the window awning, which covers the windows of the RV and provides shade and privacy. There are also slide-out awnings, which are designed to cover the slide-out sections of the RV and protect them from the elements.
No matter what type of RV awning you choose, it is important to properly care for and maintain it to ensure its longevity and effectiveness.
Signs that your RV awning fabric needs to be changed
If you’re an avid RV traveler, you know how important it is to have a sturdy and reliable awning on your vehicle. It provides much-needed shade and protection from the elements while you’re enjoying the great outdoors. However, like any other part of your RV, awning fabric can wear out over time and may need to be replaced.
But how do you know when it’s time to change your RV awning fabric? One telltale sign is if you notice any tears or holes in the fabric. These can occur due to wear and tear or unexpected accidents. Additionally, if you see any signs of mold or mildew on the fabric, it’s a clear indication that it’s time for a new awning.
Another sign is if your awning fabric is no longer retracting or extending properly. This can be a result of worn-out parts or a malfunctioning mechanism. Lastly, if your awning fabric has become discolored or faded, it may be time for a change.
A fresh, vibrant fabric not only looks better but also enhances the overall appearance of your RV. Changing your RV awning fabric may seem like a daunting task, but with the right tools and instructions, it can be done easily. So, don’t wait until your awning fabric is beyond repair; instead, keep an eye out for these signs and be proactive in replacing it to ensure your RV stays comfortable and protected during your travels.
Fading or discoloration
RV awning fabric is exposed to a ton of wear and tear, and over time, it can start to show signs of fading or discoloration. This is a common issue that many RV owners face, and it’s a clear indication that the awning fabric needs to be changed. Fading or discoloration can occur due to prolonged exposure to sunlight, harsh weather conditions, or even mold and mildew growth.
If you notice that your RV awning fabric is looking dull or discolored, it’s important to take action and replace it as soon as possible. Not only does faded or discolored fabric detract from the overall appearance of your RV, but it can also indicate that the material is becoming weaker and less resistant to the elements. By replacing the awning fabric, you can ensure that your RV stays protected and looks its best.
Tears or rips
RV awning fabric plays a crucial role in providing shade and protection against the elements while you’re on the road. However, like any other fabric, it’s prone to wear and tear over time. There are several signs that indicate it’s time to change your RV awning fabric.
Firstly, tears or rips in the fabric are a clear indication that it needs to be replaced. These tears can occur due to various reasons such as strong winds, tree branches, or general wear and tear. It’s important to address these tears as soon as possible to prevent further damage to the awning and ensure the safety of your RV.
Additionally, if you notice that the fabric is faded or discolored, it may be time for a replacement. Fading can occur due to prolonged exposure to the sun and can affect the overall appearance of your RV. Lastly, if you find that the fabric is sagging or is no longer taut, it’s a sign that it has lost its elasticity and needs to be changed.
A sagging awning not only looks unsightly but also compromises its functionality. So, if you notice any of these signs, it’s best to invest in new RV awning fabric to ensure you’re fully protected during your travels.
Mold or mildew growth
RV awnings can be a great addition to your outdoor living space, providing shade and protection from the elements. However, over time, the fabric of your awning may start to show signs of wear and tear. One of the most common issues that RV owners face with their awning fabric is the growth of mold or mildew.
This can be a result of moisture getting trapped in the fabric, especially if it is not properly dried after rain or if it is stored while still wet. Mold and mildew not only look unsightly, but they can also cause health issues for you and your family. If you notice any signs of mold or mildew growth on your RV awning fabric, it is a good indication that it is time to replace it.
Preparing to change your RV awning fabric
Changing your RV awning fabric may seem like a daunting task, but with a little preparation, it can be a straightforward process. Before you begin, make sure you have all the necessary tools and materials. This includes a new awning fabric, a ladder or step stool, a wrench or screwdriver, and a helper if possible.
It’s also a good idea to have some extra hands on deck to ensure a smooth and efficient process. Once you have everything you need, start by removing the old fabric. Carefully roll up the fabric and secure it with tape or a bungee cord to prevent it from unraveling.
Next, remove the screws or bolts that hold the fabric in place on the awning arms. Take your time and be gentle to avoid any damage. With the old fabric removed, unroll the new fabric and position it on the awning arms.
Start by attaching one end and work your way across, making sure it is evenly aligned and taut. Finally, secure the fabric in place with the screws or bolts and give it a test run to ensure everything is working properly. With a little patience and preparation, changing your RV awning fabric can be a relatively simple and rewarding project.
Gather necessary tools and materials
When it comes to changing the fabric on your RV awning, it’s essential to gather all the necessary tools and materials before getting started. This will ensure that you have everything you need on hand and can complete the task efficiently. Some of the tools you may need include a ladder or step stool to reach the awning, a tape measure to accurately measure the fabric, a screwdriver or other tools to remove any screws or fasteners, and a helper to assist with the installation.
Additionally, you’ll need the new fabric for the awning, which can be purchased from an RV supply store or online. By gathering all of these tools and materials ahead of time, you’ll be fully prepared to tackle the task of changing your RV awning fabric.
Choose the right replacement fabric
Changing the fabric on your RV awning is a great way to give your outdoor space a fresh new look. But before you start the process, it’s important to choose the right replacement fabric. There are a few factors to consider when making this decision.
First, think about the material of the fabric. Different materials offer different levels of durability and weather resistance. For example, vinyl fabric is a popular choice because it is waterproof and easy to clean.
Second, consider the color and pattern of the fabric. You may want to choose a fabric that complements the color scheme of your RV or adds a pop of color to your outdoor space. Finally, make sure to measure your awning carefully to ensure that you purchase the correct size fabric.
Taking the time to choose the right replacement fabric will ensure that your new awning looks great and stands up to the elements for years to come.
Measure your existing awning fabric
Replacing the fabric on your RV awning can give your vehicle a fresh new look and provide better protection from the elements. Before you begin the process, it’s important to measure your existing fabric to ensure you order the correct size. The easiest way to do this is to extend your awning fully and measure from the center support arm to the center of the roller tube.
Take note of this measurement and also measure the width of the fabric. These measurements will help you find the right replacement fabric for your RV awning. By measuring your existing fabric, you can be confident that the replacement fabric you order will fit your awning perfectly.
This is important because an ill-fitting fabric can lead to water leakage and reduced protection from the sun. It’s also a good idea to check the manufacturer’s specifications for your specific awning model, as they may have specific measurements or recommendations for replacement fabric. Once you have the measurements, you can start shopping for replacement fabric.
There are many different colors and patterns available, so you can choose one that matches your RV’s style and personal preferences. It’s also a good idea to look for fabric that is durable and resistant to UV rays, as this will help prolong its lifespan and protect you from the sun’s harmful rays. Replacing the fabric on your RV awning can be a DIY project, but if you’re not comfortable doing it yourself, you can also hire a professional to do the job for you.
Either way, having the correct measurements is key to ensuring a successful and seamless installation. So take the time to measure your existing fabric before ordering a replacement, and soon you’ll have a new and improved awning for your RV.
Step-by-step guide to changing your RV awning fabric
Changing the fabric on your RV awning can seem like a daunting task, but with a step-by-step guide, it becomes much easier. First, remove the screws that hold the awning fabric in place. Carefully slide the old fabric out of the awning rail, taking note of how it was threaded.
Next, lay the old fabric out on a flat surface and measure its dimensions. Use these measurements to cut the new fabric to size, making sure to add a few extra inches to each side for a proper fit. Now, slide the new fabric into the awning rail, following the same threading pattern as the old fabric.
Once the fabric is in place, reattach the screws to secure it. Finally, extend and retract the awning several times to ensure the fabric is properly tensioned and functioning correctly. With these simple steps, you can easily change the fabric on your RV awning and enjoy a fresh, new look for your outdoor space.
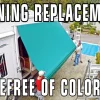
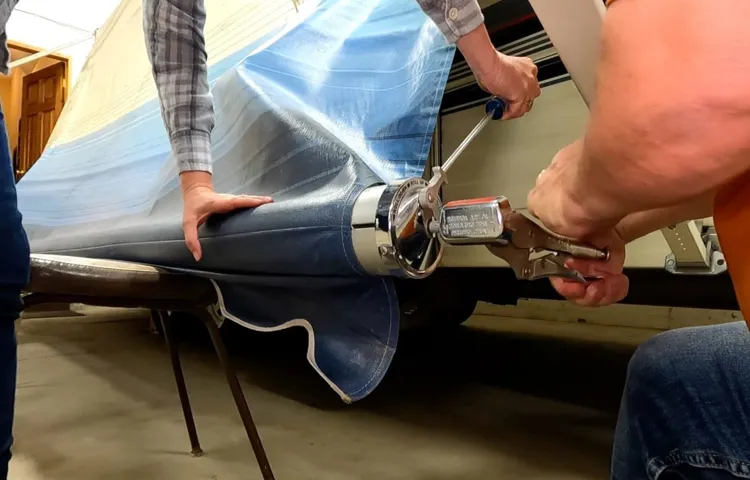
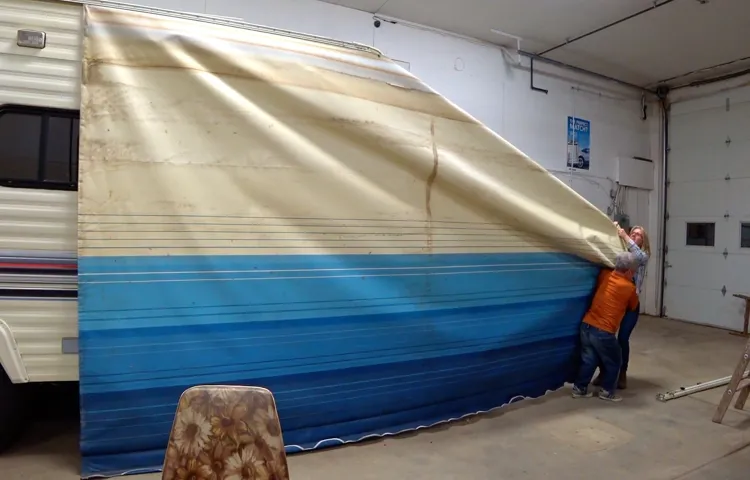
Remove the old fabric
rv awning fabric replacement So, you’ve decided it’s time to give your RV awning a fresh look and replace the old fabric. Well, you’re in the right place! Changing the fabric on your RV awning is a relatively straightforward process that can be completed in a few simple steps. The first step is to remove the old fabric.
This may seem daunting at first, but with a little patience and the right tools, it’s actually quite easy. Start by extending your awning fully and locking it in place to ensure stability. Next, locate the screws or rivets that hold the fabric in place on the awning tube and carefully remove them using a screwdriver or drill.
Once all the screws or rivets are removed, gently pull the fabric out of the awning tube, being careful not to tear or damage it. If the fabric is stuck or difficult to remove, you can use a lubricant or silicone spray to make it easier to slide out. Once the old fabric is removed, you’re ready to move on to the next step: measuring and cutting the new fabric.
Install the replacement fabric
Changing the fabric on your RV awning can give your outdoor space a fresh, new look and provide much-needed shade on those sunny days. Once you have removed the old fabric, it’s time to install the replacement. Don’t worry, it’s not as complicated as it may seem.
Follow this step-by-step guide to easily install the new fabric on your RV awning. Start by laying out the replacement fabric on a clean and flat surface.
Make sure you have all the necessary tools nearby, such as a ladder, tape measure, and screwdriver. Extend the awning to its full length, ensuring the arms are locked in place.
This will make it easier to work with the fabric. Identify the top rail of the awning, which is usually made of aluminum or another sturdy material.
This rail will hold the fabric in place. Measure and mark the center point of the rail.
Align the center point of the replacement fabric with the center point of the rail. Begin by sliding the fabric into the slot at one end of the rail. Slowly work your way to the other end, making sure the fabric is evenly distributed.
Secure the fabric to the RV awning frame
In this step-by-step guide, I will walk you through the process of changing your RV awning fabric and securing it to the awning frame. One of the most important steps in this process is ensuring that the fabric is securely attached to the frame to prevent any potential damage or accidents while on the road. To start, make sure you have all the necessary tools on hand, such as a ladder, a drill, and screws.
Begin by removing the old fabric from the awning frame, being careful not to damage any other parts in the process. Once the old fabric is removed, lay out the new fabric on a clean surface and align it with the awning frame. Starting at one end, begin attaching the fabric to the frame using the screws and drill.
Be sure to evenly distribute the screws along the frame to provide a secure hold. As you work your way down the frame, check to make sure the fabric is taut and evenly stretched. Repeat this process on the other side of the awning frame until the fabric is securely in place.
Finally, give the fabric a good tug to ensure it is properly secured. With these steps, you can confidently secure your RV awning fabric to the frame and enjoy worry-free adventures on the road.
Tips and tricks for a successful RV awning fabric replacement
Changing the fabric on your RV awning can seem like a daunting task, but with the right tips and tricks, it can be a breeze. First, make sure you have the correct replacement fabric for your specific awning model. Measure the size of your awning and order the appropriate fabric accordingly.
Before you begin the replacement process, extend your awning fully and clean it thoroughly to ensure a smooth installation. Next, carefully remove the old fabric by removing any screws or bolts holding it in place. Once the old fabric is removed, lay out your new fabric and attach it to the roller tube using the provided hooks or fasteners.
Be sure to align the fabric properly and evenly distribute the tension across the awning. Lastly, secure the new fabric in place by reattaching any screws or bolts. With these simple tips, you can successfully change the fabric on your RV awning and enjoy a fresh and updated look for your outdoor space.
Work with a partner
RV awning fabric replacement can be a daunting task, but working with a partner can make the process much easier. Here are some tips and tricks to ensure a successful replacement. First and foremost, communication is key.
Make sure you and your partner are on the same page regarding the type of fabric, measurements, and any specific requirements. It’s also a good idea to divide the tasks between the two of you – one person can focus on removing the old fabric while the other can work on installing the new one. This will save time and make the process more efficient.
Additionally, having an extra set of hands can be extremely helpful when it comes to removing and installing the fabric, as it can be heavy and cumbersome. Don’t forget to take breaks and stay hydrated – this can be a physically demanding task. With proper planning and teamwork, you and your partner can successfully replace your RV awning fabric and enjoy a refreshed and functional awning.
Use proper safety precautions
Replacing the fabric on your RV awning can be a great way to give your outdoor space a fresh new look. However, it’s important to remember that working with awnings can be dangerous if proper safety precautions aren’t taken. To ensure a successful fabric replacement, here are some tips and tricks to keep in mind.
Firstly, always make sure to carefully read and follow the manufacturer’s instructions for your specific awning model. Different awnings may have different installation methods, so it’s important to familiarize yourself with the process before getting started. This will help prevent any accidents or damage during the replacement process.
Secondly, it’s crucial to have a sturdy and stable ladder or scaffolding to work from. This will provide you with a safe and secure platform to reach the top of the awning without the risk of falling or losing balance. Always make sure the ladder is on a level surface and securely positioned before climbing up.
Additionally, when removing the old fabric, take extra caution not to damage the awning frame or any other components. Use sharp scissors or a utility knife to carefully cut away the old fabric, making sure to avoid any unnecessary snags or tears. This will help ensure a clean and smooth surface for the new fabric to be installed.
Furthermore, if your awning has any electrical components, such as lights or motors, remember to turn off the power before starting any work. This will prevent any accidental shocks or damage to the electrical system. It’s always better to be safe than sorry when it comes to working with electricity.
Lastly, consider enlisting the help of a friend or family member when replacing the awning fabric. Having an extra set of hands can make the process much easier and safer. They can assist with holding the fabric in place while you secure it or provide help with any heavy lifting that may be required.
Avoid windy or rainy weather
When it comes to replacing the fabric on your RV awning, there are a few tips and tricks that can help ensure a successful outcome. One of the most important things to keep in mind is to avoid doing the replacement during windy or rainy weather. Wind can make the process more difficult by causing the fabric to flap around and potentially get damaged.
Rain can also be problematic as it can make the fabric harder to work with and may cause issues with the adhesive used to attach it. By waiting for a calm and dry day, you can make the job easier and help ensure that the replacement goes smoothly. So, be sure to check the weather forecast and pick a day with favorable conditions before starting your RV awning fabric replacement.
Conclusion and final thoughts about changing RV awning fabric
In conclusion, changing the fabric on your RV awning is a task that may seem daunting at first, but with a little confidence and the right tools, it can be a breeze. Remember to start by carefully measuring your awning and ordering the correct size of fabric – we wouldn’t want you to end up with an extra large sombrero for your RV! Once you have the fabric in hand, gather your trusty assistant and set aside some time to tackle the project. Be sure to have a cold beverage on hand to keep you hydrated and perhaps a few snacks to keep your energy levels up – after all, you’re transforming your RV into a stylish and functional oasis! With the help of the instructions provided and some handy video tutorials, you’ll have that old, faded fabric swapped out for a fresh, vibrant replacement in no time.
The process may involve some inventive maneuvering and maybe a few light-hearted curse words, but hey, that’s part of the fun, right? Once the new fabric is installed, take a step back and admire your handiwork. Awnings may not be the most glamorous part of RV life, but they certainly play a vital role in keeping you shaded and comfortable during those sunny camping trips. Plus, who doesn’t love a well-dressed RV? So go ahead, grab your tool belt and unleash your inner DIY guru.
Changing your RV awning fabric is a rewarding and fulfilling task that will keep you looking cool and stylish as you travel the open road. Happy fabric swapping, my fellow RV enthusiasts!”
FAQs
How often should I replace my RV awning fabric?
It is recommended to replace your RV awning fabric every 5-7 years, or sooner if you notice any signs of wear and tear.
Can I replace my RV awning fabric myself?
Yes, you can replace your RV awning fabric yourself. There are many online tutorials and step-by-step guides available to assist you in the process.
What tools do I need to replace my RV awning fabric?
To replace your RV awning fabric, you will typically need a ladder, a screwdriver or drill, a tape measure, a utility knife, and a helping hand.
How long does it take to replace RV awning fabric?
The time it takes to replace RV awning fabric can vary depending on your experience and the specific model of your RV. On average, it may take a few hours to complete the replacement.
How much does it cost to replace RV awning fabric?
The cost to replace RV awning fabric can vary depending on the size and type of your awning. On average, you can expect to spend between $200 and $500 for the fabric replacement.
Can I choose a different color or pattern for my RV awning fabric?
Yes, you can choose a different color or pattern for your RV awning fabric. Many manufacturers offer a wide range of fabric options to suit your personal style and preferences.
How do I measure the size of my RV awning fabric?
To measure the size of your RV awning fabric, extend the awning fully and measure from one end to the other, including the roller tube. Be sure to measure the width and projection of the awning as well.