If you’re a frequent RV traveler, you know that changing tires is an inevitable part of owning and maintaining an RV. However, the process can feel overwhelming and complicated if you’re not familiar with it. No need to worry, though.
With our step-by-step guide, changing RV tires will become a breeze, and you’ll save money on calling AAA or a mechanic to do the job. We will give you practical advice, including what tools to use and safety precautions to observe. You won’t need to be a professional mechanic to change your RV tires after reading this guide.
We’ll break the process down into simple steps, so you can feel confident in tackling the task yourself. Just take a deep breath and let’s dive in! By the end of this article, you’ll be equipped with all the knowledge needed to change your RV tires efficiently and safely. Don’t go anywhere.
Start your engines, and let’s get started!
Table of Contents
Gather Necessary Tools and Equipment
Changing an RV tire can be a daunting task, especially if you’re not a seasoned mechanic. Before you begin, it’s important to gather all the necessary tools and equipment to make the job easier. You’ll need a lug wrench, jack stand, spare tire, and wheel chocks.
The lug wrench is used to loosen and tighten the lug nuts, and the wheel chocks will keep your RV from rolling while you’re changing the tire. A jack stand will lift your RV off the ground, allowing you to remove the flat tire and replace it with a spare. It’s crucial to ensure that the jack stand is placed on a stable surface and that it’s equipped to support the weight of your RV.
The spare tire should be in good condition and properly inflated before using it. With all of these tools and equipment on hand, you’ll be ready to change your RV tire like a pro!
– Lug wrench
When it comes to changing a tire, it’s important to have the necessary tools and equipment on hand. A lug wrench is one of the most crucial items you will need. This tool is specifically designed to loosen and tighten lug nuts, which hold your tire in place.
Without a lug wrench, changing a tire can become a difficult and time-consuming task. Make sure to choose a lug wrench that is the correct size for your lug nuts, as using the wrong size can cause damage to both the tool and the lug nuts. Additionally, it’s a good idea to have a spare tire and a jack on hand, so you can safely lift your vehicle off the ground and change the tire.
By having all the necessary equipment and tools with you, you can ensure that changing a tire will be a quick and straightforward process.
– Jack
When planning to work on a DIY project, it is important to gather all the necessary tools and equipment beforehand to ensure a smooth and seamless work process. These tools can vary depending on the project, but some basic must-haves include a hammer, screwdrivers, pliers, measuring tape, level, drill, and saw. Make sure to invest in high-quality tools and equipment to avoid safety hazards and unnecessary costs in the long run.
Additionally, it is always a good idea to read the project instructions thoroughly to determine any specific tools or materials needed. Don’t forget to wear protective gear like gloves and goggles to prevent injuries. Gathering all the necessary tools and equipment before starting your DIY project will save you time and ensure the best results.
– Spare tire
If you’re going on a road trip, you never know when a flat tire might strike, so it’s crucial to have a spare tire. But having a spare tire isn’t enough; you also need to have the necessary tools and equipment to change it. Before setting out on your journey, make sure you have a jack, lug wrench, and wheel lock key, if applicable, in your car’s trunk.
Without these tools, it will be impossible to remove the flat tire and replace it with the spare. Don’t forget to check the air pressure in your spare tire regularly and ensure that it’s in good condition. Additionally, keep in mind that not all spare tires are created equal.
Some are meant to be used for a limited distance, while others are only suitable for certain types of weather. Knowing the limitations and specifications of your spare tire is essential, so be sure to familiarize yourself with them before hitting the road. With the right tools and knowledge, changing a flat tire will be a breeze, and you’ll be back on your way in no time.
– Wheel chocks
When it comes to working on a vehicle, safety should always be the top priority. One crucial piece of equipment that should never be overlooked is a set of good quality wheel chocks. These simple devices are designed to prevent the wheels of your vehicle from rolling during maintenance or repair work.
Without them, your car or truck can unexpectedly move, causing injury or damage to yourself, the vehicle, or anything nearby. To properly use wheel chocks, you’ll need to gather a few essential tools. First, you’ll need a good set of quality chocks that are designed to hold the weight of your vehicle.
Next, you’ll need a sturdy pair of gloves since wheel chocks can be sharp and may cause injury if mishandled. Finally, it’s best to use a rubber mallet to help secure the chocks into place. With these tools and a little extra effort, you’ll ensure a safe and smooth repair or maintenance work on your vehicle.
Don’t neglect the importance of wheel chocks and be safe while working on your vehicle.
Prepare Your RV for Tire Change
Changing a tire on an RV is not an easy task, but if you prepare yourself and your RV properly, it can be done smoothly. The first step in preparing your RV for a tire change is to park it on a level surface and turn off the engine. Then, you need to make sure the RV is stabilized using stabilizing jacks to prevent it from moving or rolling while you’re changing the tire.
The next step is to locate the spare tire and make sure it’s fully inflated and in good condition. Check the lug nuts on the wheel you need to change to ensure they’re not rusted or damaged. If they are, you’ll need to replace them before changing the tire.
Use a lug wrench to loosen the lug nuts on the wheel you need to change, but don’t remove them yet. Then, use a hydraulic jack to lift the RV off the ground until the tire is off the ground. Remove the lug nuts and the flat tire, and replace it with the spare tire.
Tighten the lug nuts as much as you can and then lower the RV back to the ground. Finally, use the lug wrench to tighten the lug nuts until they’re fully secured. With these simple steps, you can successfully change a tire on your RV and get back on the road in no time.
– Find a level and firm surface
Preparing your RV for a tire change is crucial in ensuring your safety on the road. The first step is finding a level and firm surface to park your vehicle on. This will create a stable and safe environment for you to change your tire.
It’s essential to avoid any uneven or sloped surfaces as they can create instability, increasing your risk of injury. Once you’ve parked your RV on a flat surface, engage your parking brake and then place chocks behind the tires to prevent your vehicle from rolling. By preparing your vehicle properly, you’ll create a stable and safe environment for yourself to change your tire.
Remember to always prioritize your safety while performing any maintenance tasks on your RV.
– Engage your parking brake
When it comes to changing the tires on your RV, there are a few things you need to consider to ensure you do it safely. One of the first things you should always do is engage your parking brake before attempting to change any tires. This may seem like an obvious step, but it’s one that many people forget to do, and it can have serious consequences.
If your RV is not secure and the parking brake isn’t engaged, it could easily roll while you’re working on the tires. This could not only damage your RV, but it could also cause a serious accident that could have been easily avoided. So, before you do anything else, make sure your parking brake is engaged firmly, and your RV is secure before beginning any work on the tires.
By taking this step, you’ll be setting yourself up for a safer and more successful tire change experience.
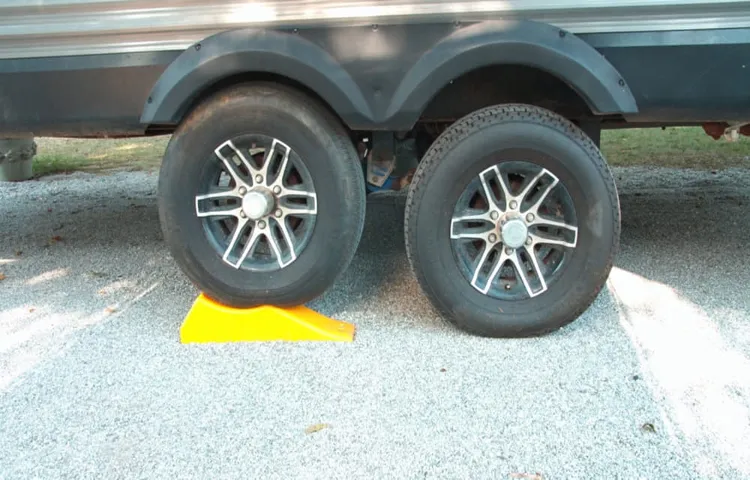
– Use wheel chocks to secure the RV
When changing the tire on your RV, one important thing to consider is how to secure the vehicle in place. This can be done by using wheel chocks, which are wedge-shaped blocks that help prevent the RV from rolling or moving during the tire change. Simply place the chocks in front of and behind the wheels that are not being lifted, and apply them firmly to the ground.
It’s also a good idea to set the parking brake and use a jack stand for extra stability and support. By taking these precautions, you can ensure a safe and successful tire change, without risking any accidents or damage to your vehicle. So don’t forget to include wheel chocks as part of your RV tire change checklist!
Remove the Old Tire
When it’s time to change an RV tire, the first step is to remove the old one. Begin by placing chocks around the wheels to prevent any movement. Then, grab a lug wrench and loosen the lug nuts, but don’t take them off yet.
Use a jack to raise the RV, making sure to consult the owner’s manual for proper placement. Once the RV is securely lifted, remove the lug nuts and take off the old tire. Carefully inspect it for any damage or wear, as this may indicate larger mechanical problems that need to be addressed.
Once the old tire is removed, it’s time to prepare for the installation of the new one.
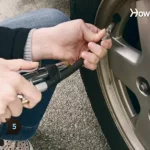
– Use the lug wrench to loosen the lug nuts
Now that you have loosened the lug nuts on your vehicle’s old tire using the lug wrench, the next step is to remove the tire completely. This may seem like a simple task, but it can be tricky if you have never done it before. Start by carefully lifting the flat tire off the hub assembly, being cautious not to damage the studs or the brake rotor.
If the tire appears to be stuck, gently wiggle it back and forth or use a rubber mallet to break it loose. Once the tire is free from the hub assembly, set it aside in a safe place and retrieve your spare tire. Remember to always inspect your spare tire before installation to ensure it is in good condition and has the correct air pressure.
By following these steps, you can remove your old tire without causing any damage and get back on the road in no time. Keep in mind that proper tire maintenance is crucial not only for your safety but also for the longevity of your vehicle’s tires.
– Use the jack to raise the RV
Using the jack to raise the RV is an essential first step when it comes to changing out an old tire. It’s important to make sure the RV is securely in place, using parking brakes and chocks to prevent any movement. Once the RV is in position, use the jack to raise the vehicle until the old tire is off the ground.
Be sure to check your RV’s manual to determine where to place the jack safely. Once the vehicle is lifted, you can begin to remove the old tire using a lug wrench. It’s important to be cautious and work slowly, ensuring that the tire is completely detached before removing it.
With the old tire removed, you can then go about installing your new one, securing it with lug nuts and lowering the RV back down to the ground. By following these steps carefully, you can change out your RV’s tire with ease, ensuring you’re ready to hit the road again in no time.
– Remove the lug nuts and the tire
Removing the old tire is an essential step in changing a flat tire. First, you need to remove the lug nuts. It’s important to make sure your car is secure before you start removing the lug nuts.
Use a tire iron or a wrench to loosen the lug nuts by turning them counterclockwise. Once the lug nuts are loose, you can remove them by hand. After removing the lug nuts, it’s time to remove the tire.
Slowly and carefully pull the tire straight out towards you. If the tire doesn’t come off easily, try wiggling it back and forth until it comes loose. Once the tire is off, inspect it for any damage or wear and tear.
If it’s damaged, you may need to replace it with a new one. Now that the old tire is off, you’re ready to put on the new one and get back on the road. Remember to tighten the lug nuts in a star pattern for even tightening.
Install the Spare Tire
Changing the tire on an RV can seem overwhelming, but with the right tools and knowledge, it can be done easily. If you find yourself with a flat tire, the first step is to safely pull over and assess the damage. Once you’ve confirmed a tire change is necessary, it’s time to install the spare tire.
Begin by locating the jack and tire wrench, usually found in a storage compartment beneath the RV. Position the jack under the frame near the flat tire, ensuring it’s secure. Use the tire wrench to loosen the lug nuts and remove the flat tire.
Align the spare tire with the studs and hand-tighten the lug nuts, avoiding cross-threading. Finally, use the wrench to tighten the lug nuts and lower the RV back down to the ground. Remember to have the flat tire repaired or replaced, and regularly check the condition of your tires to prevent future incidents.
With these steps, you can confidently change an RV tire and get back on the road.
– Position the spare tire and insert the lug nuts
Installing the spare tire can be a daunting task, especially if you’re not familiar with cars. But don’t worry, it’s actually quite simple! First, position the spare tire next to the wheel hub and line up the holes. Then, insert the lug nuts and tighten them by hand as much as possible.
Make sure they are all tightened evenly in a star pattern. Don’t use the wrench just yet. Once the lug nuts are on, lower the car and remove the jack.
Finally, use the wrench to tighten the lug nuts as tight as you can get them. Don’t worry if the car moves a little bit while you’re doing this, it’s perfectly normal. Remember, safety first! Always make sure the car is secure before driving on the spare tire.
And if you’re not comfortable changing a tire on your own, don’t hesitate to call roadside assistance. It’s better to be safe than sorry.
– Tighten the lug nuts until they are snug
Installing a spare tire can be a daunting task, but with the right tools and knowledge, it can be done quickly and safely. One important step in the process is tightening the lug nuts until they are snug. It’s important to note that you don’t want to over-tighten them, as this can cause damage to the wheel or brake components.
On the other hand, if you don’t tighten them enough, the wheel could come loose while driving, which could be dangerous. To ensure you get it right, use a lug wrench or tire iron to tighten the lug nuts in a star pattern, alternating between opposite nuts. This will ensure even pressure distribution and help prevent uneven wear on the wheel.
Remember to give each nut a good twist to ensure they are tight, but make sure not to force them with excessive pressure. With the lug nuts tightened properly, you can feel confident in hitting the road with your spare tire securely in place.
Lower Your RV
If you’ve ever needed to change an RV tire, you may have noticed that the standard height of an RV makes it difficult to access the tires and complete the task. Luckily, there’s a solution: lower your RV. Lowering your RV can be accomplished in a number of ways, including using leveling jacks, blocks, or even airbag suspensions.
However, it’s important to note that lowering your RV too much can cause damage to the frame and other components. It’s recommended to consult your RV manual and follow the manufacturer’s guidelines for safe lowering. By lowering your RV, you’ll have easier access to your tires, making it easier to change them and complete other maintenance tasks.
Plus, it can even improve your RV’s overall stability and handling while on the road.
– Use the jack to lower your RV
When it comes to camping, lowering your RV is a crucial step to ensure a stable and comfortable camping experience. Using the proper RV jack, you can easily and safely lower your RV to the desired height. The process is simple but requires attention to detail to prevent any damage to the RV.
First, you need to ensure that the area where you are lowering your RV is level. Then, you can simply place the RV jack under the part of the RV that needs to be lowered and use the handle to slowly and steadily lower it. Always make sure that you don’t exceed the weight limit of the jack and keep an eye on the RV’s level.
Lowering the RV will help with stability, prevent swaying, and make it easier to enter and exit. So, make sure to lower your RV before you start your camping adventure and enjoy a comfortable and stable experience.
– Tighten the lug nuts and double-check them
Lower Your RV Lowering your RV can be tricky, especially if you’re doing it for the first time. Before you start lowering the RV, make sure you’re on a level surface. Once you’ve determined that the surface is level, it’s time to lower the RV.
First, turn off all the appliances in the RV and disconnect the power source. Next, release the tension of the leveling jacks and begin lowering the RV. Keep an eye on the tires as the RV comes down, making sure they are touching the ground evenly.
Once the RV is fully lowered, it’s time to tighten the lug nuts and double-check them. This step is crucial as it ensures that the wheels won’t come off during your journey. Use a torque wrench to tighten the lug nuts to the manufacturer’s specifications, and make sure to double-check each one.
With these steps, you’ll be able to lower your RV safely and confidently.
Test Your New Tire
Changing an RV tire may seem intimidating, but it’s actually a simple process that you can do yourself. Before getting started, make sure you have all the necessary tools and a spare tire that matches the size and type of the one you’re replacing. Once you have everything you need, find a safe and level spot to park your RV and turn off the engine.
Start by loosening the lug nuts on the tire you need to replace, but don’t remove them yet. Then, use a jack to lift the RV off the ground and remove the lug nuts completely, taking care to keep them in a safe place. Next, carefully remove the old tire and replace it with the new one, lining up the holes with the bolts.
Tighten the lug nuts in a star pattern to ensure they’re evenly tightened, and then lower the RV slowly back to the ground. Once the RV is back on the ground, give the lug nuts another turn in the opposite direction to ensure they’re tight enough. Finally, test your new tire by taking a slow drive around your campsite or parking lot to ensure it’s secure and functioning properly.
Remember to always keep your safety in mind when changing your RV tire, and don’t hesitate to ask for help if you need it. Changing an RV tire may seem daunting, but with a little know-how, you’ll be back on the road in no time!
– Test drive your RV to ensure it handles properly
When you purchase a new RV or replace your old tires, it’s essential to test them before hitting the road. A test drive allows you to ensure that the RV’s handling ability is perfect and that the new tire meets all your needs. Testing your new tire under different weather and road conditions will also give you an idea of how it performs in different environments.
You’ll be able to familiarize yourself with the feel of the tire and how it affects the overall drive of your RV. It’s also an excellent time to test your tire’s balance, wheel alignment, and pressure. Doing this will reduce your chances of encountering unexpected mishaps during your trip and ensure a safe and comfortable driving experience.
Overall, taking the time to test your new RV tire is a crucial step in preparing for your next adventure on the road.
– Check the lug nuts again after the first 50-100 miles of driving
One of the most important steps in ensuring the longevity and performance of your newly installed tires is to test them out. But what does this mean exactly? It means taking them for a spin and paying close attention to how they handle and feel on the road. Are they providing the grip and stability you need? Do they make unusual noises or vibrations? These are all key indicators of whether your new tires are working properly and meeting your expectations.
It’s also important to re-check your lug nuts after the first 50-100 miles of driving to make sure they haven’t come loose. By taking the time to test your tires and perform routine maintenance, you’ll be able to enjoy a safe and comfortable ride for miles to come.
Conclusion
In conclusion, changing an RV tire may seem like a daunting task, but with the right tools and a little bit of know-how, it’s a breeze. Just remember to always stay safe, check your tire pressure regularly, and don’t be afraid to call in the professionals if you need a little extra help. Because at the end of the day, a well-maintained RV tire is the key to a smooth and stress-free road trip.
So go ahead, give it a try and impress your friends with your new tire-changing skills. Who knows, you may even find yourself with a newfound love for all things RV maintenance!”
FAQs
What is the process for changing an RV tire?
The process for changing an RV tire involves gathering the necessary equipment such as a tire jack, lug wrench, and spare tire. Then, loosening the lug nuts on the damaged tire and using the jack to lift the RV so the tire can be removed and replaced.
Can I change an RV tire alone or do I need assistance?
It is recommended to have assistance when changing an RV tire, although it is possible to do it alone. Having someone to assist in lifting the tire and providing safety support can make the process easier and safer.
How often should I check my RV tires for wear and tear?
It is recommended to check your RV tires at least once a month for wear and tear, and before each trip. This includes checking tire pressure, tread depth, and any signs of damage.
Is it necessary to use a specific type of tire for RVs?
Yes, it is important to use tires specifically designed for RVs. These tires have a higher load rating and are able to handle the weight and demands of the vehicle.
How long do RV tires typically last?
RV tires can last up to 5-7 years with proper maintenance and storage. However, the lifespan can vary depending on usage, weather conditions, and other factors.
What should I do if I have a flat tire on the road in my RV?
If you have a flat tire in your RV on the road, it is important to safely pull over to a level area off the road. You should then follow the process for changing the tire or call for roadside assistance if needed.
Can I repair a flat tire on my RV or do I need to replace it?
It is possible to repair a flat tire on your RV if the damage is minimal and not in a critical area. However, if the damage is severe or in a critical area, it is recommended to replace the tire to ensure safety.