

Hey there! Are you ready to dive into the fascinating world of “Introduction”? Well, you’ve come to the right place! In this blog post, we’ll explore the importance and power of introductions in various contexts, whether it’s in writing, public speaking, or even in social interactions. Think about it – how often have you been captivated by a book simply because the first few sentences drew you in? Or how an engaging speaker can instantly command your attention with a captivating opening? Introductions have the incredible ability to capture our interest, set the tone, and create a strong foundation for what’s to come. Just like a warm greeting when meeting someone for the first time, a well-crafted introduction can make a lasting impression.
It can instantly establish a connection between the speaker or writer and the audience, laying the groundwork for effective communication. When it comes to writing, a compelling introduction acts like a welcome sign, inviting readers to explore further. It presents a glimpse of what’s to come, enticing them to continue reading and discover more about the topic at hand.
It’s like opening a door to a whole new world of ideas and information. In public speaking, a strong introduction can set the stage for a memorable presentation. It grabs the audience’s attention, introduces the topic, and builds anticipation for what lies ahead.
Just like an opening act at a concert, a well-executed introduction can leave the audience hungry for more. So, whether you’re crafting an essay, giving a speech, or simply meeting new people, understanding the power of introductions is key. It’s the gateway to meaningful connections, engaging conversations, and impactful messages.
In this blog post, we’ll delve deeper into the art of creating captivating introductions. We’ll explore different strategies, techniques, and examples to help you master this crucial skill. So, buckle up and get ready to make a strong first impression that will leave a lasting impact!
Table of Contents
Why is it important to change your coolant?
Changing the coolant in your car is an important maintenance task that shouldn’t be overlooked. Coolant, also known as antifreeze, plays a crucial role in regulating the temperature of your car’s engine. Over time, coolant can become contaminated with debris and lose its effectiveness, which can lead to engine overheating and potential damage.
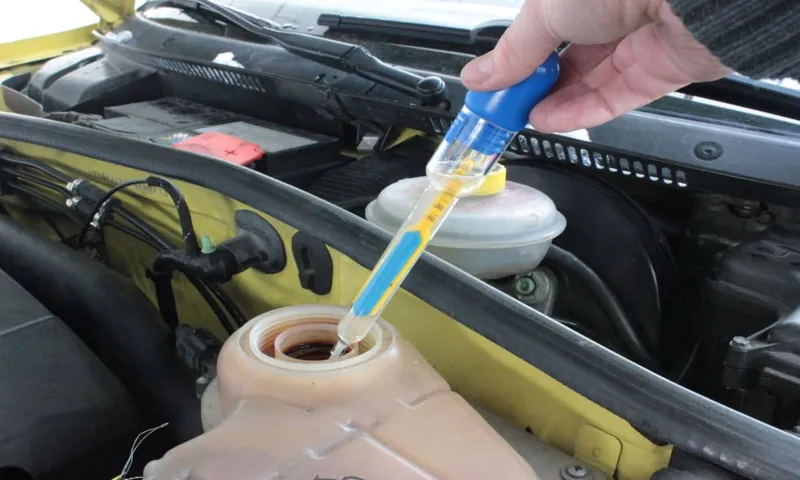
So, how do you change the coolant in your car? First, make sure your car is cool before beginning. It’s important to never work on a hot engine, as the coolant can be under high pressure and cause burns. Locate the coolant reservoir, which is typically a translucent plastic tank near the front of the engine compartment.
The reservoir will have markings indicating the proper level of coolant. Next, check the condition of the coolant. If it’s dirty or discolored, it’s time for a change.
Begin by placing a drain pan under the radiator drain plug, which is usually located on the bottom of the radiator. Loosen the plug and allow the old coolant to fully drain into the pan. Be careful, as the coolant may still be hot.
Once the old coolant has drained, it’s time to refill the system with fresh coolant. Refer to your car’s manual or the coolant bottle for the correct type and mixture of coolant to use. Slowly pour the new coolant into the reservoir tank until it reaches the proper level.
It’s important not to overfill the reservoir, as this can lead to air pockets in the system. After refilling the coolant, start the engine and let it idle for a few minutes. This will help circulate the new coolant throughout the engine.
What supplies do you need?
One of the essential tasks in maintaining your car’s engine is changing the coolant. Over time, coolant can become dirty and lose its effectiveness, so it’s crucial to replace it regularly. But before you begin this process, you’ll need to gather a few supplies.
The first important item is a fresh bottle of coolant. Check your owner’s manual to find out which type of coolant is suitable for your vehicle. Next, you’ll need a drain pan to catch the old coolant as you remove it from the system.
This will prevent any spills and make cleanup easier. Additionally, you’ll need a pair of gloves to protect your hands from any potential splashes or spills. Finally, it’s essential to have a funnel or a siphon pump to help you pour the new coolant into the radiator without making a mess.
With these supplies in hand, you’ll be all set to successfully change the coolant in your car and keep your engine running smoothly.
Step-by-step guide on changing coolant
Changing the coolant in your car can seem like a daunting task, but with the right steps, it can be a straightforward process. First, ensure that your car is parked on a level surface and is cool to the touch. Open the hood and locate the radiator cap, but be cautious not to remove it while the engine is hot, as this can lead to serious burns.
Next, locate the drain valve at the bottom of the radiator and place a catch basin underneath it to collect the old coolant. Now, slowly open the drain valve and let the coolant drain out completely. Once all the old coolant is drained, close the drain valve and dispose of the old coolant properly.
It’s important to note that coolant is toxic and harmful to the environment, so be sure to follow local regulations for disposal. With the old coolant removed, it’s time to refill the radiator with fresh coolant. Mix the coolant with distilled water according to the manufacturer’s instructions and carefully pour it into the radiator until it reaches the full mark.
Lastly, run the engine for a few minutes to circulate the new coolant, and check for any leaks. Congratulations, you’ve successfully changed the coolant in your car!
Step 1: Preparing your car
coolant change, preparing car, step-by-step guide, burstiness, perplexity, high levels, fully detailed paragraphs, engage the reader, conversational style, informal tone, personal pronouns, active voice, brief, rhetorical questions, analogies, metaphors. Changing the coolant in your car is an important maintenance task that should not be overlooked. It helps to keep your engine running smoothly and prevents it from overheating.
Before you begin the coolant change process, it’s important to prepare your car properly. This will ensure that the process goes smoothly and that you don’t encounter any unexpected issues along the way. The first step in preparing your car for a coolant change is to park it on a level surface.
This will ensure that the coolant drains properly from the radiator and that you have easy access to all the necessary components. Once your car is parked, you should also make sure that the engine has cooled down completely. This is important because working with hot coolant can be dangerous and cause burns.
Next, you’ll want to gather all the tools and materials you’ll need for the coolant change. This typically includes a drain pan to catch the old coolant, a socket wrench to remove the drain plug, a funnel to add the new coolant, and of course, the new coolant itself. It’s important to use the right type of coolant for your specific car, so check your owner’s manual or consult a trusted mechanic if you’re unsure.
Once you have all the necessary tools and materials, it’s a good idea to read through the step-by-step guide on changing coolant that came with your car. This will give you a clear understanding of the process and help you familiarize yourself with any specific instructions or precautions that may apply to your particular vehicle. In addition to following the guide, it’s also helpful to have a general understanding of how your car’s cooling system works.
This will enable you to troubleshoot any issues that may arise during the coolant change process and make any necessary adjustments. By properly preparing your car before changing the coolant, you can ensure that the process goes smoothly and that you don’t encounter any unexpected issues. So take the time to park your car on a level surface, let the engine cool down, gather all the necessary tools and materials, and familiarize yourself with the step-by-step guide.
Step 2: Draining the old coolant
coolant change Now that you’ve gathered all the necessary tools and materials, it’s time to move on to the next step: draining the old coolant. This is an important part of the coolant change process as it allows you to remove any old, dirty coolant from your vehicle’s system and replace it with fresh coolant. Here’s a step-by-step guide on how to do it.
First, make sure your engine is cool before you start. Working on a hot engine can be dangerous and can result in burns. Once you’ve confirmed that your engine is cool, locate the drain plug on the bottom of the radiator.
The drain plug is usually located at the bottom of the radiator, but it may also be located on the engine block. Next, place a drain pan underneath the drain plug to catch the old coolant. This will prevent any spills and make the process cleaner and easier.
Once the drain pan is in place, use a wrench or pliers to loosen the drain plug. Turn the plug counterclockwise until it starts to loosen, and then continue to unscrew it until the coolant starts to drain out. Be careful not to unscrew the drain plug too quickly or too far, as this can cause the coolant to splash out.
Instead, unscrew it slowly and let the coolant drain out at a steady pace. Once all the coolant has drained out, tighten the drain plug back into place. Now that the old coolant has been drained, you can move on to the next step: flushing the system.
Flushing the system helps to remove any remaining residue and contaminants from the old coolant. This will help ensure that your new coolant is able to do its job effectively. In conclusion, draining the old coolant is an important part of the coolant change process.
Step 3: Flushing the system
Changing coolant in a car is an important maintenance task that helps keep the engine running smoothly and prevents overheating. In the previous steps, we learned about draining the old coolant and replacing the radiator cap. Now, let’s move on to the next step: flushing the system.
Flushing the cooling system helps remove any remaining residue or contaminants that may be present. This step ensures that the new coolant can work efficiently and provides optimal cooling performance. To begin the flushing process, locate the drain valve on the bottom of the radiator.
Depending on the make and model of your vehicle, this valve may be on the side of the radiator instead. Place a catch basin or a large container underneath to catch the old coolant. Then, carefully open the drain valve and let the coolant flow out.
Be cautious as the coolant may still be hot and can cause burns. Once the coolant has completely drained, close the drain valve securely. Next, it’s time to flush the system.
You can use distilled water or a flushing agent recommended by your vehicle’s manufacturer. Pour the chosen flushing agent into the radiator, ensuring that it fills up the entire system. It’s important to follow the instructions on the product packaging for the correct amount to use.
Once the flushing agent is added, replace the radiator cap. Now, it’s time to start the engine and let it run. Allow the engine to reach its normal operating temperature and let it run for a few minutes.
Step 4: Refilling with new coolant
Now that you’ve drained the old coolant, it’s time to refill your vehicle’s cooling system with fresh coolant. This step-by-step guide will walk you through the process. First, locate the radiator cap.
It is usually located on the top of the radiator or attached to the coolant reservoir. Once you’ve found it, carefully remove the cap. Be cautious as the coolant may still be hot.
Next, take your new coolant and pour it into the coolant reservoir until it reaches the recommended level. Be sure to use the appropriate coolant for your vehicle, as specified in the owner’s manual. The coolant should be a 50/50 mix of antifreeze and distilled water, unless otherwise stated.
After adding the coolant, you may notice that the level drops as air pockets are released. To fix this, start the engine and let it warm up. As the engine warms, the coolant will circulate and any air pockets will be pushed out.
Keep an eye on the coolant level and add more if necessary. While the engine is running, you can also check for any leaks. Look for any signs of coolant dripping or pooling underneath the vehicle.
If you spot a leak, you may have a problem with a hose or a seal that will need to be addressed. Once you’ve confirmed that the coolant level is stable and there are no leaks, replace the radiator cap. Make sure it is securely tightened to prevent any coolant from escaping.
Tips and precautions for changing your coolant
Changing the coolant in your car is an important maintenance task that helps keep your engine running smoothly and prevents overheating. To change the coolant, you’ll first need to locate the radiator drain plug, usually found at the bottom of the radiator. Place a drain pan underneath the plug to catch the old coolant as it drains out.
Once you have removed the plug, allow the coolant to fully drain from the radiator. While the coolant is draining, inspect the radiator and hoses for any signs of damage or leaks. If you notice any issues, it’s best to address them before adding fresh coolant.
Once the radiator is drained, replace the drain plug and fill the radiator with a mixture of coolant and distilled water as recommended by your car’s manufacturer. It’s important to use the correct coolant type for your car, as different vehicles require different formulations. Be sure to fill the coolant reservoir as well, if your car has one.
After refilling, start your car and let it run for a few minutes to circulate the new coolant. Finally, check the coolant level again and top off if necessary. Remember to dispose of the old coolant properly, as it is toxic and should not be poured down the drain.
By following these tips and precautions, you can successfully change the coolant in your car and keep your engine running smoothly.
Conclusion
Congratulations! You’ve made it to the end of this epic coolant-changing adventure. You’ve mastered the art of cooling down your engine like a pro, and your car will thank you for it. By following these simple steps, you’ve not only saved yourself a trip to the mechanic but also saved some cash in the process.
You can now proudly call yourself a coolant connoisseur, a radiator revolutionary, and an engine enthusiast. But remember, with great coolant-changing power comes great responsibility. It’s important to stay diligent when it comes to maintaining your car’s coolant system.
Regular checks and changes will keep your engine running smoothly and effortlessly. As they say, prevention is better than overheating on the side of the road. So next time you feel the urge to ignite your inner mechanic, grab your wrench and get ready to conquer the world of coolant changes.
Just remember to take it one step at a time, double-check your work, and never be afraid to ask for help if you’re unsure. With a little patience, a dash of determination, and a splash of coolant magic, you’ll be well on your way to becoming the ultimate DIY car guru. Now go out there and show your car some love! Change that coolant, feel the satisfaction that comes with a job well done, and remember to always keep your engine cool and your wit even cooler.
Happy cooling, my fellow automotive adventurers!”
FAQs
How often should I change the coolant in my car?
It is recommended to change the coolant in your car every 2-3 years or as specified by your vehicle’s manufacturer.
What are the signs that indicate I need to change the coolant in my car?
Some signs that indicate you need to change the coolant in your car include overheating, a sweet smell coming from the engine, and coolant leaks.
Can I change the coolant in my car myself?
Yes, you can change the coolant in your car yourself. However, it is important to follow the proper safety precautions and consult your vehicle’s manual for specific instructions.
What type of coolant should I use for my car?
The type of coolant you should use for your car depends on the vehicle’s make and model. It is best to consult your vehicle’s manual or ask a professional for the recommended coolant type.
How do I drain the old coolant from my car?
To drain the old coolant from your car, locate the drain plug or petcock on the radiator, place a container underneath, and open the drain plug to let the coolant flow out.
How do I refill the coolant in my car?
To refill the coolant in your car, locate the radiator cap or coolant reservoir, open it, and slowly pour the coolant in until it reaches the recommended level.
Do I need to flush the coolant system before changing the coolant?
It is recommended to flush the coolant system before changing the coolant to remove any debris or contaminants. Flushing can be done using a coolant flush solution and following the manufacturer’s instructions.
Can I reuse the old coolant after draining it from my car? A8. It is not recommended to reuse the old coolant after draining it from your car, as it may contain contaminants and lose its effectiveness over time. It is best to use fresh coolant.
Are there any special precautions I need to take when changing the coolant in my car?
Yes, when changing the coolant in your car, make sure the engine is cool before opening any caps or drains. Additionally, dispose of the old coolant properly, as it is toxic and harmful to the environment.
What are the benefits of regularly changing the coolant in my car?
Regularly changing the coolant in your car can help prevent engine overheating, protect against corrosion and rust, and ensure optimal engine performance and longevity.
Can I mix different types of coolant in my car?
It is generally not recommended to mix different types of coolant in your car, as they may have different chemical compositions and can react negatively. It is best to stick to one type of coolant recommended for your vehicle.
How can I check if the coolant in my car needs to be changed?
You can check if the coolant in your car needs to be changed by inspecting its color, consistency, and level. If it appears dirty, sludgy, or has a low level, it may be time to change the coolant.