

You’re heading down the road with your trailer in tow when suddenly, you hear a loud pop. You pull over to the side of the road only to discover that you have a flat tire on your trailer. Don’t panic, changing a trailer tire is a lot easier than you might think! In this guide, we’ll walk you through the simple steps required to change a trailer tire.
We’ll cover everything from preparing to change the tire to getting back on the road. Whether you’re an experienced road warrior or a first-time trailer owner, knowing how to change a tire is an essential skill. So grab your tire iron and let’s get started!
Table of Contents
Gather Necessary Tools
When you’re facing a flat tire on your trailer, one of the first things you need to do is gather all the necessary tools to get the job done quickly and effectively. Start with a lug wrench, which will help you remove the lug nuts holding the tire in place. Additionally, you’ll need a jack to raise the trailer off the ground and a spare tire that’s fully inflated.
It’s also a good idea to have a pair of gloves to protect your hands while you work. Consider keeping a flashlight handy in case you’re changing a tire in a poorly lit area, and always make sure your emergency flashers are on to alert other drivers of your presence. With all the tools you need at the ready, you’ll be able to change your trailer tire with confidence and get back on the road in no time.
Jack
If you want to take on a new project like building a piece of furniture, it’s essential to gather all the necessary tools for the job. Before starting, make a detailed list of what you need and ensure that you have everything. If you don’t have a specific tool or equipment, consider borrowing or renting it.
Not having the required tools could make the job much more difficult and frustrating than it needs to be. For example, if you’re building a table, you’ll need saws, hammers, nails, screws, sandpaper, and a drill to put the table together. Don’t forget to wear appropriate safety gear like gloves and goggles to protect yourself from any potential injuries.
By gathering all the necessary tools, you’ll be more prepared for the job and increase your chances of completing it successfully.
Lug Wrench
When it comes to changing a tire, having the right tools can make all the difference. One essential tool that you’ll need is a lug wrench. This tool is specifically designed for removing and tightening the lug nuts on your vehicle’s wheels.
Before you get started, gather all the necessary tools, such as a spare tire, a car jack, and of course, a lug wrench. Without these tools, changing a tire can be a difficult and potentially dangerous task. Once you have everything you need, locate the lug nuts on your wheel and use the lug wrench to loosen them.
Make sure to turn the wrench in the correct direction – most often, this will be counterclockwise. Once the lug nuts are loose, raise your car with the jack and remove the wheel. From there, you can easily replace the tire and tighten the lug nuts back in place.
By having a reliable lug wrench in your vehicle’s toolkit, you’ll be able to change a tire quickly and efficiently whenever you encounter a flat.
Spare Tire
When it comes to changing a spare tire, having the necessary tools is essential. First and foremost, you’ll need a jack to lift the vehicle off the ground. Make sure it’s compatible with your specific car make and model.
It’s also crucial to have a lug wrench to loosen and tighten the lug nuts. A tire iron can also come in handy for stubborn lug nuts. In addition, reflective triangles or flares can be utilized to alert other drivers of your presence on the roadside.
A flashlight can be helpful when changing a tire in dark conditions. And last but not least, having a spare tire that is properly inflated and compatible with your vehicle is imperative. It’s always a good idea to check your spare tire’s condition periodically to ensure it’s ready when you need it the most.
By gathering these essential tools, you’ll be prepared for any unexpected flat tire emergency situations on the road.
Locate the Jacking Points
When you need to change a trailer tire, the first step is to locate the jacking points. These are the specific spots on the trailer where it’s safe to place the jack. If you’re not sure where to find them, refer to your trailer’s owner manual.
Some jacking points are marked with a small triangle on the frame. Once you’ve located the jacking points, double-check that the surrounding area is clear of any debris that could cause the jack to slip. Remember to use a stable and secure jack that can handle the weight of your trailer.
By taking the time to locate the jacking points correctly, you’ll ensure a safe and successful tire change. So, let’s get to changing that tire and hitting the road again!
Check Trailer Manual
When it comes to properly jacking up your trailer, the first step is to consult the owner’s manual. This manual will provide specific instructions on the proper jacking points for your particular trailer. Typically, these jacking points will be located near the wheels, and they may be marked with stickers or labels to make them easier to identify.
It’s important to use the designated jacking points, as using any other location could cause damage to your trailer or even result in a potential safety hazard. Checking the manual and locating the correct jacking points may seem like a small and simple task, but it is a vital part of maintaining the safety and integrity of your trailer. So, take the time to review the manual and locate those jacking points before you find yourself in a situation where you need to use them.
Loosen the Lug Nuts
Changing a trailer tire can be a daunting task, but it’s important to know how to do it properly in case of an emergency. The first step in changing a trailer tire is to loosen the lug nuts. You’ll need a wrench or a tire iron to do this.
Make sure you turn the wrench counterclockwise to loosen the nuts. It can be difficult to loosen them at first, especially if they’ve been tightened too much, so you might need to use some extra force. You don’t want to fully remove the lug nuts just yet, though.
Just loosen them enough so that you can easily remove them later when the tire is off the ground. Once you’ve loosened all the lug nuts, it’s time to move on to the next step and jack up the trailer. By taking the time to properly loosen the lug nuts, you’re setting yourself up for success as you continue with the tire-changing process.
Use Lug Wrench
When it comes to changing a tire, the first step is to loosen the lug nuts using a lug wrench. This tool enables you to apply the necessary torque to loosen the nuts. But before you start, make sure that your car is parked on a leveled surface and the emergency brake is engaged.
Always remember that safety comes first. Locate the lug nuts which are usually found behind the wheels. Place the wrench on top of the nut and turn it counterclockwise.
However, don’t remove the lug nut completely yet. Just loosen it enough to make it easier to remove later. Repeat the same steps for all lug nuts with the wrench.
Once you have loosened all the nuts, you can now proceed to lift the car using a jack. Remember to keep the wrench and loose nuts in a safe place to avoid losing them. By using the lug wrench, you can quickly and efficiently loosen the lug nuts and change your tire in no time.
Jack Up the Trailer
Changing a trailer tire can be a daunting task but with the right tools and know-how, it can be done in no time. To begin, find a safe and stable location to park the trailer. Next, ensure that the handbrake is engaged and chock the opposite wheels to prevent the trailer from rolling.
Once you have secured the trailer, use a jack to raise it up until the flat tire is off the ground. When using the jack, it is important to place it in the correct location as advised by the trailer manufacturer. Once the trailer is jacked up, use a lug wrench to loosen the lug nuts on the flat tire before removing it.
Slide the spare tire onto the wheel studs and tighten the lug nuts by hand before lowering the trailer back down. Finally, use the lug wrench to finish tightening the lug nuts, double-checking to ensure they are all tight to prevent the spare tire from falling off while driving. With these steps, you can now confidently change a trailer tire when needed.
Place Jack Under the Identified Jacking Point
When it comes to jacking up a trailer, it’s crucial that you place the jack under the identified jacking point. This is the point on your trailer that’s been specifically designed for lifting and supporting the weight of your trailer. Failing to identify the jacking point and placing the jack in the wrong area could cause serious damage to your trailer, and potentially even lead to an accident while on the road.
Some trailers will have jacking points indicated with a sticker or marking, while others may require a bit more inspection. Always refer to your trailer’s user manual to locate the jacking point and ensure that you’re placing the jack correctly. Once you’ve identified the jacking point, make sure that you position the jack directly under it.
Take care to line the saddle of the jack up carefully, and always double-check that it’s securely in place before beginning to jack the trailer up. By taking your time and being diligent in your approach to jacking up your trailer, you’ll ensure that you can do so safely and without causing any damage.
Slowly Raise the Trailer
When it comes to moving a trailer, it’s important to know how to jack it up safely. First, make sure the trailer is on a flat surface and the wheels are chocked to prevent it from rolling. Then, locate the jack points on either side of the trailer, which will usually be marked with a metal plate or outline.
Place the jack under the appropriate point and use a crank or lever to slowly raise the trailer. Keep an eye on the level of the trailer and adjust the jack as needed. Once the trailer is high enough, you can move it with ease.
Remember to always exercise caution when dealing with heavy loads, and use proper equipment to avoid injury. By following these steps, you can safely jack up your trailer and get it where it needs to go.
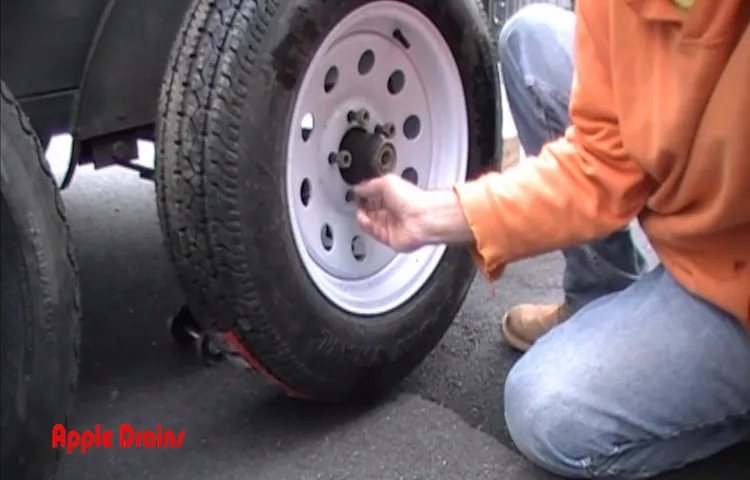
Remove the Tire
Changing a trailer tire can be a daunting task, but it doesn’t have to be. The first step is to remove the tire. Before doing so, make sure the trailer is securely in place and the parking brake is engaged.
Then, locate the lug nuts holding the tire in place and use a lug wrench to loosen them. It may require some strength and effort to loosen the lug nuts, but once they are loose, use a jack to lift the trailer off the ground. Ensure that the trailer is lifted high enough to remove the tire easily.
Once the tire is off the ground, remove the lug nuts and carefully slide the tire off the wheel hub. It’s important to keep the lug nuts in a safe place, so they don’t get lost or misplaced. With the tire removed, you can move on to the next steps in changing the tire, such as inspecting the spare tire and replacing it if necessary.
By following these simple steps, you can easily change a trailer tire and get back on the road in no time.
Fully Remove Lug Nuts
Removing a tire can be a daunting task, especially if you’re not familiar with the mechanics of your vehicle. However, it’s an essential skill that every driver should know. You must begin by fully removing the lug nuts before taking off the tire.
Firstly, ensure that the vehicle is securely parked and apply the parking brake. Next, use a lug wrench to loosen the lug nuts on the tire by turning them counterclockwise. Loosen them just enough to where you can remove them by hand once lifted off the ground.
You should have the wheel lifted by a car jack before any further loosening of the lug nuts. Once the lug nuts are loose, remove them from the wheel studs by hand. Be sure to place the lug nuts somewhere safe and away from the garage floor or sidewalk.
The next step is to take off the tire from the vehicle by lifting it with both hands and moving it away. With the tire removed, inspect it for any signs of wear, cracks or damage. If all is well, then you can proceed to install your new tire or replace the flat tire with the spare.
Gently Pull Tire Off Trailer
Removing a tire from a trailer might seem like a daunting task, but with a little know-how and some elbow grease, it can be done successfully. The first step is to gently pull the tire off the trailer. But before doing so, make sure the trailer is on a level surface, and the brakes are engaged.
Then, remove the wheel covers or hubcaps using an appropriate tool. Next, loosen the lug nuts, but do not remove them completely just yet. Using a jack, lift the trailer until the tire is off the ground.
Now, remove the lug nuts and carefully pull the tire off the trailer. It is important to handle the tire with care and avoid dropping it as it can cause damage to the tire or even injure someone. Once the tire is off, inspect it for any signs of wear or damage before installing a new one.
Removing a tire from a trailer may require some effort, but with the right technique and tools, it can be done without a hitch.
Install the Spare Tire
If you’re out on the road with your trailer and have a flat tire, don’t panic! Changing a trailer tire is actually quite simple. First, make sure you find a safe location to change the tire, away from traffic. Locate the spare tire, which should be stored in a toolbox or underneath the trailer.
Carefully remove the hubcap or wheel cover, then use a lug wrench to loosen the lug nuts on the flat tire. Once the lug nuts are loose, use a jack to raise the trailer off the ground, making sure it’s stable and secure. Remove the lug nuts and the flat tire, then align the spare tire and push it onto the studs.
Replace and tighten the lug nuts, then lower the jack and remove it. Finally, double-check the lug nuts to ensure they’re tightened appropriately before hitting the road again. With these simple steps, you can change your trailer tire and be back on your way in no time!
Align the Rim with the Bolts
Installing a spare tire can be a daunting task, especially if you’re not familiar with the process. One of the most critical steps is aligning the rim with the bolts. This ensures the tire is securely fastened to the vehicle, preventing accidents that can be caused by a loosely fitting spare tire.
To align the rim correctly, line up the holes on the tire with the bolts on the wheel hub. Gently push the tire towards the hub and hand-tighten the lug nuts, alternating between them until they’re all snug. Then use a lug wrench to tighten the nuts further, making sure not to overtighten them.
You can also refer to the vehicle’s manual for specific instructions on installing a spare tire. Remember, safety is paramount, so take the time to do the job correctly.
Hand Tighten Lug Nuts
If you’ve ever found yourself with a flat tire, you know just how frustrating it can be. But don’t worry – changing a tire is a lot easier than you might think. The first step is to locate your spare tire, jack, and lug wrench.
Once you’ve got these in hand, you can get to work. Start by loosening the lug nuts on the flat tire with your lug wrench. You don’t need to remove them completely – just loosen them enough that you can unscrew them by hand once the car is jacked up.
This is an important step because if you try to remove the lug nuts once the car is off the ground, you risk the tire spinning and the car falling off the jack. Once the lug nuts are loose, jack up the car and remove the flat tire. Then, slide the spare tire onto the hub and hand tighten the lug nuts.
Be sure to tighten them in a star pattern to ensure even pressure. Once they’re snug, lower the car and tighten the lug nuts with your lug wrench until they’re nice and tight. Voila – you’ve changed your tire!
Lower the Trailer
Changing a tire on a trailer can be a challenging task if you are unfamiliar with it. Firstly, you should make sure that you have the necessary tools and a spare tire before starting the process. To begin, you should lower the trailer to the ground using the jack provided in your vehicle’s toolkit or a separate hydraulic jack.
To do this, place the jack under the designated lifting point, often located near the damaged tire. Rotate the jack’s handle clockwise to lift the trailer slowly, and then remove the flat tire. Once the flat tire is removed, you can place the spare tire onto the trailer’s wheel hub and secure it with lug nuts.
Unscrew the jack handle counterclockwise to lower the trailer until it rests on the ground. Finally, tighten the lug nuts with a lug wrench, and you are good to go. Regular maintenance of your tires and knowledge of how to change a tire on a trailer can save you from potential headaches while out on the road.
So, next time you’re out on the road, keep this knowledge handy to ensure a smooth ride.
Slowly Lower Trailer with Jack
Lower the Trailer When it’s time to lower the trailer, make sure to do it slowly and carefully using a jack. You don’t want to rush this process, as it can be dangerous and potentially cause damage to the trailer. Start by attaching the jack to the appropriate spot on the trailer’s frame.
Next, slowly begin to turn the handle on the jack, lowering the trailer little by little. Keep an eye on the trailer’s position and the jack’s stability to ensure a safe, controlled descent. It’s important to note that you should never exceed the weight limit of your jack, as this could result in catastrophic failure.
Take your time, and prioritize safety above all else. By following these steps and using caution, you can successfully lower your trailer without incident.
Tighten the Lug Nuts
Tired of stressing over a flat trailer tire? Don’t worry, changing a trailer tire really isn’t as difficult as it seems. First, you’ll want to park the trailer on a flat surface and chock the wheels to prevent it from rolling. Next, use a jack to lift the trailer until the flat tire is off the ground.
Once the tire is removed, replace it with the spare and hand-tighten the lug nuts. But don’t stop there! You want to ensure those lug nuts are tightened correctly to prevent the wheel from falling off while driving. To do this, use a lug wrench to tighten the lug nuts in a star pattern, alternating between opposite lug nuts.
Make sure they are tight enough so that they don’t wiggle, but not so tight that they’re impossible to remove in the future. And just like that, you’re ready to hit the road again. So the next time you find yourself with a flat tire on your trailer, don’t panic – just follow these simple steps and you’ll be back on the road in no time.
Use Lug Wrench to Tighten Lug Nuts
Tightening the lug nuts on your vehicle’s wheels is an essential part of ensuring safety while driving. One of the best tools you can use to tighten lug nuts is a lug wrench. This handy tool is designed to apply the right amount of torque to the nuts, ensuring they are tightened evenly and securely.
When using a lug wrench, it is important to remember to use the proper technique. Start by placing the wrench on the lug nut, making sure it is correctly aligned. Use your body weight to apply pressure and turn the wrench clockwise to tighten the nut.
Be sure to tighten each lug nut in a star pattern to distribute the pressure evenly. By following these simple steps, you can be confident that your lug nuts are tight and your wheels are safe while out on the road.
Double Check Tightness
If you ever find yourself on the side of the road with a flat tire on your trailer, don’t worry! Changing a trailer tire can seem daunting, but with a few simple steps, you can have it done in no time. First, make sure you have all the necessary tools on hand, including a spare tire, a jack, and a lug wrench. Start by loosening the lug nuts while the trailer is still on the ground, then jack up the trailer and remove the lug nuts, taking care to keep them in a safe place.
Next, replace the flat tire with the spare and tighten the lug nuts by hand as tightly as you can, double-checking the tightness with a lug wrench. It’s important to make sure the lug nuts are tightened evenly in a star pattern to ensure the tire is seated correctly. Lastly, lower the jack and give the tire a final tightness check before hitting the road.
With these simple steps, you’ll be back on your way in no time. And remember, safety always comes first – never change a tire on a busy road or unstable surface.
Ensure All Lug Nuts Are Tightened Fully
When it comes to ensuring the safety of your car, one of the most important things to keep in mind is checking the tightness of your lug nuts. These are the nuts that keep your wheels fastened securely to your car, and if they’re not tightened properly, it can cause the wheel to wobble or, in the worst-case scenario, even fall off while you’re driving. To avoid this horrifying situation, it’s crucial that you double-check the tightness of your lug nuts periodically.
But how do you know if they’re tightened properly? One way is to use a torque wrench to measure the lug nut’s tightness. However, if you don’t have one, you can always use a lug wrench and tighten the nuts as hard as you can. Just make sure not to over-tighten them, as this can cause the studs to break.
Ultimately, the key is to ensure that all your lug nuts are tightened fully to keep yourself and others safe while on the road.
Conclusion
Changing a trailer tire may seem daunting, but with the right tools and a bit of know-how, it’s a breeze. Think of it like a dance – position your trailer in a safe spot, loosen the lug nuts in a steady rhythm, jack it up smoothly, remove the flat tire with a flourish, and replace with the new tire with grace. Tread carefully as you lower it back down and finish up with a final tightening of the lug nuts.
Now that your trailer is back on the road, you can be confident that you’ve mastered the cha-cha-cha of tire changing!”
FAQs
Can I change a trailer tire by myself?
Yes, you can change a trailer tire by yourself. However, it is always recommended to have an extra person for safety.
What tools will I need to change a trailer tire?
You will need a lug wrench, a spare tire, and a jack to change a trailer tire.
How do I know when my trailer tire needs to be changed?
You need to check your tire’s pressure regularly and look for signs of wear and tear such as cracks or bulges in the tire. If you see any of these signs, it’s time to change your trailer tire.
What is the correct way to jack up a trailer to change the tire?
Before jacking up your trailer, make sure it’s on a flat and level surface. Place the jack under the frame or the axle of the trailer, following the manufacturer’s recommendations.
Can I use the same tire that’s on my car for my trailer?
No, you cannot use the same tire that’s on your car for your trailer because they have different load capacities and speed ratings.
How often should I check my trailer tires?
Ideally, you should check your trailer tires before every trip, and at least once a month if your trailer is parked for an extended period.
What should I do if I have a flat tire on my trailer while driving?
Slowly pull over to a safe spot on the roadside and change the tire as soon as possible. If you don’t feel comfortable changing the tire, call for roadside assistance.