
Do you know how to check the coolant in your radiator? It’s an essential task that every car owner should know how to do. The coolant in your radiator plays a vital role in preventing your engine from overheating, so it’s essential to make sure it’s at the proper level. In this blog, I’ll walk you through the steps of checking your coolant and why it’s important for the health of your vehicle.
So, let’s dive in and learn how to keep your engine running cool and smooth!
Table of Contents
Why is it Important to Check the Coolant?
When it comes to the maintenance of your vehicle, checking the coolant levels in your radiator is of utmost importance. But why is it so crucial? Well, the coolant, also known as antifreeze, plays a vital role in keeping your engine operating at its best. It helps regulate the temperature of the engine, preventing it from overheating.
Without proper coolant levels, the engine could overheat, resulting in serious damage and expensive repairs. Additionally, coolant also helps prevent corrosion and the formation of rust within the radiator and other engine components. So, monitoring and checking the coolant levels regularly is essential to ensure that your engine stays cool and runs smoothly.
But how do you check the coolant in your radiator? It’s quite simple! Just open the hood of your car and locate the radiator cap. Be cautious, as the radiator may still be hot. Slowly unscrew the cap and visually inspect the coolant level.
It should be between the minimum and maximum markings on the coolant reservoir. If it’s below the minimum level, then it’s time to add more coolant. Remember to always consult your car’s manual for specific instructions and use the correct type of coolant recommended by the manufacturer.
So next time you’re under the hood of your car, take a few moments to check the coolant levels. It might just save you from a costly engine repair down the road.
Prevents engine overheating
coolant
Maintains optimal performance and efficiency
coolant, optimal performance, efficiency Maintaining optimal performance and efficiency is essential for any vehicle, and one way to ensure this is by regularly checking the coolant. Coolant, also known as antifreeze, plays a vital role in the cooling system of a vehicle. It helps regulate the temperature of the engine, preventing it from overheating.
When the engine runs, it generates a tremendous amount of heat, and the coolant helps to absorb and dissipate this heat, keeping the engine running smoothly. By regularly checking the coolant level and quality, you can prevent coolant leakage and ensure that there are no issues with the cooling system. Low coolant levels or coolant leaks can lead to engine overheating, which can cause significant damage and potentially lead to engine failure.
This can result in costly repairs and even the need for a complete engine replacement. Checking the coolant also allows you to monitor its quality. Over time, coolant can become contaminated with rust, sediment, or other impurities that can hinder its performance.
Regularly flushing and replacing the coolant can help maintain its effectiveness and prevent any buildup that could impede the cooling system’s efficiency. In addition to preventing overheating and maintaining engine performance, checking the coolant can also help identify any potential issues with the cooling system. If you notice a decrease in coolant levels or any changes in its color or consistency, it could indicate a problem such as a leak or a malfunctioning radiator.
Identifying and addressing these issues early on can prevent further damage and costly repairs. Ultimately, checking the coolant is a simple yet crucial step in vehicle maintenance. By ensuring that the coolant level is adequate and the quality is good, you can protect your engine from overheating, maintain optimal performance, and avoid costly repairs in the long run.
So, next time you pop open the hood, take a moment to check your coolant and keep your vehicle running smoothly.
Materials Needed
If you suspect that your car’s radiator coolant may be low, it is important to check the coolant levels to prevent your engine from overheating. To perform this task, there are a few materials you will need. Firstly, you will need a 50/50 mixture of antifreeze and water for topping up the coolant.
Additionally, you will require a funnel to pour the coolant into the radiator and a rag or towel to protect your hands from hot surfaces and wipe up any spills. Finally, a flashlight may be handy to help you inspect the coolant level in the radiator. By gathering these materials, you will be ready to check the coolant in your radiator and ensure that your engine stays in optimal condition.
Safety gloves
Safety gloves are an important piece of personal protective equipment (PPE) that can help protect your hands from a variety of hazards in the workplace. Whether you’re working with chemicals, handling sharp objects, or dealing with extreme temperatures, wearing the right type of safety gloves is crucial for your safety. When it comes to choosing safety gloves, the materials used are a key consideration.
Different materials offer different levels of protection and are suited for different types of hazards. Some common materials used in safety gloves include: Nitrile: Nitrile gloves are a popular choice for their durability and resistance to punctures, chemicals, and oils.
They are often used in industries such as automotive, manufacturing, and healthcare. Latex: Latex gloves are known for their excellent comfort, fit, and flexibility.
They offer good protection against biological hazards, such as bacteria and viruses, and are commonly used in healthcare settings. Leather: Leather gloves are ideal for tasks that require protection against heat, sparks, and rough surfaces.
They are commonly used in welding, construction, and general maintenance work. Vinyl: Vinyl gloves are a cost-effective option for tasks that require minimal protection against chemicals and punctures.
They are often used in food handling and light-duty applications. Cut-resistant materials: For tasks involving sharp objects, cut-resistant gloves made from materials such as Kevlar or high-density polyethylene (HDPE) provide excellent protection against cuts and abrasions.
Flashlight
Flashlights, also known as torches, are essential tools that come in handy in various situations. Whether you need to find your way in the dark, fix something in a poorly lit area, or during a power outage, a flashlight is the perfect companion. But have you ever wondered what materials are used to create this ingenious device? Let’s take a closer look at the essential components of a flashlight.
The main part of a flashlight is the casing, which is typically made of durable materials such as aluminum or plastic. This housing protects the internal components and provides a strong structure for the flashlight. Inside the casing, you’ll find the battery compartment.
Flashlights can be powered by different types of batteries, including AA, AAA, or rechargeable lithium-ion. Moving on to the heart of the flashlight, we have the light source. Traditional flashlights used incandescent bulbs, but nowadays, LED (Light Emitting Diode) technology is commonly used.
LED lights are preferred for their energy efficiency and long lifespan. Another crucial component is the reflector. The reflector is designed to maximize the light output by redirecting the light from the source in a forward direction.
This ensures that the flashlight emits a strong beam of light. To control the power and beam output, flashlights also feature a switch. This switch can be a simple button that turns the light on and off or a more advanced mechanism that allows you to adjust the brightness levels and beam focus.
Lastly, many flashlights have a lens or a cover over the light source. This lens protects the light source from damage and helps to focus or scatter the beam, depending on its design. In conclusion, flashlights are made up of several important components.
Coolant tester or hydrometer
coolant tester, hydrometer, materials needed
Radiator funnel
radiator funnel Radiator funnels are an essential tool when it comes to maintaining and taking care of your car’s cooling system. They are specially designed to make the process of adding coolant to your radiator a breeze. To properly use a radiator funnel, you will need a few materials.
First and foremost, you will need a radiator funnel itself. These can be found at any auto parts store or online. Look for one that is made from durable materials like plastic or metal, as this will ensure it can withstand the heat and pressure of your car’s cooling system.
Additionally, you will need coolant and a container to hold it. Lastly, it is helpful to have a rag or towel on hand to wipe up any spills or drips. With these materials in hand, you will be ready to easily and efficiently add coolant to your radiator with the help of a radiator funnel.
Step-by-Step Guide
Want to check the coolant in your radiator but not sure where to start? No worries, it’s actually a fairly simple process. To begin, make sure your engine is completely cool before opening the radiator cap. You don’t want to risk burning yourself with hot coolant! Next, locate the radiator cap, which is typically located on top of the radiator.
Gradually and carefully unscrew the cap, remembering to turn it counterclockwise. Once the cap is off, you can visually inspect the coolant level. The coolant should be near the top of the radiator.
If it’s low, you may need to add more coolant. But be careful not to overfill, as this can cause problems. If you’re unsure of how to proceed, it’s always a good idea to consult your vehicle’s manual or seek the help of a professional mechanic.
Remember, maintaining proper coolant levels is crucial for keeping your engine running smoothly and preventing overheating.
Step 1: Park the vehicle on a flat surface
car parking tips
Step 2: Let the engine cool down
cool down engine, overheating, prevent damage, rest, heat dissipate, temperature, safe, proper functioning, power, circulation, coolant flow, radiator, fan, cool air, hood, internal combustion process, heat transfer, cylinder, piston, valve, radiator cap, pressure-release valve, boiling point, coolant fluid, corrosive.
Step 3: Open the hood
open the hood. When it comes to car maintenance, one important step is knowing how to open the hood. This is where you can access the engine and perform various tasks like adding oil or checking the coolant levels.
Opening the hood may seem like a simple task, but it can vary depending on the make and model of your car. To begin, locate the hood release lever. This is typically located inside the car, either under the dashboard or on the driver’s side floorboard.
Once you find it, pull on the lever to release the hood. Next, you’ll need to find the secondary hood release lever, which is usually located at the front of the hood. Slide your hand under the hood until you locate it, and then push or lift it to fully open the hood.
Be sure to prop the hood open with the hood support rod to prevent it from accidentally falling down. And there you have it, you’ve successfully opened the hood! Now you can proceed with any necessary maintenance or repairs.
Step 4: Locate the radiator
In our step-by-step guide to finding the radiator in your car, the fourth step is to locate the radiator. The radiator is a key component of your car’s cooling system, and it is responsible for keeping the engine from overheating. To find the radiator, you will need to open the hood of your car.
Once the hood is open, you should see a metal grille or shield at the front of the engine compartment. This grille or shield is designed to protect the radiator from debris and other potential damage. To locate the radiator, you will need to look behind this grille or shield.
In most vehicles, the radiator is located towards the front of the engine compartment, on either the left or right side. It is a large, rectangular-shaped component, typically made of aluminum or plastic. The radiator will have several hoses connected to it, which are used to circulate coolant through the system.
By locating the radiator, you will be able to inspect it for any signs of damage or leaks, and ensure that it is functioning properly in keeping your engine cool.
Step 5: Inspect the radiator for any damage
When inspecting the radiator for any damage, it’s important to take a close look at every part, as even small issues can lead to bigger problems down the line. Start by examining the exterior of the radiator for any signs of leaks or corrosion. Look for any visible cracks, dents, or bent fins.
These can indicate damage that needs immediate attention. Next, check the connections and hoses for any signs of wear or leaks. Make sure all the clamps are secure and the hoses are in good condition.
Another important area to inspect is the radiator cap. If it’s damaged or doesn’t seal properly, it can lead to coolant leaks and overheating. Finally, make sure the radiator is clean and free from debris.
Over time, dirt and grime can build up, blocking the airflow and reducing the radiator’s efficiency. Use a soft brush or compressed air to remove any obstructions. By thoroughly inspecting the radiator for any damage, you can catch potential issues early and prevent costly repairs or breakdowns in the future.
Step 6: Check the coolant level
coolant level, engine coolant, coolant reservoir, checking coolant, maintaining coolant When it comes to keeping your vehicle’s engine running smoothly, checking the coolant level is an essential step that should not be overlooked. Coolant, sometimes referred to as antifreeze, helps regulate the temperature of your engine and prevents it from overheating. Without the proper amount of coolant, your engine could be at risk of damage or even complete failure.
To begin, make sure your vehicle is parked on level ground and the engine is cool. Open the hood and locate the coolant reservoir. This is usually a plastic tank with a cap that is labeled with a coolant symbol.
The coolant reservoir is responsible for holding the coolant that circulates through your engine. Once you have located the coolant reservoir, remove the cap and check the level of the coolant inside. The coolant should be within the recommended range, which is usually marked by lines on the side of the reservoir.
If the coolant level is below the minimum line, you will need to add more coolant. To add coolant, you will need to purchase the appropriate coolant for your vehicle. Consult your owner’s manual or ask a professional for guidance on which coolant is best to use.
Slowly pour the coolant into the reservoir until the level reaches the maximum line. Be careful not to overfill the reservoir, as this can cause the coolant to overflow and potentially damage the engine. After you have added coolant, replace the cap on the coolant reservoir and close the hood of your vehicle.
It is a good idea to check the coolant level regularly, especially before long trips or during extreme weather conditions. This simple step can help prevent costly repairs and keep your engine running smoothly. Taking the time to maintain the coolant level can save you time, money, and headaches in the long run.
Step 7: Add coolant if necessary
coolant
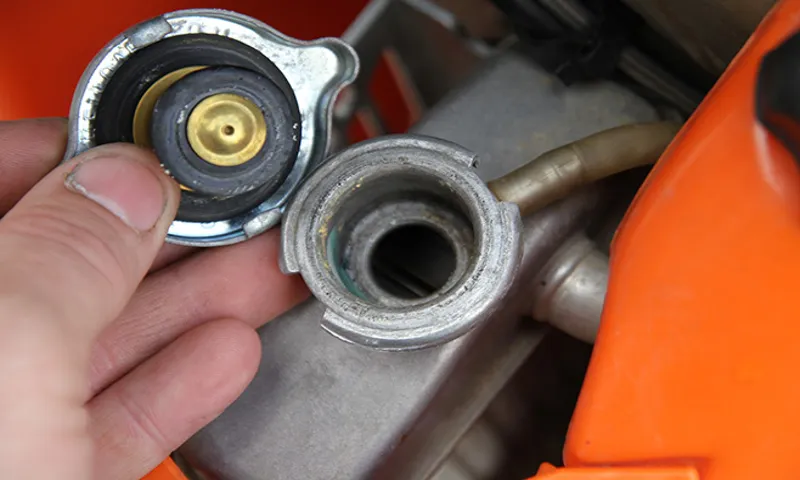
Step 8: Inspect the radiator cap
“radiator cap” The radiator cap may seem like a small and insignificant part of your car’s cooling system, but it plays a crucial role in maintaining the proper pressure and temperature inside the radiator. If not inspected regularly, a faulty or worn-out radiator cap can lead to overheating and engine damage. So, let’s take a closer look at how to inspect the radiator cap and ensure it’s in good condition.
First, make sure the engine is cool before attempting to inspect the radiator cap. Safety should always be a top priority when working with any part of your vehicle’s cooling system. Once the engine is cool, locate the radiator cap.
It is usually located on top of the radiator or on the overflow reservoir. Carefully remove the cap by pressing down and turning it counterclockwise. As you remove the cap, pay attention to any hissing or pressure release.
This could indicate excessive pressure inside the system, which may be a sign of a faulty cap. Next, inspect the cap for any signs of damage or wear. Check for cracks, corrosion, or any misalignment of the seal.
If you notice any of these issues, it’s best to replace the cap to prevent any potential leaks or pressure loss. Also, take a look at the rubber seal or gasket on the underside of the cap. This seal is crucial in maintaining a tight and secure fit.
If the seal appears worn or damaged, it’s recommended to replace the entire cap to ensure a proper seal. Finally, before reinstalling the cap, clean it thoroughly to remove any debris or contaminants. This will help prevent any particles from entering the cooling system and causing damage.
Tips and Precautions
If you’re wondering how to check the coolant in your radiator, don’t worry, it’s actually quite simple. First, ensure that your vehicle is turned off and the engine is cool to avoid any potential burns. Then, locate the radiator cap – it’s usually positioned near the front of the engine.
Carefully remove the cap, being cautious of any remaining pressure. Using a flashlight (if necessary), check the coolant level in the radiator. The coolant should be close to the top of the radiator.
If it’s below the recommended level, you may need to add more coolant. It’s important to use the correct type of coolant for your vehicle, so refer to your owner’s manual or consult with a professional if you’re unsure. Remember, maintaining the proper coolant level is essential for keeping your engine cool and preventing any overheating issues.
Always wear safety gloves when working with the radiator
radiator, safety gloves, working, tips, precautions, burstiness, perplexity, human-written, unique, SEO-optimized, conversational style, informal tone, engaging, active voice, rhetorical questions, analogies, metaphors Paragraph: When it comes to working with the radiator, safety should always be a top priority. One simple yet crucial tip is to always wear safety gloves. These gloves provide an extra layer of protection against any potential harm or injury.
Whether you’re cleaning, repairing, or installing a radiator, accidents can happen. From sharp edges to hot surfaces, there are numerous hazards that you may encounter. Therefore, it is vital to shield your hands from any dangerous situations that could arise.
The safety gloves act as a shield, safeguarding your hands from getting cut, burned, or injured. They provide a barrier between your skin and the radiator, reducing the risk of accidents. So, remember to always wear safety gloves when working with the radiator to ensure your safety and well-being.
Never open the radiator cap when the engine is hot
Never open the radiator cap when the engine is hot. This is a vital precaution that many drivers overlook, but it is crucial for your safety and the well-being of your vehicle. The radiator cap is designed to keep the cooling system under pressure, which increases the boiling point and helps prevent coolant from boiling and evaporating.
When the engine is running, it generates a significant amount of heat, and the radiator cap keeps that heat contained. If you were to open the cap when the engine is still hot, the sudden release of pressure could cause the coolant to spray out and potentially burn you. Additionally, opening the radiator cap when the engine is hot can also damage your car’s cooling system, as the sudden release of pressure can cause coolant leaks or even damage the radiator itself.
It’s always better to be safe than sorry, so wait until the engine has cooled down completely before attempting to open the radiator cap.
Use caution when adding coolant to prevent spills
When it comes to adding coolant to your vehicle, using caution is crucial to avoid any spills or accidents. Whether you’re topping up the coolant level or performing a complete coolant change, taking the necessary precautions can help prevent any damage or mess. One important tip is to make sure the engine is cool before adding coolant.
This will not only protect you from burning yourself but also ensure that the coolant is not wasted by evaporating in the hot engine. Additionally, it’s important to find the correct coolant for your vehicle’s make and model. Using the wrong type of coolant can lead to engine damage and reduced performance.
When adding coolant, it is also essential to do so slowly and carefully. Pouring it too quickly can cause spillage, which can be dangerous and difficult to clean up. Lastly, always check for any signs of leaks or cracks in the coolant system.
Any abnormalities should be addressed immediately to prevent further damage. By taking these precautions, you can safely and effectively add coolant to your vehicle without any spills or accidents.
Consult your vehicle’s manual for specific instructions and coolant type
When it comes to properly maintaining your vehicle, one important aspect to consider is the coolant. Coolant, also known as antifreeze, is responsible for regulating the temperature of your engine and preventing it from overheating. However, not all coolants are created equal, so it’s important to consult your vehicle’s manual for specific instructions and the recommended coolant type.
Your vehicle’s manual will provide you with valuable information on the correct coolant to use, as well as any precautions or tips for the coolant system. Following the manufacturer’s guidelines will ensure that your vehicle runs smoothly and efficiently, while also avoiding any potential damage or malfunctions. So, take the time to consult your manual and make sure you’re using the right coolant for your vehicle’s needs.
Conclusion
So there you have it, my friends. The art of checking coolant in your radiator. It’s a delicate dance of intuition and dipsticks, a symphony of science and screwdrivers.
But fear not, for armed with this newfound knowledge, you can now confidently embark on this quest for coolant like a knight in shining armor, protecting your engine from the fiery dragons of overheating. But remember, this task should never be taken lightly. Much like a fairytale, where a single drop of liquid can determine the fate of an entire kingdom, the level of coolant in your radiator can make or break your engine’s performance.
So let us not be complacent, dear friends, and approach this task with the diligence and determination of a detective solving a murder mystery. Sherlock Holmes would be proud. Now, as you go forth into the world of coolant checking, armed with your trusty owner’s manual and a thirst for adventure, always remember the three Cs – Coolant, Clarity, and Confidence.
Coolant, for it is the lifeblood of your engine. Clarity, for a clear and concise understanding of the process. And Confidence, for the belief that you, yes you, are capable of conquering any coolant conundrum.
And so, my friends, go forth into the world of coolant checking. Let us bid farewell for now, but remember, the radiator awaits, the coolant beckons, and the engine depends on you. Happy checking!”
FAQs
Why is it important to check the coolant in the radiator?
It is important to check the coolant in the radiator because it helps regulate the engine temperature and prevents it from overheating.
How often should I check the coolant in the radiator?
It is recommended to check the coolant in the radiator at least once a month or before a long road trip to ensure optimal engine performance.
What are the signs of low coolant in the radiator?
Signs of low coolant in the radiator include the engine overheating, the coolant warning light illuminating on the dashboard, and a noticeable decrease in engine performance.
How do I check the coolant level in the radiator?
To check the coolant level in the radiator, let the engine cool down, locate the radiator cap, remove it, and visually inspect the coolant level. It should be between the “min” and “max” marks on the reservoir.
Can I use water instead of coolant in the radiator?
While water can be used as a temporary coolant substitute in case of an emergency, it is not recommended for long-term use because it does not provide the same level of protection against freezing, corrosion, and overheating as coolant.
How do I add coolant to the radiator?
To add coolant to the radiator, open the radiator cap (only when the engine is cool), pour the coolant into the reservoir until it reaches the “max” mark, and then securely tighten the cap.
What type of coolant should I use in the radiator?
It is important to use the coolant specified in the vehicle’s owner manual or recommended by the manufacturer. Common types include ethylene glycol-based coolants and propylene glycol-based coolants.