
Hey there! Is your car constantly losing coolant, leaving you scratching your head and wondering where it’s all going? Well, you’re not alone. Coolant leaks are a common issue for many car owners, and they can be quite frustrating to track down. But fear not, because in this blog post, we’re going to guide you through the process of checking for a coolant leak.
Think of coolant like the lifeblood of your car’s engine. It circulates through the engine, absorbing heat and keeping it running smoothly. But if there’s a leak in the system, that precious coolant can escape and cause all sorts of problems.
It’s important to catch a coolant leak early on to prevent any further damage to your engine. So, how do you check for a coolant leak? Well, the first step is to perform a visual inspection of your engine bay. Look for any signs of coolant pooling or dripping underneath your car.
You may also notice a sweet smell or a white, milky substance around the radiator or coolant reservoir. These are all indicators of a coolant leak. Next, you’ll want to check your coolant levels.
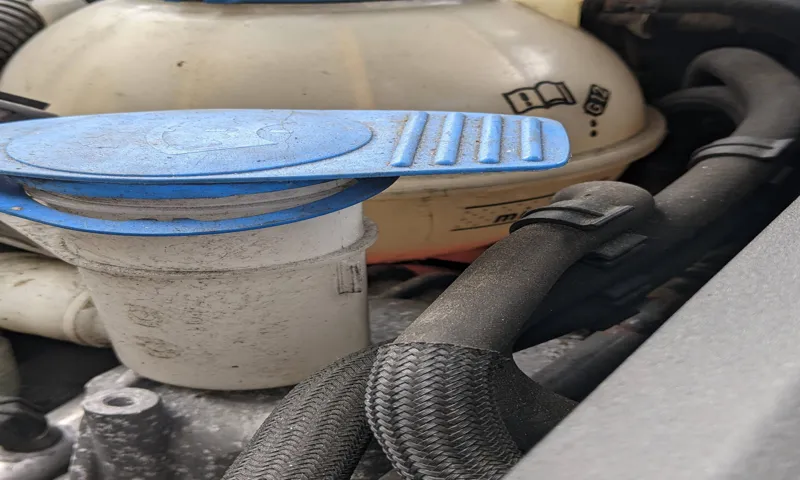
Park your car on a level surface and let the engine cool down. Then, pop open the hood and locate the coolant reservoir. There should be a minimum and maximum line marked on the reservoir.
If the coolant level is below the minimum line, there’s a good chance you have a leak. You can also perform a pressure test to pinpoint the exact location of the leak. This involves using a pressure tester to pressurize the cooling system and then observing where the pressure drops.
Table of Contents
Introduction to Coolant Leaks
So, you’re driving down the road and suddenly you notice a strange smell coming from under the hood of your car. You pop the hood and to your surprise, you see a bright green liquid pooling around the engine. Uh-oh, it looks like you have a coolant leak! Coolant, also known as antifreeze, is an important fluid that keeps your engine running at the right temperature.
It circulates through the engine, absorbing the excess heat and then passing it through a radiator to cool it down before sending it back to the engine. A coolant leak can be a serious problem if left untreated because it can cause your engine to overheat, leading to potentially costly repairs. So, it’s important to know how to check for a coolant leak.
The first thing you can do is visually inspect your engine for any signs of a leak. Look for any puddles or drips of coolant under your vehicle. Coolant is typically a bright green or orange color, so it should be easy to spot.
If you do find a leak, you’ll want to take your car to a mechanic as soon as possible to have it repaired. Another way to check for a coolant leak is to monitor the coolant level in your radiator. You can do this by locating the radiator cap (do not remove it while the engine is hot!).
Simply open the cap and take a peek inside. The coolant level should be near the top of the radiator. If it’s significantly lower than it should be, that’s a sign of a coolant leak.
Lastly, if you’re still unsure if you have a coolant leak, you can also check your engine oil. A coolant leak can sometimes cause the coolant to mix with the oil, resulting in a frothy, milkshake-like consistency. If you notice this in your engine oil, it’s definitely time to bring your car to a mechanic for further inspection.
What is coolant and why is it important?
coolant leaks, automotive cooling system, importance of coolant, coolant functions, radiator fluid Introduction to Coolant Leaks Coolant is a vital component of your vehicle’s cooling system. It plays a crucial role in maintaining the optimal temperature of the engine and preventing it from overheating. But what exactly is coolant, and why is it so important? Coolant, also known as radiator fluid, is a mixture of water and antifreeze.
Its purpose is to circulate through the engine, absorbing heat and transferring it to the radiator, where it can be dissipated. This process helps keep the engine at a safe temperature and prevents it from seizing up or suffering from other heat-related damages. So why are coolant leaks such a concern? Well, when coolant leaks out of your vehicle, the cooling system loses its ability to regulate the engine temperature effectively.
This can lead to overheating, which can cause serious damage to the engine, such as warped cylinders or a blown head gasket. In extreme cases, it can even result in a complete engine failure. To prevent coolant leaks and ensure the proper functioning of the cooling system, it’s essential to regularly check the coolant level and inspect for any signs of leaks.
Common signs of a coolant leak include low coolant levels, visible coolant puddles under the vehicle, or a sweet smell inside the car. If you notice any of these symptoms, it’s crucial to address the issue promptly and have the leak repaired. In conclusion, coolant is a critical component of your vehicle’s cooling system that helps regulate the engine temperature and prevent overheating.
Coolant leaks can lead to significant engine damage if left unrepaired, so it’s important to be vigilant and address any leaks promptly. By taking care of your coolant system, you can ensure the longevity and optimal performance of your vehicle.
Common signs of a coolant leak
“coolant leak” Introduction to Coolant Leaks Have you ever noticed a strange puddle under your car and wondered where it came from? Well, it could be a sign of a coolant leak. Coolant, also known as antifreeze, plays a crucial role in keeping your engine cool and preventing it from overheating. When there’s a leak in the cooling system, coolant can escape and eventually cause serious damage to your vehicle.
But how can you tell if you have a coolant leak? Well, there are a few common signs to look out for. First and foremost, check for any puddles of bright green, orange, or pink fluid under your car. This is usually a clear indication that your coolant is leaking.
Additionally, you may notice a sweet, syrupy smell coming from your engine or the inside of your car, which is another telltale sign of a coolant leak. In some cases, you may even see white steam or smoke coming from under the hood, indicating that coolant is evaporating due to a leak. So, if you notice any of these signs, it’s important to address the issue promptly to prevent further damage to your engine.
Why it’s important to check for leaks
coolant leaks Introduction to Coolant Leaks When it comes to taking care of our vehicles, there are so many things to keep in mind — from regular oil changes to tire rotations. However, one important maintenance task that often gets overlooked is checking for coolant leaks. Coolant, also known as antifreeze, plays a crucial role in regulating the temperature of your engine and preventing it from overheating.
If there is a leak in your coolant system, it can lead to serious engine damage and even a breakdown on the road. That’s why it’s essential to regularly inspect for coolant leaks and address them promptly. In this blog post, we’ll explore why checking for coolant leaks is so important and how you can do it.
So, let’s get started!
Tools and Equipment Needed
One of the important steps in properly maintaining your vehicle is checking for coolant leaks. Coolant, also known as antifreeze, is crucial for keeping your engine at the right temperature and preventing it from overheating. To check for coolant leaks, you will need some basic tools and equipment.
First, you will need a flashlight to help you see areas that are difficult to reach. Next, you will need some gloves to protect your hands from any chemicals or dirt that may come into contact with them. Additionally, you will need a coolant pressure tester to pressurize the coolant system and locate any leaks.
This tool is connected to the radiator or coolant reservoir and uses pressure to identify any leaks in the system. Finally, you will need a coolant leak detection kit, which typically includes a dye that can be added to the coolant. This dye will help you locate any leaks by turning fluorescent under UV light.
By utilizing these tools and equipment, you can easily identify and address any coolant leaks in your vehicle.
List of necessary tools and equipment
When it comes to any project, having the right tools and equipment is essential. Whether you’re a professional contractor or a DIY enthusiast, having the necessary tools can make all the difference in the world. So, what tools and equipment are needed to get the job done? Well, it really depends on the project at hand, but there are a few essential items that every toolbox should have.
First and foremost, a good set of screwdrivers is a must. These come in various sizes and types, including Phillips and flathead, and can be used for a wide range of tasks such as tightening or loosening screws. Another essential tool is a hammer.
This versatile tool can be used for everything from driving nails to removing stubborn nails or screws. For cutting needs, a utility knife or a pair of scissors is handy. These tools are perfect for opening packages, cutting wires, or even trimming materials.
A measuring tape is another essential tool. This retractable device allows you to accurately measure lengths and dimensions, which is crucial for any project. When it comes to electrical work, a wire stripper and a pair of pliers are essential.
These tools allow you to strip insulation from wires and manipulate them as needed. Additionally, a pair of adjustable pliers can come in handy for a variety of tasks such as gripping, bending, or twisting objects. If you’re working with wood, a saw is a must-have.
There are various types of saws available, including a panel saw, a handsaw, or a circular saw, depending on the specific task at hand. A level is also essential when it comes to carpentry work. This tool ensures that everything is straight and level, which is crucial for achieving professional-looking results.
How to prepare your vehicle for inspection
“vehicle inspection”, “prepare your vehicle”, “tools and equipment needed”, “vehicle maintenance” In order to ensure that your vehicle passes inspections with flying colors, it’s important to properly prepare it beforehand. One essential aspect of this process is having the right tools and equipment on hand. Without the proper tools, it can be nearly impossible to thoroughly inspect and maintain your vehicle.
So, what exactly do you need? Well, for starters, a good set of wrenches in various sizes is essential. These will come in handy when it’s time to tighten or loosen nuts and bolts. Additionally, a jack and jack stands are crucial for lifting the vehicle off the ground and providing stability during inspections.
You’ll also want to invest in a reliable tire pressure gauge to ensure that your tires are properly inflated. And don’t forget about a good flashlight for those hard-to-see areas! By having these tools and equipment readily available, you’ll be well-prepared to tackle any vehicle maintenance task that comes your way.
Inspecting the Coolant System
If you’re experiencing overheating or your coolant levels seem to be constantly reducing, it’s essential to check for a coolant leak in your vehicle’s coolant system. The coolant system plays a crucial role in regulating the temperature of your engine and preventing it from overheating. To check for a coolant leak, start by inspecting all the hoses and connections in your coolant system.
Look for any signs of leaking coolant or wet spots around the hoses. Additionally, check the radiator cap and the coolant reservoir for any signs of leaks. If you notice any signs of a coolant leak, it’s important to address it as soon as possible to avoid potential engine damage.
Remember, a small leak can quickly escalate into a major issue, so it’s crucial to be proactive and address the problem promptly.
Step-by-step guide to checking for coolant leaks
coolant leaks, coolant system, Step-by-step guide, inspecting the coolant system
How to perform a visual inspection
coolant system, visual inspection
Tips for locating hard-to-find leaks
Inspecting the coolant system is an essential step in locating hard-to-find leaks in your vehicle. This system is responsible for keeping the engine cool and preventing it from overheating. To inspect the coolant system, start by checking the radiator and the hoses connected to it.
Look for any signs of leaks, such as wet spots or discoloration. You should also inspect the radiator cap and ensure it is tight and in good condition. Next, move on to the water pump, which is another common source of leaks.
Check for any signs of coolant dripping or stains around the water pump. Additionally, inspect the heater hoses and the heater core for any leaks or signs of damage. These components are located inside the vehicle and are often overlooked.
Another area to inspect is the thermostat housing. Look for any signs of coolant leakage around the housing, as a faulty thermostat can cause leaks. Additionally, inspect the gaskets and seals in the coolant system, as they can deteriorate over time and lead to leaks.
If you are unable to locate the leak visually, you can use a pressure tester to pressurize the coolant system. This will help you identify any hidden leaks that may be difficult to see. Additionally, you can use a UV dye in the coolant system, which will make any leaks more visible under UV light.
By thoroughly inspecting the coolant system, you can identify and locate hard-to-find leaks. Remember to check all components, including the radiator, hoses, water pump, heater hoses, and thermostat housing. If you are unable to locate the leak visually, consider using a pressure tester or UV dye to help in your search.
Testing for Coolant Leaks
Are you experiencing issues with your car’s cooling system? One potential culprit could be a coolant leak. Coolant, also known as antifreeze, is a vital component in your vehicle’s engine, as it helps regulate the temperature and prevents overheating. If you suspect a coolant leak, it’s important to address it promptly to prevent further damage to your engine.
So how do you check for a coolant leak? There are a few simple steps you can take. First, visually inspect the engine bay for any signs of coolant puddles or stains. Next, check the radiator and overflow reservoir for any leaks or cracks.
You can also use a pressure tester to determine if there are any leaks in the cooling system. Lastly, if you notice your coolant levels consistently dropping or see white smoke coming from the exhaust, it’s a good indication that there is a coolant leak. Remember, proper maintenance and timely repairs are crucial in ensuring the longevity and performance of your vehicle.
Instructions for using a coolant pressure tester
coolant pressure tester, testing for coolant leaks, Maintaining the proper functioning of your vehicle’s cooling system is crucial for its overall performance. One common issue that many car owners face is coolant leaks. These leaks can cause the engine to overheat and lead to costly repairs if left untreated.
However, with the help of a coolant pressure tester, you can easily detect and diagnose any coolant leaks in your vehicle. Using a coolant pressure tester is a simple and effective way to test for coolant leaks. First, you’ll need to make sure your vehicle’s engine is cooled down before starting the test.
Next, locate the radiator cap and remove it. Attach the coolant pressure tester to the radiator and pump it to the recommended pressure level. This will pressurize the cooling system and allow you to detect any leaks.
Once the system is pressurized, visually inspect all hoses, connections, and the radiator for any signs of coolant leakage. Pay close attention to any wet spots, drips, or stains that may indicate a leak. You can also use a UV dye or a coolant leak detection kit to make the leak more visible under a blacklight.
If you find a leak, it’s essential to repair it as soon as possible. Depending on the severity of the leak, you may be able to fix it yourself by replacing a faulty hose or tightening a loose connection. However, if the leak is more significant, it’s best to take your vehicle to a professional mechanic who can properly diagnose and repair the problem.
Regularly testing for coolant leaks using a coolant pressure tester is a proactive way to ensure the health and longevity of your vehicle’s cooling system. By catching and addressing any leaks early on, you can prevent more significant issues from occurring down the road. So, if you suspect a coolant leak in your vehicle, don’t wait – grab a coolant pressure tester and start testing today!
How to identify leaks using a UV dye
coolant leaks, UV dye
Other methods for testing for coolant leaks
coolant leaks, testing for coolant leaks, methods for testing for coolant leaks
Fixing and Preventing Coolant Leaks
Have you ever noticed a sweet, pungent smell coming from your car and wondered if you have a coolant leak? It’s essential to address coolant leaks promptly to prevent further damage to your engine and avoid the risk of overheating. Checking for a coolant leak is relatively easy and can be done by following a few simple steps. First, make sure your engine is cool before starting, as coolant can be hot and cause burns.
Then, visually inspect the engine and radiator for any signs of coolant pooling or dripping. Look for wet spots or stains on the ground where you typically park your car. Additionally, check for white smoke or steam coming from the exhaust pipe, as this can indicate a coolant leak.
If you can’t locate any visible signs of a leak, you can also perform a pressure test using a pressure tester. This device pressurizes the cooling system, allowing you to identify any leaks by observing drops in pressure. Remember, it’s always best to consult a professional if you’re unsure or if the leak seems severe.
Common causes of coolant leaks and how to fix them
coolant leaks, common causes, fix, prevent Paragraph: Coolant leaks can be a real headache for car owners. Not only can they cause your vehicle to overheat, but they can also lead to expensive repairs if left unchecked. Thankfully, there are some common causes of coolant leaks that can be easily fixed or even prevented altogether.
One common cause of coolant leaks is a faulty radiator cap. Over time, the rubber seal on the cap can wear down, causing coolant to leak out. Luckily, replacing the radiator cap is a quick and inexpensive fix.
Another common cause of coolant leaks is a worn or damaged coolant hose. These hoses can become brittle over time and develop small cracks or holes. Inspecting and replacing worn hoses can prevent leaks from occurring.
Additionally, a leaking water pump or a faulty gasket can also cause coolant leaks. Both of these issues may require professional repair, but addressing them early can save you from more extensive damage down the line. Finally, keeping up with regular maintenance, such as flushing and replacing coolant as recommended by your car’s manufacturer, can help prevent coolant leaks from occurring in the first place.
By being proactive and addressing any potential coolant leak issues promptly, you can keep your car running smoothly and avoid costly repairs.
Tips for preventing coolant leaks in the future
coolant leaks, preventing coolant leaks
When to seek professional help
coolant leaks, seek professional help, fixing and preventing coolant leaks
Conclusion
In the swirling abyss of automotive mysteries, with engine parts whispering in their cryptic language and mechanics wielding their mighty wrenches, one common phenomenon plagues us all: the dreaded coolant leak. But fear not, intrepid motorists, for I shall guide you through the treacherous path of coolant inspection with the wisdom of a thousand seasoned auto technicians and the comedic flair of a stand-up comedian. Imagine, if you will, a delicate ballet between your car’s engine and the frigid embrace of coolant fluid.
It is a symbiotic relationship of precision and balance, where any disruption can lead to disastrous consequences. A coolant leak is no different. It is a betrayal of this exquisite partnership, a sinister trickster that lurks beneath your hood, waiting to unleash its watery havoc on your pristine engine.
Now, how does one unmask this conniving coolant leak? Listen closely, my fellow road warriors, for the answer lies within a simple yet powerful ritual that I call “The Coolant Leak Check of Astonishing Brilliance.” Gather your courage, a flashlight, and a keen eye for detail, for we march towards automotive enlightenment. Step one: Pop open the hood, like an archaeologist unearthing an ancient burial site.
Take a moment to bask in the glory of your mechanical kingdom, and summon your inner Sherlock Holmes. We shall begin our investigation at the radiator, where the coolant flows with grace and poise. Step two: With the cool demeanor of a seasoned detective, scour the radiator for any signs of betrayal.
Look for telltale signs of drips or puddles, as if the coolant were leaving a breadcrumb trail to its mischievous hiding spot. Feel the radiator hoses with your gentle touch, ensuring they are not swollen or brittle, like a guilty party attempting to conceal its true nature. Step three: Follow the trail, my dear Watsons, for our prey may have retreated to an alternate location.
Inspect every nook and cranny, venturing beneath the vehicle if necessary, as a coolant leak is an audacious beast that knows no boundaries. Be vigilant for damp spots or stains on the ground, evidence of a sneaky escape route for our elusive foe. Step four: In your quest for truth, cast a discerning eye upon the water pump, a notorious accomplice in the coolant leak conspiracy.
Summary of key points
coolant leaks, fixing coolant leaks, preventing coolant leaks
Importance of regular coolant system maintenance
coolant system maintenance, fixing coolant leaks, preventing coolant leaks. The coolant system in your vehicle is a critical component that helps regulate its temperature and prevent overheating. Regular maintenance of this system is essential to keep your engine running smoothly and avoid costly repairs.
One common issue that can occur with the coolant system is coolant leaks. These leaks can lead to decreased performance, engine damage, and even complete engine failure if left unaddressed. Fixing coolant leaks is not only important for the immediate health of your vehicle but also for preventing future problems.
By taking preventative measures and staying on top of regular maintenance, you can avoid coolant leaks and ensure the longevity of your vehicle’s coolant system. So, don’t overlook the importance of regular coolant system maintenance and make it a priority to fix and prevent coolant leaks.
FAQs
How can I check for a coolant leak in my car?
To check for a coolant leak in your car, you can start by inspecting the ground beneath your vehicle for any signs of coolant puddles or stains. Additionally, you can check the coolant reservoir to see if the coolant level has dropped significantly. If you suspect a coolant leak but cannot find any visible signs, it is recommended to have a professional mechanic perform a pressure test to accurately identify the source of the leak.
What are the common symptoms of a coolant leak?
Some common symptoms of a coolant leak include overheating of the engine, a decrease in coolant level, a sweet or chemical odor inside or outside the car, visible coolant puddles underneath the vehicle, coolant stains on engine parts or hoses, and a constant need to add coolant to the radiator or reservoir.
Can a coolant leak cause engine damage?
Yes, a coolant leak can potentially cause engine damage if not addressed promptly. Continuously driving a vehicle with a coolant leak can lead to overheating of the engine, which can cause warping or cracking of the cylinder head, damaging the gaskets, and even leading to a complete engine failure. It is important to fix any coolant leaks as soon as possible to prevent further damage to the engine.
How much does it cost to repair a coolant leak in a car?
The cost to repair a coolant leak in a car can vary depending on the extent of the leak and the specific vehicle. Typically, the cost can range from $150 to $1000. Simple repairs such as replacing a hose or a gasket may be on the lower end of the cost spectrum, while more complex repairs involving the radiator or water pump can be on the higher end. It is recommended to get a diagnosis and quote from a professional mechanic for an accurate estimate.
Can I temporarily fix a coolant leak myself?
While it is possible to temporarily fix a coolant leak yourself using products like coolant sealants or radiator stop leak, these are temporary solutions and should not be considered a long-term fix. These products can clog the cooling system or cause other issues if not used correctly. It is always best to have a coolant leak properly diagnosed and repaired by a professional mechanic to ensure a lasting fix.
How long can I drive with a coolant leak?
It is not recommended to drive with a coolant leak for an extended period as it can lead to engine damage. If you notice a coolant leak, it is best to address it as soon as possible and avoid driving the vehicle until it is repaired. Overheating the engine due to a coolant leak can cause significant damage and potentially result in costly repairs or engine replacement.
Is it safe to use water as a temporary coolant if there is a leak?
Using water as a temporary coolant if there is a leak is generally safe, as it can help keep the engine cool. However, it should only be used as a temporary solution until the coolant leak is repaired. Water does not have the same corrosion inhibitors and antifreeze properties as coolant, so it should not be used as a long-term coolant replacement. It is important to have the coolant leak fixed and refill the cooling system with the proper coolant mixture as soon as possible.