Have you checked the tire pressure on your Honda Civic lately? It may seem like a simple task, but neglecting to do so can lead to bigger problems down the road. Ensuring proper tire pressure not only improves fuel efficiency, but it also extends the life of your tires and provides safer driving conditions. Luckily, checking the tire pressure on your Honda Civic is an easy DIY task that only takes a few minutes.
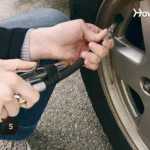
All you need is a tire pressure gauge and access to a tire pump. Simply remove the valve cap on each tire, insert the pressure gauge into the valve stem, and record the pressure reading. Make sure to compare it to the recommended pressure listed in your vehicle’s owner manual or on the tire placard located inside the driver’s side door.
If the pressure is too low, use the tire pump to inflate the tires to the recommended pressure level. By taking a few minutes out of your day to check your tire pressure, you can avoid costly repairs and ensure a smoother, safer driving experience. So, don’t wait until it’s too late – give your Honda Civic the attention it deserves and check your tire pressure today!
Table of Contents
Why Checking Your Tire Pressure is Important
If you own a Honda Civic, it’s crucial to regularly check your tire pressure. Maintaining proper tire pressure can improve your car’s performance and fuel efficiency, as well as ensure your safety on the road. So, how do you check tire pressure in a Honda Civic? First, make sure you have a tire pressure gauge on hand.
Then, locate the tire pressure monitoring system button, typically located on your dashboard or center console. Press and hold the button until the tire pressure readings appear. Check the recommended tire pressure for your specific Honda Civic model, which can be found in your owner’s manual or on the driver’s side door jamb.
Next, insert the pressure gauge into the tire valve stem and measure the pressure. If the pressure is too low, add air until it reaches the recommended level. If it’s too high, release air until it’s at the proper level.
By regularly checking your tire pressure, you can avoid potential hazards on the road and save money on repairs.
Improving Fuel Efficiency and Tire Lifespan
Maintaining proper tire pressure can greatly improve your vehicle’s fuel efficiency and tire lifespan. Why is this important? Well, if your tires are underinflated, they create more rolling resistance, which means your engine has to work harder to move the vehicle forward. This extra work results in more fuel consumption and a shorter lifespan for your tires.
On the other hand, overinflated tires can also lead to a shorter lifespan and potentially dangerous blowouts. That’s why it’s crucial to check your tire pressure regularly and keep it at the recommended level. It may not seem like a big deal, but taking a few minutes to check your tires can save you money on gas and ensure your safety on the road.
Remember, your tires are the only connection between your vehicle and the road, so it’s important to take care of them.
Increasing Safety on the Road
As a car owner, it’s essential to keep an eye on your tire pressure. Not only does it ensure the longevity of your tires, but it also plays an important role in keeping you safe on the road. Low tire pressure can lead to decreased fuel efficiency, extended stopping distance, tire failure, and can even cause accidents.
On the other hand, over-inflated tires can make your car feel unstable and cause uneven tread wear, reducing the lifespan of your tires. Checking your tire pressure regularly and maintaining it at the recommended level not only keeps you safe but also saves you money in the long run. So, make it a habit to check your tire pressure at least once a month and especially before a long trip.
Your car and your wallet will thank you! Keyword: tire pressure.
Equipment You Will Need
Learning how to check the tire pressure in your Honda Civic is an essential skill every driver should have. To start, you will need some equipment. First and foremost, you should have a tire pressure gauge.
Having a reliable gauge is essential to ensure you get an accurate reading. A good tire pressure gauge should be easy to use, easy to read, and durable. You can find affordable tire pressure gauges at any automotive store or online.
Next, you will need a tire inflator or air compressor. A tire inflator is a device that lets you add air to your tires if they’re low, while a compressor allows you to add air to all your tires at once. You can purchase an inflator or compressor from many retailers, and they come in a range of sizes and prices.
Finally, you may want to consider having a tire repair kit. While a repair kit isn’t necessary, it can be helpful in case of an emergency. With these tools on hand, you’ll be able to check and maintain your Honda Civic’s tire pressure with ease.
Tire Pressure Gauge
When it comes to maintaining your car’s tires, one of the most important things you should do is regularly check their pressure. This is where a tire pressure gauge comes in handy. This simple tool measures the air pressure inside your tires, allowing you to make sure they’re at the optimal level.
But what kind of gauge do you need? The most common types are digital and analog gauges. Digital gauges are more accurate, easy to read, and precise while analog gauges are simpler and require no batteries, making them great for emergencies. Whatever type you choose, having a tire pressure gauge on hand is essential for keeping your car running smoothly and safely.
Air Compressor
Air Compressor When it comes to using an air compressor, there are a few key pieces of equipment that you will need to get started. First and foremost, you will need the compressor itself, which will provide the power to run your tools and equipment. You’ll also need an air hose and fittings, which will allow you to connect your tools to the compressor and control the flow of air.
A pressure regulator is another essential piece of equipment, which will let you adjust the pressure of the air coming out of the compressor to suit the needs of your specific tools. Additionally, an oil and water separator can help prevent damage to your tools and equipment by removing moisture and contaminants from the air before it reaches them. With these key pieces of equipment in hand, you’ll be ready to tackle any job that requires the use of an air compressor.
So, be sure to invest in top-quality equipment to get the best results.
Steps for Checking Tire Pressure on Your Honda Civic
If you happen to own a Honda Civic, then checking the tire pressure on a regular basis is crucial to ensuring your safety and maintaining the longevity of your vehicle. Thankfully, it’s a relatively simple task to perform. First things first, locate the manufacturer recommended tire pressure information in your owner’s manual or on the sticker inside the driver’s side door jamb.
Once you have this information, grab a tire pressure gauge and head to your vehicle. Remove the tire valve cap on each tire and firmly attach the gauge. Take a reading, and compare it to the recommended tire pressure.
If it’s too low, use an air compressor to fill the tire to the appropriate level, but be careful not to overinflate it. On the other hand, if the reading shows too much pressure, you’ll need to let some air out before rechecking. This process is critical, and you should aim to check your tire pressure at least once a month to ensure your vehicle continues to perform optimally and to increase the lifespan of your tires.
Step 1: Find the Recommended Tire Pressure
If you want to ensure proper handling, safety, and fuel efficiency of your Honda Civic, checking the tire pressure is essential. The first step before checking your tire pressure is to look for the recommended tire pressure, which can be found in the owner’s manual or on the vehicle’s placard, usually located on the driver’s side doorjamb. Knowing the recommended tire pressure helps you to avoid under or over-inflating your tires, which can lead to several problems, including uneven tread wear, reduced fuel efficiency, and even tire failure.
Once you have the recommended tire pressure, you can proceed to the next step of checking your tire pressure.
Step 2: Remove Valve Stem Cap and Press Gauge Onto Valve
When it comes to checking tire pressure on your Honda Civic, there are some simple steps you can follow to make sure your tires are properly inflated. The second step in the process is to remove the valve stem cap and press your gauge onto the valve. This may seem like a no-brainer, but it’s important to note that valve stem caps can become stuck or even go missing over time, so be sure to check the condition of your caps regularly.
Once you’ve removed the cap, press your gauge onto the valve firmly – but not too hard – and hold it there for a few seconds until you hear a beep. This beep means that the gauge has taken a reading and you can now check the display to see your tire pressure. Remember, having properly inflated tires is not only important for your vehicle’s performance, but it can also improve your fuel efficiency and safety on the road.
So, take a few minutes to check your tire pressure regularly and enjoy the peace of mind that comes with knowing your Honda Civic is in top shape.
Step 3: Read the Tire Pressure Gauge
When it comes to checking the tire pressure on your Honda Civic, there are a few simple steps to follow that can help ensure your vehicle is running safely and efficiently. Step 3 involves reading the tire pressure gauge. Once you have attached the gauge to the tire valve, you should be able to see the pressure reading clearly on the gauge itself.
Keep in mind that the recommended tire pressure for your Honda Civic can vary depending on the make and model, so it’s essential to check your owner’s manual for specific guidelines. In general, the pressure should fall within the range of 32-35 PSI. If the reading is lower, you’ll need to add air to the tires, and if it’s higher, you’ll need to let some air out until the pressure falls within the recommended range.
Maintaining proper tire pressure can improve gas mileage and extend the life of your tires, making it a crucial step in keeping your Honda Civic running smoothly.
Step 4: Compare the Tire Pressure Gauge Reading to the Recommended Pressure
One of the most important things you can do for your Honda Civic is to regularly check the tire pressure. Checking tire pressure is a simple procedure that can help ensure your car’s safety and longevity. The fourth step in this process is to compare the tire pressure gauge reading to your car’s recommended pressure.
This is crucial because overinflated and underinflated tires can lead to decreased fuel efficiency, uneven wear, and even blowouts. To find your car’s recommended tire pressure, refer to your owner’s manual or the label on the inside of the driver’s side door jamb. Once you have the recommended pressure, use a tire pressure gauge to check each tire’s pressure and compare it to the recommended pressure.
If the pressure is too high or too low, adjust it as needed. With a little bit of time and effort, you can make sure your Honda Civic is running smoothly and safely on the road.
Step 5: Inflate or Deflate Your Tires
Checking tire pressure on your Honda Civic is vital to ensure maximum fuel efficiency, safe driving, and longer tire life. Inflation and deflation can lead to uneven tire wear and could cause blowouts, which can be dangerous. Checking your tire pressure frequently with a tire pressure gauge is a simple process that should be a part of your regular car maintenance routine.
Begin by removing the valve cap from the tire, and place the pressure gauge on it at a right angle. The gauge will read the pressure of the tire, compare it to the recommended PSI for your car and inflate or deflate accordingly. The recommended PSI can be found in your car owner’s manual or on a sticker inside the driver’s door frame.
Ensure that all four of your tires have the correct pressure, as there could be different pressure recommendations for the front and rear tires. With the correct tire pressure, your Honda Civic will perform at its best and save you money on gas, so it’s a simple task that’s worth your time.
Conclusion
In conclusion, checking the tire pressure of your Honda Civic is as easy as 1, 2, PSI! Just grab a tire pressure gauge and follow these simple steps: 1) locate the recommended PSI level for your tires, 2) remove the valve caps and press the gauge onto each valve stem, and 3) compare the reading on the gauge to the recommended PSI. And voila! You’re now a tire pressure pro and can confidently hit the road with optimal safety and performance. Remember, a little bit of air goes a long way, so don’t underestimate the power of a properly inflated tire.
Keep your Civic cruising smoothly and efficiently with a quick and easy tire pressure check. Happy driving!”
Regular Tire Pressure Checks are Essential for Your Honda Civic’s Maintenance
Regular tire pressure checks are essential for maintaining the performance, safety, and fuel efficiency of your Honda Civic. Proper tire pressure ensures that your vehicle’s tires have sufficient grip, stability, and durability on the road. Checking your Honda Civic’s tire pressure is a simple and quick process that you can do yourself.
Here are some simple steps to help you check your Honda Civic’s tire pressure: Purchase a tire pressure gauge from an automotive store or online.
Park your car on a level surface and turn off the engine. Find the tire valve stem on each tire and unscrew the valve cap.
Press the tire pressure gauge onto the valve stem and read the pressure.
Compare the reading to the recommended tire pressure in your Honda Civic’s owner’s manual or the tire placard located on the driver’s side doorjamb. If the pressure is too low, you can add air using an air compressor or take it to a nearby gas station.
If the pressure is too high, you can release air using the gauge or stop adding more air. By keeping your Honda Civic’s tires properly inflated, you can save money on fuel and prevent uneven tire wear, which could lead to costly repairs.
FAQs
Why is it important to check tire pressure on a Honda Civic?
Keeping the correct tire pressure helps improve fuel efficiency, prolongs tire life, and ensures better handling and safety on the road.
How often should I check the tire pressure on my Honda Civic?
It’s recommended to check tire pressure at least once a month, or every time you fill up your gas tank.
What is the optimum tire pressure for a Honda Civic?
The recommended tire pressure for a Honda Civic may vary depending on the model and year, but it can usually be found on the driver’s doorjamb or in the owner’s manual. It is usually around 32 PSI.
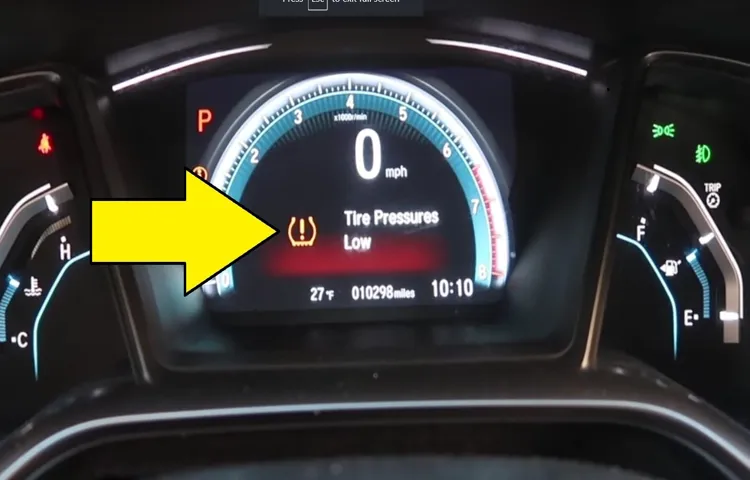
Can I rely on the tire pressure monitoring system in my Honda Civic?
Although it’s a helpful feature, the tire pressure monitoring system (TPMS) is not a substitute for regular tire pressure checks with a tire gauge. It only alerts you when tire pressure is low, but it won’t tell you if it’s overinflated.
What are the consequences of driving with incorrect tire pressure on a Honda Civic?
Driving with incorrect tire pressure may cause uneven tire wear, reduced fuel efficiency, poor handling, and an increased risk of a blowout or accident.
How can I check the tire pressure on my Honda Civic?
You can use a tire pressure gauge to measure the pressure in each tire and compare it to the recommended PSI. The process involves removing the valve cap, pressing the gauge onto the valve stem, and reading the numbers on the gauge.
What should I do if the tire pressure is too low or too high on my Honda Civic?
If the tire pressure is too low, add air to the tires until it reaches the recommended PSI. If it’s too high, let some air out until it’s within the recommended range. Make sure to check the tire pressure again after adjusting it.