Are you a proud owner of a Honda Civic 2017? If so, then keeping the tire pressure in check should be on top of your maintenance checklist. Adequate tire pressure not only prolongs the life of your tires but also ensures a smooth and safe driving experience. Checking the tire pressure on your Honda Civic 2017 is a straightforward process that you can do on your own with the right tools.
Understanding the recommended tire pressure for your vehicle is the first step, and you can find this information in your owner’s manual or the label inside the driver’s door. Once you have the recommended tire pressure, use a tire pressure gauge to measure the current pressure of each tire. Insert the gauge onto the valve stem and press down firmly to get an accurate reading.
If any tire has a pressure level below the recommended level, use a tire inflator to add air until it reaches the correct pressure level. Regularly checking the tire pressure on your Honda Civic 2017 not only saves you money on expensive tire replacements but also significantly improves your vehicle’s fuel efficiency and overall performance. It’s a simple maintenance process that can be done quickly and easily, so there’s no excuse not to keep the tire pressure in check.
Remember, adequate tire pressure not only keeps you safe on the road, but it also improves your Honda Civic’s handling and performance. So, take some time to check your tire pressure regularly, and enjoy a smoother and safer driving experience.
Table of Contents
Why Tire Pressure is Important
If you’re driving a Honda Civic 2017, it’s crucial to know how to check tire pressure regularly. Maintaining optimal tire pressure can ultimately extend your tire’s life, improve your car’s fuel efficiency, and best of all, keep you safe on the road. Checking tire pressure is straightforward and can be done quickly at a gas station or with a tire pressure gauge.
Your Honda Civic’s recommended tire pressure can be found in the owner’s manual or on the driver’s side door jamb. Simply unscrew the valve cap on each tire and place the gauge over it. You’ll want to ensure that the pressure reading matches your car’s recommended PSI, and if it’s low, you can add air accordingly.
It’s essential to check the pressure when your tires are cold and haven’t been driven in at least an hour. Don’t let under-inflated tires compromise your safety or diminish your car’s performance. Regularly checking your tire pressure is a simple yet effective way to ensure a smooth and safe ride on the road.
Increased Safety while Driving
Maintaining proper tire pressure is crucial to ensure increased safety while driving. Low tire pressure can lead to a range of issues, including decreased fuel efficiency, decreased handling, reduced braking capability, and an increased risk of tire failure. It is essential to regularly check your tires’ pressure, especially during temperature changes or before long road trips, to avoid these potential dangers.
Additionally, proper tire pressure can save you money in the long run by extending the life of your tires and improving fuel efficiency. Just like we need to take care of our bodies by maintaining our blood pressure, our cars need proper tire pressure to function at their best. So, take a few minutes to make sure your tire pressure is at the recommended level, and reap the benefits of increased safety and improved performance on the road.
Saves on Fuel Consumption
Tire pressure is an essential factor in vehicle safety and efficiency. Proper tire inflation not only ensures better handling and improved braking but also saves on fuel consumption. When tires are underinflated, the increased rolling resistance caused by flat spots on the tires leads to more fuel being burned to keep the vehicle moving.
Driving with underinflated tires can result in a significant decrease in mileage and increased CO2 emissions. On the other hand, overinflated tires may cause excessive wear in the center of the tread, leading to reduced traction, uneven tire wear, and ultimately reduced performance. Maintaining the correct tire pressure will not only improve your vehicle’s fuel economy but also save you money on gas and prevent unnecessary tire wear.
Remember to check your tire pressure regularly, at least once a month, to ensure optimal performance, and extend the life of your tires.
Preparing to Check Tire Pressure
Checking tire pressure is an important aspect of maintaining your Honda Civic’s performance. To start the process, you will need a tire pressure gauge and access to a tire inflator. Before you begin, it is important to ensure that your vehicle has been parked for at least three hours so that the tires are at their natural temperature.
Once you are ready to check the pressure, remove the valve cap from the tire and secure the gauge onto the valve stem. Once you hear a hissing sound, the gauge should show a reading of the current pressure. Repeat this for each tire on your Honda Civic, noting the readings on a piece of paper.
If the pressure is too low, use the inflator to add the appropriate amount of air, as specified in your owner’s manual or on the tire itself. By regularly checking your Honda Civic’s tire pressure, you will be ensuring a safe and smooth ride on the road.
Check Tire Pressure When Cold
When it comes to maintaining your vehicle’s tires, one of the most important things to remember is to check the tire pressure when the tires are cold. This means checking them before you drive your car for the first time that day, as driving causes the tires to heat up and can affect the accuracy of the pressure readings. Before you start, make sure you have a tire pressure gauge, which can be found at any auto parts store.
Begin by unscrewing the valve cap on the tire and pressing the gauge onto the valve stem. You’ll hear a hissing sound as air is released from the tire into the gauge. Once the gauge has recorded the pressure, compare it to the recommended pressure listed in your owner’s manual or on the sticker inside the driver’s side door jamb.
If the pressure is too low, use an air compressor or visit a gas station to add air until it reaches the correct level. By keeping your tire pressure at the recommended level, you can improve fuel efficiency, ensure proper handling, and avoid premature tire wear and potential blowouts.
Identifying Proper Tire Pressure
When it comes to identifying the proper tire pressure for your vehicle, it’s important to first prepare yourself and your tools. Start by consulting your car’s owner manual to locate the manufacturer’s recommended tire pressures. Once you know this information, gather a tire pressure gauge and an air compressor (if needed).
It’s also important to check your tire pressure when the tires are cold, so plan to do this first thing in the morning or after the car hasn’t been driven for several hours. By preparing to check your tire pressure, you’ll be able to ensure that you’re getting an accurate measurement and maintaining your car’s safety and performance.
Checking Tire Pressure
If you own a Honda Civic 2017, checking your tire pressure regularly should be part of your vehicle maintenance routine. To start, you will need a tire pressure gauge, preferably a digital one, and locate the recommended tire pressure for your car, which can be found on the driver’s side door jamb or in the owner’s manual. Once you have these materials, remove the valve cap on your tire and press the gauge onto the valve stem.
The reading will show on the digital display or the gauge’s stick. Compare the reading to the recommended tire pressure and add or release air accordingly. Repeat the process for all four tires, including the spare, and replace the valve caps after checking.
Remember that tires lose pressure over time, especially in cold weather, so you must check them frequently to ensure safe driving. By following these simple steps, you can keep your Honda Civic 2017 running smoothly and safely on the road.
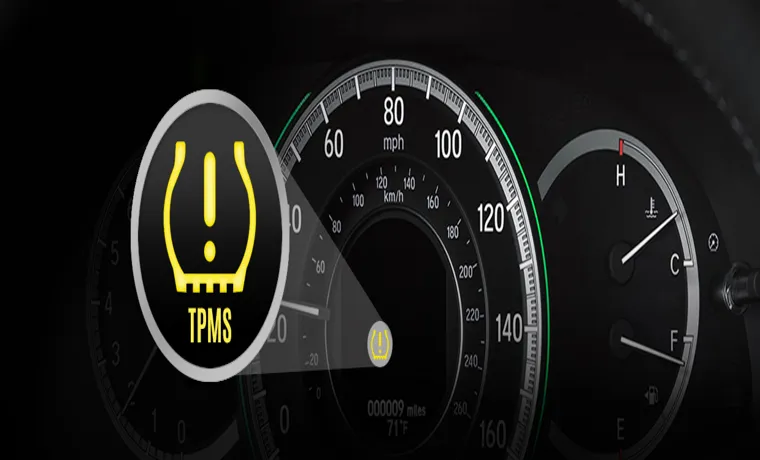
Locate Tire Pressure Monitoring System Button
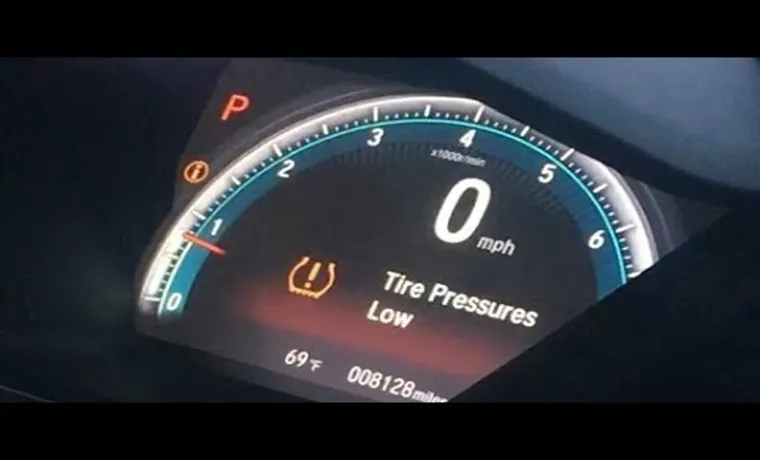
If you’re wondering how to check your tire pressure, the first thing you need to do is locate the tire pressure monitoring system button. This can usually be found on the dashboard of your car, near the steering wheel. Once you’ve located the button, press and hold it until you hear a beep or see a notification appear on the dashboard display.
This will activate the tire pressure monitoring system and allow you to check the pressure of each tire individually. It’s important to keep your tires properly inflated in order to ensure safe driving and maximize their lifespan. Low tire pressure can lead to reduced fuel efficiency, decreased traction, and even blowouts while driving.
So, take a few minutes to check your tire pressure regularly and avoid any potential hazards on the road.
Read the Tire Pressure on Your Civic
If you want to ensure better fuel efficiency, prevent blowouts, and keep your Honda Civic running smoothly, it’s essential to check your tire pressure regularly. In fact, it’s recommended that you check your tire pressure at least once a month using a reliable pressure gauge. If your tires are underinflated or overinflated, it can impact your car’s handling and cause damage to your tires.
To check your tire pressure on your Civic, you can start by removing the tire valve cap and pressing the tire pressure gauge onto the valve stem. Make sure the gauge is straight and firmly seated, and take note of the reading. If you need to add air, consult your owner’s manual to determine the proper inflation level and use an air compressor to inflate your tires.
Remember, maintaining the right tire pressure not only keeps you safe but also improves the performance and longevity of your Honda Civic.
Adjusting Tire Pressure
If you’re wondering how to check tire pressure on a Honda Civic 2017, don’t worry, it’s an easy task that can be done in a matter of minutes. First, you’ll need a tire pressure gauge which can be purchased at nearly any auto parts store. Then, locate the tire pressure information on the driver’s side door panel or in the owner’s manual.
Unscrew the valve cap from the tire and press the gauge onto the valve stem. The gauge will provide a reading which you can compare to the recommended pressure for your vehicle. If the pressure is too low, use an air compressor to add air until the desired pressure is reached.
It’s important to check your tire pressure regularly as it greatly affects your vehicle’s safety and performance.
Remove the Valve Cap
When adjusting your tire pressure, the first step is to remove the valve cap. This small piece is critical when it comes to maintaining tire pressure, as it provides protection to the valve stem from dirt and debris that could negatively affect the pressure inside your tire. Simply remove the cap by unscrewing it counterclockwise, and set it aside in a safe place so that it doesn’t get lost.
It’s important to note that some tires may have a cap that requires a special tool to remove it, so be sure to check your owner’s manual to ensure that you have the tools needed for the job. With the valve cap removed, you’re now ready to check the tire pressure using a tire pressure gauge. Remember to replace the valve cap securely once you’re done adjusting your tire pressure to ensure that it stays free from debris and maintains the correct pressure.
By taking care of your tires, you’ll save money and stay safer on the road.
Add Air into the Tire if Needed
When it comes to keeping your vehicle in good condition, one of the most overlooked tasks is checking and adjusting tire pressure. Maintaining proper tire pressure not only ensures better gas mileage but it also contributes to safer road handling. The first step in adjusting tire pressure is to determine the recommended inflation level for your vehicle’s tires.
This information can be found in your car’s owner manual or on the sticker placed in the driver’s side door jamb. Once you have this information, assess the current air pressure in your tires using a tire pressure gauge. If the gauge shows that the tire pressure is too low, simply add air into the tire until it reaches the recommended level.
However, if the tires are overinflated, use the gauge to release some air until the pressure is at the ideal setting. Remember to check your tire pressure at least once a month and before long road trips to ensure the safety of you and your passengers.
Conclusion
In the end, checking the tire pressure on your Honda Civic 2017 can be a breeze with these easy steps. Don’t let your tires deflate your confidence on the road – take charge and keep them properly inflated for a smoother, safer driving experience. Remember, it’s not just about avoiding flat tires – proper tire pressure can also improve fuel economy and extend the life of your tires.
So go ahead, grab that tire pressure gauge and become a tire pressure pro! Your Honda Civic (and your wallet) will thank you.”
FAQs
What is the recommended tire pressure for a Honda Civic 2017?
The recommended tire pressure for a Honda Civic 2017 is 32 psi.
How can I check my Honda Civic 2017 tire pressure?
You can check your Honda Civic 2017 tire pressure by using a tire pressure gauge on the valve stem. The recommended pressure should be listed in the owner’s manual or on a sticker located on the driver’s side doorjamb.
What happens if I overinflate my Honda Civic 2017 tires?
Overinflating your Honda Civic 2017 tires can lead to reduced traction and braking ability, uneven tire wear, and a harsh ride.
What happens if I underinflate my Honda Civic 2017 tires?
Underinflating your Honda Civic 2017 tires can lead to decreased fuel efficiency, uneven tire wear, and poor handling.
How often should I check my Honda Civic 2017 tire pressure?
It is recommended to check your Honda Civic 2017 tire pressure at least once a month and before long trips.
Can I visually inspect my Honda Civic 2017 tires for proper inflation?
No, you cannot accurately determine tire pressure by visual inspection alone. It is recommended to use a tire pressure gauge.
Should I check tire pressure when the tires are hot or cold?
It is recommended to check your Honda Civic 2017 tire pressure when the tires are cold and have not been driven for at least three hours.