Do you own a Honda Civic 2018 and want to ensure that your tires are perfectly inflated? Checking the tire pressure is an essential maintenance task for any car owner and can improve fuel efficiency, prolong tire life, and ensure a safe driving experience. In this blog, we will guide you through the simple steps to check tire pressure on your Honda Civic 201 Firstly, you need to determine the recommended tire pressure for your vehicle.
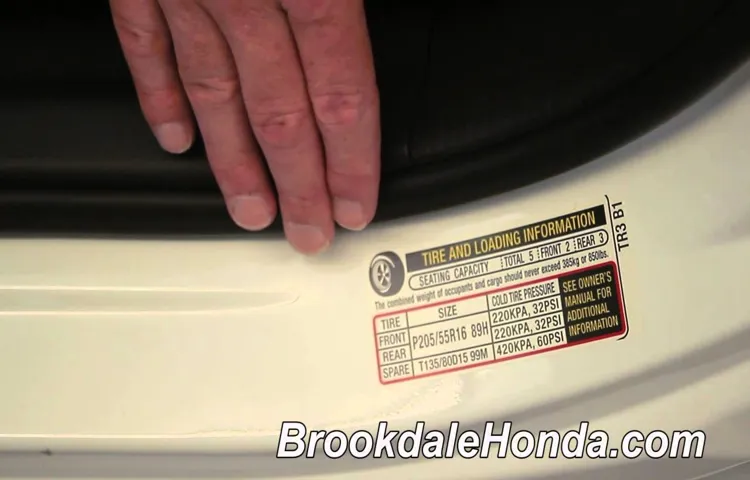
You can find this information in the owner’s manual or on the driver’s side door jamb. It is important to note that the recommended pressure may vary between the front and rear tires. Next, you need to use a tire pressure gauge to measure the pressure in each tire.
You can purchase a gauge at any auto parts store or use the gauge on the air pump at your local gas station. Remove the valve cap from the tire and press the gauge onto the valve stem. The gauge will display the current pressure reading, which should be compared with the recommended pressure.
If the pressure is too low, use a pump to inflate the tire to the correct pressure. If the pressure is too high, release air from the tire by pressing the gauge onto the valve stem and pressing the valve pin in the center. Recheck the pressure and adjust if necessary.
In conclusion, checking the tire pressure on your Honda Civic 2018 is a simple yet crucial task that should not be overlooked. By following these steps, you can ensure that your tires are properly inflated, which will save you money and provide a safer driving experience.
Table of Contents
Introduction
If you’ve recently become the proud owner of a Honda Civic 2018 or you’ve been driving it for a while now, it’s important to know how to check its tire pressure regularly. Proper tire pressure is essential for maximizing fuel efficiency, improving handling, and reducing tire wear. The good news is, it’s easy to do yourself with just a few simple steps.
Firstly, you’ll need an accurate tire pressure gauge. Next, locate the recommended tire pressure for your car, which is normally posted on the driver’s side doorjamb or in the owner’s manual. Remove the valve cap, press the gauge onto the valve stem, and read the pressure on the gauge.
If the pressure is too low, add air until the recommended pressure is reached. If it’s too high, release some air until you reach the recommended pressure. Remember to check your tire pressure monthly or before long trips to keep your Honda Civic running smoothly.
Why Checking Tire Pressure is Important
Tire pressure is the most overlooked maintenance task in vehicle care. It is vital to check tire pressure at least once a month to ensure that your vehicle performs at its optimum level. Under or over-inflated tires can cause several issues, including poor fuel economy, reduced traction, and even tire failure.
Checking tire pressure is essential because it helps extend the lifespan of your tires, improve your vehicle’s handling, and save you money in the long run. By maintaining proper tire pressure, you can enhance safety, control, and comfort while driving. Remember, ignoring tire pressure can lead to costly repairs, accidents, or even fatalities.
So, it’s crucial to set aside time regularly to check the pressure in your tires to stay safe on the road.
What You Will Need
If you’re wondering how to check tire pressure on your Honda Civic 2018, fear not. It’s a relatively simple process that you can do on your own with just a few tools. Firstly, you’ll need a tire pressure gauge.
These are readily available at most gas stations or auto supply stores. Next, you’ll want to locate the tire pressure specifications for your car. This information can usually be found in your owner’s manual or even on a sticker located on the driver’s side doorjamb.
Once you have your gauge and specs, you’re ready to get started. Simply unscrew the valve cap on your tire and firmly press the gauge onto the valve stem. You should hear a hissing sound, and the gauge will give you a reading of the tire’s pressure.
Compare this to your car’s recommended specs and adjust as necessary by adding or releasing air. With these few steps, you’ll be on your way to making sure your tires are at the right pressure and avoiding potential problems down the road.
Tire Pressure Gauge
When it comes to checking your vehicle’s tire pressure, a tire pressure gauge is the essential tool you’ll need. This device takes readings of the air pressure inside the tire, and it’s crucial for ensuring the safety and efficiency of your car. To get started, you’ll need to purchase a tire pressure gauge.
You can find them at most auto parts stores, and they’re relatively inexpensive. Make sure to read the instructions carefully, as there are different types of tire pressure gauges with different methods of use. Some require you to press the gauge onto the tire valve and read the numbers on the screen, while others may have a dial or indicator.
It’s also important to note that some gauges may need to be calibrated periodically, so be sure to check the instructions for this as well. So, to keep your vehicle running smoothly and safely, make sure you have a reliable tire pressure gauge on hand, and use it regularly to check your tires’ pressure.
Owner’s Manual
If you are a new car owner, it’s important to have a clear understanding of the essential items you need to keep your vehicle running smoothly. Firstly, you will need to have your owner’s manual. This detailed guidebook provides you with vital information about your car, such as recommended maintenance schedules, how to identify warning indicators, and what type of fuel to use.
Along with your owner’s manual, you will also need items such as a spare tire, a tire jack, and a lug wrench to replace a flat tire in an emergency. A set of jumper cables is also important to keep in your car for emergencies that involve a dead battery. To keep your car clean and well-maintained, you should have a fuel injector cleaner, car wash soap, and a few microfiber towels.
A portable tire inflator is also a convenient item to have in case of low tire pressure. These essential items will not only keep your car running smoothly but also create peace of mind while on the road.
Steps to Check Tire Pressure
If you own a Honda Civic 2018, you need to maintain the tire pressure for optimal performance and safety on the road. Checking the tire pressure is a simple task that you can easily do on your own with a few basic steps. First, park your car in a flat and safe location and turn off the engine.
Then, remove the valve cap from the tire and place the pressure gauge onto the valve stem. Read the pressure measurement and compare it with the recommended pressure listed in the owner’s manual or on the side of the tire. If the pressure is too low, use an air compressor to inflate the tire to the correct pressure level.
Repeat the process for all four tires, including the spare tire. Remember to check the tire pressure at least once a month or before long road trips to ensure maximum fuel efficiency, handling, and safety while driving. It’s crucial to keep your tires inflated to the recommended level to avoid accidents and extend the lifespan of your car’s tires.
So, make checking tire pressure a regular part of your car maintenance routine, and you’ll enjoy a safe and comfortable driving experience with your Honda Civic.
Step 1: Park Your Car Safely
When it comes to maintaining your vehicle, checking tire pressure is an essential step in keeping safe on the road and prolonging the lifespan of your tires. But before you even think about grabbing that pressure gauge, the first step is to park your car safely. Make sure you’re on a level surface, away from any traffic, and turn off the engine.
This will ensure your safety and accuracy when measuring tire pressure. It’s important to note that tire pressure should only be checked once the tires are cold, as driving even a short distance can increase the pressure and give you a false reading. By taking the time to park safely and allowing the tires to cool down, you’ll get an accurate reading and have peace of mind knowing you’re taking the right steps to maintain your vehicle.
Step 2: Locate the Tire Pressure Monitoring System (TPMS) Button
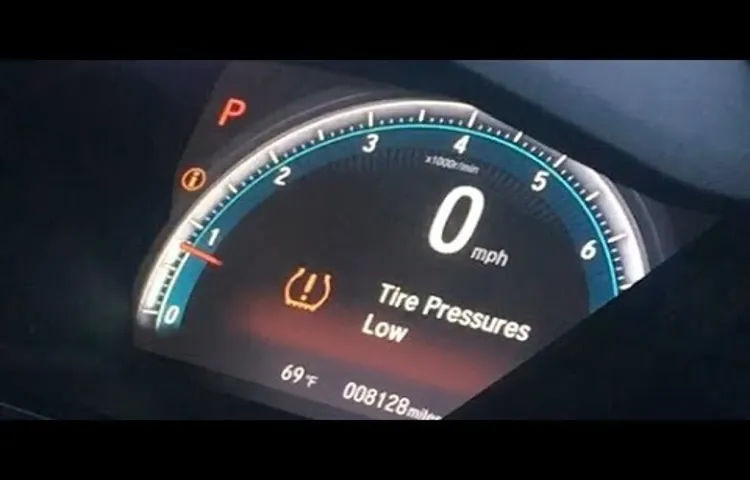
When checking your tire pressure, the second step is to locate the Tire Pressure Monitoring System (TPMS) button. This button is typically located near your steering wheel and may have an icon that depicts tires with an exclamation point. Pressing this button will indicate the current tire pressure of each individual tire.
Some cars may also require the ignition to be turned on in order for the system to work. It’s important to note that TPMS buttons can vary between car models, so consulting your car manual can help you locate the button more efficiently. Remember, checking your tire pressure regularly not only ensures proper handling and fuel efficiency, but also keeps you and other drivers safe on the road.
So, take the time to familiarize yourself with your car’s TPMS button and incorporate tire pressure checks into your routine maintenance.
Step 3: Press and Hold the TPMS Button Until the TPMS Light Blinks Twice
When it comes to your car, ensuring that your tires are properly inflated is essential for both safety and fuel efficiency. That’s where the TPMS or Tire Pressure Monitoring System comes in handy. Checking your tire pressure with this system can save you from a lot of trouble.
To start the process, make sure your vehicle is in the “on” position and locate the TPMS button in your car. Once you’ve found it, press and hold it down until the TPMS light blinks twice. This will reset the TPMS system and provide an accurate reading of your tire pressure.
Keep in mind that you should always check your tire pressure when the tires are cold and never overinflate them. By following these simple steps, you’ll be able to maintain your car’s tires, improve fuel efficiency, and ensure a safe driving experience.
Step 4: Use the Tire Pressure Gauge to Check Your Tire Pressure
Once you’ve located the valve stem on your tire, it’s time to check the pressure using a tire pressure gauge. This tool is essential for accurate readings, as relying on the visual appearance of a tire can be deceiving. Tire pressure gauges come in either digital or analog form, and both should work accurately as long as they’re in good working condition.
Simply remove the valve cap and press the gauge onto the valve stem firmly. You should hear a slight hissing noise indicating that the air is being released into the gauge. Once the gauge reading has stabilized, take note of the number displayed.
You can compare this number to the recommended PSI for your tire, which can be found in your vehicle owner’s manual or on the tire placard located on the driver’s side door jamb. If the reading is below the recommended PSI, add air until the gauge reaches the desired number. Always keep in mind that incorrect tire pressure can create hazardous driving conditions, so it’s important to check your tire pressure regularly and adjust accordingly.
Step 5: Compare the Pressure to the Recommended PSI
When checking your tire pressure, it’s essential to compare the readings to the recommended PSI. This ensures that your tires are performing at their best and keeping you safe on the road. The recommended PSI can typically be found in your vehicle manual or on the inside of the driver’s side door.
If the pressure is below the recommended PSI, your tires may be underinflated, increasing the risk of a blowout, reducing fuel efficiency, and causing uneven wear. Overinflated tires, on the other hand, can reduce your vehicle’s handling and traction ability, affecting your safety when driving. By regularly checking your tire pressure and comparing it to the recommended PSI, you can help ensure your tires are performing optimally and keep your vehicle running smoothly.
What to Do if Tire Pressure is Too High or Too Low
If you own a Honda Civic 2018, you can easily check your tire pressure. Before you do, though, it’s important to know why you need to check your tire pressure in the first place. When your tire pressure is too high, your car will ride stiffly and you’ll have less traction.
When your tire pressure is too low, your car will ride roughly, and your tires will wear out faster. To check your tire pressure, you’ll first need to know the recommended pressure by checking your car’s manual or using a tool on the driver’s side doorjamb. Then, use a tire pressure gauge to check the pressure in each tire.
If your tire pressure is too high, use a pressure gauge to let out air. And if it’s too low, you can add air at a gas station. It’s important to check your tire pressure regularly to ensure safe driving and prevent unnecessary tire wear.
Add or Release Air as Needed
If you find that your tire pressure is too high or too low, don’t worry, it’s a common issue that can easily be resolved. The first step is to check your owner’s manual or the label on the driver’s side door for the correct tire pressure for your vehicle. Next, you’ll need to use a tire pressure gauge to check the current pressure.
If it’s too high, you’ll need to release air by using the valve stem and a tire pressure gauge. On the other hand, if it’s too low, you’ll need to add air until it reaches the recommended pressure. It’s important to not overinflate or underinflate your tires, as it can negatively affect your vehicle’s handling, fuel efficiency, and even cause damage to your tires.
Proper tire pressure is crucial for a safe and smooth driving experience, so don’t neglect this important aspect of vehicle maintenance.
Re-check Tire Pressure
Tire pressure is a critical factor that affects your vehicle’s performance, fuel efficiency, and safety. It is vital to check your tire pressure regularly, as overinflated or underinflated tires can cause problems on the road. Firstly, if your tires are underinflated, they will create more friction with the road, making it harder for your vehicle to move and resulting in higher fuel consumption, and also increasing the risks of a blowout.
On the other hand, overinflated tires can reduce your vehicle’s traction, causing it to drift and slide on the road, especially during wet and icy conditions. Checking tire pressure is an easy task. The recommended PSI levels can be found in your car manual or on the tire sidewall.
Use a pressure gauge to check your tire pressure before driving. If you find your tire pressure is too low, inflate them to the recommended PSI level. If it is too high, you can release some air until it reaches the recommended level.
Maintaining proper tire pressure can not only save you money on fuel but also keep you safe on the road.
Conclusion
In conclusion, checking your tire pressure on a Honda Civic 2018 is a breeze and should be done regularly to ensure optimal performance and safety on the road. Don’t be a deflated driver, grab a tire gauge and give your tires the attention they deserve. Trust us, your Civic will thank you – and who knows, maybe your gas mileage will improve enough to afford that road trip you’ve been dreaming of!”
FAQs
What is the recommended tire pressure for a Honda Civic 2018?
The recommended tire pressure for a Honda Civic 2018 is 32 PSI.
How often should I check the tire pressure on my Honda Civic 2018?
It is recommended to check the tire pressure on your Honda Civic 2018 at least once a month.
Can I check the tire pressure on my Honda Civic 2018 myself?
Yes, you can check the tire pressure on your Honda Civic 2018 yourself with a tire pressure gauge.
Where can I find the correct tire pressure for my Honda Civic 2018?
You can find the correct tire pressure for your Honda Civic 2018 in your owner’s manual or on the driver’s side door jamb.
What should I do if the tire pressure on my Honda Civic 2018 is too low?
If the tire pressure on your Honda Civic 2018 is too low, add air to bring the tire pressure to the recommended level.
Can incorrect tire pressure affect my Honda Civic 2018’s performance?
Yes, incorrect tire pressure can affect your Honda Civic 2018’s performance, including fuel efficiency and handling.
Is it necessary to rotate the tires on my Honda Civic 2018?
Yes, it is necessary to rotate the tires on your Honda Civic 2018 every 5,000-7,500 miles to ensure even wear and prolong tire life.