
Tired of that unsightly mildew taking over the underside of your RV awning? Trust me, you’re not alone. A dirty awning not only looks unappealing, but it can also lead to potential health hazards and damage to your RV. So, it’s important to take the necessary steps to clean and maintain your awning regularly.
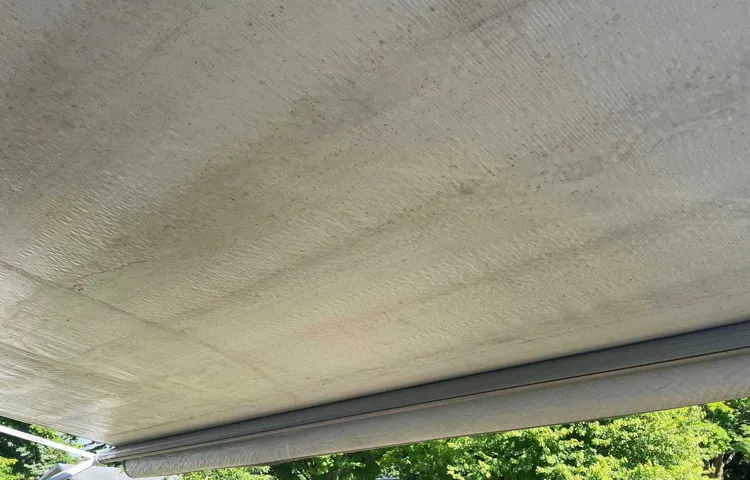
Mildew is a common problem for RV owners, especially those who live in humid or damp climates. It thrives in areas with poor ventilation, where moisture tends to accumulate. Over time, mildew can cause stains, discoloration, and even weaken the fabric of your awning.
But fear not! Cleaning mildew from the underside of your RV awning is not as daunting as it may seem. With a few simple steps and the right cleaning agents, you can have your awning looking brand new in no time. One of the first things you’ll need to do is to assess the severity of the mildew.
Is it just a few spots here and there, or has it spread all over? This will determine the methods and cleaning agents you’ll use. Next, you’ll want to gather the necessary supplies. These may include a ladder or step stool, a soft-bristle brush or sponge, mildew cleaner or a mixture of bleach and water, a bucket, and a hose with a spray nozzle.
Before you start cleaning, it’s important to protect yourself by wearing gloves and eye protection. Mildew cleaner or bleach can be strong chemicals, so it’s better to be safe than sorry. Now it’s time to get down to business.
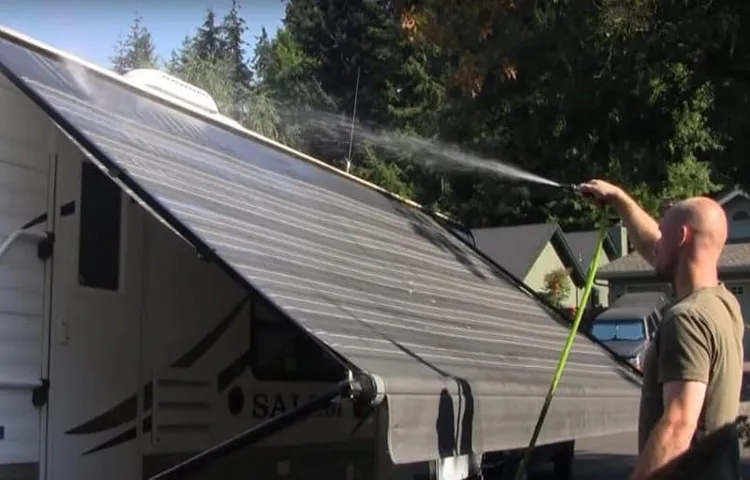
Start by wetting the underside of your awning with a hose. This will help loosen any dirt and debris that may be stuck to the fabric. Next, mix your mildew cleaner or bleach and water according to the instructions on the bottle.
Table of Contents
Introduction
Cleaning mildew from the underside of an RV awning is an important task that should not be overlooked. Mildew can not only cause an unpleasant odor but also damage the fabric of the awning if left untreated. Luckily, there are several methods you can use to effectively remove mildew and keep your awning looking fresh and clean.
In this blog post, we will explore different ways to clean mildew from the underside of an RV awning, including using bleach, vinegar, or a commercial mildew remover. Additionally, we will provide tips on preventing mildew from forming in the first place, such as regularly inspecting and properly storing the awning when not in use. With these tips in mind, you can ensure that your RV awning remains in top condition, ready for your next adventure.
So let’s get started on banishing that mildew and restoring your awning to its former glory!
What is mildew and why is it a problem for RV awnings?
RV awnings are a great addition to any camper or motorhome, providing shade and protection from the sun and elements. However, one common problem that many RV owners encounter is the growth of mildew on their awnings. But what exactly is mildew and why is it such a problem? Mildew is a type of fungus that thrives in damp and dark environments, making RV awnings a perfect breeding ground.
It appears as dark, discolored patches on the fabric and can also cause a musty odor. Not only does mildew make your awnings look unsightly, but it can also lead to deterioration of the fabric over time. And let’s face it, nobody wants to spend their camping trip under a mildew-infested awning.
So what can be done to prevent and remove mildew from your RV awnings?
Why should you clean mildew from the underside of your RV awning?
clean mildew, RV awning. Introduction: Cleaning mildew from the underside of your RV awning is an essential task for any RV owner. While it may seem like a small and insignificant part of your vehicle, neglecting to clean the mildew can lead to some serious problems down the line.
Mildew not only looks unsightly, but it can also cause damage to your RV and even affect your health. In this blog post, we will explore why it’s important to clean mildew from the underside of your RV awning and provide some tips on how to do so effectively. So grab your cleaning supplies and let’s get started!
Materials and tools needed
Cleaning mildew from the underside of an RV awning can be a daunting task, but with the right materials and tools, it can be done efficiently. To tackle this job, you will need a few essential items. Firstly, you’ll need a ladder or a stable surface to safely reach the underside of the awning.
Additionally, you will need a bucket filled with warm water and a mild detergent or specialized awning cleaner. You will also need a soft-bristle brush or sponge to scrub away the mildew. A garden hose with a spray nozzle will be necessary to rinse off the cleaner and debris.
Lastly, it’s always a good idea to wear gloves and protective eyewear during the cleaning process. With these materials and tools in hand, you’ll be well-prepared to effectively remove the mildew from your RV awning.
List of materials you will need for the cleaning process
When it comes to cleaning, having the right materials and tools can make all the difference. Here is a list of the essentials you will need for the cleaning process. First, you will need cleaning solutions.
This can include all-purpose cleaners, window cleaners, and specialty cleaners like tile or stainless steel cleaners. Make sure to choose the appropriate cleaner for the surface you are cleaning. Next, you will need cleaning cloths or rags for wiping down surfaces.
Microfiber cloths are a great choice as they are absorbent and leave surfaces streak-free. You will also need a good vacuum cleaner for cleaning carpets and floors. Look for one with strong suction and attachments for hard-to-reach areas.
Additionally, you will need a broom and dustpan for sweeping up dirt and debris. A mop and bucket will be necessary for cleaning hard floors. Finally, don’t forget to have rubber gloves to protect your hands from chemicals and a sturdy apron or old clothes to protect your clothing from stains or splashes.
Having these materials on hand will make your cleaning tasks much easier and more efficient.
List of tools you will need for the cleaning process
When it comes to cleaning, having the right materials and tools can make all the difference. Making sure you have everything you need before you start can save you time and frustration. Here is a list of materials and tools that are commonly used for cleaning tasks.
First and foremost, you will need some cleaning solutions. This can include all-purpose cleaner, glass cleaner, disinfectant, and floor cleaner, depending on what areas you will be cleaning. You will also need a good supply of microfiber cloths for wiping down surfaces.
These are great because they are reusable and can be thrown in the washing machine when they get dirty. For scrubbing tougher stains, you may want to have some scrub brushes on hand. These can be small handheld brushes or larger brushes with a long handle for those hard-to-reach places.
A bucket is another essential tool for cleaning, as it can hold your cleaning solution and provide a place to rinse out your cloths. And don’t forget about gloves to protect your hands and goggles to protect your eyes. With these materials and tools, you’ll be well-equipped to tackle any cleaning task that comes your way.
Preparation
If you’re an RV enthusiast, you know that owning a recreational vehicle comes with the responsibility of keeping it clean and well-maintained. One area that often gets neglected is the underside of the RV awning, where mildew can easily grow and thrive. But don’t worry, cleaning mildew from the underside of your RV awning is actually quite simple with the right preparation.
Before you start, make sure you have a few essential items on hand, including a long-handled brush or broom, a bucket of warm water, a mild detergent or bleach solution, and a ladder or step stool. Once you have these items, you’re ready to tackle the mildew and get your RV awning looking brand new again.
Inspecting the awning for any damages or tears
When it comes to preparing your awning for the upcoming season, one important step is inspecting it for any damages or tears. Before you even think about opening up your awning and enjoying some shade, it’s crucial to make sure it’s in good condition. Start by giving the awning a thorough visual inspection.
Look for any signs of wear and tear, such as frayed edges or loose stitching. Check for any tears or holes that could potentially let water or sunlight through. Don’t forget to examine the frame as well – any rust or corrosion should be addressed immediately.
By taking the time to inspect your awning for any damages or tears, you can ensure that it will provide you with the shade and protection you need all season long.
Choosing the right cleaning solution
cleaning solution, preparation, choosing the right cleaning solution. When it comes to cleaning, choosing the right cleaning solution is essential to achieve a clean and spotless result. Before you even start cleaning, it’s important to take some time to prepare and gather the necessary supplies.
This includes selecting the right cleaning solution for the task at hand. There are various types of cleaning solutions available on the market, each designed to tackle different types of stains and messes. Whether you’re dealing with grease in the kitchen, soap scum in the bathroom, or stains on the carpet, it’s crucial to choose a cleaning solution that is specifically formulated to target and remove the problem.
Taking into consideration the surface or material you’ll be cleaning is also important. Different surfaces may require different cleaning solutions to ensure that they are not damaged. By properly preparing and selecting the right cleaning solution, you can tackle even the toughest cleaning challenges with ease and efficiency.
Cleaning process
If you notice mildew forming on the underside of your RV awning, don’t panic! It’s a common issue that can easily be resolved with a good cleaning. To start, remove the awning from your RV and lay it flat on a clean surface. Mix a solution of equal parts water and white vinegar in a spray bottle.
Spray the mixture onto the affected areas and let it sit for about 15 minutes to break down the mildew. Then, use a soft bristle brush or sponge to scrub away the mildew, paying attention to any stubborn spots. Rinse the awning thoroughly with clean water and allow it to air dry completely before reattaching it to your RV.
Regular cleaning and maintenance will help prevent mildew from returning in the future.+
Step 1: Erecting the awning
When it comes to erecting the awning, one important step is the cleaning process. Before you start setting up the awning, it’s essential to ensure that the area where it will be installed is clean and free from any debris or dirt. This will not only make the installation process easier but also help in maintaining the overall condition and longevity of the awning.
To clean the area, you can start by sweeping away any loose dirt or debris using a broom or brush. After that, you can use a mild soap or detergent mixed with water to scrub away any stubborn stains or marks on the surface. Make sure to rinse off the soap thoroughly and allow the area to dry completely before proceeding with the rest of the awning installation process.
By following this simple cleaning step, you can ensure that your awning is installed on a clean and well-maintained surface, providing maximum durability and aesthetics to your outdoor area.
Step 2: Removing any loose debris
When it comes to cleaning your home or any space, it’s crucial to follow a step-by-step process to ensure that everything is thoroughly cleaned and free from dirt and debris. One of the first steps in the cleaning process is removing any loose debris. This can include things like dust, dirt, crumbs, or any other small particles that have accumulated in the area.
By removing this loose debris first, you’re making it easier for you to clean the space effectively. A vacuum cleaner or a broom can be handy tools in getting rid of loose debris. Simply go over the surface, making sure to reach all the nooks and crannies, until all the loose debris is gone.
This step is essential because if you were to skip removing the loose debris and jump straight into cleaning, you might end up spreading the dirt around or not getting the desired results. So, take a few minutes to clear away the loose debris before moving on to the next step in the cleaning process.
Step 3: Applying the cleaning solution
cleaning solution, applying, carpet cleaning, wipe, sponge, solution mixture, stains, carpet fibers, dirt, debris, deep cleaning, fresh and clean In the third step of the carpet cleaning process, it’s time to apply the cleaning solution to your carpet. This is where the real magic happens and those stubborn stains and dirt spots start to disappear. To apply the solution, you can use a clean cloth or sponge.
Make sure the cloth or sponge is damp, but not soaking wet. Dip it into the solution mixture and gently wipe it over the stained areas of your carpet. Pay close attention to any heavily soiled spots or high-traffic areas.
The cleaning solution will penetrate deep into the carpet fibers, loosening up dirt and debris that have been trapped. As you wipe away, you’ll notice the stains fading away, leaving your carpet looking fresh and clean.
Step 4: Scrubbing the underside of the awning
To complete the awning cleaning process, it’s important not to forget about the underside of the awning. This is an area that often gets neglected because it’s not as visible as the top side. However, cleaning the underside is just as important, as dirt, dust, and debris can accumulate there over time.
To scrub the underside of the awning, start by removing any loose dirt and debris with a broom or brush. Next, mix a solution of warm water and mild detergent in a bucket. Dip a soft-bristle brush into the solution and scrub the underside of the awning in a gentle, circular motion.
Pay particular attention to any areas with stains or discoloration. Rinse the awning with clean water using a hose or pressure washer, making sure to remove all traces of soap. Finally, allow the awning to air dry completely before retracting it.
Regularly cleaning the underside of your awning will help to maintain its appearance and prolong its lifespan.
Step 5: Rinsing off the cleaning solution
Cleaning process Now that you have applied the cleaning solution to the surface you are cleaning, it’s time to move on to the next step – rinsing off the cleaning solution. This step is crucial to ensure that all the dirt, grime, and cleaning solution residue is completely removed from the surface. To begin, you will need a clean damp cloth or sponge.
Dip the cloth or sponge in clean water and wring out any excess water. Then, gently wipe the surface in a circular motion, making sure to cover all areas. As you are rinsing off the cleaning solution, you may notice that the water becomes discolored or dirty.
This is a good sign, as it means that the cleaning solution is effectively removing dirt and grime from the surface. Continue to rinse the surface until the water runs clear and there is no more dirt or cleaning solution residue visible. You may need to rinse the cloth or sponge several times throughout this process to ensure that you are using clean water to rinse off the cleaning solution.
Once you have finished rinsing off the cleaning solution, it is important to dry the surface thoroughly. Use a clean dry cloth or towel to wipe away any excess water and leave the surface to air dry completely. By thoroughly rinsing off the cleaning solution, you are ensuring that the surface is left clean and free from any residue.
This will help to maintain the cleanliness and appearance of the surface and prevent any build-up of dirt or grime in the future. So, now that you know how to properly rinse off the cleaning solution, you can confidently move on to the final step of the cleaning process – enjoying your clean and sparkling surface!
Drying and maintenance
If you’ve noticed mildew forming on the underside of your RV awning, don’t worry – it’s a common issue that can be easily fixed. The first step in cleaning mildew from the underside of your RV awning is to thoroughly dry it out. This can be done by opening the awning and allowing it to dry in the sun for a few hours.
Once the awning is dry, you can start the cleaning process. Mix a solution of warm water and mild dish soap, and use a soft bristle brush to scrub the affected areas. Be sure to scrub gently to avoid damaging the fabric.
Rinse the awning thoroughly with clean water to remove any soap residue, and then allow it to dry completely before retracting it. Regular maintenance is key to preventing mildew growth, so make sure to keep your awning clean and dry on a regular basis. Additionally, you can consider using a mildew-resistant fabric spray to provide extra protection against future growth.
With proper care and maintenance, you can keep your RV awning looking and smelling fresh for years to come.
Drying the awning properly
Drying the awning properly is an essential part of its maintenance, as it helps to extend its lifespan and keep it looking its best. After cleaning the awning, it is important to ensure that it is thoroughly dried before storing or using it again. Leaving the awning wet can lead to the growth of mold and mildew, which can be difficult to remove and cause damage to the fabric.
To dry the awning, start by using a soft cloth or towel to remove any excess moisture. Pay special attention to the seams and corners, as these areas tend to hold onto water. Once the excess moisture has been removed, you can use a fan or open up the awning to allow for air circulation.
It is also important to make sure that the awning is completely dry before folding or rolling it up for storage. This will prevent any musty odors or damage from occurring. By following these steps, you can keep your awning in great condition and ensure that it lasts for years to come.
Applying a protective coating
drying and maintenance Once you have applied a protective coating to your surface, whether it’s a car, furniture, or even your phone, it’s important to properly dry and maintain it to ensure its longevity and effectiveness. Drying the coating is crucial because any moisture left on the surface can lead to unevenness or even damage. To begin the drying process, it’s best to let the coating sit undisturbed for a designated amount of time, usually indicated on the product’s instructions.
During this time, make sure the surface is in a clean and dry environment to avoid any dust or debris sticking to it. Once the drying time is complete, use a soft, lint-free cloth to gently wipe away any excess residue or moisture. It’s important not to scrub or rub too hard, as this can potentially damage the coating.
After drying, it’s important to maintain the protective coating to ensure its effectiveness over time. Regular cleaning using mild detergent or a designated cleaning product for the specific coating is recommended. Avoid using harsh chemicals or abrasive cleaners, as they can strip away the protective layer.
Additionally, avoid using rough or abrasive materials to clean the coated surface, as these can also cause damage. Instead, opt for soft microfiber cloths or sponges to gently clean the surface. In addition to regular cleaning, it’s also important to periodically inspect the coating for any signs of wear or damage.
This can include areas where the coating may be peeling or bubbling, indicating that it may need to be reapplied. Taking the time to maintain and inspect the protective coating will help ensure its longevity and effectiveness in protecting your surface. Remember, prevention is key when it comes to protecting your investments, so taking the extra time to properly dry and maintain your coated surfaces will pay off in the long run.
Conclusion
And there you have it, my friends, a foolproof guide on ridding your precious RV awning of that pesky mildew. With just a few simple steps and a little bit of elbow grease, you can transform your lackluster awning into a shining beacon of cleanliness and freshness. Remember, prevention is the key to keeping mildew at bay.
Regularly inspecting your awning and attending to any signs of moisture or dampness will greatly reduce the chances of mildew forming in the first place. But if you do happen to find yourself face to face with the dreaded mildew, fear not! Armed with our tried and true methods, you can bid adieu to those unsightly stains and foul odors. Whether you choose the trusty vinegar solution or opt for the more exotic grapefruit seed extract, you can rest assured that your awning will be mildew-free and ready for your next adventure.
So, next time you find yourself confronted with mildew lurking beneath your RV awning, don’t despair. Roll up your sleeves, grab your cleaning supplies, and tackle the task head-on. Your awning will thank you, and so will all the campers who will marvel at your awning-cleaning prowess.
Now go forth, fellow adventurers, and conquer that mildew like the cleaning heroes you are! Happy camping, and may your awnings always stay mildew-free and fabulous!
FAQs
Can mildew damage the underside of an RV awning?
Yes, mildew can cause damage to the underside of an RV awning if left untreated. It can lead to the growth of mold and can weaken the fabric over time.
Why does mildew grow on the underside of an RV awning?
Mildew tends to grow in areas with high humidity, poor ventilation, and organic debris. The underside of an RV awning can provide the ideal conditions for mildew growth, especially if the awning is not properly cleaned and maintained.
Is it necessary to clean mildew from the underside of an RV awning?
Yes, it is important to clean mildew from the underside of an RV awning to prevent further damage and to maintain its functionality. Mildew can cause stains, odor, and can potentially weaken the fabric, leading to tears or holes.
What is the best way to clean mildew from the underside of an RV awning?
The best way to clean mildew from the underside of an RV awning is to start by removing any loose debris or leaves. Then, mix a solution of water and a gentle detergent or mildew cleaner. Use a soft brush or sponge to gently scrub the affected areas, and rinse thoroughly with clean water. It is important to ensure the awning is completely dry before retracting it.
Can I use bleach to remove mildew from the underside of an RV awning?
While bleach can be effective in killing mildew, it is not recommended to use it on RV awnings as it can damage the fabric and potentially cause discoloration. It is best to use a gentle, mildew-specific cleaner or detergent.
How often should I clean the underside of my RV awning to prevent mildew growth?
It is recommended to clean the underside of an RV awning at least once a year, or more frequently if you notice any signs of mildew or mold growth. Regular cleaning and maintenance can help prevent mildew from forming in the first place.
Can I prevent mildew growth on the underside of my RV awning?
Yes, there are steps you can take to prevent mildew growth on the underside of your RV awning. These include ensuring proper ventilation, keeping the awning dry when not in use, and removing any organic debris regularly. You can also consider using a mildew-resistant fabric treatment or cover for added protection.