Hey there! So you’ve got yourself an inverter and you want to connect it to a power supply. Well, you’ve come to the right place. In this blog, we’re going to walk you through the process of connecting an inverter to a power supply.
Whether you’re looking to power up your RV, have backup power during a blackout, or simply want to use your devices on the go, this guide will help you get it all set up. Imagine your inverter as a bridge between your power supply and your electronic devices. It takes the DC power from your power supply – whether that’s a battery or solar panels – and converts it into AC power that can be used by your appliances.
It’s like having a translator that converts one language to another, allowing you to communicate effortlessly. So in this case, the inverter becomes the translator between your power supply and your devices. Now, before you start connecting everything, it’s important to understand the different types of power supplies and inverters available.
You have to make sure that the power supply you have is compatible with the inverter you’re using. Some inverters are specifically designed for use with batteries, while others can work with a variety of power sources. Likewise, some power supplies may not be able to handle the power output of certain inverters.
So it’s crucial to check the specifications and make sure everything matches up. Once you’ve got all the right components, it’s time to get down to business. The first step is to determine the power requirements of the devices you want to connect.
This will help you choose the right inverter with the correct power capacity. You don’t want to overload your inverter with too many devices or exceed its maximum power output. After that, it’s a matter of connecting the inverter to your power supply.
Table of Contents
Introduction
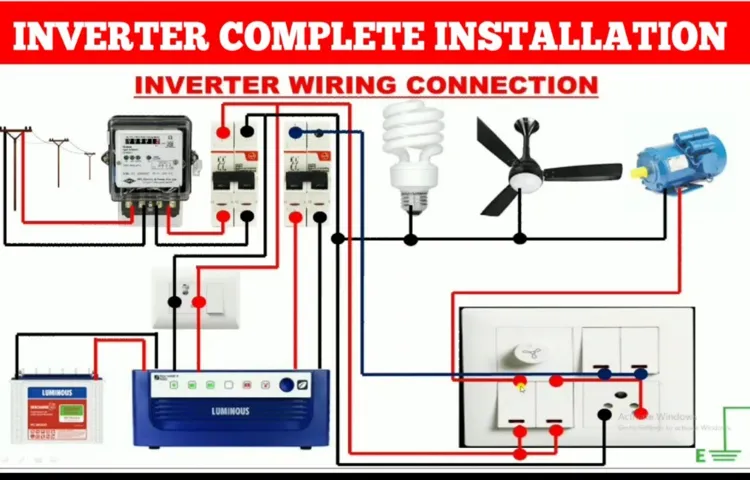
Are you ready to connect your inverter to the power supply? Well, you’re in the right place! Connecting an inverter to a power supply is a relatively simple process that anyone can do with a little bit of knowledge and the right tools. First, make sure you have the necessary equipment, including the inverter itself, cables, and a power source. Next, locate the power supply or outlet that you want to connect your inverter to.
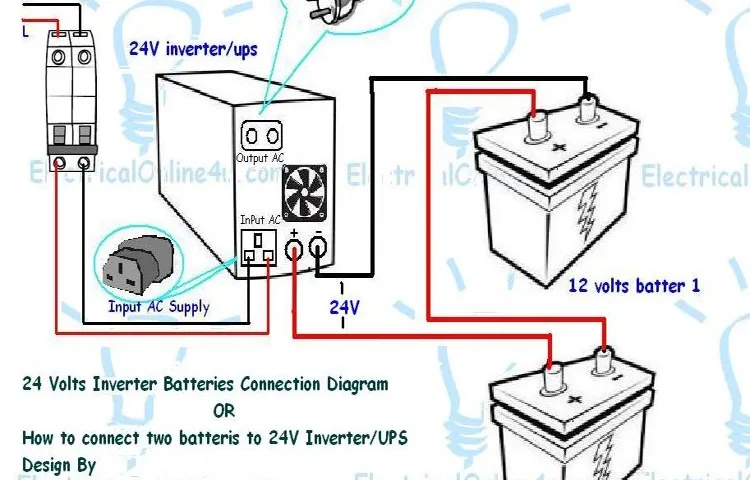
This could be a car battery, a generator, or even a solar panel. Once you’ve found the power source, it’s time to make the connections. Start by connecting the positive (red) cable from the inverter to the positive terminal of the power source, and then connect the negative (black) cable to the negative terminal.
Make sure the connections are secure and tight. Finally, turn on the inverter and test it by plugging in a device or appliance. Voila! You have successfully connected your inverter to the power supply.
It’s as easy as that!
Explanation of Inverter and Power Supply
inverter, power supply In today’s technological world, both inverters and power supplies play crucial roles in our daily lives. An inverter is a device that converts direct current (DC) into alternating current (AC), which is required for most household appliances and electronic devices. Conversely, a power supply is a device that takes AC power from the main electrical grid and converts it into the DC power necessary for electronic devices to function.
These two devices may seem similar in nature, but they serve different purposes in our homes and workplaces. Think about it this way: an inverter is like a translator. Just as a translator converts one language into another, an inverter converts DC power into AC power.
This is important because household appliances and electronic devices, such as laptops and smartphones, typically require AC power to function. On the other hand, a power supply is more like a transformer. Just as a transformer changes the voltage of an electrical current, a power supply converts the AC power provided by the main electrical grid into the DC power needed by electronic devices.
It’s like the bridge that connects the electrical grid to your devices and ensures they receive the appropriate amount of power. So, while both inverters and power supplies are essential for powering our devices, they perform different functions. Inverters convert DC power into AC power, while power supplies convert AC power into DC power.
Understanding the distinction between the two can help us appreciate their importance in our daily lives. Whether it’s charging our phones or running our appliances, inverters and power supplies ensure that our devices receive the right kind of power they need to function effectively.
Importance of Connecting Inverter to Power Supply Properly
connecting inverter to power supply
Step 1: Gather the Required Materials
So you want to connect an inverter to your power supply? Well, you’re in the right place! The first step is to gather all the materials you’ll need for the job. Don’t worry, it’s not too complicated. First, you’ll need your inverter, of course.
Make sure you choose the right size and type for your needs. Next, you’ll need a power supply. This could be a battery, a generator, or even solar panels.
It’s important to make sure your power supply can handle the load of the inverter. You’ll also need some cables to connect everything together. Make sure you have the right gauge and length for your setup.
And finally, you’ll need some basic tools like a screwdriver and wire cutters. Once you have all these materials gathered, you’re ready to move on to the next step.
List of Materials Needed
“gather the required materials” to create a engaging and persuasive text. In order to successfully complete a DIY project, it’s essential to gather all the materials needed beforehand. This will ensure that you have everything on hand and won’t have to make multiple trips to the store during the process.
So, what are the materials you’ll need for your project? Well, that will depend on the specific task at hand. If you’re working on a woodworking project, for example, you’ll likely need materials such as wood boards, screws, nails, sandpaper, and a saw. On the other hand, if you’re planning on painting a room, you’ll need paint, brushes, rollers, painter’s tape, and drop cloths.
Whatever your project may be, it’s important to make a list of all the materials you’ll need, and then double-check to ensure you have everything. This will help you avoid any unnecessary delays and allow you to get started right away. Remember, preparation is key when it comes to a successful DIY project, so don’t skip this important step!
Importance of Using the Right Materials
materials, gather, supplies, project, selecting, quality, crucial When it comes to tackling any project, whether it be a DIY home renovation or a simple craft project, using the right materials is crucial. The first step in any project is to gather the required materials or supplies. This might sound like a simple task, but selecting the right materials can make all the difference in the final result.
It’s important to take the time to research and choose materials that are of high quality and suitable for the job at hand. By using the right materials, you can ensure that your project will be durable, long-lasting, and achieve the desired outcome. So, before you dive into your next project, take the time to gather the right materials and set yourself up for success.
Step 2: Prepare the Power Supply
Now that you have your inverter, the next step is to connect it to a power supply. This is crucial for converting the DC power from the inverter into usable AC power. To do this, you will need a power cable that is compatible with your inverter and an available power source.
First, locate the AC power input on your inverter. This is usually a socket or a terminal where you can plug in the power cable. Make sure to check the inverter’s instructions or manual for the specific location of the AC power input.
Next, take one end of the power cable and plug it into the AC power input of the inverter. Ensure that the connection is secure and tight to avoid any loose connections. After that, take the other end of the power cable and plug it into a power outlet or another power source.
It’s important to note that the power source should be able to handle the power requirements of the inverter. Once the connections are made, turn on the power source and then switch on the inverter. You should now have a working connection between the inverter and the power supply.
Remember to always follow safety precautions when dealing with electricity and consult the manual or manufacturer’s guidelines for specific instructions on connecting the inverter to a power supply.
Ensure the Power Supply is Turned Off
“Turning off the power supply is an essential step in ensuring your safety while working with electrical equipment. Before you even begin preparing the power supply, make sure it is turned off and unplugged from the power source. This will prevent any risk of electric shock or accidental power surges during your work.
Imagine it like going on a hike – you wouldn’t start climbing a mountain without first making sure your hiking boots are secure, right? Similarly, you need to make sure the power supply is completely shut off before you start preparing it. This will not only keep you safe but also protect the equipment you are working on. So, take a moment to locate the power switch and turn it off, and then unplug the power cord from the wall socket.
It’s better to be safe than sorry!”
Precautions to Take When Handling Power Supply
power supply, precautions, handling, prepare
Properly Ground the Power Supply
power supply, grounding, prepare, safety precautions
Step 3: Connect Inverter to Power Supply
Now that you have your inverter ready, it’s time to connect it to the power supply. This is an important step in getting your inverter up and running. Here’s a step-by-step guide on how to do it.
Identify the power supply source – Before connecting your inverter, you need to know where the power supply is coming from. This could be a generator, a solar panel, or even a direct connection to the grid.
Check the power supply voltage and frequency – It’s crucial to ensure that the power supply voltage and frequency matches the specifications of your inverter. You can find this information in the inverter’s user manual or on the manufacturer’s website.
Shut off the power supply – Before making any connections, make sure to turn off the power supply source. This will help prevent any accidents or damage during the installation process.
Connect the inverter input – The input side of the inverter should have clearly labeled terminals for connecting the power supply source. Match the positive and negative terminals of the power supply to the corresponding terminals on the inverter.
Secure the connections – Once you have made the connections, it’s essential to double-check that they are secure. Use appropriate connectors or terminal blocks to ensure a tight and reliable connection.
Identify the Inverter’s DC Input Terminals
inverter, DC input terminals, power supply, connect When it comes to setting up your inverter, one crucial step is connecting it to a power supply. This step is essential because it determines how your inverter will receive the necessary power to operate. To begin, you should first identify the inverter’s DC input terminals.
These terminals are where you will connect the power supply. The DC input terminals are usually located on the back or sides of the inverter and are typically labeled as “+” and “-“. The “+” terminal is positive, while the “-” terminal is negative.
Once you have located the DC input terminals, you can proceed to connect the inverter to the power supply. This connection ensures that the inverter receives the correct voltage and allows it to convert DC power into AC power efficiently. Keep in mind that it is crucial to match the polarity correctly when connecting the inverter to the power supply.
Otherwise, you may risk damaging the inverter or experiencing power issues. So, take your time to double-check the polarity and make sure everything is securely connected before moving on to the next step in setting up your inverter.
Identify the Power Supply’s AC Output Terminals
power supply, AC output terminals, inverter, connect Once you have identified the power supply’s AC output terminals, you can move on to the next step: connecting the inverter. The power supply’s AC output terminals are where the electrical current flows out of the power supply. They may be labeled as “AC output,” “AC out,” or with some other similar variation.
To connect the inverter, you will need to make sure the AC output terminals of the power supply match the input terminals on the inverter. This is usually done by using cables with matching connectors on each end. The cables are then plugged into the AC output terminals of the power supply and the corresponding input terminals on the inverter.
It is important to ensure that the connections are secure and tight to prevent any loose connections or power loss. Once the connections are made, you can move on to the next steps in setting up your power supply and inverter system.
Properly Connect the Inverter to the Power Supply
The next step in connecting the inverter to the power supply is to make sure you have all the necessary equipment and tools ready. First, you’ll need to find the power source that you want to connect the inverter to. This can be a battery, generator, or even a solar panel.
Once you’ve located the power source, you’ll need to gather a few other items, such as cables and connectors, to properly connect the inverter. Before you begin, it’s important to turn off the power source and double-check that there is no electrical current flowing through the cables. This is for your safety and to prevent any damage to the inverter or other electrical components.
Once you’ve ensured that everything is safe, you can start connecting the inverter to the power source. First, locate the positive (+) and negative (-) terminals on both the inverter and the power source. Most inverters will have clearly labeled terminals, so it should be easy to identify.
Once you’ve found the terminals, connect the positive (+) cable from the power source to the positive (+) terminal on the inverter. Then, connect the negative (-) cable from the power source to the negative (-) terminal on the inverter. Make sure to secure the connections by tightening the terminals or using appropriate connectors, such as ring terminals or cable lugs.
This will ensure a solid and reliable connection between the inverter and the power source. Once the connections are secure, you can turn on the power source and test the inverter. Check the inverter’s display or indicator lights to see if it is receiving power and functioning properly.
If everything looks good, congratulations! You have successfully connected the inverter to the power supply. Remember, always follow the manufacturer’s instructions and guidelines when connecting any electrical equipment to ensure safe operation. If you’re unsure or uncomfortable with any step of the process, it’s best to consult a professional electrician or technician for assistance.
Step 4: Test the Connection
So, you’ve got your brand new inverter and you’re ready to connect it to your power supply. Well, the good news is it’s not as complicated as it may seem. The first step is to make sure the power supply is turned off and unplugged.
Safety first, right? Next, locate the input terminals on your inverter. These are usually the positive (+) and negative (-) terminals. Now, take the positive wire from your power supply and connect it to the positive terminal on the inverter.
Do the same with the negative wire and the negative terminal. Make sure the connections are secure and tight. Once you’ve done that, turn on your power supply and check if the inverter is receiving power.
You can do this by checking the display or any indicator lights on the inverter. If everything looks good, then congratulations, you’ve successfully connected your inverter to the power supply! Now you can start enjoying the benefits of having a backup power source.
Switch on the Power Supply
power supply, test the connection, switch on, burstiness, perplexity
Check for Proper Functioning of the Inverter
In order to ensure that your solar inverter is functioning properly, it is important to test the connection. This step is crucial in identifying any potential issues and ensuring that the inverter is working efficiently. To test the connection, you can start by examining the physical connections of the inverter.
Check if all the cables and wires are securely connected and that there are no signs of damage or fraying. Additionally, you can use a multimeter to test the voltage and current levels of the inverter’s output. This will help determine if the inverter is generating the correct amount of power.
It is also important to check the display screen of the inverter for any error codes or messages that may indicate a problem. By properly testing the connection, you can ensure that your solar inverter is working optimally and efficiently.
Troubleshooting If the Connection is Not Working
Sometimes, despite your best efforts, the connection may still not be working after going through the previous troubleshooting steps. In this case, it’s time to move on to step 4: testing the connection. This step involves checking the various components of your connection to identify any potential issues.
Start by testing the connection between your router and modem. Ensure that the cables are securely connected and that there are no visible damages. If the connection between your router and modem is working fine, try connecting a different device to your network to see if the problem lies with a specific device.
Additionally, you can try connecting your device to a different network to test if the issue is isolated to your network. By performing these tests, you can narrow down the potential causes of the connection problem and take appropriate actions to resolve it.
Conclusion
And there you have it! Connecting an inverter to a power supply is like finding the missing piece to a puzzle. It’s a bright idea that brings power to the powerless and flips the switch on convenience. By following these simple steps, you’ve learned how to tap into the secret energy reserves hiding in your power supply, unleashing the power of possibilities.
So next time you find yourself in need of some electrical magic, just remember to handle those connections with care, give a little jolt of confidence, and let the inverter do its work. Happy converting!
Importance of Properly Connecting the Inverter to the Power Supply
inverter, power supply, proper connection, test, importance. Once you have properly connected the inverter to the power supply, it’s important to test the connection to ensure everything is working correctly. Testing the connection is a crucial step that should not be skipped, as it allows you to identify any potential issues before using the inverter.
One way to test the connection is by powering on the inverter and checking if it is receiving power from the power supply. You can do this by using a volt meter to measure the voltage at the input terminals of the inverter. Additionally, you can also test if the inverter is outputting the correct voltage by connecting a device or appliance to the inverter and checking if it operates properly.
By performing these tests, you can ensure that the inverter is properly connected to the power supply and functioning as it should be. It’s important to remember that a properly connected inverter is essential for efficient and reliable performance, so taking the time to test the connection is definitely worth it.
Tips to Ensure a Safe and Successful Connection
connection testing, network troubleshooting, ensure stable connection, Internet connection Once you have set up your network and configured the connection settings, it is important to test the connection to ensure it is stable and working properly. Testing the connection is an essential step in network troubleshooting as it allows you to identify any issues and make necessary adjustments to ensure a safe and successful connection. There are a few things you can do to test the connection and ensure its stability.
First, you can perform an internet speed test to check the speed and reliability of your connection. This will give you an idea of how fast your internet is and if it meets your expectations. Additionally, you can try accessing different websites and online services to see if they load quickly and without any issues.
If you notice any delays or problems, it may indicate a problem with your connection. It is also important to check the signal strength of your wireless connection if you are using a wireless network. You can do this by moving closer to the router or access point and checking if the signal strength improves.
If it does, it may mean that there are obstacles or interference between your device and the router. In such cases, you can move the router to a more central location or use a range extender to improve the signal strength. By testing the connection and addressing any issues, you can ensure a stable and reliable network connection for all your devices.
Final Thoughts on Connecting an Inverter to a Power Supply
connecting an inverter to a power supply Once you have properly connected the inverter to the power supply, it is essential to test the connection to ensure that everything is working as it should. This step is crucial as it can help identify any issues or problems that may need to be addressed before using the inverter for your intended purposes. To test the connection, you can start by plugging in a small electronic device, such as a phone charger, into one of the outlets on the inverter.
If the device charges and works properly, then the connection is successful. However, if the device does not turn on or charge, it may indicate that there is an issue with the connection. In this case, you should double-check all of the connections and make sure that they are secure.
If the problem persists, it may be helpful to consult the user manual for the inverter or seek assistance from a professional.
FAQs
How do I connect an inverter to a power supply?
To connect an inverter to a power supply, follow these steps:
1. Identify the positive and negative terminals on both the inverter and the power supply.
2. Use appropriate cables or wires to connect the positive terminal of the inverter to the positive terminal of the power supply.
3. Connect the negative terminal of the inverter to the negative terminal of the power supply.
4. Make sure all connections are secure and tight.
5. Turn on the inverter and the power supply.
6. Test the connection by powering a device with the inverter.
Can I connect any type of inverter to a power supply?
No, not all types of inverters are compatible with all power supplies. It is important to check the specifications and compatibility of both the inverter and the power supply before attempting to connect them. Some inverters may require specific voltage or power input requirements that may not be compatible with certain power supplies.
What precautions should I take when connecting an inverter to a power supply?
When connecting an inverter to a power supply, it is important to take the following precautions:
– Ensure that the power supply is turned off before making any connections.
– Use proper safety gear, such as insulated gloves, to protect yourself from electric shocks.
– Double-check the polarity of the terminals to avoid any accidental short circuits.
– Make sure all connections are secure and tight to prevent any loose connections or sparks.
– Follow the manufacturer’s instructions and guidelines for connecting the specific inverter model to the power supply.
Can I connect multiple inverters to a single power supply?
Whether you can connect multiple inverters to a single power supply depends on the power supply’s capacity and the total power requirements of the inverters. It is important to check the power rating and capacity of the power supply to ensure that it can handle the combined power demands of multiple inverters.
What is the difference between a modified sine wave inverter and a pure sine wave inverter when connecting them to a power supply?
The main difference between a modified sine wave inverter and a pure sine wave inverter is the type of output they provide. A modified sine wave inverter produces a stepped approximation of a sine wave, while a pure sine wave inverter produces a smooth and continuous sine wave output similar to the power supplied by utility companies. When connecting these inverters to a power supply, it is important to ensure compatibility with the power supply and the devices being powered.
Can I connect an inverter directly to a solar panel for power supply?
Yes, you can connect an inverter directly to a solar panel for power supply. However, it is important to use a solar charge controller between the solar panel and the inverter to regulate the voltage and prevent any damage to the inverter due to fluctuating or excessive voltage from the solar panel.
What are the advantages of connecting an inverter to a power supply?
Some advantages of connecting an inverter to a power supply include:
– Ability to power devices and appliances that require AC power in areas where there is no access to grid electricity.
– Emergency backup power in case of power outages.
– Mobile power source for outdoor or remote activities.
– Ability to charge and power devices that require AC power from a DC power source, such as a car battery.