
Hey there! Is your car’s engine overheating? Well, before you start panicking, it might be time to perform a coolant flush. A coolant flush is an essential maintenance task that helps keep your engine running smoothly and prevents it from overheating. It’s like giving your car’s engine a refreshing spa treatment, flushing out all the gunk and debris that can accumulate over time.
But how exactly do you perform a coolant flush? Don’t worry, I’ve got you covered. In this blog post, I’m going to walk you through the steps of performing a coolant flush, so you can keep your car running cool all summer long. Whether you’re a seasoned car enthusiast or a complete newbie, I promise you’ll find this guide easy to follow and incredibly helpful.
So, let’s get started and give your car’s engine the TLC it deserves!
Table of Contents
Why is a Coolant Flush Necessary?
A coolant flush is an essential part of car maintenance that many people overlook. It involves removing the old coolant from the radiator and replacing it with fresh coolant. But why is a coolant flush necessary? Well, over time, coolant can become contaminated with dirt, rust, and other debris.
This can clog up the radiator and reduce its efficiency. It can also lead to overheating and potential engine damage. A coolant flush helps to remove these impurities and keep your radiator and engine running smoothly.
Think of it like changing the oil in your car. Just as you wouldn’t want dirty oil circulating through your engine, you wouldn’t want dirty coolant either. So, if you want to keep your car in tip-top shape, don’t forget about the importance of a coolant flush.
Preventing Overheating
coolant flush, overheating, prevent overheating Overheating is one of the most common problems that can occur in a vehicle, and it can be quite a headache for car owners. One of the best ways to prevent this issue is by getting a coolant flush. But why is a coolant flush necessary? Well, think of your car’s cooling system as a chemical reaction.
Over time, the coolant becomes contaminated with dirt, debris, and rust particles. This contamination can cause the coolant to become less effective at absorbing and dissipating heat. As a result, your engine may start to overheat, which can lead to serious damage.
A coolant flush helps remove these contaminants and replenishes the coolant, ensuring that it can do its job properly. Just like how you need fresh water to stay hydrated, your car’s cooling system needs clean coolant to prevent overheating. So, next time you notice your engine running hotter than usual, consider getting a coolant flush to keep your car running smoothly and prevent any costly repairs down the line.
Preventing Rust and Corrosion
coolant flush, preventing rust, corrosion
What You Will Need
Before you begin the process of flushing your coolant, there are a few things you will need. First and foremost, you will need a coolant flush kit. This kit typically includes a cleaner and a conditioner that will help remove any debris and build-up in your cooling system.
You will also need a drain pan to catch the old coolant as it is drained from your vehicle. It’s important to have a proper container to dispose of the old coolant as well, as it is toxic and harmful to the environment if not disposed of correctly. Additionally, you will need a funnel to help pour the new coolant into your vehicle without making a mess.
Lastly, you will need a new bottle of coolant, as the old coolant should not be reused. It’s important to have all of these items on hand before you start the coolant flush process to ensure a smooth and efficient operation.
Coolant
coolant, vehicle maintenance, radiator, engine temperature, antifreeze, overheating, car care
Distilled Water
distilled water Distilled water is a type of purified water that has gone through a process called distillation. It is made by boiling water and then collecting the steam, which is then condensed back into a liquid form. This process removes impurities and minerals from the water, resulting in a highly purified product.
Distilled water has many uses, including in medical and scientific experiments, as well as in household appliances such as steam irons and humidifiers. It is also commonly used in automotive batteries, as it does not contain any minerals that could corrode the battery terminals. To make distilled water at home, you will need a distillation apparatus, which typically consists of a boiling flask, a condenser, and a collection vessel.
You will also need a heat source, such as a hot plate or a stove. It is important to note that while distilled water is safe to drink, it lacks the minerals that are necessary for good health. Therefore, it is recommended to consume a balanced diet that includes foods or beverages that provide essential minerals.
Radiator Flush Kit
radiator flush kit One of the essential maintenance tasks for your vehicle’s cooling system is a radiator flush. Over time, coolant can become contaminated with rust, debris, and other harmful particles, which can negatively affect your engine’s performance. That’s where a radiator flush kit comes in handy.
The radiator flush kit includes a variety of tools and chemicals that help you effectively clean out your radiator and remove any built-up deposits. These kits typically come with a flush solution that breaks down any contaminants and a flush gun that attaches to your radiator to effortlessly flush out the old coolant. Additionally, some kits may also include a coolant tester to check the quality of the new coolant you’re adding.
With a radiator flush kit, you can ensure that your cooling system is running smoothly and efficiently, helping to extend the life of your engine.
Rubber Gloves
rubber gloves
Step-by-Step Guide to Flushing Coolant
Have you ever wondered how to flush coolant from your vehicle’s cooling system? Well, you’re in luck because I’m here to guide you through the step-by-step process. Flushing the coolant is an essential maintenance task that should be done regularly to keep your engine running smoothly and prevent overheating. So, let’s get started! First, you’ll need to gather the necessary tools and materials.
You’ll need a drain pan to catch the old coolant, a wrench or pliers to remove the drain plug, a garden hose, and a suitable coolant flush solution. Make sure to consult your vehicle’s owner’s manual for the specific coolant flush solution recommended for your car. Next, locate the radiator drain plug, which is usually located at the bottom of the radiator.
Place the drain pan underneath the plug to catch the coolant. Use the wrench or pliers to loosen and remove the drain plug, allowing the coolant to drain completely. Once the coolant has drained, it’s time to flush the system.
Close the drain plug and fill the radiator with the flush solution, following the manufacturer’s instructions for the correct ratio of solution to water. It’s important to use the appropriate amount to ensure an effective flush. After filling the radiator with the flush solution, replace the radiator cap and start the engine.
Let the engine run for a few minutes to circulate the solution throughout the cooling system. This will help break down any deposits and contaminants that may have built up over time. Next, turn off the engine and allow it to cool completely.
Once cooled, open the radiator drain plug and allow the solution to drain into the pan. This will flush out any remaining contaminants from the system. After the flush solution has drained, close the drain plug once again.
Step 1: Prepare Your Vehicle
coolant flushing, vehicle maintenance, cooling system, radiator, engine overheating, step-by-step guide, prepare vehicle, drain coolant, flush coolant Is your vehicle feeling a bit under the weather? It might be time to give it a coolant flushing. Flushing the coolant is an important part of vehicle maintenance, as it helps to keep your engine running smoothly and prevent it from overheating. In this step-by-step guide, we will walk you through the process of flushing the coolant in your vehicle.
So let’s get started! The first step in flushing the coolant is to prepare your vehicle. Start by parking your vehicle on a flat surface and engaging the parking brake to ensure that it doesn’t roll away. Next, open the hood of your vehicle and locate the radiator, which is usually located at the front of the engine compartment.
Depending on your vehicle, you may need to remove a plastic cover or shroud to access the radiator. Once you have access to the radiator, it’s time to drain the coolant. Look for the drain plug or petcock at the bottom of the radiator and place a drain pan underneath to catch the coolant as it drains out.
Open the drain plug or petcock to begin draining the coolant. Allow the coolant to fully drain out before moving on to the next step. Once the coolant has drained, close the drain plug or petcock securely to prevent any leaks.
Congratulations, you have successfully prepared your vehicle for the coolant flushing process!
Step 2: Drain the Old Coolant
flush coolant, drain old coolant, step-by-step guide, burstiness, perplexity
Step 3: Flush the System
In this step-by-step guide to flushing coolant, we will cover the important process of flushing the system. Flushing the coolant system is necessary to remove old coolant, debris, and any contaminants that may be present. Over time, these elements can build up and cause damage to the cooling system, leading to overheating and potential engine damage.
To flush the system, you will need to drain the old coolant, flush the system with clean water, and then fill it with fresh coolant. This process ensures that your cooling system is clean and functioning properly, keeping your engine cool and running smoothly. So, let’s dive into the details of how to flush your coolant system and keep your engine in top shape.
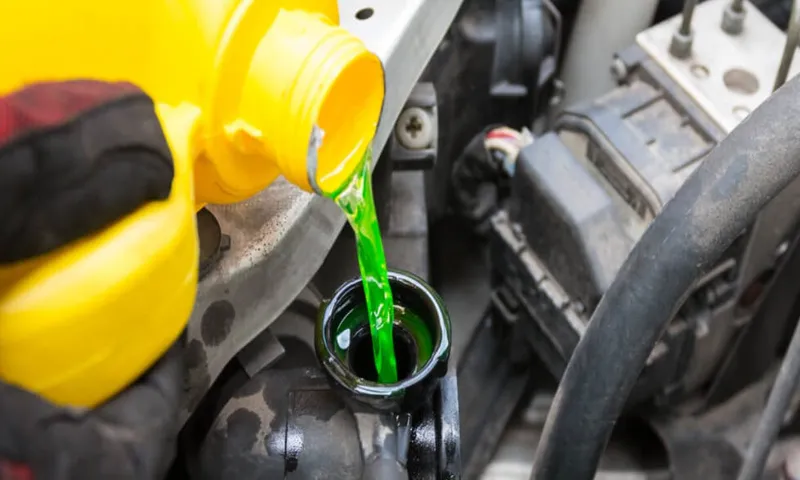
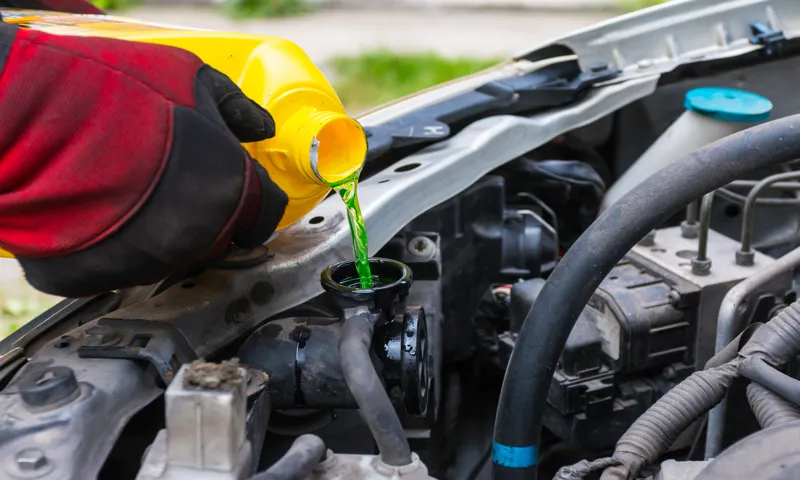
Step 4: Refill with Fresh Coolant
coolant, change coolant, flush coolant, refill coolant, car maintenance After completing the flushing process, you’ll need to refill your radiator with fresh coolant. This is an essential step in maintaining your car’s cooling system and preventing overheating. To ensure proper filling, locate the radiator cap, which is usually located near the front of the engine bay.
Remove the cap and set it aside. Then, using a funnel, carefully pour the fresh coolant into the radiator reservoir until it reaches the recommended level indicated on the reservoir. It’s important to use the correct type of coolant for your vehicle, so be sure to check your owner’s manual or consult a mechanic if you’re unsure.
Once the coolant is filled to the proper level, replace the radiator cap and secure it tightly. Remember to also check the coolant level in the overflow or expansion tank and top it up if necessary. It’s important to regularly monitor the coolant level and top it up as needed to ensure the efficient functioning of your car’s cooling system.
Additionally, make sure to properly dispose of any old coolant, as it is considered hazardous waste. By following these steps and regularly maintaining your coolant system, you’ll be able to keep your engine running smoothly and avoid costly repairs down the road.
Tips for a Successful Coolant Flush
If you’re experiencing issues with your vehicle’s cooling system, it may be time for a coolant flush. Over time, coolant can become dirty and contaminated, which can lead to overheating and engine damage. To perform a successful coolant flush, start by locating the radiator drain plug and opening it to drain the old coolant.
Next, remove the thermostat and flush the system with a hose to remove any remaining coolant and debris. After flushing, reinstall the thermostat and refill the system with a fresh mixture of coolant and water. Be sure to consult your vehicle’s manual or a trusted mechanic for specific guidelines and recommendations for your make and model.
Regular coolant flushes can help keep your cooling system running smoothly and prevent costly repairs down the road.
Check the Owner’s Manual
coolant flush, owner’s manual, successful coolant flush When it comes to performing a coolant flush on your vehicle, one of the most important things you can do is to check the owner’s manual. This little book holds a wealth of information specific to your car, including the recommended intervals for flushing and replacing the coolant. Following these guidelines will ensure that you have a successful coolant flush that keeps your engine running cool and protected from overheating.
The owner’s manual will also provide you with the right type of coolant to use for your specific vehicle, as using the wrong coolant can cause damage to your engine. So, before you grab a wrench and start disassembling things, take a few minutes to consult your owner’s manual and get all the information you need to perform a successful coolant flush.
Protect Yourself
coolant flush, protect yourself, successful coolant flush, coolant system, vehicle maintenance, flushing the coolant, radiator coolant, engine coolant, cooling system, overheat, engine damage, radiator, overheating, coolant change, water pump, radiator cap, thermostat, coolant level, preventative maintenance. Paragraph: So, you’ve decided it’s time to give your vehicle’s coolant system some much-needed attention. Flushing the coolant is an essential part of vehicle maintenance, as it helps keep your engine running cool and prevents it from overheating.
If your vehicle experiences an overheating issue, it can lead to serious engine damage and potentially costly repairs. The coolant, also known as engine coolant or radiator coolant, plays a crucial role in regulating your engine’s temperature. Over time, the coolant can become contaminated and lose its effectiveness, which is why a coolant flush is necessary.
During a coolant flush, the old coolant is drained out of the system, along with any debris or contaminants that may have accumulated. Then, fresh coolant is added to ensure optimal cooling performance. By regularly flushing your coolant system, you can prevent overheating issues and prolong the life of your engine.
So, don’t neglect this important preventative maintenance task!
Dispose of Old Coolant Properly
coolant flush, dispose of coolant
Perform Regular Maintenance
coolant flush, regular maintenance
Conclusion
In conclusion, performing a coolant flush is like giving your vehicle’s engine a refreshing spa day. Just like a day at the spa helps you relax and rejuvenate, a coolant flush helps your engine cool down and keep its temperature under control. Think of coolant as your engine’s very own personal AC system.
It circulates through the engine, absorbing the heat and carrying it away, just like a cool breeze on a hot summer day. Over time, however, the coolant can become dirty and contaminated, just like the air in a crowded room. That’s where the coolant flush comes in.
By flushing out the old coolant and replacing it with fresh fluid, you’re giving your engine a chance to start anew, free from debris and contaminants. It’s like hitting the reset button on your car’s internal temperature control system. Plus, by maintaining a clean and efficient cooling system, you’re ensuring that your engine will run smoothly and efficiently, helping to extend its lifespan.
So, the next time you decide to give your car some TLC, don’t forget about the coolant flush. It might not be as glamorous as a bubble bath or a fancy facial, but it’s just as important for the health and longevity of your engine. Plus, knowing how to perform a coolant flush will make you the coolest car owner on the block.
Stay cool, my friends!”
FAQs
How often should I perform a coolant flush?
It is generally recommended to perform a coolant flush every 30,000 to 50,000 miles, or every 2 to 3 years, depending on your vehicle and driving conditions.
What are the signs that indicate I need a coolant flush?
Some signs that you may need a coolant flush include the engine overheating, coolant leaks, a rusty or discolored coolant, or a coolant warning light on your dashboard.
Can I perform a coolant flush myself, or should I take it to a professional?
While it is possible to perform a coolant flush yourself, it is recommended to take it to a professional. They have the necessary equipment and expertise to ensure a proper and thorough flush.
What are the benefits of a coolant flush?
A coolant flush helps to remove any built-up contaminants, rust, or debris in the cooling system, which can improve the overall performance and longevity of your engine. It also helps to prevent overheating and potential engine damage.
How long does a coolant flush typically take?
The time it takes to perform a coolant flush can vary depending on the vehicle and the condition of the cooling system. On average, it can take anywhere from 1 to 3 hours.
How much does a coolant flush cost?
The cost of a coolant flush can vary depending on several factors, including the make and model of your vehicle, the location, and the service provider. On average, you can expect to pay between $100 to $200 for a coolant flush.
Is there a specific coolant type I should use for a coolant flush?
It is important to use the coolant type specified by your vehicle manufacturer for a coolant flush. This ensures compatibility and optimal performance. Some common coolant types include ethylene glycol (green), propylene glycol (orange or pink), or a hybrid organic acid technology (HOAT) coolant.