Looking for a way to protect your truck bed and keep it looking fresh? Adding a bed liner and a tonneau cover is a great solution! But what do you do when it comes time to install the tonneau cover over the bed liner? That’s where cutting the bed liner for the tonneau cover comes in. In this blog post, we’ll show you how to cut a bed liner for a tonneau cover, step by step, so you can achieve a seamless fit and maximum protection for your truck bed. So grab your tools and let’s get started!
Table of Contents
Introduction
So you’ve got yourself a tonneau cover for your truck bed and now you’re ready to install it. But wait, what about the bed liner? Do you have to cut it so that it fits properly with the cover? The answer is yes, and in this blog post, I will show you how to cut a bed liner for a tonneau cover. Cutting a bed liner may sound like a daunting task, but with the right tools and techniques, it can be done easily and effectively.
By following a few simple steps, you’ll be able to create a clean and professional-looking cut that perfectly matches your tonneau cover. So let’s get started and make your truck bed look as good as new!
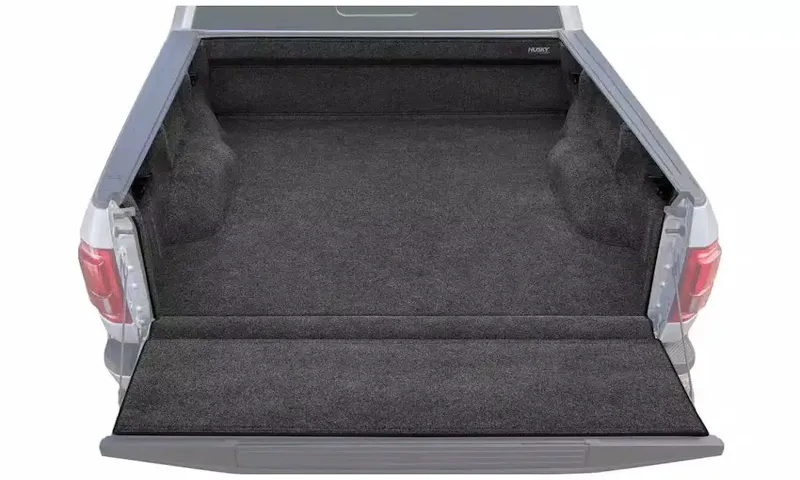
What is a Bed Liner
bed liner, truck bed, cargo area, protection, scratches, dents, damage, spray-on, drop-in, types. A bed liner is an accessory that is used to protect the cargo area of a truck bed from scratches, dents, and other damage. It is designed to provide a protective layer between the truck bed and any items that are being transported.
There are different types of bed liners available on the market, including spray-on and drop-in liners. Spray-on bed liners are applied directly onto the truck bed and create a durable and seamless finish. They are usually custom-made to fit the specific dimensions of the truck bed and offer excellent protection against impact and abrasion.
On the other hand, drop-in bed liners, as the name suggests, are placed or dropped into the truck bed. They are made from materials like plastic or rubber and offer a removable option for protection. Drop-in liners are generally easier to install but may not provide the same level of durability as spray-on liners.
Overall, bed liners are essential in maintaining the condition of a truck bed and keeping it free from damage. Whether you choose a spray-on or drop-in liner, both offer excellent protection for your truck bed.
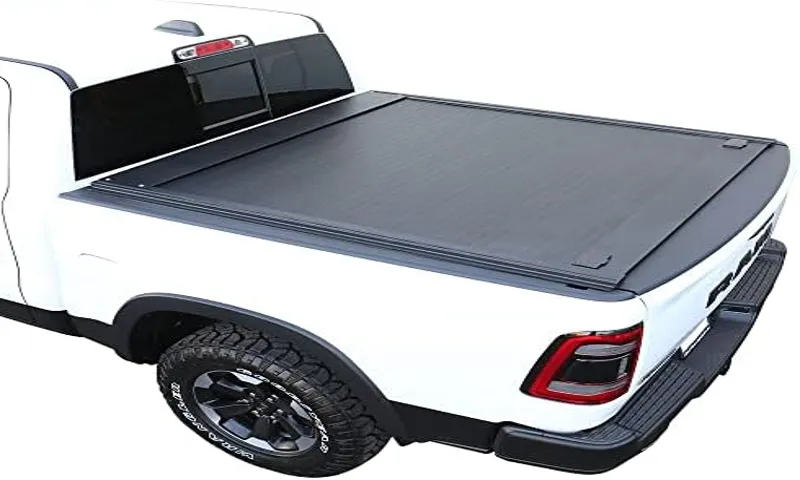
What is a Tonneau Cover
tonneau cover
Why Cut a Bed Liner for a Tonneau Cover
bed liner for tonneau cover, cut bed liner, tonneau cover installation Introduction: If you own a truck, you probably know the importance of protecting its bed from scratches, dents, and damage. That’s where a bed liner comes in handy. It provides an extra layer of protection for your truck bed, ensuring that it stays in pristine condition.
But what if you also want to install a tonneau cover on your truck? Can you have both a bed liner and a tonneau cover? The answer is yes, and one way to achieve this is by cutting the bed liner to accommodate the tonneau cover. In this article, we will explore why you might consider cutting a bed liner for a tonneau cover and the benefits it can offer.
Tools and Materials Needed
When it comes to installing a tonneau cover on your truck bed, you may need to cut the bed liner to ensure a proper fit. But before you start hacking away at your liner, it’s important to have the right tools and materials on hand. First and foremost, you’ll need a sharp utility knife or bed liner cutting tool.
These tools are designed specifically for cutting through bed liners and will make the job much easier. You’ll also want to have a measuring tape or ruler to ensure precise cuts. Additionally, having a sturdy work surface or cutting mat will help protect your truck bed and provide a stable surface to cut on.
And don’t forget some gloves to protect your hands from any sharp edges or debris. By having these tools and materials ready, you’ll be well-equipped to cut your bed liner for the tonneau cover installation.
Bed Liner
Bed liner installation can be a great way to protect the bed of your truck from scratches, dents, and other damage. But before you get started, it’s important to gather all the necessary tools and materials. Here’s a list of what you’ll need: First, you’ll need a bed liner kit.
These kits typically include a bed liner spray, rollers or brushes for application, and any necessary prep materials. Make sure to choose a kit that is compatible with your specific truck bed material, whether it’s metal or plastic. Next, you’ll need some sandpaper or a sanding block.
This will be used to roughen up the surface of the truck bed, ensuring that the bed liner will adhere properly. Be sure to choose sandpaper with a grit that is appropriate for your specific truck bed material. You’ll also need a degreaser or cleaner to remove any grease, oil, or dirt from the truck bed.
This step is crucial for ensuring proper adhesion of the bed liner. Make sure to choose a cleaner that is safe for the material of your truck bed. To protect yourself during the installation process, it’s a good idea to wear safety goggles, gloves, and a respirator.
Bed liner spray can be messy and potentially harmful if inhaled or applied to the skin, so taking these precautions is important. Finally, you’ll need some masking tape and plastic sheeting to cover any areas of the truck you don’t want to be coated with bed liner. This will help ensure a clean and professional-looking installation.
By gathering these tools and materials before you begin, you’ll be well-prepared for a successful bed liner installation. Just make sure to follow the instructions provided with your kit and take your time to ensure a thorough and even application. Your truck bed will thank you for the added protection!
Tonneau Cover
One of the most essential tools you’ll need when installing a tonneau cover is a Phillips head screwdriver. This tool is commonly used to secure the cover to the bed of the truck. Additionally, you may need a drill with appropriate drill bits to create holes if your tonneau cover requires it.
It’s important to have the right size drill bit to ensure a proper fit. Another tool you might need is a tape measure to accurately measure the length and width of your truck bed, ensuring the tonneau cover is the correct size. Some tonneau covers also come with latch brackets that require a socket wrench to tighten.
Having these tools on hand will make the installation process much smoother. In terms of materials, you may need self-tapping screws or clamps to secure the tonneau cover to the truck bed. It’s a good idea to check the instructions that come with your specific tonneau cover to ensure you have all the necessary tools and materials before beginning the installation process.
Measuring Tape
Measuring tape is an essential tool that everyone should have in their toolbox. Whether you’re a homeowner, a DIY enthusiast, or a professional tradesperson, a measuring tape is a versatile and indispensable tool. But before you start your next project, it’s important to know what tools and materials you will need to ensure accurate measurements.
First and foremost, you will need a high-quality measuring tape. Look for one that is at least 25 feet long and made of durable materials, such as steel or fiberglass. A tape with both metric and imperial measurements will give you the flexibility to work with different units of measurement.
Additionally, you will need a pencil or a pen to mark your measurements. This will help you remember and reference the measurements later on. A carpenter’s pencil with a flat edge is a great choice as it won’t roll away easily.
Another tool that can come in handy when using a measuring tape is a small level. This will help you ensure that your measurements are accurate and straight. A level will also help you determine if a surface or object is level or plumb.
Lastly, having a notepad or a smartphone with a note-taking app can be useful for jotting down measurements and keeping track of your progress. This will eliminate the need to rely solely on memory and will help you stay organized throughout your project. In conclusion, a measuring tape is an essential tool that everyone should have in their toolbox.
When using a measuring tape, it’s important to have the right tools and materials on hand to ensure accurate measurements. This includes a high-quality measuring tape, a pencil or pen, a small level, and a notepad or smartphone for note-taking. By having these tools ready, you’ll be well-equipped to tackle any measuring task with ease.
Marker or Chalk
“Marker or Chalk” When it comes to creating eye-catching and vibrant signage, two popular tools often come to mind: markers and chalk. Both markers and chalk have their own unique qualities that make them appealing for different purposes. So, which one should you choose? Let’s take a closer look at the tools and materials needed for each and the factors to consider when deciding between marker or chalk for your signage needs.
For markers, you’ll need a variety of colors to create dynamic and attention-grabbing signs. Whether it’s for a poster, a menu board, or a promotional display, markers offer the advantage of bold and vivid colors that can easily be seen from a distance. They are also quick-drying, allowing you to work efficiently without worrying about smudging or smearing your artwork.
Additionally, markers come in different tip sizes, allowing you to create fine details or thick bold lines depending on your preference. On the other hand, chalk provides a more rustic and vintage look to your signage. Chalkboards have a timeless appeal and are often used in cafes, restaurants, and shops to create a cozy and nostalgic ambiance.
Chalk is easily erasable, making it ideal for menus that need frequent updates or for temporary signage. It also has a softer and more textured finish compared to markers, giving your signage a unique and handcrafted feel. When deciding between marker or chalk, there are a few factors to consider.
Firstly, think about the surface you’ll be working on. If you’re creating a sign on a chalkboard or a blackboard, then obviously chalk is the way to go. But if you’re working on a glossy surface or a non-porous material, markers might be a better choice as they adhere better to these surfaces.
Another factor to consider is the longevity of your signage. If you want your sign to last for a long time without fading or smudging, markers are the more durable option. Chalk, on the other hand, tends to fade and smudge over time, especially when exposed to moisture or humidity.
Utility Knife or Scissors
“utility knife or scissors” The tools and materials needed for a DIY project can make or break your experience. When it comes to cutting materials, the choice between a utility knife and scissors can be a tough one. Both have their advantages and disadvantages, so it’s important to consider your specific needs before making a decision.
If you’re working with thinner materials like paper or fabric, scissors are often the go-to option. They offer more control and precision, allowing you to make clean, accurate cuts. Scissors are also great for cutting curves or intricate shapes, making them a versatile tool for craft projects.
On the other hand, a utility knife is the ideal choice for thicker, tougher materials like cardboard or plastic. With a sharp, retractable blade, it can slice through these materials with ease. The utility knife is also helpful when you need to make long, straight cuts, as it typically has a ruler guide that can ensure accurate measurements.
So, which tool should you choose? It ultimately depends on the nature of your project. If you’re working on a craft project that requires precise cuts or intricate shapes, scissors may be the better option. However, if you need to cut through thicker materials or make long, straight cuts, a utility knife may be more efficient.
Remember to take safety precautions when using either tool. Always keep blades sharp and in good condition, and be sure to use proper cutting techniques to avoid accidents. With the right tool in hand, you can confidently tackle your DIY projects and achieve the results you desire.
Safety Gloves
Safety gloves are an essential part of any work or DIY project that involves tools and materials. They provide protection for your hands and help minimize the risk of accidents and injuries. To ensure you have the right safety gloves for the job, there are a few tools and materials you’ll need to consider.
First and foremost, you’ll need to assess the type of work you’ll be doing. Are you going to be handling sharp objects or working with chemicals? This will determine the level of protection you need from your safety gloves. For example, if you’re working with chemicals, you’ll need gloves that are resistant to those specific chemicals.
Next, you’ll need to consider the material of the gloves. Safety gloves are typically made from a variety of materials, including latex, nitrile, and leather. Each material has its own pros and cons, so it’s important to choose the one that best suits your needs.
Latex gloves, for example, are widely used in the medical field because they provide a high level of sensitivity and dexterity. On the other hand, leather gloves are more durable and provide better protection against cuts and abrasions. In addition to the material, you’ll also need to consider the thickness of the gloves.
Thicker gloves provide more protection, but they can also limit your dexterity and make it difficult to handle small objects or tools. It’s important to find a balance between protection and functionality. Finally, you’ll need to make sure the gloves fit properly.
Ill-fitting gloves can be uncomfortable to wear and can even increase the risk of accidents. Take the time to measure your hand and choose gloves that are the right size and provide a snug fit. In conclusion, when it comes to safety gloves, it’s important to consider the tools and materials you’ll be working with, the type of protection you need, the material of the gloves, and the fit.
Step-by-Step Guide
If you have a tonneau cover on your truck and want to install a bed liner, you may need to cut the liner to fit properly. Cutting a bed liner for a tonneau cover can seem intimidating, but with the right tools and a step-by-step approach, it can be a straightforward process. Here’s a simple guide on how to cut a bed liner for a tonneau cover.
Measure and mark: Start by measuring the dimensions of your tonneau cover and bed liner. Use a measuring tape to get accurate measurements.
Once you have the measurements, mark them on the bed liner using a pen or marker. Make sure to double-check the measurements before proceeding.
Prepare the cutting area: Find a flat and stable surface to cut the bed liner. Lay down a cutting mat or a piece of cardboard to protect the surface from any damage. You can also use a workbench or a sturdy table for this purpose.
Use a utility knife or scissors: Depending on the material of your bed liner, you can use a utility knife or a pair of heavy-duty scissors to make the cuts. Make sure the blade is sharp to ensure clean and precise cuts.
Cut along the marked lines: Use the utility knife or scissors to cut along the marked lines on the bed liner. Take your time and make slow, steady cuts to avoid any mistakes.
Step 1: Measure your Tonneau Cover
In order to properly install a tonneau cover on your truck bed, it is important to take accurate measurements. This will ensure that the cover fits snugly and provides maximum protection for your cargo. To get started, you will need a tape measure and a helper to assist you.
Begin by measuring the length and width of your truck bed, making sure to include any protrusions such as toolboxes or bed extenders. Next, measure the distance from the top of the bed rail to the top of the tailgate. This will determine the height of the cover you will need.
Finally, measure the distance between the bed rails at the front and back of the truck bed. This will help you determine if your truck bed has a tapered design, in which the width at the front is narrower than the width at the back. By taking accurate measurements, you can ensure a proper fit for your tonneau cover and enjoy the benefits of added security and improved fuel efficiency.
Step 2: Measure and Mark your Bed Liner
bed liner, measure, mark, step-by-step guide. In this step-by-step guide, we will show you how to measure and mark your bed liner for installation. Before starting this process, make sure you have all the necessary tools and materials on hand.
Begin by placing your bed liner on top of your truck bed, making sure it is centered and aligned properly. Once in place, take a measuring tape and measure the length and width of your truck bed. It is important to measure accurately to ensure a proper fit.
Once you have obtained these measurements, use a pencil or marker to mark the dimensions on your bed liner. This will serve as a guide when it comes time to trim the liner to size. Take your time with this step to ensure precise markings.
Once you have all your markings in place, you can move on to the next step of the installation process.
Step 3: Cut the Bed Liner
In this step-by-step guide on cutting a bed liner, we will walk you through everything you need to know to get the job done right. Cutting a bed liner may sound like a daunting task, but with the right tools and techniques, it can be a straightforward process. The first thing you’ll want to do is gather all the necessary tools, including a utility knife, measuring tape, and a straight edge.
Measure the area you want to cut and mark it with a pencil or masking tape. Using your straight edge as a guide, carefully score the bed liner with the utility knife. Make sure to apply enough pressure to create a clean, even cut.
Once you’ve scored the bed liner, go over the cut multiple times to ensure a clean break. Remember to take your time and be patient – rushing could result in a sloppy cut. With these tips in mind, cutting a bed liner doesn’t have to be a difficult task.
So grab your tools and get to work!
Step 4: Test the Fit
Now that you have selected a dress pattern and sewn all the pieces together, it’s time to test the fit. This step is crucial because you want the dress to look and feel perfect on your body. Start by trying on the dress and examining how it hangs on your frame.
Are the shoulder seams hitting the right spot? Is the waist sitting at your natural waistline? These are important considerations to ensure that the dress fits you properly. Next, take a closer look at the overall fit of the dress. Are there any areas that are too tight or too loose? Pay attention to the bust, waist, and hips, as these are common areas where fit issues can arise.
If you notice any areas that need adjustment, mark them with pins or fabric chalk. Once you have identified any fit issues, it’s time to make the necessary adjustments. This could involve taking in or letting out seams, shortening or lengthening the dress, or adding darts for a better fit.
The goal is to make the dress conform to your specific body shape and proportions. After making the adjustments, try on the dress again to see how the fit has improved. Keep in mind that it may take a few rounds of adjustments to get it just right.
Take your time and be patient with the process. Remember, the fit is one of the most important aspects of a garment. It can make or break the overall look and feel of the dress.
By following these steps and taking the time to test the fit, you can ensure that your finished dress will be a perfect fit for you.
Step 5: Make any necessary adjustments
In the final step of the process, it’s important to make any necessary adjustments to your plan. This step allows us to assess our progress and identify areas where we need to make changes. It’s all about fine-tuning and ensuring that our plan is working effectively.
This could involve revising certain steps, reallocating resources, or even changing our goals slightly. The key here is to be flexible and open to making adjustments. Sometimes unexpected challenges arise along the way, and it’s important to be able to adapt to them.
By making these necessary adjustments, we can ensure that our plan is on track and that we are working towards our ultimate goal. So take a step back, assess your progress, and make any necessary tweaks to keep moving forward.
Tips and Precautions
Cutting a bed liner to fit a tonneau cover can seem like a daunting task, but with the right tools and precautions, it can be a straightforward process. First and foremost, safety should be a priority. Make sure to wear protective gloves and eyewear to prevent any injuries.
When measuring and cutting the bed liner, take your time and double-check your measurements to ensure accuracy. It’s always better to cut less than needed, as you can always trim off more later if necessary. When using a utility knife or any sharp tool, be cautious and apply steady pressure to make clean cuts.
It’s also a good idea to place a sturdy cutting surface underneath the liner to protect your truck bed. Taking these tips and precautions into consideration will help you achieve a clean and precise cut for your tonneau cover.
Use safety gloves when cutting the bed liner
One important tip when cutting a bed liner is to always wear safety gloves. It may seem like a simple precaution, but it can make a big difference in keeping your hands protected. Bed liners are typically made from tough materials like rubber or plastic, so using gloves can prevent any accidental cuts or scrapes while handling them.
Not only can this help prevent any injuries, but it can also ensure that your hands stay clean and free of any chemicals or substances that may be present on the bed liner. So, before you start cutting, make sure to grab a pair of safety gloves to keep your hands safe and protected.
Double-check your measurements before cutting
Double-check your measurements before cutting When it comes to any home improvement project or DIY project, accurate measurements are crucial. Whether you’re building a piece of furniture or hanging a new shelf, cutting materials to the wrong size can lead to many frustrations and wasted time. That’s why it’s always important to double-check your measurements before making any cuts.
It’s a simple step that can save you from making costly mistakes. One helpful tip is to use a measuring tape that has clear and easy-to-read markings. This will ensure that you can quickly and accurately measure your materials.
Additionally, make sure to measure twice and cut once. It’s a classic saying for a reason – taking the time to double-check your measurements can prevent you from having to start all over again. Another precaution to take is to measure from the correct starting point.
For example, if you’re cutting a piece of wood, make sure you’re measuring from the edge and not the middle. This will give you the most accurate measurement and help you avoid any errors. It’s also important to consider any potential variations in materials.
For instance, if you’re working with fabric, remember that it can stretch or shrink. Take this into account when measuring and cutting, as it can affect the final product. Lastly, don’t be afraid to seek assistance or ask questions if you’re unsure about your measurements.
Sometimes a second set of eyes can catch something that you may have missed. In conclusion, double-checking your measurements before cutting is a simple but important step in any DIY project. It can save you from costly mistakes and ensure that your final product turns out the way you intended.
Start with a small cut and gradually increase if needed
Starting with a small cut and gradually increasing the size if needed can be a helpful strategy when faced with a difficult task or challenge. This approach allows for a sense of progress and accomplishment along the way, making it less overwhelming and more manageable. By breaking down the task into smaller, more attainable steps, it becomes easier to stay motivated and focused.
Plus, it helps to prevent burnout and ensures that you don’t bite off more than you can chew. Just like slicing a piece of cake, it’s better to start with a small slice and then go back for seconds if you’re still hungry. This method of incremental progress can be applied to all areas of life, whether it’s tackling a big project at work, learning a new skill, or even improving your fitness level.
So, the next time you’re faced with something daunting, remember to start small and enjoy the journey of accomplishing each step along the way.
Test fit the bed liner on the tonneau cover before finalizing the cut
When installing a bed liner on a tonneau cover, it is crucial to test fit the liner before making any final cuts. This will ensure that you get the perfect fit and avoid any unnecessary mistakes. By doing a test fit, you can identify any potential areas that may need adjustments or modifications before permanently installing the liner.
Before doing the test fit, make sure to thoroughly clean and dry both the tonneau cover and the bed liner. This will ensure a proper fit and prevent any dirt or debris from getting trapped between the two surfaces. Once everything is clean and dry, lay the bed liner over the tonneau cover and align it properly.
During the test fit, pay attention to any areas where the liner may be too tight or too loose. It’s normal for the liner to require some adjustments, but make sure not to force it into place. Instead, take note of where modifications may be necessary, such as trimming away excess material or adding extra fasteners for a secure fit.
By test fitting the bed liner on the tonneau cover, you can save yourself time and frustration down the road. It’s better to make any necessary adjustments before cutting or permanently installing the liner. This way, you can ensure a perfect fit and avoid any potential damage to either the tonneau cover or the liner itself.
Remember, it’s always better to be safe than sorry. Take your time and double-check everything during the test fit process. This will ensure that your bed liner and tonneau cover work together seamlessly, providing maximum protection for your truck bed.
Conclusion
In conclusion, cutting a bed liner for a tonneau cover is like performing a delicate surgery on your truck. Much like a skilled surgeon, you must possess a steady hand, a sharp blade, and a dash of creativity. It’s a delicate dance between preserving the integrity of the liner while creating the perfect fit for your cover.
But fear not, fellow truck enthusiasts, for I have shared with you the secrets to achieving a flawlessly fitted tonneau cover. Remember to measure twice, cut once, and use the proper tools for the job. Take your time and approach this task with the finesse of a master artist wielding a paintbrush.
So, grab your measuring tape and your trusty utility knife, and let the precision begin. With a little patience and a touch of ingenuity, you’ll be enjoying the benefits of a well-fitted tonneau cover in no time. Happy cutting, my fellow truck aficionados!”
FAQs
If you’ve recently purchased a tonneau cover for your truck bed and you already have a bed liner installed, you may be wondering how to cut the bed liner to allow for a perfect fit. Luckily, cutting a bed liner for a tonneau cover is a relatively simple process. Start by measuring the dimensions of your tonneau cover and marking those measurements onto the bed liner.
Use a sharp utility knife or a bed liner trimmer to carefully cut along the marked lines. Be sure to take your time and make precise cuts to ensure a clean and seamless fit. Once you’ve finished cutting the bed liner, test the fit with your tonneau cover to make any necessary adjustments.
Overall, cutting a bed liner for a tonneau cover is a straightforward DIY task that anyone can do with a little patience and precision.
Can I use a different tool to cut the bed liner?
“cut bed liner with a different tool” When it comes to cutting a bed liner, it’s important to use the right tools to ensure a clean and precise cut. While it may be tempting to use a different tool that is readily available, such as a utility knife or a saw, it is recommended to use a specific tool designed for cutting bed liners. These tools are often made with a serrated blade that is sharp enough to cut through the liner without causing any damage or fraying.
Using a different tool may not only result in an uneven and messy cut, but it can also lead to the liner becoming weaker and more prone to tearing or unraveling over time. So, for the best results and to maintain the durability and integrity of your bed liner, it’s best to stick with the designated cutting tool.
Do I need to remove the tonneau cover to cut the bed liner?
“tonneau cover, cut, bed liner, remove” Navigating the world of truck accessories can sometimes feel like a maze, with so many different parts and pieces to consider. One common question that arises is whether or not you need to remove the tonneau cover in order to cut your bed liner. The answer to this question largely depends on the type of tonneau cover you have and the method you plan to use for cutting the bed liner.
Some tonneau covers may require removal in order to properly access and cut the bed liner, while others may have features that allow you to work around them. If you have a soft roll-up tonneau cover, for example, you may be able to roll it back or remove it completely in order to cut the bed liner. This can provide easier access and a clear line of sight for making accurate cuts.
On the other hand, hard-fold or retractable tonneau covers may have panels that can be lifted or folded to expose the bed liner underneath. In these cases, you may not need to remove the entire cover, but you may still need to adjust it in some way to create enough space for cutting. It’s important to keep in mind that cutting your bed liner should be done with care and precision, as any mistakes can result in an imperfect fit or potential damage to the liner itself.
If you’re unsure about how to properly cut your bed liner, it’s always a good idea to consult the manufacturer’s instructions or seek the assistance of a professional. They can provide guidance on the best practices for cutting your liner while minimizing any potential risks. In conclusion, the need to remove your tonneau cover in order to cut your bed liner will depend on the specific type of cover you have and the method you plan to use for cutting.
Whether you choose to remove the cover completely or simply adjust it to create enough space, it’s important to approach the task carefully and seek appropriate guidance if needed. By doing so, you can ensure a precise and accurate fit for your bed liner, as well as protect the integrity of your truck’s accessories.
Can I trim a bed liner that is already installed on a truck?
“trim bed liner already installed truck” Yes, it is possible to trim a bed liner that is already installed on a truck. Many truck owners may find that their bed liner is either too long or too wide for their truck bed, and they want to trim it to fit properly. Trimming a bed liner is not an uncommon practice, and it can be done with the right tools and a little bit of patience.
However, it is important to note that not all bed liners can be easily trimmed. Some bed liners are made of materials that are difficult to cut through, while others may not have any excess material that can be trimmed. If you are unsure whether your bed liner can be trimmed, it is best to consult the manufacturer’s instructions or contact a professional for assistance.
FAQs
How do I cut a bed liner for a tonneau cover?
To cut a bed liner for a tonneau cover, start by measuring the dimensions needed for the cover. Then, use a sharp utility knife or scissors to carefully cut along the measured lines. Make sure to take your time and make precise cuts to ensure a clean and accurate fit.
What tools do I need to cut a bed liner for a tonneau cover?
To cut a bed liner for a tonneau cover, you will need a measuring tape, a marker or pencil to mark the measurements, and a sharp utility knife or scissors to make the cuts. Additionally, having a straight edge or ruler can help ensure straight and accurate cuts.
Can I use a regular knife to cut a bed liner for a tonneau cover?
While it is possible to use a regular knife to cut a bed liner for a tonneau cover, it is recommended to use a sharp utility knife or scissors instead. These tools are specifically designed for cutting through materials like bed liners and will provide cleaner and more precise cuts.
Are there any safety precautions I should take when cutting a bed liner for a tonneau cover?
Yes, when cutting a bed liner for a tonneau cover, it is important to wear safety goggles to protect your eyes from any flying debris. Additionally, make sure to work in a well-ventilated area to avoid inhaling any dust or particles. Lastly, always exercise caution and work slowly to prevent any accidental injuries.
How can I ensure that the bed liner is a perfect fit for the tonneau cover?
To ensure a perfect fit for the tonneau cover, start by accurately measuring the dimensions needed. Double-check your measurements and mark them on the bed liner. Take your time and make precise cuts along the marked lines. It may also be helpful to test fit the bed liner before finalizing the cuts.
Can I trim the bed liner after it has been installed on the tonneau cover?
Yes, it is possible to trim the bed liner after it has been installed on the tonneau cover. However, it is recommended to make any necessary adjustments before installing the liner to ensure a neater and more professional-looking finish.
Are there any specific techniques for cutting a bed liner for a tonneau cover?
When cutting a bed liner for a tonneau cover, it is generally best to start with smaller cuts and gradually work your way toward the desired dimensions. This allows for more control and ensures that you do not accidentally cut too much off. Additionally, using a straight edge or ruler can help guide your cuts and maintain straight lines.