
Have you ever noticed your car overheating or smelling an unusual odor while driving? These can be signs that your engine is experiencing cooling system issues. Unless you’re a car expert, it can be tough to identify the source of the problem. A coolant pressure test can help you determine the cause of these issues and avoid damage to your engine.
This test measures the pressure created by the coolant system when the engine is running at operating temperature. By performing this procedure, you can inspect the cooling system for leaks, blockages, or other malfunctions that might cause your car to overheat or smell like burning. In this blog, we’ll cover how to perform a coolant pressure test and diagnose your car’s cooling system problems.
Table of Contents
What is a Coolant Pressure Test
If you’re wondering how to do a coolant pressure test, it’s a relatively simple process that can help you diagnose potential issues with your car’s cooling system. Essentially, a coolant pressure test involves pressurizing the system to identify leaks or other issues that could be causing your car to overheat or lose coolant. To perform the test, you’ll need a specialized radiator pressure tester kit, which can be purchased at most auto parts stores.
Then, you’ll need to locate the radiator cap and remove it, attaching the pressure tester in its place. From there, you’ll pump up the pressure and observe for any leaks. If you notice that pressure drops quickly or that there are visible leaks, it could indicate a problem that needs to be addressed.
By performing a coolant pressure test, you can catch potential issues before they lead to more significant problems down the line.
Explanation of Coolant Pressure Test
A coolant pressure test is a diagnostic procedure that helps you determine if your car’s cooling system is working properly. During this test, a special tool is attached to the cooling system, and the system is pressurized. This causes the coolant to circulate at a higher pressure than normal, which can help identify leaks or other issues.
A coolant pressure test is important because issues with your cooling system can lead to engine damage and other problems. By identifying issues early on, you can save money on repairs and prevent further damage to your car. It’s a relatively simple procedure that can be done by a mechanic, or you can even do it yourself if you have the right tools and knowledge.
So, if you’re experiencing issues with your car’s cooling system, consider getting a coolant pressure test to help diagnose the problem and keep your car running smoothly.
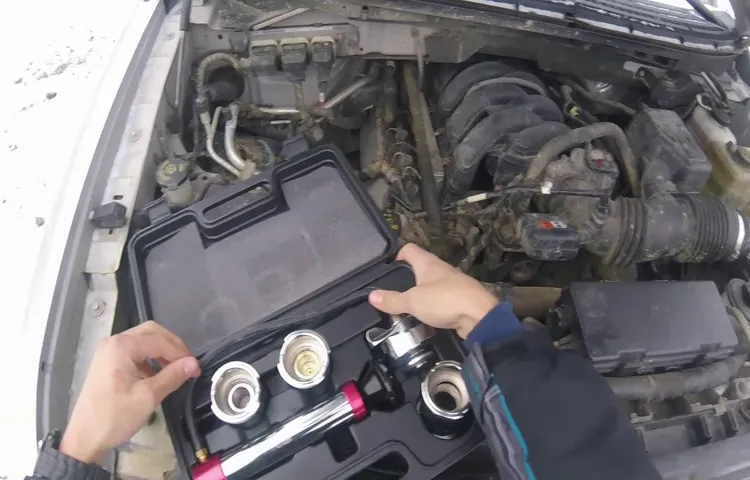
Tools Required for Coolant Pressure Test
If you’re wondering how to do a coolant pressure test, you’ll first need a few tools. First, you’ll need a coolant pressure tester kit, which typically costs around $50-$100. This kit will include a hand pump, pressure gauge, and various adapters to fit different types of radiators and systems.
You may also need a funnel or hose to add coolant to the system before testing. Lastly, it’s important to have a clean and safe workspace to work in, as coolant can be toxic and dangerous if mishandled. With these tools on hand, you can easily perform a coolant pressure test to diagnose any issues in your cooling system.
Simply attach the tester to your radiator or coolant reservoir, pump it to the recommended pressure level, and observe the gauge for any drops in pressure. This will help you identify leaks or other issues before they become a bigger problem.
List of Required Tools
If you suspect that your vehicle’s cooling system is faulty, a coolant pressure test can help to identify any leaks or other issues. However, before you can perform this test, you’ll need to gather a few essential tools. First and foremost, you’ll need a pressure tester kit that is compatible with your make and model of vehicle.
This kit will include a hand pump, pressure gauge, and a variety of adapters to connect to different pressure points in the cooling system. Additionally, you’ll need a set of pliers to help remove hose clamps and a funnel to add coolant to the system if needed. Finally, it’s a good idea to have a flashlight on hand to help you see into dark and cramped spaces under the hood.
In short, the key tools required for a coolant pressure test are a pressure tester kit, pliers, funnel, and flashlight. With these tools in hand, you’ll be able to perform a thorough diagnosis of your vehicle’s cooling system and identify any leaks or other issues that may be affecting its performance. So, don’t hesitate to arm yourself with these essential tools and get to work keeping your car running smoothly and efficiently.
Steps for Conducting Coolant Pressure Test
If you suspect that your car’s cooling system is failing to keep the engine cool, then you might want to consider testing the coolant pressure. Conducting a coolant pressure test is a simple and cost-effective way to diagnose any issues within the system before they become bigger problems. Firstly, make sure that your engine is cool before removing the radiator cap.
Then attach the coolant pressure testing kit to the radiator and pump the pressure up to the level specified for your vehicle. The pressure should hold steady for a few minutes without dropping, if it does start to drop, then this indicates a leak within the cooling system. Repeat the process on the expansion tank cap if your vehicle has one.
If you find that there is a leak, then it is likely that a component within the cooling system has failed and needs to be replaced. By regularly conducting a coolant pressure test, you can identify and resolve any issues early on, saving you both time and money. So, if you’re wondering how to do a coolant pressure test, all you need is a simple testing kit and a few minutes of your time.
Step 1: Prepare the Vehicle for Test
One of the first steps to conducting a coolant pressure test is to prepare the vehicle for the test. This involves ensuring that the engine is cool and the pressure in the cooling system has been released. To do this, you need to wait until the vehicle has been sitting for an extended period, or you can use a radiator cap tool to release the pressure safely.
Another essential step is to inspect the coolant system’s components for any signs of wear or damage. This includes checking the hoses, radiator, thermostat, water pump, and radiator cap. Any component that is cracked, corroded, or shows signs of leaks should be repaired or replaced before proceeding with the test.
By taking the time to prepare the vehicle properly, you can ensure that the test will provide accurate results and prevent further damage to the engine.
Step 2: Attach the Pressure Tester
Now that you have prepared the vehicle for a coolant pressure test, it’s time to attach the pressure tester. Start by identifying the coolant reservoir or the radiator cap, depending on the type of vehicle. Remove the cap and place it aside.
Then, attach the pressure tester to the opening by following the manufacturer’s instructions. Tighten the attachment until it’s snugly fit in place. Make sure there are no leaks or gaps between the pressure tester and the opening.
You don’t want air escaping from the connection and affecting the results. Once that’s done, turn on the engine and let it run for a few minutes. Observe the pressure gauge on the tester and see if it matches the recommended level for your vehicle.
If it’s too low or too high, there might be a problem with the cooling system that needs further investigation. Keep in mind that you should never remove the tester while the engine is still hot or under pressure. Wait until it cools down before safely detaching it.
A coolant pressure test is an easy and essential method to diagnose potential cooling system issues before they turn into more significant problems.
Step 3: Pump the Pressure Tester
To conduct a coolant pressure test, the next step after connecting the pressure tester is to pump it up to the desired pressure level. Use the pump handle to build pressure inside the cooling system and keep an eye on the pressure gauge to ensure you reach the recommended pressure level. Typically, the pressure should range between 12 to 15 pounds per square inch (psi), but this value may vary depending on the vehicle’s manufacturer.
Once you achieve the required pressure, lock the pump handle in place to maintain pressure and evaluate the system’s performance. Keep in mind that a coolant pressure test can reveal engine problems such as leaking head gaskets, faulty water pumps, and clogged radiators. Therefore, taking the time to conduct this test can save you money in the long run by identifying and fixing issues early on.
So, take the few minutes necessary to pump up the pressure tester, and you’ll be one step closer to diagnosing your cooling system’s health.
Step 4: Monitor the Pressure and Observe Results
The fourth and final step in conducting a coolant pressure test is to monitor the pressure and observe the results. This involves keeping a close eye on the gauge while the engine runs, checking for any sudden drops or increases. If the pressure remains steady and within the recommended range, then the coolant system is likely functioning properly.
On the other hand, if the pressure drops or fluctuates, it could indicate a leak in the system or a faulty component. It’s important to act quickly if any issues are detected, as running an engine with low coolant pressure can cause serious damage. By carefully monitoring the pressure and observing the results during a coolant pressure test, you can identify any problems early and take the necessary steps to keep your engine running smoothly.
So remember, whether you’re a professional mechanic or a DIY enthusiast, regular coolant pressure testing is essential for maintaining the health and performance of your car’s engine.
Interpreting Test Results
If you suspect that your engine is suffering from overheating, it’s essential to perform a coolant pressure test to diagnose the problem accurately. Doing a coolant pressure test is a straightforward process that requires minimal tools. First, ensure your engine is cold before you remove the pressure cap from the radiator.
Next, attach the pressure tester to the radiator and pump it to the manufacturer’s recommended PSI rating. Wait for about five minutes to check the pressure gauge for a significant drop, which indicates a coolant leak. If there is no pressure loss, observe the coolant in the radiator and look for discoloration or contamination.
Once you’ve completed the test, you must interpret the results accurately. Low pressure could indicate a malfunctioning pressure cap, while a rapid loss of pressure is a sign of a cracked head gasket. In contrast, contaminated coolant could indicate a blown gasket or a cracked engine block.
In summary, performing a coolant pressure test is essential to diagnose any engine overheating issues effectively.
Normal Reading for Coolant Pressure Test
Normal Reading for Coolant Pressure Test So, you’ve performed a coolant pressure test on your vehicle’s cooling system and now you’re left wondering what those numbers actually mean. The normal reading for a coolant pressure test is typically between 12 and 15 psi (pounds per square inch) when the engine is cold. However, this can vary depending on the make and model of your vehicle.
A reading outside of this range may indicate a problem with the cooling system, such as a leak or a faulty radiator cap. It’s important to note that if your vehicle is warmed up and the pressure is above the normal range, this could be a sign of a blown head gasket or other serious issue. It’s always best to consult a professional mechanic if you are uncertain about the results of your coolant pressure test.
Remember, regularly performing a coolant pressure test can help to prevent costly repairs down the line.
Indications of Faulty Pressure Test Results
Interpreting test results for a pressure test can be tricky if you are not familiar with the process. However, there are some indications of faulty results that you can look out for. One sign is if the results are not consistent with previous tests or expected values.
This may indicate a problem with the equipment being tested or errors in the testing process. Another indication of faulty results could be if there are significant fluctuations in the pressure readings during the test. This could indicate leaks or other problems with the system being tested.
It is important to review the results carefully and consult with a professional if any potential issues are identified. By careful interpretation of test results and attention to potential warning signs, you can ensure that your pressure testing is accurate and reliable.
Conclusion and Safety Tips
In conclusion, performing a coolant pressure test may sound daunting, but it’s actually a breeze with the right tools and a little bit of know-how. By checking for leaks and ensuring that your coolant system is operating at optimum levels, you’ll be prolonging the life of your vehicle and avoiding any costly repairs down the road. So, go ahead and give it a try – your car will thank you!”
FAQs
What is a coolant pressure test and why is it necessary?
A coolant pressure test is a diagnostic tool to determine if there are any leaks in the engine’s cooling system. It is necessary to avoid engine overheating and potential damage.
How is a coolant pressure test performed?
A coolant pressure test involves attaching a pressure gauge to the radiator or coolant reservoir and pressurizing the system to the recommended PSI. Then, the technician inspects for any leaks in the system.
What is the recommended PSI for a coolant pressure test?
The recommended PSI for a coolant pressure test may vary depending on the make and model of the vehicle. However, it typically ranges from 15 to 20 PSI.
Can a coolant pressure test be performed at home?
Yes, a coolant pressure test can be performed at home using a pressure tester kit that can be purchased at an auto parts store. However, it’s important to follow the instructions carefully and take proper safety precautions.
How often should a coolant pressure test be performed?
It is recommended to perform a coolant pressure test at least once a year or as part of regular vehicle maintenance. However, it’s essential to perform the test immediately if any overheating or coolant loss is detected.
What are the common causes of coolant leaks in the engine?
Common causes of coolant leaks in the engine include a faulty radiator, damaged hoses, a cracked engine block, a failed water pump, or a damaged head gasket.
How much does a coolant pressure test cost at an auto repair shop?
The cost of a coolant pressure test at an auto repair shop may vary depending on the location and the specific make and model of the vehicle. However, it typically ranges from $50 to $150.