
Are you looking to perform a coolant flush but unsure where to start? Well, you’re in luck! In today’s blog post, we are going to walk you through the step-by-step process of how to perform a coolant flush in your own garage. Picture this: your car’s temperature gauge starts to rise, and you can practically feel the heat radiating from under the hood. Your heart sinks as you realize that it’s time for a coolant flush.
But fear not! This task may seem daunting at first, but with the right tools and some patience, you’ll have your coolant system running smoothly in no time. Just like our bodies need to stay cool, so do our vehicles. If we neglect to flush out the old coolant, it can become dirty and filled with debris over time.
This can lead to poor engine performance, overheating, and even engine damage. That’s why it’s crucial to regularly perform a coolant flush to keep your car running smoothly and prevent any potential issues down the road. Think of the coolant system as your car’s version of a water park.
When everything is running smoothly, the coolant flows through the engine and radiator, effectively cooling down the hot parts of the engine. However, over time, dirt and grime can build up, causing blockages and hindering the flow of coolant. Now, it’s time to grab your toolbox and get your hands dirty! We’ll guide you through each step of the coolant flush process, from draining the old coolant to refilling the system with fresh coolant.
So, what are you waiting for? Let’s dive in and give your car’s coolant system the refresh it deserves!
Table of Contents
What is a Coolant Flush?
So, you’ve probably heard about getting a coolant flush for your car, but what exactly does that mean? Well, a coolant flush is a procedure where the old coolant in your car’s radiator is completely drained and replaced with fresh coolant. This is important because over time, coolant can become contaminated with dirt, debris, and rust, which can affect its ability to cool your engine properly. A coolant flush helps to ensure that your engine stays at the right temperature and prevents overheating.
Now, you might be wondering how to do a coolant flush yourself. Well, it’s actually a pretty simple process. First, you’ll need to gather the necessary tools and supplies, including a drain pan, a wrench to remove the drain plug, and the appropriate type of coolant for your car.
Then, you’ll need to locate the radiator drain plug, usually located at the bottom of the radiator. Place the drain pan underneath and carefully remove the plug to let the old coolant drain out. Once all the old coolant has been drained, you can then close the drain plug and refill the radiator with fresh coolant.
It’s important to follow the manufacturer’s instructions and use the right amount and type of coolant for your specific car. And that’s it! By doing a coolant flush, you’re helping to keep your engine running smoothly and preventing any potential cooling system issues down the road.
Understanding the Purpose
coolant flush

Importance of Regular Coolant Flush
coolant flush, importance of regular coolant flush, benefits of coolant flush, maintaining vehicle performance
What You Will Need
If you’re wondering how to do a coolant flush on your vehicle, there are a few things you will need to get started. First and foremost, you will need to gather the necessary tools and materials. This includes a bucket or drain pan to catch the old coolant, a socket set or wrench to remove the drain plug, a funnel to add new coolant, and of course, the coolant itself.
It is important to use the correct type of coolant for your specific vehicle, so be sure to check your owner’s manual or consult with a professional if you’re unsure. Additionally, you may also want to have some gloves and safety goggles on hand to protect yourself from any spills or splashes. Once you have all of these items, you will be ready to begin the coolant flush process.
Required Tools
To embark on any project, it’s always essential to have the right tools at hand. In the case of DIY or home improvement tasks, having the required tools can make all the difference in achieving successful results. So, what do you need for your next project? Here’s a list of the must-have tools that every homeowner should have in their arsenal.
First and foremost, a good set of basic hand tools is a must. This includes screwdrivers in various sizes and types (flathead and Phillips), adjustable wrenches, pliers, a utility knife, and a hammer. These tools are essential for everyday tasks like tightening screws, cutting materials, and fixing loose items around the house.
Next, it’s important to have a collection of power tools. A cordless drill is a versatile tool that can be used for multiple purposes, such as drilling holes, driving screws, and installing fixtures. A circular saw is another must-have power tool, perfect for cutting materials like wood and plywood.
A jigsaw is useful for making curved cuts and intricate designs, while a reciprocating saw is great for demolition work. For more specialized tasks, having a few extra tools can be useful. For plumbing repairs, a pipe wrench, plumber’s tape, and a plunger are essential.
If you plan on doing electrical work, a voltage tester, wire cutters, and wire strippers are necessary. If you’re tackling outdoor projects, a level, a tape measure, and a stud finder will come in handy. Finally, don’t forget about safety equipment.
Safety goggles, gloves, and a dust mask are essential for protecting yourself while working. A sturdy ladder is also necessary for reaching high places safely. Having the right tools can make any DIY project more manageable and enjoyable.
Materials and Coolant
materials and coolant
Step-by-Step Guide
Are you noticing that your car’s temperature gauge is running higher than usual? It’s time for a coolant flush. Flushing your coolant system is an essential maintenance task that helps keep your engine cool and prevents overheating. Luckily, this is a task that you can easily do yourself with a few simple steps.
First, gather the necessary tools and equipment, including a drain pan, coolant, and a funnel. Then, locate the radiator drain plug, which is usually located at the bottom of the radiator. Once you’ve located it, place the drain pan underneath to catch the coolant.
Loosen the drain plug and let the coolant fully drain out. Next, remove the radiator cap to allow air to enter the system. Fill the radiator with water and replace the cap.
Start the engine and let it run for a few minutes to circulate the water through the system. After the engine has cooled down, repeat the process of draining the water. Once the water is fully drained, refill the radiator with the recommended mixture of coolant and water.
Replace the radiator cap and start the engine again to circulate the coolant mixture. Finally, check for any leaks or irregularities and top off the coolant if necessary. With these simple steps, performing a coolant flush at home is a breeze and can help prolong the life of your engine.
Preparing the Vehicle
When preparing a vehicle for a road trip, it’s important to follow a step-by-step guide to ensure everything is in order. The first step is to check the tires and make sure they are properly inflated and have enough tread. This is crucial for both safety and fuel efficiency.
Next, you should inspect the fluids, such as oil, coolant, and windshield wiper fluid, and top them up if needed. It’s also a good idea to check the brakes, lights, and horn to ensure they are all in working order. Additionally, make sure you have all the necessary documents, such as your driver’s license, registration, and insurance, in case you need them during your trip.
Finally, pack an emergency kit with items like a first-aid kit, jumper cables, and a flashlight, just in case. By following these steps, you’ll be well-prepared for a smooth and enjoyable road trip.
Draining the Old Coolant
coolant, draining old coolant, step-by-step guide
Flushing the System
Flushing the system is an essential step in maintaining the efficiency and longevity of your plumbing system. Over time, debris, sediment, and mineral buildup can accumulate in your pipes, causing clogs and reducing water flow. Flushing the system involves thoroughly cleaning your pipes and removing any obstructions.
But how exactly do you flush your plumbing system? Let’s break it down step by step. Turn off the water supply: Before you begin flushing your system, turn off the water supply to avoid any mishaps or accidental flooding.
Open all faucets: Open all the faucets in your home, including sinks, showers, and bathtubs. This will ensure that all the water in your plumbing system is drained out.
Locate the main water valve: The next step is to locate the main water valve, typically located near your water meter or in your basement. Turn off the valve to cut off the water supply completely.
Attach a garden hose: Next, attach a garden hose to the spigot on the bottom of your hot water heater or the outside faucet. Make sure the other end of the hose is placed in a drain or outside where the water can flow freely.
Open the drain valve: Open the drain valve on your hot water heater to allow water to flow out. This will help flush out any debris or sediment that has settled in the tank.
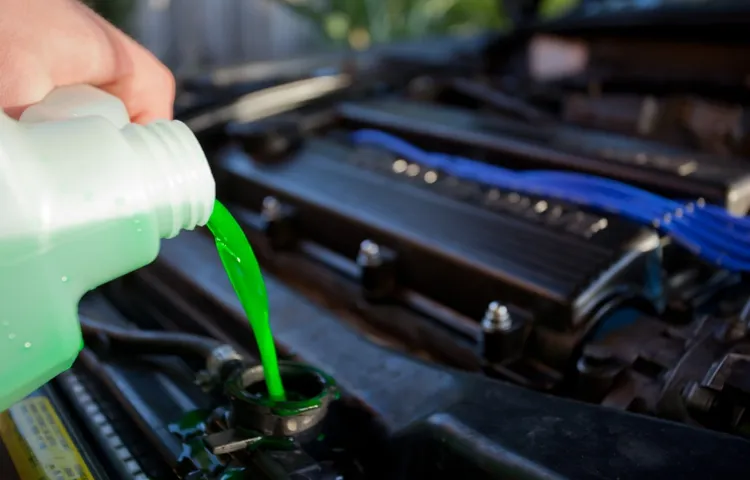
Refilling with New Coolant
coolant replenishment, replace coolant, car coolant change, how to add coolant to car, adding coolant to radiator, cooling system maintenance, car coolant system, coolant flush and fill, automotive maintenance. Refilling your car’s coolant is an essential part of routine car maintenance. Over time, coolant can become contaminated or evaporate, leading to decreased effectiveness and potential engine damage.
Luckily, performing a coolant replenishment is a relatively straightforward process that can be done by anyone with a bit of knowledge and a few tools. In this step-by-step guide, we’ll take you through the process of refilling your car’s coolant. Step 1: Before starting, make sure your engine is completely cool.
Safety is crucial, and you don’t want to risk burning yourself on hot engine parts. Locate the coolant reservoir, which is typically a translucent plastic tank connected to the radiator. Step 2: Using a rag or towel, carefully unscrew the coolant reservoir cap.
Be cautious as pressure built-up inside the cooling system can cause hot coolant to spray out. If necessary, release the pressure by slowly turning the cap counterclockwise until a hissing sound is heard. Step 3: Look at the fluid level inside the coolant reservoir.
If it’s below the “MIN” or “ADD” line, you’ll need to add more coolant. Never attempt to remove the radiator cap when the engine is hot, as it may result in serious injury. The coolant reservoir cap is a safer alternative for adding coolant.
Step 4: Prepare the right coolant mixture for your car. Check your vehicle’s owner manual or consult with a professional to determine the correct coolant type and ratio. Most modern vehicles require a specific mixture of coolant and distilled water.
Bleeding the System
“bleeding the system” Step-by-Step Guide: Bleeding the System Have you ever heard the term “bleeding the system” and wondered what it meant? Well, you’re in the right place! In this step-by-step guide, we’ll break down the concept of bleeding the system and show you how to do it. But first, let’s talk about what bleeding the system actually means. When it comes to various systems in our everyday lives, such as plumbing or even financial systems, there can sometimes be air trapped within them.
This air can cause issues and disrupt the proper functioning of the system. That’s where bleeding comes in – it’s the process of removing that trapped air. Now, let’s dive into the steps of bleeding a system.
First and foremost, you’ll need to identify the system you want to bleed. Is it your car’s cooling system? Your home’s heating system? Once you’ve determined the system, you can move on to the next step. The second step is to locate the bleeding point.
Most systems have a designated point where you can release the trapped air. It could be a valve or a screw – check the system’s manual or do some research to find out where it is. Once you’ve found the bleeding point, it’s time to prepare your tools.
Depending on the system you’re working with, you may need a screwdriver, a wrench, or even a specialized bleed kit. Gather everything you need so you’re ready to go. Next, get your system ready for bleeding.
This might involve turning off the power supply, draining any excess fluid, or simply turning off the system. Again, consult the manual or do some research to ensure you’re following the correct procedure. Once you’re ready, it’s time to actually bleed the system.
Tips and Precautions
So you’ve decided to take on the task of flushing your coolant system yourself, huh? Good for you! Flushing your coolant regularly is an essential part of maintaining your vehicle’s overall performance and preventing engine overheating. However, there are a few important tips and precautions to keep in mind before you dive in. First and foremost, always make sure to consult your vehicle’s owner’s manual for specific instructions and recommendations for your particular make and model.
This will ensure that you’re following the correct procedure and using the appropriate coolant for your vehicle. Additionally, it’s crucial to let your engine cool down completely before starting the flush. Coolant can reach extremely high temperatures during operation, so it’s essential to avoid any potential burns or injuries.
Lastly, be sure to properly dispose of the old coolant. Coolant contains chemicals and toxins that can be harmful to the environment if not disposed of correctly. Take it to a recycling center or a mechanic who will dispose of it safely.
By following these simple tips and precautions, you’ll be well on your way to a successful coolant flush and a happy and healthy vehicle.
Safety Measures
safety measures, tips and precautions, staying safe at home, protecting yourself and your loved ones, personal safety, home security, safeguarding your home, preventing accidents, reducing risks Safety should always be a top priority, especially when it comes to our homes and the well-being of our loved ones. By taking some simple precautions and following a few basic tips, we can create a safe and secure environment for ourselves and our families. First and foremost, it’s important to ensure that our homes are equipped with proper security measures.
This includes installing sturdy doors and windows with reliable locks, as well as a reliable alarm system. It’s also a good idea to have motion sensor lights outside, which can deter potential intruders. Additionally, it’s important to be mindful of preventing accidents within the home.
This includes keeping walkways clear of clutter, using non-slip mats in the bathroom, and securing loose rugs to prevent trips and falls. It’s also important to properly store any hazardous materials, such as cleaning chemicals or sharp objects, in places that are out of reach of children and pets. Finally, it’s important to be prepared for emergencies.
This includes having a first aid kit readily available, as well as knowing how to perform basic CPR and other life-saving techniques. By taking these simple safety measures, we can ensure the well-being of ourselves and our loved ones and create a safe and secure environment in our homes.
Common Mistakes to Avoid
One of the most common mistakes that people make when it comes to blogging is not doing enough research before writing their content. It’s important to do your homework and gather as much information as possible before sitting down to write. This will not only help you come up with fresh and unique ideas but also ensure that your content is accurate and reliable.
Another common mistake that bloggers often make is not optimizing their content for search engines. Without proper SEO techniques, your blog posts may not rank well in search engine results, which means that fewer people will find and read your blog. It’s important to use relevant keywords in your content, optimize your meta tags, and provide high-quality and informative content to improve your SEO.
Additionally, it’s important to avoid neglecting your audience. Your blog posts should be engaging and relatable, and should provide valuable information to your readers. Another mistake to avoid is not promoting your blog posts.
It’s important to share your content on social media platforms, promote it on your website, and reach out to other bloggers and websites for collaboration opportunities. Lastly, make sure to proofread your blog posts before publishing them. Typos, grammar errors, and factual inaccuracies can undermine your credibility and professionalism.
Taking the time to proofread your content will help you catch these mistakes and ensure that your blog posts are polished and error-free. By avoiding these common mistakes, you can improve the quality and visibility of your blog, and attract and retain more readers.
Conclusion
And there you have it, now you’re fully equipped with the knowledge and confidence to tackle a coolant flush like a seasoned DIY mechanic. Remember, cooling system maintenance is essential for the health and longevity of your vehicle. So don’t let your engine get hot under the collar – give it the TLC it deserves with a coolant flush.
No more playing it cool, it’s time to get down and dirty with your coolant! Happy flushing!”
Importance of Regular Coolant Flush
coolant flush, maintenance, engine health, tips, precautions. Regular coolant flushes are an essential part of vehicle maintenance to ensure optimal engine health. Over time, coolant can become contaminated with dirt, debris, and rust particles, which can clog the radiator and lead to engine overheating.
By flushing the coolant system regularly, you can remove these impurities and prevent potential damage to your engine. But before you jump right into it, here are a few tips and precautions to keep in mind. First, always make sure the engine is completely cool before attempting a coolant flush.
Hot coolant can cause severe burns, so it’s important to wait until the engine has had time to cool down. Additionally, be sure to wear protective gloves and eyewear to protect yourself from any splashing coolant. It’s also crucial to follow the manufacturer’s guidelines for the type of coolant to use and the recommended intervals for flushing.
Using the wrong coolant or neglecting to flush it regularly can have detrimental effects on your engine’s performance and lifespan. Taking these simple tips and precautions into account will help you maintain your vehicle’s engine health and ensure a smooth and trouble-free ride.
Maintaining Vehicle Performance
vehicle performance, tips and precautions
FAQs
What is a coolant flush?
A coolant flush is a maintenance procedure where old coolant is removed from the cooling system of a vehicle and replaced with new, fresh coolant. This helps to keep the cooling system clean and prevents engine overheating.
Why is a coolant flush important?
A coolant flush is important because it helps to remove contaminants, rust, and debris from the cooling system. This improves the efficiency of the cooling system and extends the life of the engine. It also helps to prevent overheating and potential damage to the engine.
How often should I do a coolant flush?
It is recommended to do a coolant flush every 2 to 5 years, or depending on the manufacturer’s guidelines. However, if you notice any signs of coolant contamination or engine overheating, it is advisable to do a coolant flush sooner.
Can I do a coolant flush myself or should I take it to a professional?
While it is possible to do a coolant flush yourself, it is recommended to take it to a professional. They have the necessary tools and equipment to properly flush and refill the cooling system. They can also inspect the system for any potential issues and ensure the job is done correctly.
What are the signs that indicate the need for a coolant flush?
Some signs that indicate the need for a coolant flush include engine overheating, coolant leaks, discolored or rusty coolant, a strong odor coming from the coolant, or the vehicle’s temperature gauge constantly showing high temperatures. If you notice any of these signs, it is a good idea to have a coolant flush done.
How long does a coolant flush take?
The duration of a coolant flush can vary depending on the vehicle and the condition of the cooling system. On average, it takes about 30 minutes to an hour to complete a coolant flush. However, it may take longer if there are any complications or if additional repairs are needed.
What coolant should I use for a coolant flush?
It is important to use the correct type of coolant recommended by the vehicle manufacturer for a coolant flush. This information can be found in the vehicle’s owner’s manual or by consulting a professional. Using the wrong type of coolant can cause damage to the cooling system and affect the vehicle’s performance.