
Hey there, car enthusiasts! Have you ever wondered why it’s important to drain the coolant in your car? Well, I’ve got the answers for you. Just like our bodies need water to stay hydrated, a car’s engine needs coolant to keep it cool and prevent overheating. But over time, this coolant can become contaminated with dirt, debris, and old engine fluids.
So, just like we need to replenish our bodies with clean water, our cars need to have their coolant changed to keep the engine running smoothly. Think of your car’s engine like a marathon runner on a scorching hot day. If the runner doesn’t hydrate properly, they could collapse from heat exhaustion.
The same goes for your car’s engine. If the coolant gets too dirty or loses its effectiveness, it won’t be able to dissipate heat efficiently, leading to potential engine damage. Draining the coolant in your car is like hitting the reset button.
By removing the old, contaminated coolant and replacing it with fresh, clean coolant, you’re giving your engine a fresh start. This ensures that it can continue to perform optimally and keeps the risk of overheating at bay. But how often should you drain the coolant? Well, it depends on several factors like the make and model of your car, its age, and your driving habits.
As a general rule of thumb, it’s recommended to have your coolant changed every 30,000 to 50,000 miles or every 2 to 5 years. However, it’s always best to consult your car’s owner’s manual or a professional mechanic to determine the specific maintenance schedule for your vehicle. So, the next time you’re wondering why you should bother draining the coolant in your car, just remember that it’s all about keeping your engine cool and preventing any potential damage.
Don’t let your car’s engine suffer from heat exhaustion – give it the fresh coolant it deserves! Stay tuned for more car maintenance tips and tricks, and keep those engines running smoothly. Happy driving!
Table of Contents
What is Coolant
If you’ve ever wondered what that colorful liquid is inside your car’s radiator, it’s called coolant, and it plays a vital role in keeping your engine running smoothly. Coolant, also known as antifreeze, is a mixture of water and chemicals that help regulate your engine’s temperature and prevent it from overheating. It works by absorbing excess heat from the engine and then circulating it through the radiator, where it’s cooled down and sent back to the engine.
This continuous cycle keeps your engine at an optimal temperature, allowing it to function efficiently. However, over time, coolant can become contaminated with dirt, debris, and impurities, which can affect its performance. That’s why it’s important to regularly drain and replace the coolant in your car.
So how do you go about draining the coolant? Step one is to locate the drain plug on your car’s radiator. It’s typically located at the bottom of the radiator, but the exact location may vary depending on your car’s make and model. Once you’ve located the drain plug, place a container or bucket underneath it to catch the coolant.
Then, carefully open the drain plug using a wrench or a pair of pliers, allowing the coolant to flow out. Make sure to wear gloves and exercise caution, as the coolant may still be hot. Once all the coolant has drained, close the drain plug and dispose of the old coolant properly.
It’s important to note that coolant is toxic and should never be poured down the drain or onto the ground. Instead, you can take it to a local recycling center or an automotive store that accepts used coolant. After draining the coolant, it’s recommended to flush the system with water to remove any remaining impurities.
Once the system has been flushed, you can refill it with fresh coolant. It’s important to consult your car’s owner manual or a professional mechanic to determine the correct type and ratio of coolant for your specific vehicle. By regularly draining and replacing the coolant in your car, you can ensure that your engine stays cool and performs at its best.
Definition and Purpose of Coolant
Coolant is a substance that is used to regulate the temperature of a system or machine. It is often used in vehicles to maintain an optimal operating temperature for the engine. Coolant is typically a mixture of water and additives, such as antifreeze, that help to prevent freezing in cold temperatures and boiling in hot temperatures.
The purpose of coolant is to dissipate heat, preventing overheating and allowing the system or machine to operate efficiently. By absorbing heat and carrying it away, coolant helps to prevent damage to the engine or other components. It’s like the cooling system of your body – when you exercise or get too hot, your body sweats to cool down and maintain a stable temperature.
Coolant works in a similar way, keeping the temperature in check and preventing any detrimental effects of extreme heat or cold.
Importance of Maintaining Coolant Levels
“coolant levels” The coolant is a vital component of a vehicle’s cooling system. It plays a crucial role in maintaining the engine temperature and preventing it from overheating. Coolant, also known as antifreeze, is a mixture of water and additives that helps regulate the temperature inside the engine.
Without proper coolant levels, the engine can overheat, leading to serious damage to the engine components. Imagine your car’s engine is like a pot of boiling water. Just like how water needs to be cooled down to prevent it from boiling and causing a mess, the engine needs coolant to regulate its temperature.
By regularly checking and maintaining the coolant levels in your vehicle, you can ensure that your engine remains cool and operates at an optimal level.
Tools and Materials Needed
If you’re planning on draining the coolant in your car, there are a few tools and materials you’ll need to have on hand. First and foremost, you’ll need a drain pan to catch the coolant as it drains from the system. This will help prevent any spills and ensure that the coolant is properly disposed of.
Additionally, you’ll need a socket set or wrench to remove the drain plug and any other necessary components. A pair of gloves is also a good idea to protect your hands from any coolant that may come into contact with your skin. Finally, you’ll need the appropriate coolant to replace the old fluid once the system has been drained and flushed.
Make sure to consult your car’s manual or speak to a professional to ensure that you’re using the correct type of coolant for your specific vehicle. With these tools and materials in hand, you’ll be well-equipped to safely and effectively drain the coolant from your car.
List of Tools
“Essential Tools and Materials for a DIY Enthusiast” If you’re a DIY enthusiast, having the right tools and materials is crucial for the success of your projects. Whether you’re a seasoned pro or just starting out, there are a few key items that should be in every DIYer’s toolbox. First and foremost, a good set of basic hand tools is essential.
This includes a hammer, screwdrivers in different sizes, pliers, an adjustable wrench, and a tape measure. These tools will come in handy for a wide range of tasks, from hanging pictures to making small repairs around the house. Next, you’ll need some power tools.
A cordless drill is a must-have, as it can be used for drilling holes and driving screws. A circular saw is another versatile tool that can be used for cutting wood and other materials. Additionally, a jigsaw is useful for making curved cuts, while a sander is great for smoothing out rough surfaces.
In addition to these tools, there are a few other items that you’ll need for various DIY projects. A level is important for ensuring that items are hung straight, while a stud finder can be used to locate wall studs before drilling. A utility knife is handy for cutting through materials like cardboard and carpet, and a set of safety goggles and gloves will help protect you from potential hazards.
When it comes to materials, it’s always a good idea to keep some basic supplies on hand. This includes screws, nails, and various types of adhesive, as well as sandpaper in different grits. Depending on the types of projects you enjoy, you may also want to have some paint, brushes, and rollers, as well as wood glue and filler.
While this list is by no means exhaustive, having these essential tools and materials will set you up for success in your DIY endeavors. Remember, investing in quality tools and taking care of them will ensure that they last for years to come and make your projects easier and more enjoyable. So get out there and start tackling those DIY projects with confidence!
List of Materials
“Tools and Materials Needed for Your Next DIY Project” Before you dive into your next DIY project, make sure you have all the necessary tools and materials on hand. Having the right tools can make a world of difference in the success and efficiency of your project. Firstly, you’ll need a basic set of hand tools, such as a hammer, screwdriver set, pliers, and tape measure.
These tools will come in handy for a variety of tasks, from hanging shelves to tightening loose screws. Additionally, you’ll want to invest in a power drill, as it will make drilling holes and driving screws much easier and faster. Depending on your project, you may also need some specialized tools.
For example, if you’re working with wood, a saw and sandpaper will be essential. If you’re painting, brushes, rollers, and masking tape will be necessary. Other tools to consider include a level, utility knife, wire cutters, and a wrench set.
In terms of materials, the requirements will vary depending on your specific project. However, there are a few basic materials that you should always have on hand. These include nails, screws, and wall anchors, as well as various types of adhesive, such as glue and tape.
It’s also a good idea to have a stock of paint, brushes, and rollers, as well as sandpaper in different grits for smoothing surfaces. Don’t forget safety equipment, such as goggles, gloves, and a dust mask, to protect yourself while working. By ensuring you have the right tools and materials before starting your DIY project, you’ll save time, frustration, and potentially costly mistakes.
So, take some time to make a list and gather everything you need before getting started. Happy DIY-ing!
Preparing Your Vehicle
So, you’ve decided to take matters into your own hands and drain the coolant in your car. That’s great! It’s an essential maintenance task that can prolong the life of your vehicle’s engine and keep it running smoothly. But before you start, it’s important to make sure you’re well-prepared.
First things first, gather all the necessary tools and materials. You’ll need a drain pan to collect the coolant, a pair of gloves to protect your hands, and a funnel to pour the new coolant back in. Additionally, it’s a good idea to have some rags or towels handy to clean up any spills or drips.
Next, park your car on a level surface and let the engine cool down completely. This is crucial to prevent burns and injuries. Opening the radiator cap while the engine is still hot can result in hot coolant spraying out and causing harm.
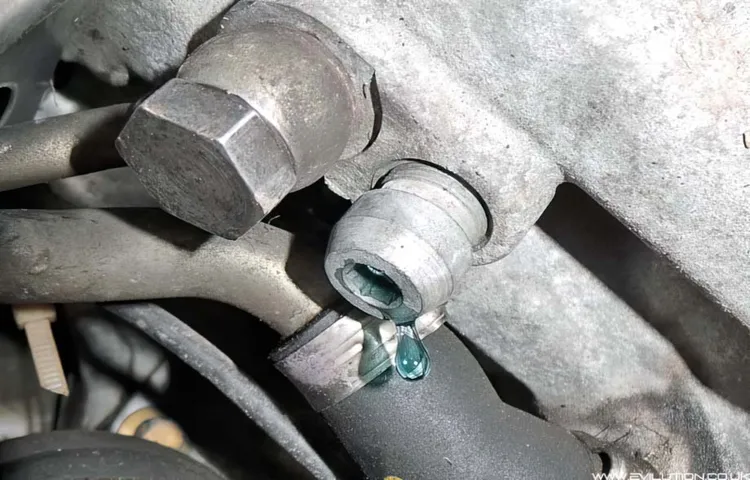
Once the engine has cooled down, locate the radiator drain plug. It’s usually located at the bottom of the radiator. Use a wrench or pliers to loosen the plug, allowing the coolant to drain into the pan.
Keep in mind that some vehicles may have a coolant drain valve instead, so consult your owner’s manual for specific instructions. After all the coolant has drained, it’s time to flush the system. This step is essential to remove any debris or contaminants that may have accumulated.
Simply fill the radiator with water, put the radiator cap back on, and start the engine. Let it run for a few minutes, allowing the water to circulate and flush out any remaining coolant. Once the system has been flushed, it’s time to drain the water.
Safety Precautions
car safety precautions, vehicle preparation, safe driving Preparing your vehicle before hitting the road is an essential safety precaution. Taking the time to ensure your car is in optimal condition can greatly reduce the risk of accidents and breakdowns. Start by checking your fluid levels, including oil, coolant, and brake fluid.
If any levels are low, top them up to the recommended levels. Next, inspect your tires for wear and tear. Make sure they have sufficient tread depth and are properly inflated.
A well-maintained set of tires can improve traction and handling, especially in wet or slippery conditions. Additionally, examine your lights, signals, and windshield wipers to ensure they are all in working order. It’s also important to check your brakes and suspension for any signs of damage or abnormalities.
Lastly, don’t forget to pack an emergency kit with essentials like a spare tire, roadside flares, jumper cables, and a first aid kit. By taking these safety precautions and preparing your vehicle, you can have peace of mind while driving and enjoy a safe journey.
Locating the Coolant Drain
coolant drain, vehicle preparation
Gathering the Necessary Tools and Materials
“Preparing Your Vehicle: Gather the Necessary Tools and Materials for a Successful Road Trip” Before embarking on a road trip, it’s essential to prepare your vehicle to ensure a smooth and stress-free journey. One of the first steps in this preparation is gathering the necessary tools and materials. Think of it as assembling your road trip survival kit.
So, what items should be included in this kit? First and foremost, make sure you have a spare tire in good condition along with a jack and lug wrench. Flat tires can happen unexpectedly, and having the necessary tools to change a tire will save you time and frustration. Additionally, it’s a good idea to have a tire pressure gauge to regularly check the air pressure in your tires.
Next, gather basic tools such as a screwdriver, adjustable wrench, pliers, and a flashlight. These tools can come in handy for minor repairs or adjustments along the way, like tightening a loose bolt or fixing a loose wire. A flashlight is especially useful for nighttime emergencies.
Don’t forget to include a first aid kit in your vehicle. Accidents happen, and having essential supplies like band-aids, antiseptic wipes, and pain relievers can make a big difference in an emergency situation. Other items you may want to consider including are jumper cables, a portable tire inflator, a portable phone charger, and a road atlas or GPS navigation device.
Jumper cables can be a lifesaver if your battery dies, while a portable tire inflator can save you from having to find a gas station with an air pump. Lastly, make sure you have an extra bottle of windshield washer fluid and a roll of paper towels in case your windshield gets dirty or you encounter unexpected spills. By gathering these essential tools and materials, you’ll be well-prepared to handle any minor issues or emergencies that may arise during your road trip.
Remember, the key is to be proactive and prepared, so you can focus on enjoying the journey and creating unforgettable memories!
Draining the Coolant
If you’ve ever wondered how to drain the coolant in your car, you’re not alone. Many car owners are unfamiliar with this process, but it’s actually quite simple. Draining the coolant is an important maintenance task that helps prevent your engine from overheating and keeps it running smoothly.
To get started, you’ll need a few basic tools: a wrench, a drain pan, and a funnel. First, locate the drain plug on the bottom of your radiator. Place the drain pan underneath the plug to catch the coolant as it drains out.
Use the wrench to loosen the plug, then carefully unscrew it and let the coolant flow into the drain pan. Once all the coolant has drained out, replace the drain plug and tighten it with the wrench. Finally, use the funnel to pour fresh coolant into the radiator until it reaches the specified level.
Be sure to dispose of the old coolant properly, as it can be toxic to the environment. And that’s it – you’ve successfully drained and refilled the coolant in your car.
Step 1: Preparing the Drain Pan
draining coolant, drain pan
Step 2: Loosening the Radiator Cap
One important step in draining the coolant from your car is to loosen the radiator cap. This may seem like a simple task, but it’s essential to do it correctly to prevent any accidents or injuries. To start, make sure your car is completely cooled off before attempting to remove the radiator cap, as the hot coolant can cause burns.
Once you’re sure it’s safe, locate the radiator cap, which is typically located on the top of the radiator. Use a cloth or towel to protect your hand from any heat or pressure that may escape when loosening the cap. Slowly turn the cap counterclockwise, being cautious of any steam or pressure that may be released.
If you notice any resistance or difficulty, stop and allow the car to cool down further before attempting again. Once the cap is loosened, you can proceed with the next steps in draining the coolant.
Step 3: Positioning the Drain Pan
“draining the coolant.” Draining the coolant is an essential step in maintaining your vehicle’s engine performance and preventing overheating. To begin, you’ll need to position the drain pan under the car’s radiator.
This pan will catch the coolant as it is released from the radiator. Make sure the pan is large enough to hold all the coolant and place it securely to prevent any spills or accidents. Once the drain pan is in place, locate the drain valve on the radiator.
This valve is usually a small plug located on the bottom or side of the radiator. Using a wrench or pliers, carefully loosen the drain valve, allowing the coolant to flow into the drain pan. Take caution as the coolant may still be hot, so it’s a good idea to wear gloves and protect your skin from any potential burns.
As the coolant drains, you may need to adjust the position of the drain pan to catch all the coolant. Once the coolant has completely drained, tighten the drain valve back up to prevent any leaks. Congratulations, you have successfully completed the draining process, and your vehicle is now ready for the next step in the coolant replacement process.
Step 4: Opening the Drain Valve
draining the coolant When it comes to maintaining your vehicle’s cooling system, one important task is draining the coolant. Over time, coolant can become contaminated with rust, debris, and other impurities that can affect the system’s performance. By draining the old coolant and replacing it with fresh coolant, you can help ensure that your engine stays cool and runs smoothly.
The process of draining the coolant involves opening the drain valve, usually located at the bottom of the radiator. Think of it like releasing the plug at the bottom of a bathtub to let the water drain out. Once the drain valve is open, the old coolant will flow out, taking with it any impurities that may have accumulated.
It’s important to have a container and some rags ready to catch any spilled coolant and to protect yourself from getting it on your skin or clothing. Draining the coolant is just one step in maintaining your vehicle, but it’s an essential one that can help keep your engine running at its best.
Step 5: Allowing the Coolant to Drain
Draining the coolant from your car is an important step in performing regular maintenance and preventing the engine from overheating. To begin, you’ll want to make sure the engine is cool to the touch before starting. Safety is key, so always wear gloves and eye protection to avoid any mishaps.
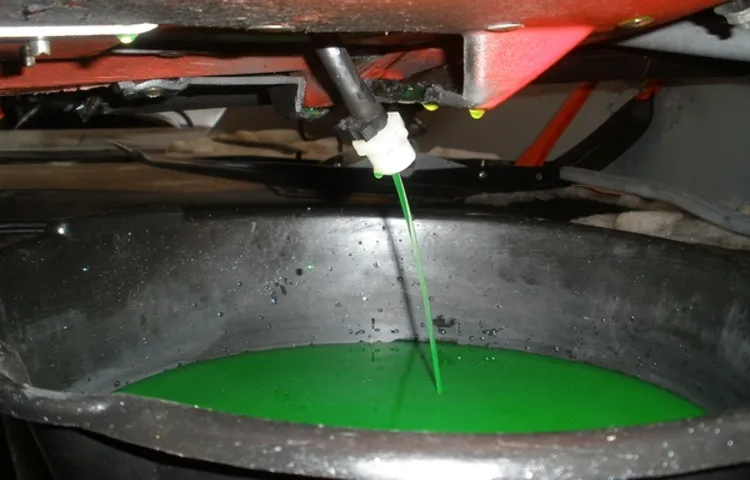
Look for the drain valve, which is usually located at the bottom of the radiator. Find a suitable container to catch the coolant as it drains out. Once you have everything in place, slowly open the drain valve and allow the coolant to flow out.
Depending on the size of your radiator, this may take a few minutes. While the coolant is draining, take the opportunity to inspect the hoses and clamps for any signs of wear or damage. Once all the coolant has been drained, close the drain valve and dispose of the coolant according to local regulations.
Remember, coolant is toxic and harmful to the environment, so be sure to handle it with care. By regularly draining and replacing the coolant in your car, you can help keep the engine running smoothly and avoid potential overheating issues.
Step 6: Closing the Drain Valve
draining the coolant Now that we’ve flushed out the old coolant from the radiator and engine block, it’s time to close the drain valve and move on to the next step. Closing the drain valve is a crucial part of the coolant draining process as it prevents any potential leaks or spills. So, how do you go about closing the drain valve properly? First, locate the drain valve on the bottom of the radiator or engine block.
It’s usually a small petcock or bolt-like mechanism that controls the flow of coolant. Once you’ve found it, make sure you have a drain pan or bucket handy to catch any remaining coolant that may come out. Next, using a wrench or pliers, slowly turn the drain valve clockwise to close it.
Be gentle and take your time to avoid any damage to the valve or surrounding components. The valve should close smoothly without any resistance. If you encounter any resistance, stop immediately and assess the situation.
It’s possible that there may be a blockage or an issue with the valve itself. Once the drain valve is closed, double-check for any leaks or drips. Take a moment to inspect the area around the valve and wipe away any excess coolant.
It’s essential to ensure that the valve is tightly closed to prevent any coolant from escaping when you refill the system. With the drain valve closed and the area clean, you can now move on to the next step in the coolant changing process. Whether it’s refilling the system with fresh coolant or performing any other necessary maintenance, you can do so with confidence knowing that the drain valve is securely closed.
Remember, the coolant draining process is a crucial aspect of maintaining your vehicle’s cooling system. It helps to remove any old or contaminated coolant, ensuring optimal performance and preventing overheating. By properly closing the drain valve, you’re taking a step towards keeping your engine running smoothly and efficiently.
Refilling the Coolant
If you’re wondering how to drain the coolant in your car, you’ve come to the right place! Draining the coolant is an essential part of routine car maintenance, as it helps prevent your engine from overheating and keeps it running smoothly. To start, park your car on a level surface and let the engine cool down completely. This is crucial, as the coolant can be extremely hot and can cause serious burns if mishandled.
Once the engine is cool, locate the radiator drain plug, which is usually located at the bottom of the radiator. Place a container or bucket underneath the drain plug to catch the coolant that will be released. Slowly loosen the drain plug and allow the coolant to drain fully into the container.
Once all the coolant has been drained, tighten the drain plug back up. Now it’s time to refill the coolant! Make sure to use the type of coolant recommended by your car’s manufacturer, as using the wrong type can cause damage to your engine. Open the radiator cap and pour in the fresh coolant until it reaches the proper level.
Finally, replace the radiator cap and start your car to check for any leaks or abnormalities. By following these simple steps, you can easily drain and refill the coolant in your car, ensuring optimal engine performance and longevity.
Step 1: Flushing the System
When it comes to keeping your vehicle running smoothly, maintaining the cooling system is crucial. Part of this process involves refilling the coolant, which helps regulate your engine’s temperature and prevent it from overheating. Once you’ve completed the first step of flushing the system, it’s time to add fresh coolant.
But how do you do it? Refilling the coolant is a straightforward process that can easily be done at home. To begin, locate the coolant reservoir under the hood of your car. It’s usually a translucent plastic container with markings indicating the minimum and maximum levels.
First, make sure your engine is cool before attempting to refill the coolant. Opening the reservoir while the engine is still hot can release hot steam or coolant and cause injury. Once the engine has cooled down, carefully open the cap of the reservoir.
Next, mix the coolant with water following the manufacturer’s recommendations. Some coolants come premixed, while others require dilution with water. Be sure to read the instructions on the coolant bottle to determine the proper ratio.
Using a funnel, slowly pour the coolant mixture into the reservoir, being careful not to overfill it. It’s essential to pour the coolant slowly to prevent air bubbles from forming. Once the reservoir is filled to the recommended level, replace the cap tightly.
After refilling the coolant, it’s a good idea to check for any leaks. Start the engine and let it warm up while keeping an eye on the coolant reservoir. If you notice any leaks or a significant drop in coolant level, it could indicate a more significant issue that needs to be addressed by a professional.
Step 2: Mixing the Coolant
“Step 2: Mixing the Coolant – Refilling the Coolant” Once you have drained the old coolant from your engine, it’s time to refill it with fresh coolant. But before you do that, it’s important to mix the coolant properly. Mixing the coolant correctly ensures that it has the right concentration of water and antifreeze to effectively cool your engine and prevent freezing during colder months.
To mix the coolant, you will need to follow the instructions provided by the manufacturer. Typically, the coolant will come in a concentrated form that needs to be diluted with water. The proper ratio of coolant to water will depend on the climate you live in and the recommendations of the manufacturer.
You can use distilled water or tap water to mix with the coolant, but it’s important to note that tap water may contain impurities that could potentially harm your engine. Therefore, it’s generally recommended to use distilled water if possible. To mix the coolant, start by filling a clean container with the appropriate amount of water.
Then slowly add the coolant, following the manufacturer’s instructions for the correct ratio. It’s important to mix the coolant and water thoroughly to ensure a uniform mixture. Once you have mixed the coolant, you’re ready to refill your engine with it.
Locate the radiator cap or coolant reservoir and carefully pour the coolant into it. Be sure to fill it to the proper level, but avoid overfilling as it can lead to overflow and potential damage to your engine. After refilling the coolant, it’s a good idea to run your engine for a few minutes to allow the coolant to circulate throughout the system and remove any air bubbles.
Check the coolant level again after the engine has cooled down and add more if necessary. Remember, properly mixing and refilling the coolant is essential for maintaining the health and performance of your engine. It’s always a good idea to consult your vehicle’s manual or a professional mechanic if you have any doubts or questions about the process.
Step 3: Refilling the Radiator
refilling the coolant
Step 4: Checking Coolant Levels
coolant, coolant levels, refilling coolant, radiator, engine coolant, maintenance, car maintenance. In the previous steps, we learned how to check the coolant levels in our car’s radiator. Now, let’s move on to the next step: refilling the coolant.
As we mentioned before, coolant is a crucial component in keeping our engine running smoothly and preventing overheating. Without enough coolant, our engine can overheat and cause serious damage. So, it’s important to ensure that the coolant levels are topped up regularly.
To begin refilling the coolant, we need to locate the coolant reservoir in our car. This reservoir is usually made of translucent plastic, making it easy to see the coolant level. Once we’ve found it, we need to remove the cap and check the coolant level.
If it’s low, we can proceed with filling it up. Before pouring in the coolant, we should make sure the engine is cool. Attempting to refill the coolant while the engine is hot can be dangerous and may cause burns.
Once the engine is cool, we can carefully pour the coolant into the reservoir. It’s important to pour slowly to avoid any spills or overflow. When pouring the coolant, we should aim to fill the reservoir up to the designated fill line.
This line is usually marked on the side of the reservoir. It’s crucial not to overfill the reservoir, as this can lead to pressure buildup and potential damage to the cooling system. If we accidentally overfill, we can use a clean cloth or paper towel to carefully remove some of the excess coolant.
Additional Tips and Precautions
When it comes to draining the coolant in a car, there are a few additional tips and precautions to keep in mind. First and foremost, always make sure the engine is cool before attempting to drain the coolant. This will prevent any accidental burns or injuries.
Additionally, it’s a good idea to have a catch pan or bucket ready to collect the old coolant as it drains out. This will help prevent any spills or messes. You should also wear protective gloves and eyewear to protect yourself from any potential splashing or contact with the coolant.
Another important tip is to be sure to dispose of the old coolant properly. Coolant is toxic and harmful to the environment, so it should never be poured down the drain or into the ground. Instead, take it to a local recycling center or automotive shop that accepts used coolant for proper disposal.
By following these additional tips and precautions, you can safely and effectively drain the coolant in your car.
Proper Coolant Disposal
proper coolant disposal options
Checking for Leaks
“checking for leaks, additional tips and precautions” When it comes to checking for leaks in your home, there are a few additional tips and precautions you should keep in mind. First, it’s important to regularly inspect all the areas where water is used, such as sinks, toilets, and appliances. Look for any signs of water damage, such as dark spots, mold, or soft spots in the walls or floors.
It’s also a good idea to check the water pressure in your home. If the pressure is too high, it can put added stress on your pipes and increase the chance of leaks. Consider installing a pressure regulator to keep the pressure at a safe level.
Another tip is to be aware of the age and condition of your plumbing system. If your pipes are old or worn down, they are more likely to develop leaks. Consider having a professional plumber inspect your plumbing system on a regular basis to catch any potential issues before they become major problems.
Finally, make sure everyone in your home knows how to locate and shut off the main water valve. In the event of a leak, being able to quickly turn off the water can help minimize damage. By following these additional tips and precautions, you can stay proactive in preventing and addressing leaks in your home.
Maintaining Coolant Levels
coolant levels, radiator fluid, engine coolant, vehicle maintenance Additional Tips and Precautions: In addition to regularly checking and maintaining your coolant levels, there are a few other tips and precautions to keep in mind. Firstly, make sure to always use the recommended type of coolant for your specific vehicle. Different vehicles require different coolant formulas, so be sure to consult your owner’s manual or speak with a qualified mechanic to ensure you are using the correct type.
Secondly, be cautious when adding coolant to a hot engine. If your engine has recently been running, the radiator and coolant can reach high temperatures, causing the fluid to expand and potentially overflow when you open the cap. To avoid any accidents or burns, it’s best to let the engine cool down before adding or checking the coolant levels.
Another important tip is to never mix different types of coolant. Coolants come in different colors and formulations, and mixing them can lead to chemical reactions that can damage your engine. Always stick with one type of coolant and avoid mixing different brands or formulations.
Lastly, be mindful of any visible leaks or signs of coolant loss. If you notice pools of coolant underneath your vehicle or a consistent drop in coolant levels, it may indicate a leak in the radiator, hoses, or engine. Addressing these issues promptly can prevent further damage and ensure your engine stays properly cooled.
If you’re unsure about any potential leaks or issues, it’s always best to consult a professional mechanic for a thorough inspection. Remember, maintaining proper coolant levels is a crucial part of vehicle maintenance and can help prevent overheating and potential engine damage. By following these additional tips and precautions, you can ensure that your engine coolant system is in good working order and keep your vehicle running smoothly for years to come.
Conclusion
So there you have it, my friends. Draining the coolant in your car is like saying goodbye to an old flame. It’s not always easy, but it’s necessary for moving on to better things.
Just like in a breakup, you need to be patient, careful, and precise. Make sure to gather your tools, find the right spot, and anticipate any unexpected surprises along the way. But remember, draining the coolant isn’t just about getting rid of the old.
It’s about creating space for something new and improved. Just like how draining the coolant in your car frees up room for a fresh batch of liquid gold, it also gives you the opportunity to assess the overall health of your engine and prevent any potential disasters down the road. So take this chance to start afresh and keep your ride running smoothly.
And if you find yourself struggling with the process, don’t hesitate to seek help from a professional or even a trusty YouTube tutorial. Sometimes, it’s just better to let the experts handle the heartache and keep us on the road to happiness. So let’s bid farewell to the old coolant, like a bitter ex, and embrace the sweet freedom of a clean and well-maintained car.
Cheers to new beginnings and smooth rides ahead!”
Importance of Proper Coolant Maintenance
coolant maintenance, importance of coolant maintenance, proper coolant maintenance, tips for coolant maintenance, coolant maintenance precautions
Benefits of Regular Coolant Changes
Regular coolant changes can provide several benefits for your vehicle’s engine. One of the main advantages is that it helps maintain the engine’s temperature at an optimal level. Coolant helps dissipate heat and prevent overheating, which can cause serious damage to the engine.
By regularly changing the coolant, you ensure that the system remains efficient and effective in cooling the engine. This can prolong the life of your engine and save you from costly repairs in the long run. Another benefit of regular coolant changes is that it helps prevent corrosion and rust within the cooling system.
Over time, coolant can become contaminated with rust, dirt, and other debris, which can clog the system and cause damage. By flushing out the old coolant and replacing it with fresh coolant, you minimize the risk of these contaminants causing corrosion and other issues. This can also improve the overall performance of your vehicle.
Additionally, regular coolant changes can help maintain the proper pH balance of the coolant. Over time, coolant can become acidic, which can lead to damage to various components of the cooling system, including the radiator, hoses, and water pump. By changing the coolant regularly, you ensure that the pH balance remains within the recommended range, reducing the risk of damage and prolonging the lifespan of these components.
In conclusion, regular coolant changes offer several benefits for your vehicle’s engine and cooling system. They help maintain optimal engine temperature, prevent corrosion and rust, and maintain the proper pH balance of the coolant. By making this simple maintenance task a regular part of your vehicle’s upkeep, you can save yourself from potentially expensive repairs and extend the life of your engine.
So, don’t forget to schedule those coolant changes regularly and keep your engine running smoothly for years to come.
FAQs
How do you drain the coolant in a car?
To drain the coolant in a car, locate the radiator drain petcock at the bottom of the radiator. Place a drain pan underneath and open the petcock to let the coolant drain out completely.
Is it necessary to drain the coolant in a car?
Yes, draining the coolant in a car is necessary for maintenance purposes. It helps in flushing out old coolant, removing contaminants, and preventing fluid breakdown.
How often should I drain the coolant in my car?
It is recommended to drain and replace the coolant in your car approximately every two to three years or as specified in the vehicle manufacturer’s manual.
Can I drain the coolant myself or should I seek professional help?
Draining the coolant can be done by yourself, but if you are unsure or uncomfortable with the process, it is always advisable to seek professional help to avoid any damage to your car.
Can I reuse the drained coolant?
It is not recommended to reuse the drained coolant as it may have contaminants and degradation that can affect the cooling system. It is best to use fresh coolant for optimal performance.
Are there any safety precautions to take while draining the coolant?
Yes, it is important to let the engine cool down before attempting to drain the coolant to avoid potential burns. Additionally, wearing protective gloves and eyewear is advisable to prevent any contact with the coolant.
What should I do with the drained coolant?
Coolant should be disposed of properly as it is toxic and harmful to the environment. Contact your local recycling or waste management facility for guidance on how to dispose of the drained coolant safely.