
Is your car overheating or is the engine running hotter than usual? It may be time for a coolant change. Draining your car’s coolant is an important maintenance task that you can easily do at home. In this step-by-step guide, we’ll show you how to drain your car’s coolant without damaging your engine.
We’ll discuss the tools you’ll need, safety precautions to take, and how to properly dispose of the old coolant. So, grab your wrench and let’s get started on this DIY car maintenance task. By the end of this guide, you’ll have a better understanding of how your car’s cooling system works and how to keep it running smoothly.
Table of Contents
What You’ll Need
If you want to drain your coolant, there are a few things you’ll need to get started. First, you’ll need a container that can hold at least two gallons of liquid. This container should be clean and free of any residue or debris.
You’ll also need a socket wrench or adjustable wrench to loosen the drain plug on the radiator. A funnel will come in handy when refilling the coolant, along with a bottle of coolant that matches the specifications of your vehicle’s manufacturer. Finally, it’s important to wear protective gloves and eye gear to prevent injury or contamination.
Gather these items before starting the process, as it will save you time and ensure a smooth draining process. It’s crucial to follow the steps carefully and dispose of the coolant properly, as it may contain toxic chemicals that could be harmful to the environment. By taking the necessary precautions and following the proper steps, draining your coolant can be a relatively easy and straightforward process.
– Drain pan – Gloves – Safety glasses – Pliers – Funnel – New coolant
When it comes to replacing your engine coolant, you’ll need to gather a few tools beforehand. First of all, you’ll want to have a drain pan to catch old coolant and avoid spills. Additionally, gloves and safety glasses are essential for protecting your hands and eyes during the process.
Pliers will also come in handy for removing any hose clamps or other components. And of course, you’ll need a funnel to refill the coolant after draining it. Finally, don’t forget to purchase new coolant to ensure your engine runs smoothly.
With these tools at your disposal, you’ll be ready to tackle a coolant replacement with confidence. So what are you waiting for? It’s time to get started and keep your engine in top condition!
Step 1: Cooling Your Engine
If you are wondering how to drain your coolant, the first step is to cool your engine. This is because the coolant can be hot and may cause burns if you attempt to remove it while it’s still warm. You can do this by allowing your engine to cool down completely, which may take several hours depending on how hot it is.
Alternatively, you can use an engine coolant flush kit to quickly cool down the engine. Simply connect it to your radiator and follow the instructions to flush out the old coolant and replace it with fresh coolant. Once your engine is cool to touch, you can begin the process of draining the coolant out of the system.
Remember that it’s important to work in a well-ventilated area, wear protective gear, and dispose of the old coolant in an environmentally-friendly way to prevent harm to yourself and the environment. With these precautions in mind, you’ll be well on your way to successfully draining your coolant and keeping your engine running smoothly.
Let your car cool for at least an hour before draining the coolant.
Cooling Engine Before draining the coolant from your car, it is crucial to let your engine cool for at least an hour. The engine generates an enormous amount of heat, which needs to be dispelled before draining the coolant. Suppose you skip this step and begin draining the coolant while the engine is still warm or hot.
In that case, the hot coolant can rush out of the engine when the radiator cap is removed, causing serious burns or injuries. The coolant system is a pressurized system, and the pressure can be dangerous if the engine is not allowed to cool down first. Once you let the engine cool for an hour or so, the coolant temperature will reduce, making it safe to proceed with the coolant draining process.
By taking the necessary precautions, you can keep yourself safe and prevent any untoward incidents from happening.
Step 2: Locate the Drain Petcock
After finding the radiator, the next step in draining your coolant is to locate the drain petcock. This component is a small valve located underneath the radiator and is responsible for releasing the coolant from the engine. The location of the drain petcock can vary depending on the make and model of your vehicle, so it’s important to refer to the owner’s manual or consult with a mechanic if you’re unsure.
Generally, the drain petcock is located on the bottom right-hand corner of the radiator and can be easily identified by its shape and placement. Once you’ve found it, you can begin the process of draining your coolant by opening the valve and allowing the old coolant to flow out. Remember to take caution when handling the petcock as it can be hot to the touch.
With the drain petcock located, you’re ready to move on to the next step in the process of flushing out your coolant system.
Check your car’s manual to locate the drain petcock. It is usually located at the bottom of the radiator.
Once you’ve gotten your tools ready, it’s time to locate the drain petcock. Your car’s manual will come in handy for this step. It usually shows you where to find the petcock, and it’s often located at the bottom of the radiator.
The petcock valve looks like a small faucet and controls the coolant drain. However, keep in mind that some radiators don’t have petcocks. In such cases, you’ll have to remove the lower radiator hose to drain the coolant.
It’s essential to find the drain petcock or hose to avoid damaging the radiator or coolant system while draining. Remember to place a drain pan under the radiator to collect the coolant as it drains. Once you’ve located the petcock or hose, move onto the next step, the coolant draining process.
Step 3: Prepare Your Work Area
Before starting the process of draining your coolant, it is essential to prepare your work area. For instance, lay down a tarp or some old towels to protect your garage floor from spills and leaks. Make sure you have all the necessary tools, including a socket wrench, drain pan, and funnel, close by.
Don’t forget about safety gear too! You may need gloves and safety goggles if you’re working with hot coolant or other hazardous materials. Once you’ve got everything set up, it’s time to start draining your coolant. Don’t rush this process and take your time to ensure you’re doing everything correctly.
By preparing your work area adequately, you’ll avoid any unnecessary mess or accidents and make the process much more manageable.
Place the drain pan under the petcock. Wear gloves and safety glasses.
Preparing your work area before doing any mechanical work is crucial, as it can save you time and money in the long run. Step 3 in changing your oil is to prepare your work area. Make sure to place a drain pan under the petcock to catch the old oil and prevent it from spilling over the surroundings.
It’s crucial to wear gloves and safety glasses during the oil change process to protect yourself from any possible hazards. Your safety should always come first, so it’s imperative to take the necessary precautions. Remember, the oil can be hot, and you don’t want any skin contact with the oil.
Failure to prepare your work area before starting the oil changing process can lead to uninvited accidents, so it’s crucial to follow this step to avoid any inconvenience. By taking the extra time to prepare, you’ll have a safe and clean work area that will help make the job easier and more efficient.
Step 4: Open the Petcock
Now that you have located the drain valve, it’s time to prepare for the coolant to begin flowing out. Before opening the petcock, place a drain pan or bucket underneath it to catch the coolant. This will prevent your garage or driveway from getting messy and help keep the environment clean.
Once you have the drain pan in place, use your hand or a pair of pliers to open the petcock. Ensure that it is turned completely counterclockwise to allow the coolant to flow out smoothly. Be careful not to force it or twist too hard as this can damage the valve.
Once the petcock is open, allow the coolant to drain completely before moving on to the next step. Remember to dispose of the old coolant properly as it can be harmful to both the environment and animals.
Use pliers to open the petcock. The old coolant should flow into the drain pan.
Opening the petcock is a crucial step in changing your car’s old coolant. To accomplish this, you’ll need a pair of pliers to turn the valve. Place a drain pan beneath the petcock before opening it to catch the old coolant that will drain out.
As you turn the valve, be careful not to force it too hard, as it can break over time. Slowly twist it until the coolant begins to flow out, indicating that the valve is open. You’ll want to let it drain completely to ensure that all of the old coolant is removed.
Once it stops, close the petcock by firmly turning the valve back in the opposite direction. This step is essential for proper flushing of the system to ensure a smooth and effective flow of fresh coolant. By following these steps, you can be sure that your car’s cooling system will be well-maintained, reducing the risk of overheating and engine damage.
Step 5: Flush with Water
After draining the old coolant from your car’s radiator, it’s important to flush it out with water to remove any remaining debris or contaminants. You can use a water hose or a bucket of clean water to do this. Simply pour the water into the radiator until it reaches the top, and turn on the engine for a few minutes so that the water circulates throughout the entire system.
Then, drain the water from the radiator and repeat the process until the water comes out clear. This is a crucial step in the process of changing your coolant because any remaining debris or contaminants in the system could cause blockages or damage to your engine. By flushing with water, you can ensure that your engine is running with a clean and efficient coolant system, which will keep it functioning properly and prevent overheating.
Close the petcock and flush the system with water until all old coolant is removed.
Flushing your cooling system with water is an essential step in maintaining your vehicle’s health. By removing all old coolant, you’re ensuring that your engine runs smoothly, stays cool, and operates efficiently. To begin the process, close the petcock and let gravity drain out the old coolant.
Once drained, refill the system with water, crank the engine, and let the water circulate. Once the water becomes hot, turn the engine off, let it cool down, and repeat the process. You may need to flush the system several times to ensure that all old coolant is removed.
It’s important to use clean water and avoid tap water that contains mineral deposits that can cause damage to the cooling system. Once the system has been thoroughly flushed, you can add new coolant to ensure that your vehicle’s engine stays cool and protected. Remember, neglecting your cooling system can result in engine damage and costly repairs, so take the time to keep it well-maintained.
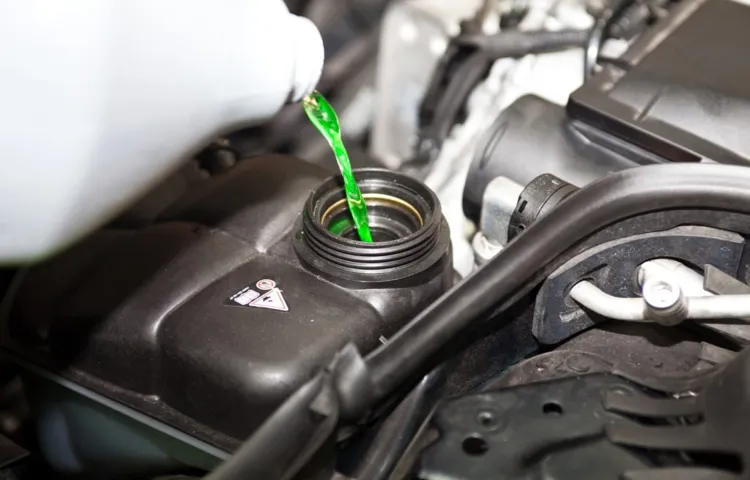
Step 6: Add New Coolant
Finally, it’s time to add new coolant to your car. But before doing that, make sure you’ve closed the drain valve securely. Then, open the radiator cap and carefully pour the new coolant into the radiator.
Make sure you use the right type of coolant for your car as recommended in the owner’s manual. Pour the coolant slowly, allowing all air pockets to escape, until the coolant level reaches the top of the radiator. Once you’ve done that, replace the radiator cap.
But wait, you’re not done yet. You’ll need to turn on your car and let it idle for a few minutes. This will help the coolant circulate through the engine and release any trapped air bubbles.
Then recheck the coolant level and add more as necessary. Now your car’s cooling system is back to top condition, and you can enjoy smooth and safe driving for miles to come. Remember to perform routine maintenance on your car’s cooling system to prevent overheating and costly repairs in the future.
Using a funnel, add the new coolant according to your car’s manual instructions.
Adding new coolant to your car’s engine is a crucial step in maintaining its performance and longevity. Using a funnel, carefully pour in the new coolant according to your car’s manual instructions. It’s essential to use the right type of coolant recommended by your car’s manufacturer to ensure optimal performance.
Pour the coolant slowly and steadily into the radiator, making sure not to overfill it. Overfilling the radiator can cause the coolant to overflow and damage the engine. Once you have poured in the right amount of coolant, remove the funnel and securely place the radiator cap back onto the filler neck.
Double-check the coolant level in the reservoir and ensure that it’s at the recommended level. It’s a simple process that can save you from costly repairs and keep your car running smoothly. So, take a few moments to add new coolant to your engine and enjoy the peace of mind knowing your car is running at its best.
Step 7: Dispose of Old Coolant Properly
When it comes to a coolant change, disposal of the old coolant is just as important as the actual draining process. Simply dumping it down the drain or into the ground can have serious environmental consequences. It’s important to dispose of old coolant responsibly, and luckily, there are a few ways to do so.
The first step is to check with your local recycling center or mechanic shop to see if they accept used coolant. Many places have special containers and processes for safe disposal. If there are no local options, consider purchasing a coolant recycling system.
These systems filter and clean the old coolant, allowing it to be reused or disposed of safely. With proper disposal, you can enjoy a well-maintained engine and peace of mind knowing you’ve done your part to protect the environment. So next time you drain your coolant, make sure to handle the disposal process with care.
Do not pour old coolant down the drain. Dispose of it properly at an approved location.
When changing the coolant in your car, it’s essential to remember to dispose of the old coolant properly. Pouring old coolant down the drain is not only illegal but also harmful to the environment. Coolant contains toxic chemicals that can cause significant damage to aquatic life and contaminate water sources.
Therefore, it’s important to take the necessary steps to dispose of coolant safely and responsibly. The safest way to dispose of old coolant is to take it to an approved facility that can handle hazardous wastes. You can contact your local waste disposal center or a mechanic to find a suitable location for disposing of coolant.
Some auto parts stores also have coolant recycling programs or can recommend hazardous waste disposal facilities. By properly disposing of old coolant, you’re ensuring that you’re not contributing to environmental pollution while maintaining your vehicle’s cooling system.
In Conclusion
Congratulations! You are now a coolant-draining master. You’ve successfully learned how to rid your engine of its hot, murky liquid in a safe and efficient manner. The result? A healthier engine that can run smoother and cooler.
So go ahead and flaunt your newfound skills to your friends. After all, who wouldn’t want to be friends with a someone who knows how to expertly drain their coolant? Happy draining!”
Draining your coolant is an important part of maintaining your car’s engine. Follow these steps carefully to ensure a successful draining process.
When it comes to disposing of old coolant, it’s important to do it properly to avoid harming the environment. Start by checking with your local waste disposal center to see if they accept old coolant. If they do, transfer the old coolant to a secure container and label it properly before dropping it off.
If your waste disposal center doesn’t accept old coolant, you can also check with your local auto parts store, as some offer recycling programs. Whatever you do, never pour old coolant down the drain or into the soil, as it can harm wildlife and contaminate water sources. As an additional precaution, always wear gloves and protective eyewear when handling old coolant, as it can be toxic if ingested.
By following these steps, you can dispose of your old coolant in a safe and eco-friendly way, ensuring both the health of your car and the environment.
FAQs
Why is it important to drain your coolant?
Draining your coolant helps to remove any contaminants or debris that may have accumulated in your engine’s coolant system, preventing potential engine damage and overheating.
How often should you drain your coolant?
It is recommended to drain and replace your coolant every two years or according to your vehicle manufacturer’s specific recommendations.
What is the process for draining your coolant?
To drain your coolant, you first need to locate the drain valve underneath your vehicle’s radiator. Then, place a container or bucket underneath the valve and turn the valve counterclockwise to allow the coolant to drain out. Be sure to dispose of the coolant properly.
Can I reuse my old coolant?
It is not recommended to reuse old coolant as it may contain contaminants or may have lost its effectiveness in preventing engine overheating.
What type of coolant should I use to refill my engine?
You should use the specific type of coolant recommended by your vehicle manufacturer. This information can usually be found in your vehicle’s owner manual.
How do I know if my coolant needs to be replaced?
Signs that your coolant may need to be replaced include an overheating engine, a sweet smell coming from your engine, or visible debris or particles in your coolant.
Can I drain my coolant on my own, or should I take it to a mechanic?
If you have basic knowledge and experience with vehicle maintenance, you can drain your coolant on your own. However, if you are unsure or uncomfortable with this process, it is best to seek the help of a professional mechanic.