
Hey there car enthusiasts! Has your car been running a little hot lately? Well, don’t worry, I’ve got you covered. Today, we’re going to talk about the importance of coolant and how to properly fill your car with it. Whether you’re a seasoned mechanic or a beginner, this guide will help you keep your engine running smoothly and prevent any overheating issues.
Now, you might be wondering, what exactly is coolant? Think of it as your car’s lifeline, keeping your engine cool and preventing it from overheating. Just like how we rely on water to stay hydrated and keep our body temperature in check, coolant does the same for your engine. It circulates through your car’s cooling system, absorbing heat and carrying it away from the engine, keeping everything at an optimal temperature.
So, why is it important to regularly check and fill up your coolant? Well, think of it as giving your car a refreshing drink. Without coolant, your engine can overheat, leading to potential damage and costly repairs. It’s like running a marathon without taking a water break – your body (or in this case, your car) won’t be able to perform at its best and could end up breaking down.
Now that we understand the importance of coolant, let’s dive into how to fill your car with it. First, you’ll need to locate your car’s coolant reservoir. It’s usually a translucent plastic tank with a cap labeled “coolant” or “antifreeze.
” Once you’ve found it, make sure your engine is cool before removing the cap – you don’t want to risk burning yourself. Next, take a look at the coolant mixture recommended by your car’s manufacturer. This information can usually be found in your owner’s manual.
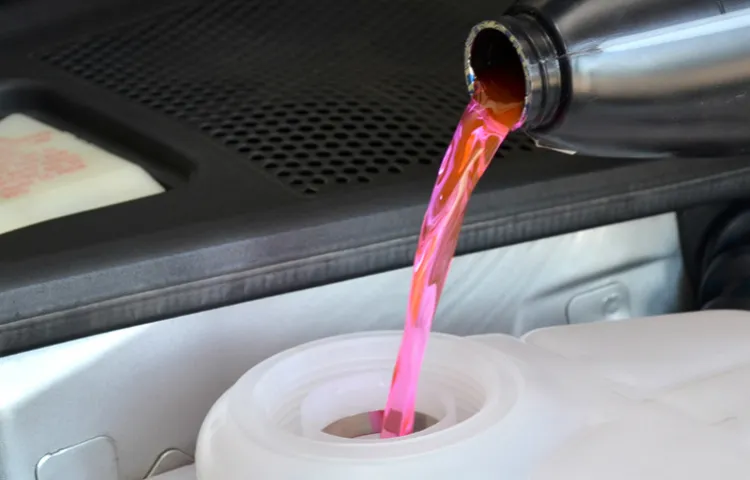
It’s important to note that different types of coolants are available, so make sure you’re using the correct one for your specific car. Once you’ve got the right coolant, slowly pour it into the reservoir, making sure not to overfill it. And voila, you’ve successfully filled your car with coolant! Remember, it’s essential to check your coolant levels regularly, especially before embarking on long trips or during hot weather.
Table of Contents
Introduction
Are you in need of filling your car with coolant? Don’t worry, I’ve got you covered! Filling your car’s coolant is an essential part of regular vehicle maintenance, as it helps to prevent your engine from overheating. To begin, you’ll need a few things: a container of coolant, a funnel, and a clean rag. First, locate your car’s coolant reservoir, which is typically a translucent plastic tank near the radiator.
Make sure your engine is completely cooled before proceeding. Once you’ve found the reservoir, remove the cap and place the funnel securely into the opening. Carefully pour the coolant into the funnel, ensuring that you don’t overfill the reservoir.
Take your time, and pour the coolant slowly to avoid any spills or splashes. Once you’re satisfied with the coolant level, securely replace the cap and wipe away any spilled coolant with the clean rag. Congratulations, you’ve successfully filled your car with coolant! Remember to check your coolant levels regularly and top up as needed to keep your engine running smoothly.
The Importance of Coolant
coolant, engine coolant, cooling system, car maintenance, overheating, vehicle performance. Introduction: When it comes to car maintenance, there are many important factors to consider in order to keep the vehicle running smoothly. One crucial component that often goes overlooked is coolant.
Coolant, also known as engine coolant, plays a vital role in the cooling system of a car. It is responsible for keeping the engine from overheating and ensuring optimal vehicle performance. In this blog post, we will explore the importance of coolant and why it should never be neglected in your car maintenance routine.
So, let’s dive in and uncover the secrets behind a properly functioning cooling system!
Types of Coolant
coolant types, automotive coolant, engine coolant, types of coolant, types of engine coolant. Introduction: When it comes to keeping our engines running smoothly, coolant is an essential component. But did you know that there are different types of coolant available? Each type serves a specific purpose and is designed to provide the best protection for your engine.
In this article, we will explore the various types of coolant, their benefits, and how to choose the right one for your vehicle. So, let’s dive in and discover which coolant is cool for your engine!
Step 1: Prep Your Car
Filling your car with coolant is an essential part of regular vehicle maintenance. So, how do you go about it? Well, step one is to prep your car. Before you can begin adding coolant, you need to make sure your car is in a safe and secure position.
Park your car on a level surface and turn off the engine. Open the hood and locate the coolant reservoir, which is usually a translucent, plastic tank. You may need to refer to your car’s manual to find its exact location.
Once you’ve located the reservoir, check the coolant level. If it’s low, you’ll need to add more coolant. But before you do that, it’s important to let your car cool down completely.
This is because the engine and coolant can be extremely hot, which can cause burns. So, make sure to let your car sit for at least a few hours to cool down. Once your car is cooled down and you’ve taken the necessary safety precautions, you’re ready to move on to the next step in filling your car with coolant.
Park Your Car on a Flat Surface
parking on a flat surface
Let the Engine Cool Down
Let the Engine Cool Down Before you start working on your car’s engine, it’s important to let it cool down. When your engine is running, it generates a lot of heat, so it’s best to give it some time to cool off before you get started. This will not only help protect you from burns, but it will also make it easier to work on your car without any complications.
Think of it like baking a cake – you wouldn’t want to take it out of the oven while it’s still piping hot, right? The same goes for your car’s engine. So, give it some time to cool down, go grab a cup of coffee, and then you’ll be ready to dive into the world of car maintenance and repairs.
Step 2: Locate the Coolant Reservoir
So you’ve realized that your car is running low on coolant and it’s time to top it up? Great! The next step is to locate the coolant reservoir. This is usually a translucent plastic tank that is connected to the radiator. It can be found under the hood of your car, and its location can vary depending on the make and model of your vehicle.
Typically, it is located near the front of the engine compartment. You may need to refer to your car’s owner manual or do a quick search online to find the exact location for your specific car. Once you’ve located the coolant reservoir, you can move on to the next step of filling it up.
Open the Hood
Step 2: Locate the Coolant Reservoir Now that we have popped the hood, it’s time to dive into the next step of checking your car’s coolant levels – locating the coolant reservoir. This important component can usually be found towards the front of the engine bay and is typically made of translucent plastic, allowing you to see the coolant inside. Keep in mind that different car models may have slightly different locations for the coolant reservoir, but it should generally be easy to spot.
To locate the coolant reservoir, start by scanning the engine bay for a container that resembles a small plastic tank with a cap on top. It may be labeled with the word “coolant” or have a symbol indicating its function. If you can’t locate it right away, refer to your car’s owner manual for specific instructions.
The coolant reservoir is an essential part of your car’s cooling system, as it stores and releases coolant as needed to keep the engine temperature regulated. Once you’ve located the coolant reservoir, take a moment to visually inspect it. Make sure the coolant level is within the “full” or “max” mark indicated on the side of the reservoir.
If the level is below the recommended mark, it’s time to add more coolant. However, it’s important to note that you should never attempt to remove the cap from the coolant reservoir while the engine is hot, as it can release scalding steam and cause serious burns. Wait until the engine has cooled down before proceeding to the next step.
Checking your car’s coolant levels is an important maintenance task that shouldn’t be overlooked. Without proper coolant levels, your engine can overheat and potentially cause severe damage. By locating the coolant reservoir and ensuring the coolant level is adequate, you’re taking a proactive step in preserving your car’s health.
So take a moment to open that hood, find the coolant reservoir, and keep on top of your car’s cooling system maintenance. Your engine will thank you!
Identify the Coolant Reservoir
coolant reservoir Step 2: Locate the Coolant Reservoir Now that you understand the importance of the coolant reservoir and why it’s essential to check it regularly, let’s move on to the next step – actually finding it in your vehicle. The coolant reservoir is typically made of translucent plastic and is usually located near the front of the engine compartment. You might need to pop the hood of your car and look for a container with a cap that says “coolant” or “engine coolant.
” Keep in mind that the exact location of the coolant reservoir can vary depending on the make and model of your vehicle, so refer to your owner’s manual for the specific details. Once you’ve located the reservoir, take a moment to familiarize yourself with it. You’ll likely notice that it has a minimum and maximum fill line – make sure the coolant level is between these lines to ensure proper functioning of your engine.
Remember, it’s crucial not to open the coolant reservoir cap when the engine is hot, as the pressure could cause hot coolant to spray out and potentially burn you. Safety first, always wait for the engine to cool down before opening the cap.
Step 3: Mix the Coolant
Alright, now comes the fun part – mixing the coolant! Once you have determined the correct type of coolant for your car, it’s time to get mixing. Start by grabbing a clean container that is large enough to hold the amount of coolant your car requires. Ideally, it should have markings on the side to help you measure the right amount.
Next, carefully pour the coolant concentrate into your container. Refer to your car’s owner manual or the coolant bottle instructions for the correct ratio of coolant to water. Generally, the ratio is 50% coolant to 50% distilled water.
This ensures that the coolant is properly diluted and will protect your engine from freezing or overheating. Now, it’s time to add the distilled water. Slowly pour it into the container, making sure to fill it up to the appropriate level as indicated by the markings.
Be cautious not to overfill, as this may cause the mixture to overflow when you pour it into your car’s coolant reservoir. Once you have mixed the coolant and water together, give it a gentle stir with a clean stir stick or a non-metal tool to ensure it is thoroughly combined. This will help ensure that the coolant and water mixture will be evenly distributed throughout your car’s cooling system.
And that’s it! You have successfully mixed the coolant for your car. Now it’s time to move on to the final step – filling your car with the coolant mixture.
Read the Coolant Labels
coolant labels, mix the coolant, engine coolant, antifreeze, automotive coolant, coolant mixture, cooling system, temperature control, proper coolant mixture, car maintenance
Mix the Coolant with Distilled Water
mix coolant with distilled water When it comes to keeping your engine cool and running smoothly, one important step is to mix the coolant with distilled water. Coolant, also known as antifreeze, is a fluid that helps regulate the temperature of your engine and prevent it from overheating. But using pure coolant alone can actually be detrimental to your engine’s performance.
That’s why it’s important to dilute it with distilled water. Distilled water is free from impurities and minerals that can clog up your engine’s cooling system, ensuring that the coolant can do its job effectively. To mix the coolant with distilled water, you’ll need to determine the correct ratio.
This ratio is usually specified by the manufacturer and can vary depending on the type of coolant you’re using and the climate you live in. Once you’ve determined the ratio, you can start mixing the two fluids together. A common ratio is a 50/50 mix of coolant and distilled water, but it’s always best to check your vehicle’s manual or consult a professional for the exact ratio that’s recommended for your specific make and model.
Mixing the coolant with distilled water is a simple process that can be done at home. Start by filling a clean container with the recommended amount of coolant. Then, add an equal amount of distilled water to the container.
Use a funnel to avoid any spills or mess. Once both fluids are in the container, secure the lid tightly and shake the container gently to ensure that they’re thoroughly mixed. Now that the coolant and distilled water are combined, you can pour the mixture into your engine’s cooling system.
Be sure to refer to your vehicle’s manual for the location of the coolant reservoir or radiator. Slowly pour the mixture into the appropriate opening until it reaches the desired level. Avoid overfilling, as this can cause the fluid to expand and potentially lead to leaks or other issues.
Step 4: Add Coolant
So you’ve checked the coolant level in your car and realized it’s running low. Don’t worry, adding coolant is a simple task that you can do yourself. First, make sure your engine is completely cooled down before you begin.
Then, locate the coolant reservoir, which is usually a translucent plastic container with a cap that is labeled “coolant” or “antifreeze.” Open the cap and check the coolant level. If it’s below the minimum mark, it’s time to add more coolant.
Before adding coolant, it’s important to use the right type and mixture. Refer to your car’s owner manual or consult a professional to determine the correct coolant for your vehicle. Coolant usually comes in a 50/50 mixture of coolant and distilled water.
If you’re using concentrated coolant, you’ll need to mix it with water according to the manufacturer’s instructions. Once you have the correct coolant mixture, carefully pour it into the reservoir until it reaches the recommended level. Be sure not to overfill the reservoir, as this can cause damage to your engine.
After adding the coolant, securely close the reservoir cap. After adding coolant, start your car and let the engine run for a few minutes. This allows the coolant to circulate through the system and helps to remove any air bubbles.
Then, check the coolant level again and add more if necessary. Remember to always dispose of any leftover coolant properly, as it is toxic to humans and animals. By following these steps, you can easily fill your car with coolant and ensure that your engine stays cool and running smoothly.
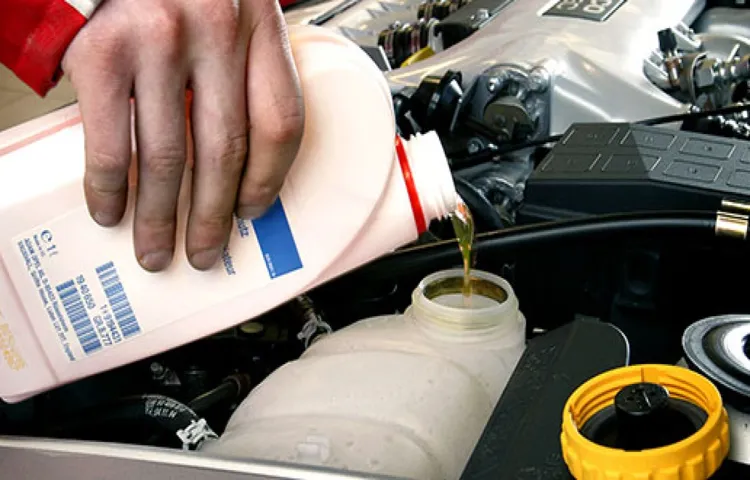
Remove the Coolant Reservoir Cap
In order to add coolant to your vehicle, you will first need to remove the coolant reservoir cap. This cap is usually located on top of the coolant reservoir, which is a plastic container near the radiator. It’s important to note that before removing the cap, you should allow your engine to cool down completely.
Hot coolant can be extremely dangerous and can cause burns. Once the engine has cooled down, you can carefully remove the cap by twisting it counterclockwise. Be cautious when removing the cap, as there may still be pressure built up inside the system.
Slowly loosen the cap until you hear a hissing sound, indicating that the pressure is being released. Once the pressure has been released, you can fully remove the cap.
Slowly Pour the Coolant into the Reservoir
coolant, reservoir, pour slowly
Check the Reservoir Level
In order to keep your car running smoothly, it’s important to regularly check the reservoir level and add coolant if needed. This is a simple yet crucial step in car maintenance that can help prevent overheating and costly repairs. To begin, locate the coolant reservoir in your car’s engine bay.
It’s usually a translucent plastic container with markings indicating the minimum and maximum levels. Next, check the level of coolant in the reservoir. If it’s below the minimum mark, it’s time to add coolant.
Coolant, also known as antifreeze, is a special fluid that helps regulate the temperature of your engine. It prevents it from getting too hot in the summer and too cold in the winter. Adding coolant is easy – just unscrew the cap on the reservoir and pour the coolant in until it reaches the recommended level.
Be sure to use the correct type of coolant for your car, as different vehicles require different formulations.
Step 5: Check for Leaks
After filling your car with coolant, it’s important to check for any leaks. Leaks can reduce the effectiveness of your coolant and can potentially cause your engine to overheat. To check for leaks, start by inspecting the engine bay for any visible signs of coolant leakage, such as puddles or stains.
Next, use a flashlight to carefully check all the hoses, connections, and fittings for any signs of leakage. Look for dripping or wet spots around these areas. You should also check the radiator, water pump, and thermostat housing for any signs of leakage.
If you notice any leaks, it’s important to address them immediately to prevent any further damage. Tightening loose connections or replacing damaged hoses may be necessary. By regularly checking for leaks, you can ensure that your car’s cooling system is functioning optimally and avoid any potential issues.
Inspect the Reservoir and Hoses
leaks, inspect, reservoir, hoses, check, burst, high pressure, fluid, car, engine, maintenance. The next step in our car maintenance routine is to inspect the reservoir and hoses for any leaks. Leaks can be a common problem when it comes to the car’s fluid system, and it’s important to catch them early before they become a big issue.
To start, locate the reservoir under the hood of your car. It’s usually a small plastic container that holds the fluid for your car’s brakes or power steering. Next, check the hoses connected to the reservoir.
Look for any signs of wear and tear, such as cracks or bulges. These can indicate that the hose is weakening and may burst under high pressure. Checking for leaks is important because if there are any, it can lead to a loss of fluid, which can in turn affect the performance of your car’s engine.
So take the time to inspect the reservoir and hoses regularly to ensure that everything is in good working order. It’s a simple step that can save you a lot of trouble down the road.
Look for Any Drips or Puddles
look for leaks, check for leaks, drips, puddles One important step in maintaining the health and efficiency of your vehicle is regularly checking for leaks. Leaks can indicate a problem with your car’s fluid systems, such as the engine oil, coolant, brake fluid, or transmission fluid. So, it’s crucial to identify and fix any leaks as soon as possible to prevent further damage and costly repairs.
To check for leaks, start by inspecting the ground underneath your car for any drips or puddles. If you notice any wet spots or fluids, it’s a clear sign that there might be a leak. Take note of the color and consistency of the liquid, as different colors can indicate different types of leaks.
For example, engine oil is usually dark brown or black, coolant is usually green or pink, and transmission fluid is typically red. Additionally, check the engine compartment for any visible signs of leaks, such as wet spots or oil stains. If you do find a leak, it’s essential to address it promptly by visiting a qualified mechanic who can diagnose the issue and make the necessary repairs.
Remember, a small leak today can become a big problem tomorrow, so always be vigilant and proactive when it comes to checking for leaks in your vehicle.
Conclusion
In conclusion, filling your car with coolant is like giving it a refreshing spa treatment. Just like we humans need hydration to keep going, our car engines also need a coolant refill to quench their thirst and stay cool under pressure. So, the next time your car starts feeling a bit overheated, remember to show it some love and fill it up with that liquid coolness.
After all, a cool car is a happy car, and a happy car means a happy driver! Keep your engine chill and your driving thrill!”
Regularly Check and Maintain Coolant Levels
coolant levels, maintenance, leaks
Summarize the Steps to Fill Car with Coolant
coolant, fill car, check for leaks
FAQs
What is coolant and why is it important for a car?
Coolant is a liquid that helps regulate the temperature of a car’s engine. It is important because it prevents the engine from overheating and helps maintain optimal performance.
How do I know when my car needs coolant?
You can check the level of coolant in your car’s reservoir tank. If it is below the minimum level or if the coolant appears dirty or rusty, it is time to add more coolant.
Can I use water instead of coolant in my car?
While water can temporarily be used as a coolant substitute in case of emergency, it is not recommended for regular use. Coolant contains additives that provide additional protection against rust, corrosion, and freezing.
How often should I refill my car’s coolant?
The frequency of coolant refills depends on various factors such as the type of coolant used, driving conditions, and maintenance schedule. It is generally recommended to check the coolant level every few months and top it up as needed.
How do I properly fill my car with coolant?
To fill your car with coolant, first make sure the engine is cool. Locate the coolant reservoir, usually marked with a “Coolant” or “Engine Coolant” label. Remove the cap and slowly pour the coolant into the reservoir until it reaches the recommended level. Recap the reservoir tightly.
Is it necessary to bleed the cooling system after adding coolant?
Bleeding the cooling system is not always necessary after adding coolant. However, if you notice air bubbles or hear gurgling sounds after filling the coolant, it may be necessary to bleed the system to expel trapped air.
Can I mix different types of coolant together?
It is generally not recommended to mix different types of coolant together as they may have different chemical compositions. If you need to add coolant, it is best to use the same type that is already in your car’s cooling system.