
If you’re an avid electric scooter rider, you know the importance of having a well-maintained scooter. However, even with proper maintenance, accidents happen. One of the most common issues faced by electric scooter riders is a flat tire.
Although it may seem daunting at first, fixing a flat tire on an electric scooter can be a surprisingly straightforward process. In this blog post, we’ll take you through the steps of fixing a flat tire on an electric scooter and ensure you are prepared for the unexpected. So, sit tight, put on your learning hat, and let’s dive in!
Table of Contents
Identify the Problem
If you own an electric scooter, you understand how exhilarating it can be to ride it around town. However, like any other type of vehicle, electric scooters are prone to certain mechanical issues and one common problem is a flat tire. When this happens, don’t panic! Fixing a flat tire on an electric scooter is easier than you might think.
First, identify the problem by checking the tire for any visible damage, such as punctures or tears. Next, assess the air pressure by using a tire pressure gauge or simply pressing on the tire with your finger. If the tire is underinflated, use an air pump to fill it up to the recommended pressure level.
However, if the tire is punctured, it may require a patch or replacement. With a little know-how, you can easily fix a flat tire on your electric scooter and continue riding in no time!
Inspect the tire for punctures or leaks
When inspecting your tires, one of the most common issues to look for is punctures or leaks. These can be caused by a variety of factors, such as driving over sharp objects or wear and tear over time. To identify the problem, start by visually examining the tire for any visible signs of damage, such as cuts or gouges.
Then, check the air pressure to see if the tire is losing pressure faster than usual, which could indicate a leak. If you’re still unsure, try spraying a soapy water solution around the tire while it’s inflated to see if bubbles form, indicating a leak. It’s important to address any punctures or leaks promptly, as they can lead to decreased tire performance, reduced fuel efficiency, and even blowouts on the road.
So, keep an eye out for these common tire issues to ensure your safety and the longevity of your tires.

Check the air pressure
When it comes to maintaining your tire’s health, checking the air pressure is a crucial step. Low air pressure can lead to poor gas mileage, uneven wear, and even a blowout on the road. The first step to addressing this issue is identifying the problem.
Start by inspecting each tire to see if there’s any visible damage, such as bulges or punctures. Next, check the owner’s manual or tire placard for the recommended tire pressure for your vehicle. Then, use a tire gauge to check the air pressure in each tire.
If any tire is low, add air until it reaches the appropriate level. By taking the time to check your tire’s air pressure regularly, you can prevent potential safety hazards on the road and extend the life of your tires.
Gather the Necessary Tools
If you’re an electric scooter rider, it’s essential to know how to fix a flat tire. The first step is to gather the necessary tools. You’ll need a tire lever, a patch kit or spare inner tube, and a pump.
Many electric scooter owners prefer to use a hand pump, which is small and portable, but you could also use an electric pump if available. It’s important to check the manufacturer’s instructions before attempting to fix the tire as different scooters may require specific tools or approaches. Remember to always wear gloves to protect your hands from any sharp objects or debris in the tire.
Once you have all the necessary tools, you’re ready to move on to the next step in getting your electric scooter back on the road.
Spare tire tube or patch kit
When it comes to tire maintenance, it’s essential to have the necessary tools at hand in case of a flat. One of the most critical decisions you’ll need to make beforehand is whether to carry a spare tire tube or a patch kit. A spare tire tube is a sealed tube that you can use to replace your tire when it gets punctured.
On the other hand, a patch kit helps patch up small holes in your tire, so you don’t have to replace it altogether. Both options have their advantages and disadvantages, so choosing the right one depends on your specific needs and preferences. Whichever one you choose, make sure to keep it in good condition and easily accessible in case of an emergency.
Using the right tool in the right situation can mean the difference between getting back on the road quickly or getting stuck on the side of it. So, plan ahead, and make sure you have the right tools to tackle any flat tire situation that comes your way.
Tire levers
Before you dive into the process of changing a tire, make sure you have all the proper tools on hand. The first and perhaps most important tool is a tire lever. This handy tool will help you remove the tire from the rim without damaging either one.
Without tire levers, you’ll quickly find yourself struggling to get the tire off, to the point where you may even damage it or the rim. Along with tire levers, you’ll also need a jack, lug wrench, and a spare tire to complete the job. Once you’ve gathered these tools, you’re ready to safely and efficiently change your tire in case of an emergency on the road.
Remember, safety should always come first when changing a tire on your vehicle.
Air pump or CO2 cartridges
If you’re an avid cyclist, you know the importance of keeping your tire pressure at the right level. One of the essential tools you need for this is an air pump or CO2 cartridges. While both options are effective, they each have their pros and cons.
An air pump is a more traditional option that you can use repeatedly without having to worry about running out of air. It’s also a more eco-friendly option since it doesn’t produce waste. On the other hand, CO2 cartridges are a more lightweight and compact option that you can easily take with you on a ride.
They’re also the faster option since they inflate your tire in just seconds. Before choosing which option to go with, consider what type of cycling you’ll be doing, how much space you have to carry your tools, and your environmental impact. Ultimately, having a reliable method of inflating your tires is crucial for a safe and enjoyable ride.
Remove the Wheel
Fixing a flat tire on an electric scooter may seem daunting, but it can be done with a few simple steps. First, remove the wheel where the flat tire is located by loosening the bolts with a wrench. Once the wheel is off, use a tire lever to pry off the tire from the rim.
Next, locate the puncture or hole in the tire and mark it with a pen. Patch the hole with a tire patch kit and then reposition the tire back onto the rim. Make sure the tire is properly aligned with the rim before inflating it to the correct pressure.
Finally, carefully place the wheel back onto the scooter, tightening the bolts with a wrench. With this easy process, you can have your electric scooter back up and running in no time!
Unscrew the nuts or bolts
Unscrewing the nuts or bolts is the first step in removing a wheel from your vehicle. This might seem like a straightforward process, but it can be slightly time-consuming depending on the level of rust or corrosion present. You can utilize a socket wrench or lug wrench designed to fit the nuts or bolts.
Be sure to grip the wrench securely so you can exert enough force to unscrew each nut or bolt. Once you have unscrewed them, don’t remove them just yet. First, you need to use a jack to lift the vehicle, enabling you to remove the tire easily.
If you’re using a hydraulic jack, make sure it’s on a solid, flat surface, and the lever is locked in place before pumping the hydraulic fluid. Then, in a counterclockwise motion, you can remove each nut or bolt from the wheel, before finally pulling the wheel off the vehicle hub. Remember, safety always comes first when working on your vehicle, so exercise caution and take your time.
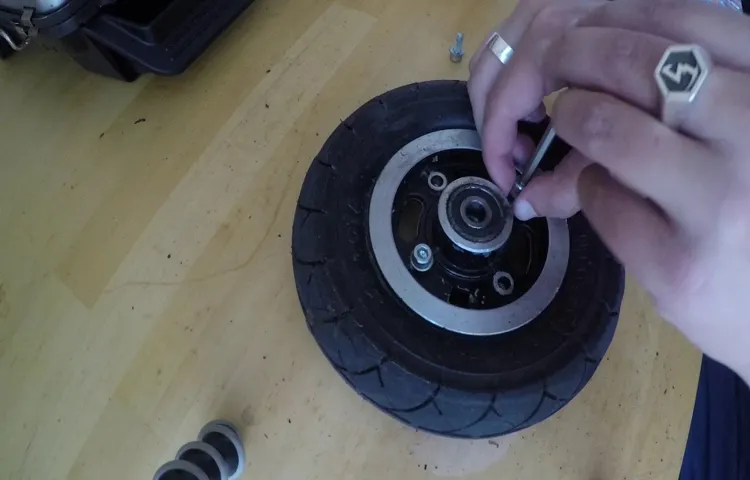
Remove the wheel from the scooter frame
Removing the wheel from a scooter frame can be a bit intimidating, especially if you’re not mechanically inclined. But don’t worry, I’m here to walk you through each step! Start by locating the axle bolt, which holds the wheel in place. It may be covered by a plastic cap or disc.
Once you find it, use a wrench to loosen and remove the bolt. Next, gently tug the wheel away from the frame. If it doesn’t come off easily, you may need to wiggle it back and forth a bit or tap it with a rubber mallet until it loosens.
Carefully lift the wheel away from the frame and set it aside. Be sure to keep all of the parts together so you can easily reassemble the scooter. With just a few minutes of your time, you can successfully remove the wheel from your scooter frame and continue on with your day.
Repair or Replace the Tire
Electric scooter flat tires can be a nuisance, but fixing them is often a simple task. First, determine if the tire needs to be repaired or replaced altogether. If there is a small puncture, such as from a nail or screw, a tire repair kit with a plug can be used to fix the hole.
However, if the damage is more significant, such as a tear or large puncture, the tire should be replaced entirely. To replace the tire, remove the wheel from the scooter and remove the old tire from the rim. Install the new tire onto the rim and remount the wheel onto the scooter.
It’s essential to ensure the tire is mounted correctly and inflated to the recommended pressure to prevent future flats. Overall, repairing or replacing a flat tire on an electric scooter is a straightforward process that can be done quickly and easily with the right tools and knowledge.
Patch the puncture or replace the tube
When it comes to tire repairs, the big debate often centers around whether to replace the entire tire or patch up the puncture. As a car owner, it’s important to understand your options in order to make an informed decision. In most cases, if the damage is minor and limited to the tread area, a patch or plug can be a safe and cost-effective solution.
However, if the tire has sustained sidewall damage or a blowout, replacing the entire tire is usually the only option. It’s worth noting that while a patch can effectively seal a puncture, it does not restore the tire’s original strength and integrity. For this reason, it’s always wise to keep an eye on any patched tires and replace them if they begin to show signs of wear and tear.
Ultimately, whether you choose to repair or replace your tire will depend on the extent of the damage, as well as your budget and personal preferences. So, the bottom line is to consult a professional and make the best decision that suits both your safety and your wallet.
Align the tire on the rim
When it comes to tire maintenance, there are two main options to consider: repair or replace. In some cases, a simple patch or plug can fix a puncture, but if the damage is too severe or the tire is too worn, replacement may be the better choice. However, one thing that should always be checked before making any decisions is if the tire is properly aligned on the rim.
Misalignment can cause uneven wear and decrease the tire’s lifespan, so it’s essential to make sure everything is in place before repairing or replacing. Ensuring proper alignment can also lead to a smoother ride and improved handling. To align the tire on the rim, a technician will use specialized equipment to check and adjust the tire’s position and balance.
By doing so, they can ensure that the tire wears evenly and remains in good condition for as long as possible. So, if you’re ever in doubt about what your tire needs, be sure to have a professional check the alignment before taking any further steps.
Reinstall the Wheel
If you’ve ever experienced a flat tire on your electric scooter, don’t worry, it’s a common problem that can be easily fixed. The first step is to locate the puncture and remove the damaged inner tube. Once you’ve done that, you’ll need to get a replacement tube that fits your scooter’s tire size.
It’s also a good time to check the condition of your tire, making sure there isn’t any other damage or wear. After inserting the new inner tube, it’s time to reinstall the tire onto the wheel. This isn’t a difficult process, but it can be a bit tricky if you don’t have experience with it.
Make sure to press the tire onto the rim evenly to avoid any kinks or bumps. Inflate the tire slowly, checking the pressure level with a gauge, and you’re good to go! Remember to check your tires periodically to avoid future flats and prolong the lifespan of your scooter.
Attach the wheel to the scooter frame with nuts or bolts
When it comes to repairing or adjusting your scooter, one of the most crucial steps is reinstalling the wheel. This is where you need to attach the wheel to the scooter frame using nuts or bolts. The process may seem simple, but there are a few things that you need to keep in mind to ensure that the wheel is properly aligned and securely attached.
Start by lining up the axle with the slot or hole on the frame, then slide the wheel into place. Use a torque wrench or socket to tighten the nuts or bolts, making sure that they are tightened to the recommended torque. And don’t forget to check the alignment and tightness of the wheel after a few rides, as vibrations and movement can sometimes cause it to loosen over time.
By properly reinstalling the wheel, you can ensure a safer and smoother ride every time you hit the road.
Pump up the tire to the recommended air pressure
If you’ve successfully removed your bike tire, it’s now time to put it back on. Before you do, make sure to pump up the tire to the recommended air pressure level. You can usually find this level written on the tire itself.
Inflating your bike tire to the correct PSI (pounds per square inch) will improve your ride quality and prevent premature wear of your tire. Once you’ve inflated your tire properly, you can now reinstall the wheel. Align the axle with the dropouts and put the wheel in place.
Tighten the quick-release lever to secure it in place. Check the wheel alignment and make sure it spins freely without any rubbing. If you encounter any issues or your wheel wobbles, remove and reinstall it again until you achieve proper alignment.
Remember, proper wheel installation is crucial for your safety and the longevity of your bike. By following these steps, you’ll be back on the road in no time, enjoying a smooth and safe ride.
Final Tips
Fixing a flat tire on an electric scooter can be frustrating, but with a few simple steps, it can be done quickly and easily. Firstly, identify the location of the puncture by inspecting the tire closely. Once you have located the puncture, release any remaining air in the tire using a screwdriver or a tire lever.
Next, remove the wheel from the scooter and take the tire off the rim. Apply a patch on the inside of the tire at the site of the puncture, using a repair kit. After finishing the repair, reinstall the tire on the rim, inflate the tire to the proper pressure level, and then put the wheel back on the scooter.
Finally, test the scooter to ensure it is running properly. Remember to always carry a repair kit with you when riding your electric scooter to prevent being stranded with a flat tire. By following these simple steps, you can fix a flat tire on an electric scooter and get back to cruising the streets in no time!
Inspect the tire regularly to prevent future issues
As we near the end of this guide, it’s important to emphasize the importance of regularly inspecting your tires to prevent future issues. By taking a few minutes every so often to visually inspect your tires for things like cuts, punctures, or uneven wear, you can save yourself a lot of headaches down the road. Not only does this help you avoid unexpected blowouts or flats, but it also ensures that your tires are wearing evenly and will last as long as possible.
So, next time you’re filling up with gas, take a quick walk around your vehicle and check your tires for any signs of wear and tear. Trust us, your wallet (and your safety) will thank you!
Consider carrying a spare tire tube or patch kit with you while riding
If you’ve ever been caught with a flat tire while cycling, you know how frustrating it can be. That’s why it’s always a good idea to carry a spare tire tube or patch kit with you on your rides. This can save you from having to walk your bike back home or wait for a ride.
A spare tube or patch kit is easy to carry and can quickly fix a puncture or tear in your tire. Plus, it’s always better to be safe than sorry. So, before heading out on your next cycling adventure, make sure you pack a spare tire tube or patch kit in your bike bag.
It could be the difference between an enjoyable ride and a frustrating one.
Conclusion
In conclusion, fixing a flat tire on an electric scooter is pretty straightforward as long as you have the right tools, skills, and mindset. It may seem like a daunting task at first, especially if you’re not mechanically inclined, but with a bit of patience and determination, you can get it done in no time. And who knows, maybe you’ll even discover a hidden talent for DIY repair.
So next time you find yourself stranded with a deflated tire, don’t panic – just remember these steps, and soon enough, you’ll be back on the road, cruising with ease and confidence like a pro!”
FAQs
What tools do I need to fix a flat tire on an electric scooter?
You will need tire levers, a wrench, a new inner tube, and a pump.
Can I patch a hole in my electric scooter tire instead of replacing the entire inner tube?
Yes, you can patch small holes with a tire patch kit, but larger holes or tears will require replacing the inner tube.
How do I remove the wheel from my electric scooter to fix a flat tire?
First, disconnect the battery and turn the scooter upside down. Then, use a wrench to loosen the bolts on the wheel axle and slide the wheel off.
How do I determine which size inner tube to purchase for my electric scooter?
Check the sidewall of your tire for the size information, or refer to your scooter’s owner manual for guidance.
Can I prevent future flat tires on my electric scooter?
Yes, by regularly inspecting your tires for wear and foreign objects, maintaining proper tire pressure, and avoiding rough roads and obstacles.
How long does it take to fix a flat tire on an electric scooter?
Depending on your experience and the severity of the flat tire, it may take anywhere from 20 minutes to an hour.
Should I attempt to fix a flat tire on my electric scooter myself or take it to a professional?
If you feel comfortable and have the necessary tools and knowledge, fixing a flat tire on your electric scooter yourself can save time and money. However, if you are unsure, it may be best to take it to a professional for safe repair.