
RV awnings are an essential feature for anyone who enjoys camping and traveling in their recreational vehicle. These versatile accessories provide shade and protection from the elements, allowing you to enjoy the outdoors in comfort. But what exactly are RV awnings, and how do they work? In this blog post, we’ll explore the ins and outs of RV awnings, from their purpose to their installation process.
Whether you’re a seasoned RV enthusiast or new to the world of RVing, understanding these awnings can enhance your camping experience and make your time on the road more enjoyable. So let’s dive in and unravel the mystery of RV awnings together!
Table of Contents
Section 1: Assessing the Damage
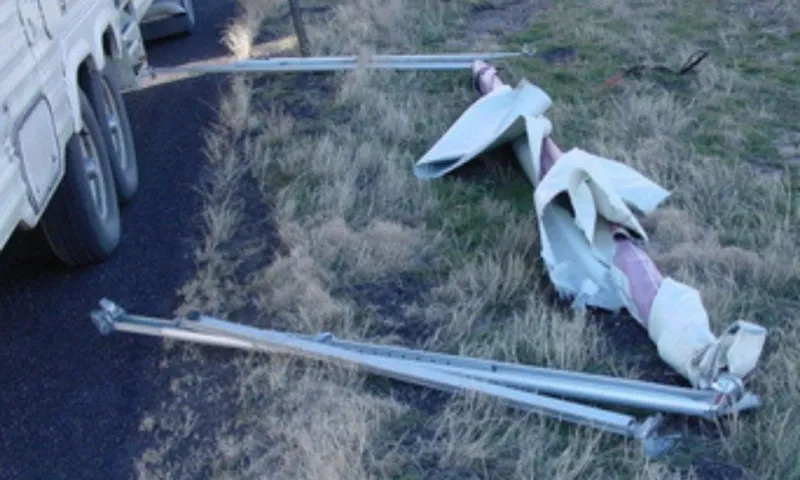
If you’re faced with the unfortunate task of fixing your RV awning, don’t fret! It may seem like a daunting task, but with a few simple steps, you can have your awning looking good as new. The first thing you’ll want to do is assess the damage. Is it a small tear, a broken arm, or something else entirely? Once you’ve determined the extent of the damage, you can then move on to finding the appropriate solution.
Whether it’s patching up a tear with some awning repair tape or replacing a broken arm, there are plenty of options available to get your RV awning back in working order. Remember, repairing an RV awning is a doable task, and with a little bit of effort, you’ll be enjoying the shade and comfort it provides once again. So don’t let a damaged awning ruin your trip – take the necessary steps to fix it and get back to enjoying the great outdoors.
Subsection 1.1: Visual Inspection
Visual Inspection, damage assessment, Burst Pipes, Burst Water Pipe, Burst Sewer Pipe, Understanding Burst Pipes
Subsection 1.2: Testing the Operation of the Awning
After assessing the extent of the damage to your awning, it’s important to test its operation to determine if any functional components were affected. To do this, start by extending and retracting the awning using the controls or manual crank. Pay close attention to any unusual noises or jerky movements that may indicate mechanical issues.
Additionally, check the alignment of the awning as it extends and retracts to ensure it is moving smoothly and evenly. It’s also a good idea to inspect the fabric for any tears or signs of wear that may have been caused by the damage. By testing the operation of the awning, you can identify any potential problems and take the necessary steps to repair or replace damaged components.
Section 2: Gathering the Necessary Tools and Materials
If your RV awning is in need of repair, don’t worry! With the right tools and materials, you can easily fix it yourself. The first step is to gather all the necessary supplies. You’ll need a ladder, a tape measure, a screwdriver, a replacement fabric, and an awning repair kit.
Make sure to measure your awning to determine the correct size for the replacement fabric. Once you have everything you need, you’re ready to start tackling the repair.
Subsection 2.1: Tools Needed
In order to successfully complete any project, it is important to gather all the necessary tools and materials. This is especially true when it comes to more complex tasks like DIY home improvements or crafting projects. So, what tools do you need to have on hand? Well, it really depends on the specific project you are working on.
However, there are a few basic tools that are essential for almost any project. These include items like a hammer, screwdriver set, pliers, tape measure, and a utility knife. These tools will be invaluable in helping you complete tasks like measuring, cutting, and fastening materials.
Additionally, it is a good idea to invest in some safety equipment, such as goggles and gloves, to protect yourself while working. By having the right tools at your disposal, you can ensure that your project goes smoothly and that you have everything you need to get the job done right.
Subsection 2.2: Materials Needed
materials needed for gathering tools and materials for a project In order to successfully complete a project, it is important to gather all the necessary tools and materials beforehand. This not only ensures that you have everything you need to get started, but it also helps to streamline the process and prevent any unnecessary delays or frustrations. The specific tools and materials you will need will depend on the nature of your project, but there are a few general items that are commonly needed across a range of projects.
For example, you may need basic tools such as a hammer, screwdrivers, and a tape measure. Additionally, you may also need specific materials such as nails, screws, and various types of adhesives. It is always a good idea to make a list of all the tools and materials you will need before you begin, so that you can ensure you have everything on hand and ready to go.
This will help to save time and avoid any last minute trips to the store. So, take the time to gather all the necessary tools and materials before you start your project, and you’ll be well prepared to tackle any task that comes your way.
Section 3: Repairing the Awning
If you’re an avid RV traveler, having a functional awning is essential to enjoying the outdoors while protecting yourself from the sun and rain. However, awnings can sometimes become damaged due to wear and tear or unforeseen accidents. So, how do you fix a RV awning? The first step in repairing a RV awning is to assess the damage.
Look for any tears, holes, or bent parts that may need fixing. If you’re dealing with a tear or hole, you can use an awning repair tape or patch kit to seal it up. Simply clean the area with rubbing alcohol, cut a piece of the tape to size, and press it firmly onto the damaged area.
This will create a waterproof seal and prevent further damage. If the awning components are bent or misaligned, you may need to disassemble and realign them. Start by removing the awning fabric from the roller tube and then remove the hardware that holds the awning arms in place.
Once the arms are detached, use a mallet or rubber mallet to gently straighten any bent parts. If any components are broken, you may need to replace them with new ones. When reinstalling the awning, make sure the fabric is properly aligned on the roller tube and the arms are securely attached.
Test the awning by extending and retracting it a few times to ensure it operates smoothly. If everything looks good, you’re ready to enjoy your repaired RV awning once again! Remember, if you’re unsure or uncomfortable with repairing the awning yourself, it’s always best to consult a professional. They will have the necessary experience and tools to correctly fix any damage and ensure your awning is in top-notch condition for your next adventure.
Subsection 3.1: Repairing Tears or Holes
awning repair, repairing tears or holes in awnings
Subsection 3.2: Replacing Broken or Bent Components
One of the most common issues that can arise with an awning is broken or bent components. Whether it’s due to wear and tear over time or an accident, these issues can cause the awning to become less effective or even unusable. Fortunately, replacing these components is usually a relatively easy fix.
The first step is to identify which components are broken or bent. This may involve inspecting the awning and looking for any obvious signs of damage. Once the damaged components have been identified, it’s time to find replacements.
Many hardware stores or awning manufacturers will sell replacement parts for common awning components. It’s important to make sure that the replacements are the correct size and style for your specific awning. Once you have the replacement components, it’s simply a matter of uninstalling the damaged parts and installing the new ones.
This may require using basic tools such as a screwdriver or wrench. Overall, replacing broken or bent components is a straightforward process that can have your awning looking and functioning as good as new.
Subsection 3.3: Lubricating Moving Parts
In order to keep your awning working smoothly, it’s important to lubricate its moving parts regularly. Over time, the components of your awning can become stiff and can start to squeak or creak when you try to open or close it. To prevent this, you can apply a lubricating spray to the joints, hinges, and other moving parts.
This will help to reduce friction and keep everything working as it should. When choosing a lubricant, be sure to select one that is specifically designed for outdoor use and is safe for the materials used in your awning. Applying the lubricant is easy – simply spray it directly onto the moving parts and use a cloth to wipe away any excess.
By keeping your awning well-lubricated, you can extend its lifespan and ensure that it continues to provide you with shade and protection for years to come.
Section 4: Maintaining the Awning for Longevity
If you own an RV with an awning, it’s important to know how to fix it to ensure its longevity. One common issue you may encounter with your RV awning is tears or holes. These can happen due to strong winds, branches, or general wear and tear.
To fix a tear or hole in your awning, you can use a patch kit made specifically for awnings. Simply clean the area around the tear or hole, apply the patch according to the instructions, and press firmly to ensure it adheres properly. Another important aspect of maintaining your RV awning is to regularly clean it.
This will help remove any dirt, debris, or buildup that may cause damage over time. Use a mild detergent and a soft brush to gently scrub the awning, and hose it down afterwards to rinse off any residue. It’s also a good idea to inspect your awning for any loose or damaged parts.
Tighten any screws or bolts that may have come loose, and replace any damaged components as necessary. By taking these steps, you can ensure that your RV awning stays in great shape for years to come.
Subsection 4.1: Regular Cleaning
To maintain the longevity of your awning, regular cleaning is essential. Over time, dirt, dust, and pollutants can accumulate on the fabric, causing it to deteriorate and lose its aesthetic appeal. Cleaning your awning on a regular basis not only improves its appearance but also helps prevent mold and mildew from growing, which can lead to further damage.
Begin by removing any loose debris, such as leaves or branches, with a broom or a brush. Then, use a soft-bristle brush and a mild soap solution to scrub the fabric gently. Rinse off the soap with clean water and allow the awning to air dry completely.
Avoid using harsh chemicals or abrasive cleaners, as they can damage the fabric. By incorporating regular cleaning into your awning maintenance routine, you can keep it looking great and ensure its longevity.
Subsection 4.2: Proper Storage and Usage
If you want to keep your awning in top condition for as long as possible, proper storage and usage are essential. When it comes to storage, always make sure to clean your awning before putting it away. This will help prevent any dirt or debris from causing damage or staining the fabric.
Additionally, it’s important to store the awning in a dry and well-ventilated area to avoid any mold or mildew growth. If you have a retractable awning, be sure to fully retract it before storing to protect it from the elements. When it comes to usage, it’s important to follow the manufacturer’s instructions and guidelines.
Avoid putting excessive weight on the awning, as this can cause strain and damage. Additionally, be mindful of the weather conditions when using your awning. If it’s windy or stormy outside, it’s best to retract the awning to prevent it from getting damaged.
Taking these steps to properly store and use your awning will help ensure its longevity and keep it looking great for years to come.
Subsection 4.3: Lubrication and Inspection
Awning maintenance is an essential part of ensuring its longevity and functionality. One crucial aspect of maintaining your awning is lubrication and regular inspection. By lubricating the moving parts of the awning, such as the hinges and arms, you can prevent them from seizing up and causing unnecessary wear and tear.
It’s like giving your awning a soothing massage, ensuring that all the parts are working smoothly and efficiently. Regular inspection is also important to catch any signs of damage or wear early on. By checking for loose screws or bolts and making any necessary repairs, you can prevent minor issues from turning into major problems.
So, just like you would have a routine check-up with your doctor to catch any potential health issues, make sure to give your awning the attention it deserves to keep it in tip-top shape.
Section 5: Conclusion and Additional Tips
So next time your RV awning gets twisted, don’t panic. With a little patience and these simple steps, you’ll be back to enjoying the great outdoors in no time. Remember, fixing an awning is like solving a puzzle – it requires a sharp mind, a steady hand, and maybe a touch of magic.
And just like magic, once your awning is back in place, it’ll feel like it was never broken at all. So go forth, intrepid traveler, and conquer the awning woes that come your way. Happy RVing!”
FAQs
How do I fix a torn RV awning?
To fix a torn RV awning, you can use an RV awning repair tape or patch kit. Start by cleaning the area around the tear with soap and water, then apply the tape or patch over the tear. Press firmly to ensure it adheres properly.
What should I do if my RV awning won’t retract?
If your RV awning won’t retract, there are a few potential solutions. First, check if the awning is locked in place. If it is, unlock it and try retracting again. If that doesn’t work, check for any obstructions that may be preventing the awning from retracting fully. Lastly, make sure the awning motor or mechanism is working properly and not damaged.
How often should I clean my RV awning?
It is recommended to clean your RV awning at least twice a year or more frequently if needed. Regular cleaning helps prevent dirt, debris, and mold from building up on the awning fabric. Use a mild soap or specialized awning cleaner, a soft brush, and water to clean the awning. Rinse thoroughly and allow it to dry completely before retracting.
Can I repair a sagging RV awning?
Yes, you can repair a sagging RV awning. One possible solution is to adjust the tension on the awning arms or springs. You can do this by using the adjustable knobs or levers located on the awning assembly. Another option is to replace the awning fabric if it is worn or stretched out, as this can also contribute to sagging.
How do I protect my RV awning from sun damage?
To protect your RV awning from sun damage, you can use an awning cover or wrap it in a UV-resistant fabric. Avoid leaving the awning extended for long periods when not in use, as constant exposure to the sun can fade and weaken the fabric. Additionally, regular cleaning and maintenance can help prolong the lifespan of your RV awning.
Is it possible to replace just a section of my RV awning fabric?
Yes, it is possible to replace just a section of your RV awning fabric. Many awning manufacturers offer replacement fabric that can be customized to the specific dimensions of your awning. Make sure to measure the length and width accurately to ensure a proper fit. You may also need to remove the awning roller and slide in the new fabric section.
How can I prevent my RV awning from flapping in the wind?
There are a few ways to prevent your RV awning from flapping in the wind. First, make sure the awning is properly adjusted and tensioned. Some models have adjustable arms or springs that allow you to tighten or loosen the fabric. You can also use awning tie-downs or straps to secure the awning to the ground or nearby structures, reducing flapping and movement.