RV awnings provide a perfect location for shade when you are traveling or camping outdoors. It acts as an extension of your living space and can help protect you from the sun’s harmful rays. However, issues with RV awnings can occur, particularly a stretched awning.
More often than not, a stretched awning can hinder the fun and outdoor experience. The question on your mind is likely “How to fix a stretched RV awning?” Fortunately, fixing a stretched RV awning is simple, and you can do it yourself. In this article, we will guide you through the process of stretching your RV awning back to its original state.
So, let’s dive in and get started!
Table of Contents
Identify the Problem
If you’re an avid RV traveler, you may have experienced a common problem with your awning: it can become stretched out over time. This can make it difficult to properly retract or even cause it to flap in the wind. Luckily, fixing a stretched RV awning is not a difficult task.
First, identify the problem by inspecting the fabric for any tears or holes. Next, check the tension on the springs or tubing to ensure they are properly aligned and not causing the stretch. If the fabric is intact and the tension is correct, then you may need to replace the fabric entirely.
It’s important to address a stretched RV awning as soon as possible so it doesn’t cause further damage to the mechanism or the fabric. Don’t let this common problem put a damper on your RV adventures – with a little bit of maintenance and care, your awning can be back to its fully functional state in no time.
Check for Loose Hardware and Adjust Tension
When it comes to addressing problems with your doors or windows, one of the first things you should check for is loose hardware and tension issues. This includes checking the hinges, handles, locks, and other components to ensure that they’re secure and properly fastened. Loose hardware can be a major problem, causing doors and windows to rattle, squeak, or even fail to close properly.
You may also need to adjust the tension on your doors or windows to ensure that they’re operating smoothly and without unnecessary resistance. This can be done by tightening or loosening screws or adjusting the spring tension, depending on your specific situation. By identifying and correcting any loose hardware or tension issues, you can improve the performance and longevity of your doors and windows, ensuring that they remain secure and functional for years to come.
Measure the Awning Fabric and Replace if Necessary
When it comes to awning fabric, there are a few common problems that may occur over time. One of the most obvious issues is when the fabric becomes worn or damaged, which can happen due to a variety of reasons. If you notice that your awning fabric is torn or has holes in it, it’s important to measure the fabric to determine if it needs to be replaced.
This can involve taking precise measurements of the width and length of the fabric, as well as checking for any signs of wear or damage that could indicate the need for a replacement. Keep in mind that replacing the fabric may seem like a simple task, but it’s important to use high-quality materials and ensure that the fabric is properly installed to prevent any future issues. By taking the time to identify the problem and replace the fabric as necessary, you can keep your awning looking great and functioning properly for years to come.
Tools and Materials Needed
If you’re looking to fix an RV awning that’s stretched out, there are a few tools and materials you’ll need to get started. First, you’ll need a ladder to help you reach the awning. You’ll also need a tape measure to measure the length of the awning and determine how much it has stretched.
Once you have these tools on hand, you’ll need to purchase replacement fabric for the awning. Make sure to choose a fabric that is suitable for your RV and the weather conditions you’ll be facing. You’ll also need a set of awning rails to attach the fabric to the RV.
Once you have all these materials, you’ll be ready to fix your awning. It’s important to take your time during the installation process to ensure that the awning is properly attached and functioning as it should be. With a little bit of patience and effort, you’ll have your RV awning looking and functioning like new again in no time.
Cordless Drill and Socket Set
When it comes to doing any sort of DIY work, having the right tools is absolutely crucial. If you’re looking to tackle a project that involves both drilling and tightening bolts, then a cordless drill and socket set are must-haves. The cordless drill gives you the freedom to move around easily without worrying about cords, while the socket set provides you with all the different socket sizes you’ll need to tighten bolts of various sizes.
Other essential tools you should have on hand include a hammer, screwdrivers in various sizes, pliers, and a level. With the right tools at your disposal, you’ll be well-equipped to take on any job that comes your way. When it comes to selecting a cordless drill and socket set, it’s important to consider factors such as the types of projects you’ll be working on and the power of the drill.
Some drills are more powerful than others and may be better suited to heavy-duty work, while others may be better suited to lighter tasks. Additionally, some sockets are designed to be used with specific types of bolts, so it’s important to ensure that the sockets in your set are compatible with the bolts you’ll be working with. By taking the time to choose the right tools and materials for your project, you’ll be setting yourself up for success and ensuring that your project is completed efficiently and effectively.
Tape Measure and Marker
When it comes to measuring and marking materials for a project, having the right tools is essential. The two basic tools you will need are a tape measure and a marker. The tape measure allows you to accurately measure lengths and widths of materials, while the marker enables you to make precise marks for cutting or drilling.
A good quality tape measure should have clear and easy-to-read measurements, as well as a sturdy and durable casing. A marker with a fine point tip and permanent ink is ideal, as it will make precise marks that won’t smudge or smear. While it may seem simple, having these two tools on hand can make all the difference in the accuracy and success of your project.
So, before you start any new project, make sure you have a tape measure and a marker at the ready!
Awning Fabric and Replacement Hardware
When it comes to replacing your awning fabric and hardware, you’ll need a few tools and materials to get the job done right. One of the primary tools you’ll need is a tape measure, so you can accurately measure the length and width of your awning. You’ll also need a pair of heavy-duty scissors to cut the fabric to the correct size.
Additionally, a seam ripper can come in handy for removing any old stitching or hardware. In terms of materials, you’ll need a high-quality replacement fabric that’s durable and able to stand up to the elements. You’ll also need replacement hardware, such as grommets, zippers, and brackets.
Don’t forget the thread and sewing machine if you plan to sew the replacement fabric yourself. With these tools and materials in hand, you’ll be well-equipped to tackle your awning replacement project. So, why wait? Get started and have fun giving your awning a new lease on life!
Step-by-Step Instructions
If you have an RV awning that is sagging or stretched out, don’t worry. It’s a common problem that can be easily fixed with a few simple steps. First, start by retracting the awning completely so that it’s safely stored away.
Next, locate the adjusting bolts, which are usually placed on the awning arms. These bolts can be adjusted to tighten or loosen the awning as needed. In most cases, loosening the bolts will allow you to adjust the tension of the awning.
Once you have loosened the bolts, gently pull the awning fabric back into place until it is taut. Finally, tighten the adjusting bolts once you have achieved the right amount of tension. You may need to repeat this process a few times until you get the right amount of tension.
With some patience and persistence, you can easily fix your stretched out RV awning and restore it to its former glory.
Disconnect the Awning from the RV
Disconnecting the awning from the RV can seem like a daunting task, but it’s actually a straightforward process that anyone can do. To start, make sure the awning is fully retracted and secure. Then, locate the bolts that attach the awning arms to the RV and unscrew them using a wrench.
If the awning is particularly heavy, it may be helpful to have someone else hold it in place while you remove the bolts. Once the bolts are removed, carefully pull the awning arms away from the RV, being sure to watch for any hoses or wires that may be connected to the awning. Finally, gently lower the awning to the ground and voila! Your awning is now safely disconnected from your RV.
Remember, always wear protective gear such as gloves and safety glasses when handling heavy equipment.
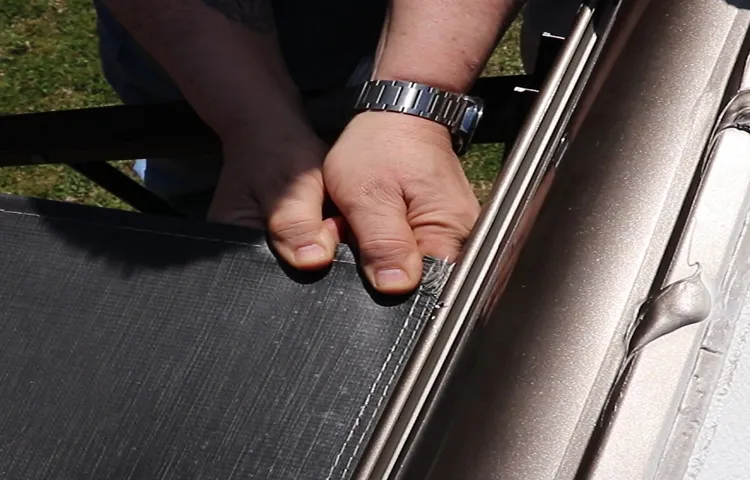
Remove the Awning Fabric from the Roller Tube
Removing the awning fabric from the roller tube might seem like a daunting task, but it is a necessary step when it comes to repairing or replacing your awning. Luckily, it is a relatively simple process that can be done with just a few tools. The first step is to locate the fabric stop located on the roller tube and unscrew it.
Once the fabric stop has been removed, you can start rolling up the fabric onto the roller tube until it is all the way up. It is important to ensure you keep the fabric straight and flat to prevent any damage or creases. Once you have rolled up the fabric, you can remove it from the roller tube by pulling it gently off.
Remember to take care not to tear or damage the fabric in the process. With the fabric removed, you can now move forward with repairing or replacing any components of the awning, knowing that the fabric is safely stored until needed again.
Measure the Awning Fabric and Replace if Necessary
Awning Fabric Replacement If your awning fabric is worn, torn, or faded, it may be time for a replacement. The first step is to measure the size of the existing fabric to ensure you order the correct replacement. To do this, measure the width and projection of the awning, from end to end.
Be sure to add extra inches to each measurement to allow for hemming and attachments. If the existing fabric is beyond repair or you want to update the look of your outdoor space, it’s time to order a new awning fabric. There are many fabric options to choose from, including acrylic, polyester, and vinyl.
Each material has its pros and cons, so it’s important to choose the best one for your needs. Once you have your new fabric, carefully remove the old fabric and attach the new one according to the manufacturer’s instructions. With a little effort, you can have a fresh and beautiful awning that will protect you from the sun while adding style to your outdoor space.
Re-Attach the Awning Fabric to the Roller Tube
After you’ve removed and replaced the awning fabric, it’s time to reattach it to the roller tube on your RV. This step is crucial in making sure that the awning functions properly and stays secure while you’re on the road. Here are the step-by-step instructions for reattaching the awning fabric:
Make sure that the roller tube is fully extended, and that the arms of the awning are locked in place. Starting at one end, carefully slide the fabric into the groove on the roller tube.
Make sure that the fabric is aligned evenly with the tube. Once the fabric is in place, use the awning rod to turn the roller tube in the opposite direction that you rolled it out.
This will cause the fabric to begin rolling up, and will ensure that it is properly attached to the tube. Continue turning the roller tube until the fabric is fully rolled up.
Finally, lock both ends of the awning into place to keep it secure. Taking the time to properly reattach the awning fabric will ensure that your RV’s awning is functional and safe for future travels.
Re-Connect the Awning to the RV
If you’re an RV enthusiast, you know that setting up an awning is of utmost importance when you’re out camping. It provides shade and shelter from the weather, giving you a comfortable space to enjoy the outdoors. However, sometimes it can get disconnected from your RV, and that can be frustrating.
Fear not, re-connecting the awning isn’t as complicated as it seems. Firstly, make sure you have someone to help you as it is a two-person job. You’ll need to install the top brackets on the RV by using screws to secure them to the sidewall.
You can then attach the bottom brackets to the awning arms using the same screws. Next, insert the arms into the top brackets, one at a time. Make sure they fit securely before locking them in place.
Finally, attach the arms to the bottom brackets and lock them into place as well. Voila! Your awning is reconnected and ready for use. Remember, always check the instructions manual before installing or reconnecting your awning, and don’t hesitate to ask for help if needed.
Happy camping!
Final Thoughts
In conclusion, fixing a stretched RV awning can save you lots of money and extend the life of your vehicle. Start by identifying the cause of the stretching and taking the appropriate steps to prevent it from happening again. If the damage is already done, you can attempt to fix it yourself with a few basic tools and supplies or seek the help of a professional.
Remember to always follow safety precautions when working with your RV awning. By taking proper care of your awning, you can enjoy the great outdoors without worrying about costly repairs. So don’t wait until it’s too late, take action today and protect your investment.
Conclusion
In summary, fixing a stretched RV awning requires two things: patience and a little bit of elbow grease. First, identify the cause of the stretching, be it old age, weathering, or simply improper installation. Next, determine the correct method for tightening the fabric, whether it be using adjustable arms or simply resewing the seams.
And finally, don’t forget to take care of your awning by regularly cleaning and protecting it from further damage. With these tips in mind, your RV awning will be taut, resilient, and ready for whatever adventures come your way!”
FAQs
What causes an RV awning to stretch over time?
Exposure to sunlight, wind, and prolonged use can cause an RV awning to stretch.
How do I know if my RV awning needs to be fixed?
Signs of a stretched or damaged RV awning include flapping, ripping, or sagging.
Can I fix a stretched RV awning myself, or do I need a professional?
It is possible to fix a stretched RV awning yourself with the proper tools and guidance. However, hiring a professional can ensure a proper repair.
What tools do I need to fix a stretched RV awning?
The tools needed to fix a stretched RV awning include an awning repair tape, a ladder, and a ratchet wrench.
How do I properly measure my RV awning to determine how much material to purchase?
To properly measure your RV awning, measure the length and width of the awning and purchase enough material to cover it.
What is the best type of material to use to fix a stretched RV awning?
The best type of material to use to fix a stretched RV awning is a vinyl fabric.
How long does it typically take to fix a stretched RV awning?
The time it takes to fix a stretched RV awning varies depending on the severity of the damage and the experience of the person doing the repair. It can take anywhere from a few hours to a full day.