
Hey there! Dealing with a cracked coolant reservoir can be a frustrating situation, especially when you rely on your car to get you from point A to point B. But fear not, because today I’m going to show you how to fix that cracked coolant reservoir like a pro! Imagine this: you’re driving down the road, enjoying the breeze on a sunny day, when suddenly you notice that your car’s temperature gauge is inching towards the red zone. Panic sets in as you realize that your coolant reservoir is cracked, and your car’s engine is at risk of overheating.
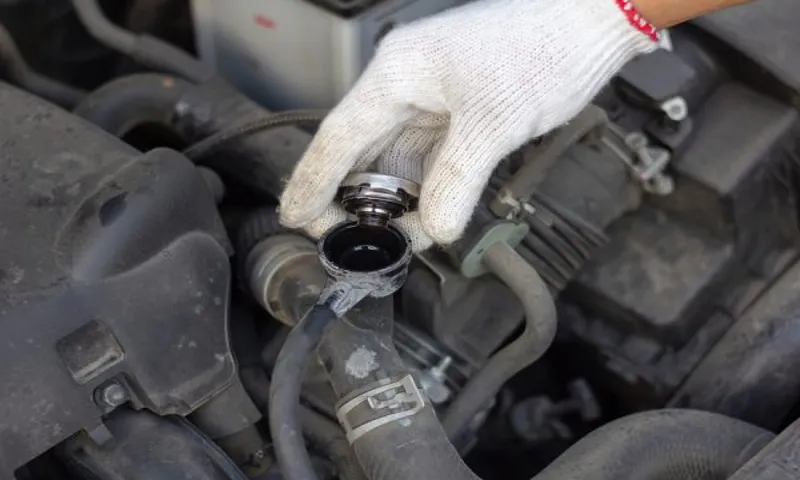
But before you start stressing out or spending a fortune on a mechanic, let me reassure you that fixing a cracked coolant reservoir is easier than you might think. With a few simple steps and some basic tools, you’ll be back on the road in no time. First things first, you’ll need to locate the cracked reservoir.
This usually sits near the radiator, and it’s a plastic container that holds the coolant or antifreeze mixture. Look for any visible cracks or signs of leaks. Once you’ve identified the crack, it’s time to take action.
Now, you have two options: repairing the crack or replacing the entire reservoir. If the crack is small and manageable, you can opt for a repair. But if the crack is significant or the reservoir is worn out, it’s best to replace it altogether.
For a repair, you’ll need to gather the necessary supplies, such as epoxy or a specialized adhesive for plastic. Clean the area around the crack thoroughly, ensuring that it’s free from dirt and debris. Apply the adhesive or epoxy according to the manufacturer’s instructions, making sure to cover the entire crack.
Allow it to dry completely before adding coolant back into the reservoir. If a replacement is in order, fear not. Fortunately, coolant reservoirs are relatively affordable, and you can easily find a suitable replacement at your local auto parts store or online.
Table of Contents
Introduction
Are you dealing with a cracked coolant reservoir in your car? Don’t worry, it’s a common issue that can be fixed. The coolant reservoir, also known as the overflow tank or expansion tank, is responsible for holding excess coolant and releasing it back into the radiator when needed. Over time, due to the constant exposure to heat and pressure, the reservoir can develop cracks or leaks.
These cracks can lead to coolant leaks, which can result in engine overheating and potential damage. So, it’s important to address the issue promptly. In this blog section, we will discuss how to fix a cracked coolant reservoir and get your car back on the road.
– Importance of the coolant reservoir
coolant reservoir There are many important components in a vehicle’s cooling system, and one that often gets overlooked is the coolant reservoir. This small plastic container plays a crucial role in maintaining the proper level of coolant in the system, which is essential for preventing overheating and engine damage. The coolant reservoir acts as a reservoir for excess coolant, allowing it to expand and contract with temperature changes.
It also acts as a safety feature, allowing for easy monitoring of coolant levels and providing a backup supply in case of a leak or loss of coolant. Without a functioning coolant reservoir, the cooling system would be unable to properly regulate temperature, leading to potential engine failure and costly repairs. So, while it may seem like a small and insignificant part, the coolant reservoir plays a vital role in keeping your vehicle running smoothly and safely.
– Common causes of a cracked coolant reservoir
cracked coolant reservoir Introduction: A cracked coolant reservoir can be a frustrating problem for car owners. The coolant reservoir plays a crucial role in the cooling system of a vehicle, storing and supplying coolant to the engine as needed. When the reservoir becomes cracked, it can lead to coolant leaks and potential overheating issues.
There are several common causes for a cracked coolant reservoir, ranging from age and wear to accidents or improper maintenance. In this blog post, we will explore these causes in more detail, providing information and tips to help car owners understand and address this issue. So, let’s get started and find out what might be causing your cracked coolant reservoir!
Assessing the Damage
So, you’ve noticed that your coolant reservoir is cracked, and you’re wondering how to fix it. No need to panic! Cracks in the coolant reservoir can happen due to various reasons like aging, stress, or accidents. The good news is that you can easily fix it yourself without the need to visit a mechanic or spend a ton of money.
First, you’ll need to assess the damage and determine the severity of the crack. If it’s a small crack, you may be able to fix it temporarily with an epoxy or a coolant reservoir repair kit. Just make sure to clean the crack thoroughly before applying any fix to ensure proper adhesion.
However, if the crack is significant or if your coolant reservoir is made of plastic, it’s best to replace it with a new one. This will ensure a proper and long-lasting fix, preventing any future issues with your cooling system. Remember to always consult your vehicle’s manual or reach out to a professional if you’re unsure about any steps in the process.
– Signs of a cracked coolant reservoir
cracked coolant reservoir, signs of a cracked coolant reservoir Are you concerned that your vehicle may have a cracked coolant reservoir? Assessing the damage is crucial to ensure the proper functioning of your vehicle’s cooling system. One common sign of a cracked coolant reservoir is coolant leakage. If you notice puddles of coolant underneath your car, it could be an indication of a crack in the reservoir.
Another sign to look out for is a lowering coolant level. If you consistently need to add coolant to your car, it could be a sign that there is a crack in the reservoir. Additionally, you may notice the engine temperature rising higher than usual.
This could be due to a loss of coolant caused by a cracked reservoir. It’s essential to address these signs promptly to prevent further damage to your vehicle’s cooling system.
– Checking for leaks
Checking for leaks is an essential step in assessing the damage caused by a water-related incident. Leaks can occur in various areas of a property, such as pipes, roofs, or windows, and they can lead to significant water damage if not detected and addressed promptly. When assessing the damage, it is crucial to visually inspect the property for signs of water leakage.
Look for visible water stains on walls, ceilings, or floors, as well as any damp or musty odors. It’s also important to check for any signs of mold or mildew growth, as this can indicate that there is an ongoing leak. Additionally, it’s recommended to inspect areas prone to water damage, such as the bathroom, basement, or attic.
By systematically checking for leaks, you can identify and address any issues before they escalate into more significant problems.
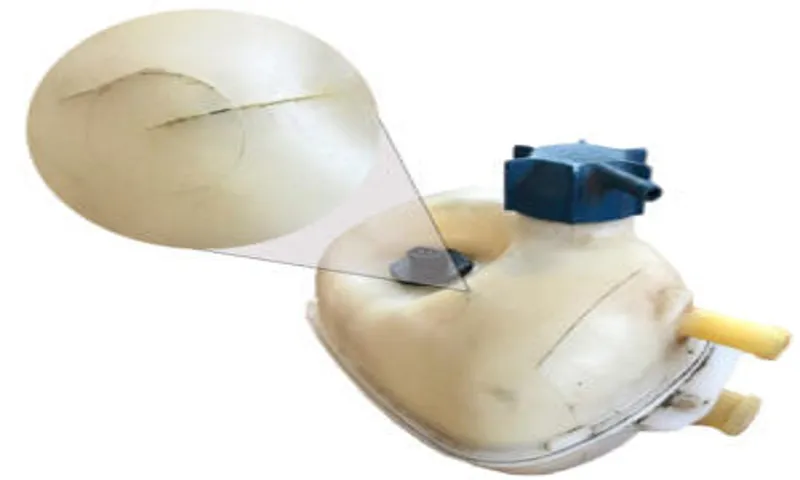
– Identifying the location of the crack
crack location, assessing damage, foundation repair When it comes to assessing the damage to your foundation, one crucial step is identifying the location of the crack. Cracks in the foundation can occur for various reasons, such as soil settlement, water pressure, or even natural disasters like earthquakes. By identifying the location of the crack, you can determine the severity of the damage and the appropriate course of action for repair.
To identify the crack’s location, you must first visually inspect the foundation both inside and outside your home. Look for any visible signs of cracking, such as hairline cracks or wider gaps in the concrete. Pay attention to areas where cracks commonly occur, such as along the corners of the foundation or near windows and doors.
In some cases, the location of the crack may not be easily visible, especially if it is hidden behind walls or under flooring. In such situations, you may need to use specialized techniques to pinpoint the precise location. This can include using thermal imaging cameras or moisture meters to detect temperature or humidity changes that may indicate the presence of a crack.
Once you have identified the location of the crack, you can proceed with assessing the damage. This involves determining the depth and width of the crack, as well as inspecting the surrounding area for any signs of structural instability. If the crack is small and superficial, it may only require minor cosmetic repairs.
However, if the crack is large or extends deep into the foundation, it could be a sign of more significant structural issues and may require professional foundation repair. Assessing the damage to your foundation is a crucial step in ensuring the safety and stability of your home. By identifying the location of the crack and assessing its severity, you can take the necessary steps to address the issue and prevent further damage.
Remember, cracks in the foundation should never be ignored, as they can lead to serious structural problems if left untreated.
Preparing for the Repair
Is your coolant reservoir cracked and in need of a fix? Don’t worry, we’ve got you covered. In this blog post, we’ll walk you through the steps of how to fix a cracked coolant reservoir. First, you’ll need to gather the necessary tools and materials.
This includes a new coolant reservoir, a socket set, pliers, a screwdriver, and coolant. It’s important to have the right tools on hand to ensure a successful repair. Next, you’ll want to locate the cracked coolant reservoir.
This component is typically located near the radiator and is responsible for holding and circulating coolant throughout the system. Once you’ve located the reservoir, you’ll need to carefully remove it. This may require loosening or removing any clamps or brackets that are holding it in place.
After removing the cracked reservoir, you’ll want to inspect it for any additional damage. If there are any other cracks or signs of wear, it’s best to replace the reservoir entirely. A damaged reservoir can lead to coolant leaks, which can cause engine overheating and potential damage.
Once you have your new reservoir, it’s time to install it. Begin by attaching any necessary hoses or connectors. Then, carefully place the reservoir in its designated spot and secure it with the appropriate clamps or brackets.
Once the new reservoir is securely in place, it’s time to refill the coolant. Make sure to follow the manufacturer’s instructions for the proper coolant-to-water ratio and fill the reservoir to the recommended level. Finally, it’s important to test the repair.
– Gathering necessary tools and materials
Eyeing a fixer-upper? Before diving into any repair project, it’s essential to gather the necessary tools and materials. Not only will this save you from running back and forth to the hardware store, but it will also ensure that the project runs smoothly without unnecessary delays. So, what exactly do you need? Well, it depends on the specific repair you’re undertaking.
However, some common items you’ll often find handy include a toolbox with various screwdrivers and wrenches, a sturdy ladder, a flashlight, safety goggles, gloves, and of course, the specific materials required for the job, such as nails, screws, adhesive, or paint. Whether it’s fixing a leaky sink, patching up a hole in the wall, or repairing a faulty electrical outlet, having all the tools and materials readily available will greatly streamline the process and make your repair journey a breeze. So, make a checklist and ensure you have everything you need before getting started.
– Safety precautions to keep in mind
When it comes to repairing things around the house, it’s important to always prioritize safety. Before you even begin the repair, there are a few precautions you should keep in mind to ensure you stay safe throughout the process. First, make sure you have the proper tools and equipment for the job.
Using the wrong tools can not only hinder your progress but also put you at risk of injury. Additionally, it’s crucial to have a clear understanding of what you’re repairing and how to do it correctly. Researching and reading up on the repair beforehand can save you from potential mishaps.
Next, don’t forget to turn off any power sources or shut off the water supply, if applicable, before beginning the repair. This will prevent any accidental shocks or leaks. Lastly, wear the appropriate protective gear such as safety goggles, gloves, and a mask if necessary.
These simple precautions can go a long way in ensuring your safety while you tackle those repair projects around the house.
Repairing the Cracked Coolant Reservoir
If you notice that your coolant reservoir has a crack, don’t panic! It’s actually quite common for these plastic components to develop cracks over time. Fortunately, fixing a cracked coolant reservoir is a relatively simple task that you can do yourself. The first step is to drain the coolant from the reservoir and remove it from the vehicle.
Next, clean the area around the crack thoroughly to ensure a proper seal. Once the area is clean, you can use a plastic repair epoxy to seal the crack. Apply the epoxy generously and make sure it covers the entire crack.
Allow the epoxy to dry for the recommended time, and then reinstall the reservoir. Refill the coolant and check for any leaks. With just a little bit of time and effort, you can have your coolant reservoir back in working order in no time.
– Draining the coolant
coolant reservoir, cracked, repairing, draining coolant
– Cleaning the reservoir
coolant reservoir, cracked, repair, cleaning, reservoir maintenance When it comes to maintaining your vehicle, the coolant reservoir is often overlooked. However, it plays a crucial role in keeping your engine running smoothly and preventing it from overheating. If you’ve noticed a crack or leak in your coolant reservoir, it’s important to address it as soon as possible to avoid further damage.
Cleaning the reservoir is the first step in repairing it. To do this, you’ll need to drain all the coolant from the reservoir and flush it out with clean water. This will remove any debris or impurities that may have accumulated.
Once clean, you can inspect the reservoir for any cracks or damage and determine if it can be repaired or needs to be replaced. Regular maintenance and cleaning of your coolant reservoir will not only extend its lifespan but also ensure optimal performance for your engine. So, don’t neglect this important component of your vehicle’s cooling system!
– Applying a sealant or epoxy
repairing a cracked coolant reservoir
– Reinforcing the repair with a patch
cracked coolant reservoir, patch, repair One common issue car owners face is a cracked coolant reservoir. This can be quite problematic as coolant is a crucial component in maintaining the engine’s temperature. Thankfully, repairing a cracked coolant reservoir is a relatively straightforward process.
One solution involves reinforcing the repair with a patch. The first step is to drain the coolant from the reservoir and remove it from the vehicle. Then, thoroughly clean the cracked area to ensure the patch adheres properly.
There are various types of patches available, such as rubber patches or epoxy patches. Choose a patch that is suitable for the material of your coolant reservoir. Apply the patch over the crack, ensuring it covers the entire affected area.
Press firmly to ensure a strong bond. Leave it to dry and cure completely before reinstalling the coolant reservoir. Once the reservoir is back in place, refill it with coolant and check for any leaks.
This patch method is often effective in repairing cracked coolant reservoirs and can save you money on expensive replacements.
Testing the Repair
Have you noticed a crack in your coolant reservoir and wondering how to fix it? Don’t worry, it’s a common issue that can be resolved easily. First, you’ll need to drain the coolant from the reservoir. Start by removing the cap and then locating the drain plug or hose at the bottom of the reservoir.
Once you’ve drained the coolant, you can begin the repair process. There are a few options for fixing a cracked reservoir. One option is to use a coolant sealant, which is a liquid adhesive that can fill in the crack and create a temporary seal.
Another option is to use epoxy or plastic welding to repair the crack. If the crack is too large or the reservoir is severely damaged, it may be best to replace the reservoir altogether. Remember to thoroughly clean the area around the crack before applying any adhesive or sealant to ensure a proper bond.
Once the repair is complete, refill the reservoir with coolant and check for any leaks. It’s important to monitor the reservoir for any signs of further damage or leaks in the future. Regular maintenance and inspection can help prevent these issues from occurring in the first place.
So, don’t let a cracked coolant reservoir cause you any more headaches, follow these steps and get it fixed in no time.
– Refilling the coolant
coolant, refilling the coolant, testing the repair
– Checking for leaks after repair
Checking for leaks after a repair is an essential step to ensure the effectiveness of the fix. After all, what good is a repair if it doesn’t solve the problem completely? So, how do you test the repair to make sure there are no leaks? One way is to apply a pressurized test to the system. This can be done by using an air compressor to pump air into the system and then checking for any drops in pressure.
If the pressure remains steady, then there are no leaks. Another method is to use a soapy water solution. Apply the solution to the repaired area and look for any bubbles.
If there are bubbles, it means there is a leak that needs to be addressed. By thoroughly testing the repair, you can have peace of mind knowing that it has been done correctly and that there are no hidden issues waiting to cause further problems down the line.
– Monitoring the reservoir for any future issues
Once the repair work on the reservoir is completed, it is crucial to conduct thorough testing to ensure that the problem has been resolved effectively. This testing phase involves monitoring the reservoir for any future issues. By keeping a close eye on the reservoir, we can identify potential leaks or other problems that may arise.
Testing can also help in determining if all the components of the reservoir are functioning optimally after the repair work. It is important to note that testing should not be a one-time activity, but rather an ongoing process to ensure the long-term integrity of the reservoir. By regularly monitoring the reservoir, we can address any potential issues before they escalate and cause further damage.
In essence, testing the repair ensures that the reservoir is in good working order and ready to serve its intended purpose of storing and supplying water effectively.
Conclusion
So there you have it, your comprehensive guide on how to fix a cracked coolant reservoir. We’ve covered everything from identifying the problem, gathering the necessary tools, and step-by-step instructions on how to patch it up. Now, you might be wondering, why go through all this trouble? Why not just buy a new coolant reservoir? Well, my friend, let me explain to you why fixing it yourself is the way to go.
Firstly, it’s a great way to show off your handyman skills. Imagine the satisfaction of telling your friends, “Oh, that cracked coolant reservoir? Yeah, I fixed it myself.” Talk about being the hero of the day! Secondly, it’s cost-effective.
Why spend your hard-earned money on a brand new reservoir when you can fix the one you have? You’ll be saving those dollars for something way more exciting like a weekend getaway or a new gadget! Lastly, it’s an opportunity to channel your inner MacGyver. Think about it – you’re essentially MacGyvering your car’s coolant system. Who wouldn’t want to be compared to the legendary problem-solver extraordinaire? So, next time you find yourself with a cracked coolant reservoir, don’t panic.
Grab your tools, follow our guide, and become the hero, the money-saver, and the MacGyver of car repairs. You’ve got this!”
– Importance of timely repair
“Testing the Repair” One of the most crucial steps in the repair process is the testing phase. It’s important to evaluate whether the repair has been successful and if the damage has been properly addressed. Imagine if you took your car to the mechanic to fix a rattling noise, and when you got it back, the noise was still there.
You would be understandably frustrated. The same principle applies to any kind of repair, whether it’s a broken appliance or a leaky roof. Testing the repair ensures that it has been completed to a satisfactory standard.
It’s like double-checking your work before submitting a report or reviewing a recipe before serving it to guests. Without this crucial step, we risk leaving the underlying issues unresolved and potentially causing more damage in the long run. Whether it’s checking a phone screen for any remaining cracks or running water through newly repaired pipes, testing the repair is essential to ensure the job is done right.
So the next time you get something repaired, make sure to ask for a test to ensure your peace of mind.”
– Proper maintenance to avoid future cracks
Proper maintenance is crucial for avoiding future cracks in your repairs. After you have completed the crack repair, it’s important to test the effectiveness of your fix. One way to do this is to use a moisture meter to check the moisture content of the repaired area.
If the moisture levels are significantly lower than before the repair, it’s a good sign that the crack has been properly sealed. Additionally, you can conduct a visual inspection to look for any signs of re-cracking or water leakage. If everything looks good, you can feel confident that your repair is holding strong.
Regularly inspecting and maintaining the repaired area will help ensure its longevity and prevent future cracks from occurring. Remember, prevention is always better than having to fix the problem again down the line.
FAQs
What causes a coolant reservoir to crack?
A coolant reservoir can crack due to factors such as excessive heat, freezing temperatures, physical damage, or age-related deterioration of the plastic material.
How can I diagnose a cracked coolant reservoir?
To diagnose a cracked coolant reservoir, you can visually inspect it for visible cracks or signs of leakage. Additionally, you can perform a coolant pressure test to check for any loss of pressure or a drop in coolant levels.
Can a cracked coolant reservoir be repaired or does it need to be replaced?
In most cases, a cracked coolant reservoir cannot be effectively repaired and should be replaced. The plastic material used in coolant reservoirs tends to become brittle over time, making repairs unreliable. It is recommended to replace the reservoir to ensure proper functioning and prevent future coolant leaks.
How much does it cost to replace a cracked coolant reservoir?
The cost of replacing a cracked coolant reservoir can vary depending on your vehicle’s make and model, as well as the labor costs charged by your mechanic. On average, the replacement cost can range from $100 to $300, including parts and labor.
Can I drive my vehicle with a cracked coolant reservoir?
It is not recommended to drive your vehicle with a cracked coolant reservoir. A cracked reservoir can lead to coolant leaks, which can cause the engine to overheat and potentially result in severe damage. It is best to address the issue as soon as possible to avoid more costly repairs.
What are the consequences of ignoring a cracked coolant reservoir?
Ignoring a cracked coolant reservoir can lead to coolant leaks, which can result in the engine overheating. Overheating can cause significant damage to engine components, such as the cylinder head, pistons, and valves. Additionally, coolant leaks can cause a loss of coolant, leading to engine coolant level drops and possible engine failure.
Can I temporarily fix a cracked coolant reservoir to prevent leaks?
While temporary fixes are possible, they are not recommended for a cracked coolant reservoir. The plastic material tends to be difficult to repair effectively, and temporary fixes may not hold for long. It is best to replace the reservoir to ensure a reliable and long-lasting solution.