So you’ve got a dented running board on your vehicle, and it’s definitely not a sight you want to see every time you walk up to your car. Whether it’s the result of a careless parking maneuver or an unfortunate encounter with a stray shopping cart, a dented running board can be an eyesore that affects the overall appearance of your vehicle. But fear not, because in this blog post, we’ll walk you through the steps on how to fix a dented running board and restore it to its former glory.
Just like a scratched record can ruin the groove, a dented running board can disrupt the sleek and smooth flow of your vehicle’s appearance. But fixing it doesn’t have to be an expensive or time-consuming ordeal. By following a few simple steps and using some basic tools, you can tackle this repair project yourself and save money in the process.
Think of your dented running board as a crumpled piece of paper. Just like you can smooth out the creases and restore the paper to its original form, you can do the same with your running board. With a little patience and effort, you’ll have your running board looking as good as new in no time.
But first things first, let’s gather the materials you’ll need for this repair project. You’ll need a hairdryer or heat gun, a can of compressed air, a pair of gloves, a bucket of soapy water, a soft cloth or sponge, a rubber mallet or wooden block, and some touch-up paint or clear coat. These tools will help you effectively remove the dent and restore the finish of your running board.
Now that you have everything you need, it’s time to get started on fixing that dented running board. In the next section, we’ll walk you through each step of the process, from heating the dent to applying the finishing touches. So grab your tools and let’s get to work!
Table of Contents
- 1 Introduction
- 2 Assess the Damage
- 3 Preparation
- 4 Repair Methods
- 5 Step-by-Step Instructions
- 5.1 Step 1: Clean the area around the dent
- 5.2 Step 2: Heat the dented area (if using heat gun)
- 5.3 Step 3: Apply suction (if using suction cup dent puller)
- 5.4 Step 4: Use mallet and block (if using rubber mallet)
- 5.5 Step 5: Apply heat and dry ice (if using hairdryer and dry ice)
- 5.6 Step 6: Repeat steps as necessary
- 6 Finishing Touches
- 7 Conclusion
- 8 FAQs
- 9 Resources
- 10 References
- 11 FAQs
Introduction
If you have a dented running board on your vehicle, don’t fret – it’s actually a relatively common problem that can be fixed fairly easily. The first step is to assess the extent of the damage. Small dents can often be popped out using a plunger or a rubber mallet.
If the dent is larger or more severe, you may need to use a heat gun or a hairdryer to warm up the metal before attempting to push it back into shape. It’s important to be gentle and patient during this process, as too much force can cause further damage to the running board. Once you’ve successfully popped out the dent, you can use a filler compound to smooth out any remaining imperfections.
After the filler has dried, sand it down until it’s flush with the rest of the running board. Finally, apply a coat of automotive paint to ensure a seamless finish. By following these steps, you’ll have your dented running board looking as good as new in no time.
Explanation of a running board and its purpose
Introduction: Have you ever noticed those long, flat strips of metal or rubber that run along the sides of some vehicles? Those are called running boards, and they serve an important purpose beyond just looking stylish. Running boards are primarily designed to provide additional support and convenience when entering or exiting a tall vehicle, such as a truck or SUV. They essentially act as a step, making it easier for passengers to get in and out of the vehicle safely.
But their benefits go beyond just aiding accessibility. Running boards also add a touch of style to a vehicle, enhancing its overall appearance. In this blog post, we will delve further into the functionality and purpose of running boards, exploring their many advantages and how they have evolved over time.
So, let’s dive in and uncover the world of running boards.
Assess the Damage
So, you’ve got a dented running board on your car. Don’t panic! It’s a common problem that can be fixed with a little effort. First things first, assess the damage.
Is the dent minor or severe? If it’s minor, with no paint damage, you may be able to fix it yourself. If the dent is severe or the paint is damaged, it’s best to seek professional help. Now, let’s talk about how to fix that dented running board on your own.
One method is to use a plunger. Yes, you heard that right – a plunger! It works by creating suction and pulling the dent out. Simply wet the running board and the suction cup of the plunger, then firmly press it against the dent and pull.
Another option is to use a heat gun or hairdryer to heat up the dent, then use a can of compressed air turned upside down to rapidly cool it. The sudden change in temperature can help the metal contract and pop the dent out. Just remember to use caution with the heat gun and always keep it moving to avoid damaging the paint.
These DIY methods may not work for every dent, but they’re certainly worth a try before shelling out for professional repairs.
Inspecting the dented running board
running board damage, dented running board, inspecting dented running board Inspecting the dented running board is an essential step in assessing the damage. When we come across a dented running board, it’s important to take a close look and evaluate the extent of the damage. Is the dent deep or surface-level? Are there any cracks or holes caused by the impact? These are the questions that need answers before we can determine the best course of action.
One way to assess the damage is by carefully examining the dent itself. Is it a small dent or a larger one? If it’s a small dent, the running board may only require a simple repair, such as paintless dent removal. On the other hand, if the dent is more severe and has caused structural damage, a replacement might be necessary.
Additionally, it’s important to inspect the surrounding areas of the running board for any signs of damage. Is there any paint chipping or scratching? Are there any loose or detached parts? These are indications that the impact may have been more significant and that there could be underlying issues that need attention. In some cases, insurance may cover the cost of repair or replacement for a dented running board.
Before proceeding with any repairs, it’s wise to contact your insurance provider and inquire about the coverage and the necessary documentation needed. Inspecting the dented running board is an important step in the process of addressing the damage. By carefully assessing the dent and the surrounding areas, we can determine the extent of the damage and make informed decisions about the repair or replacement options.
Remember to reach out to your insurance provider to understand if the repair would be covered and make sure to keep all the necessary documentation for a hassle-free claim process.
Identifying the extent of the damage
Assessing the extent of the damage is crucial when dealing with any kind of disaster or emergency situation. Whether it’s a natural disaster like a hurricane or a man-made incident like a fire, it’s essential to evaluate the damage to determine the next steps and plan for recovery. But how exactly do you go about assessing the damage? Let’s dive in.
First and foremost, safety should be the top priority. Before entering the affected area, make sure it is safe to do so. Check for any structural damage or hazards that could pose a risk to your safety.
If necessary, seek assistance from professionals who are trained in handling hazardous situations. Once it’s safe to enter, start by documenting the damage. Take photos or videos of the affected areas, making sure to capture the extent of the destruction.
This visual evidence will be helpful later on when dealing with insurance claims or seeking assistance from disaster relief agencies. Next, focus on assessing the structural damage. Look for any signs of instability or cracks in the walls, ceilings, or floors.
Pay attention to any sagging or leaning structures, as these could indicate structural damage. Evaluate the integrity of the foundation and roof, as these are critical components of any building. In addition to structural damage, assess the damage to the contents of the affected area.
This could include furniture, appliances, personal belongings, and inventory for businesses. Note the condition of these items and document any damages or losses. It’s also important to check for any water damage, especially if the disaster involved flooding or a water-related incident.
Preparation
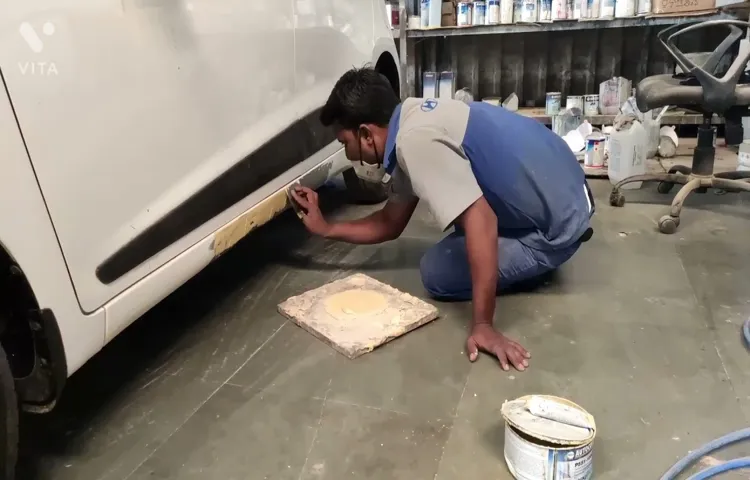
If you have a dented running board on your vehicle, don’t worry – it’s a common issue that can be fixed with a little bit of preparation. First, you’ll need to gather the necessary tools and materials. This may include a heat gun, a rubber mallet, sandpaper, body filler, and automotive paint.
Once you have everything you need, make sure to clean the affected area thoroughly to remove any dirt or debris. Next, use the heat gun to warm up the metal around the dent. This will make it more pliable and easier to work with.
Then, use the rubber mallet to carefully and gently tap out the dent from the backside of the running board. Be sure to work in small, controlled movements to avoid causing further damage. Once the dent is mostly removed, use sandpaper to smooth down any rough edges or imperfections.
Apply a layer of body filler and allow it to dry completely before sanding it down again. Finally, apply a few coats of automotive paint to match the color of your running board and give it a finished look. With a little bit of patience and effort, you can easily fix a dented running board and have your vehicle looking good as new.
Gathering the necessary tools and materials
To successfully complete any project, whether it be a craft, a home improvement task, or a DIY project, gathering the necessary tools and materials is crucial. Without the right supplies, you’ll find yourself unprepared and unable to complete the task at hand. Therefore, preparation is key.
Start by assessing what tools and materials you already have on hand. Take a moment to consider if any of your existing tools can be used for the current project. This will help save time and money by avoiding unnecessary purchases.
Next, make a list of the specific tools and materials needed for the project. This list will serve as your roadmap and ensure that you don’t forget anything. Once you have your list, check if you have any of the materials readily available.
If not, it’s time to hit the hardware store or your local craft store. Depending on the project, you may also need to consider the quality and durability of the materials. For example, if you’re building a shelf, you’ll want to choose sturdy wood that can support the weight of your belongings.
Gathering the necessary tools and materials may seem like a tedious task, but it’s an essential step in the project’s success. So before you dive into your next DIY endeavor, remember to prepare accordingly and gather everything you need to get the job done right.
Ensuring safety precautions are in place
Ensuring safety precautions are in place is crucial before undertaking any task or activity. Preparation is key to preventing accidents, injuries, or any other mishaps that may occur. It is essential to identify potential risks and hazards and take appropriate measures to mitigate them.
This may involve conducting a thorough risk assessment, providing training to individuals involved, and implementing safety protocols. For example, before starting a construction project, it is important to assess the site for potential hazards such as uneven terrain, electrical hazards, or falling objects. By identifying and addressing these risks upfront, construction workers can be better prepared and equipped to handle their tasks safely.
Similarly, in industries that deal with hazardous materials or chemicals, it is crucial to have proper safety procedures in place. This may include providing employees with personal protective equipment (PPE), regular safety training sessions, and ensuring that all safety equipment and systems are in working order. By taking these safety precautions seriously and being proactive in our approach, we can create a safer environment for everyone involved.
Whether it’s in the workplace or any other setting, preparation and planning can go a long way in preventing accidents and ensuring the well-being of individuals. So, before embarking on any task, let’s always prioritize safety and take the necessary precautions.
Repair Methods
Running boards are a common feature on many vehicles, providing a convenient step to help you get in and out of your car or truck. Unfortunately, running boards can also be prone to damage, including dents. Whether it’s from a wayward shopping cart or an accidental kick, a dented running board can be unsightly and affect the functionality of the board.
But don’t worry, there are ways to fix a dented running board and restore it to its former glory. One method involves using a rubber mallet or a hammer with a rubber tip to gently tap out the dent from the backside of the board. Another option is to use a hairdryer or heat gun to heat the dent, then use compressed air or a plunger to push out the dent from the front.
Alternatively, you can use a specialized dent removal tool, such as a suction cup or a dent puller, to slowly and carefully pull out the dent. Whichever method you choose, it’s important to take your time and apply gentle, controlled pressure to avoid causing further damage to the running board. And if you’re not confident in your repair skills, it’s always best to consult a professional to ensure the job is done right.
So don’t let a dented running board bring you down. With a little patience and the right tools, you can fix it yourself and get back on the road in style.
Method 1: Using a heat gun and plunger
When it comes to fixing a dent in your car, there are several methods you can try. One popular method is using a heat gun and a plunger. This method is relatively simple and can be done at home with just a few tools.
To start, you’ll need a heat gun, which is a device that blows hot air, and a plunger, which is a suction device used to remove dents. First, heat up the area around the dent using the heat gun. Be careful not to hold the heat gun too close to the paint, as it can cause damage.
The heat will help to expand the metal and make it more malleable. Next, place the plunger over the dent and firmly press down. Make sure there is a good seal between the plunger and the car surface.
Once you have a secure seal, pull back on the plunger with a quick, strong motion. This will create a suction effect and hopefully pull the dent outwards. Repeat the process several times, applying heat as needed, until the dent is no longer visible.
It may take a few attempts to fully remove the dent, so be patient and persistent. Once the dent is gone, use some polish or wax to restore the shine to the affected area. Using a heat gun and plunger can be a cost-effective and efficient way to fix minor dents in your car.
However, it is important to note that this method is best suited for small dents without any major damage to the paint. If the dent is large or there is paint chipping or cracking, it is best to consult a professional for repair.
Method 2: Using a suction cup dent puller
dents, suction cup dent puller, repair Have you ever found yourself with a frustrating dent in your car? It can be a major eyesore, but luckily, there are several ways to fix it. One popular method is using a suction cup dent puller. This handy tool uses the power of suction to essentially “pull” the dent out of place.
It’s a simple and affordable solution that can save you a trip to the repair shop. Using a suction cup dent puller is fairly straightforward. Start by cleaning the surface area of the dent and ensuring it’s free of any debris.
Then, apply a generous amount of lubricant to the suction cup. This will help create a strong seal between the cup and the surface of your car. Next, place the suction cup directly over the dent, making sure it’s centered and firmly pressed against the surface.
Once in place, use the handle to create suction by pulling back on it. This will create a vacuum effect and hopefully, pop the dent back into place. It’s important to note that suction cup dent pullers work best on smaller dents that haven’t caused any major damage to the paint or body of your car.
They may not be as effective on larger or more severe dents. If the suction cup dent puller doesn’t fully remove the dent, you can try using a hairdryer or heat gun to warm up the area. This can make the metal more malleable and easier to manipulate.
Alternatively, you may need to consult a professional to assess and repair the damage. In conclusion, a suction cup dent puller can be a useful tool for removing minor dents from your car. It’s a simple and cost-effective solution that you can easily do yourself.
Method 3: Using a rubber mallet and wooden block
One method of repairing a dent in your car’s bodywork is by using a rubber mallet and a wooden block. This method can be effective for smaller dents that have not caused any paint damage. The first step is to position the wooden block behind the dent on the inside of the car’s bodywork.
This will provide a solid surface for the mallet to strike against. Using the rubber mallet, gently tap the dent from the outside, moving in a circular motion towards the center. The idea is to slowly push the dent back into its original shape.
It’s important to apply even pressure and to be patient, as it may take several attempts to completely remove the dent. As you tap, you can periodically check your progress by looking at the dent from different angles. Once the dent is popped out, you can use a heat gun or hairdryer to apply heat to the area and then cool it with compressed air, which can help to further smooth out the paint.
This method requires some skill and finesse, so if you’re unsure, it’s best to consult a professional. With a rubber mallet and wooden block, you can save money and restore your car’s bodywork to its former glory.
Method 4: Using a hairdryer and dry ice
hairdryer, dry ice, repair methods
Step-by-Step Instructions
So, you’ve found yourself with a dented running board on your vehicle. It can be frustrating, but fear not! I’m here to provide you with a step-by-step guide on how to fix that pesky dent. First, gather the necessary materials: a heat gun or hairdryer, a can of compressed air, a bucket of soapy water, a sponge or soft cloth, and a plunger.
Start by using the heat gun or hairdryer to warm up the dented area. This will make the metal more pliable and easier to work with. Once the area is heated, grab the can of compressed air and turn it upside down.
Spray the compressed air directly onto the dent for about 30 seconds. The extreme coldness of the compressed air will cause the metal to contract, helping to pop the dent out. Now, take your plunger and place it over the dent.
Push down firmly and then quickly pull up. This suction action should help to further release the dent. Finally, clean the area with the soapy water and sponge or cloth to remove any residue.
And voila! Your running board should be dent-free and good as new.
Step 1: Clean the area around the dent
“Step 1: Clean the area around the dent” When it comes to fixing a dent in your car, taking the time to properly clean the area around the dent is an important first step. This is because any dirt, grime, or wax buildup can affect the adhesion of the repair materials and make it harder for the dent to be fixed effectively. To clean the area, you’ll want to start by washing the surrounding area with a mild soap and water solution.
Use a sponge or cloth to gently scrub away any dirt or debris, paying close attention to the dent itself. Be sure to rinse thoroughly to remove any soap residue. Next, you’ll want to dry the area completely before continuing with the repair process.
This can be done using a clean, lint-free cloth or towel. Make sure to get into any crevices or hard-to-reach areas to ensure a clean surface. Once the area is clean and dry, take a closer look at the dent to assess its severity.
If it’s a small dent or dimple, you may be able to fix it on your own. However, if it’s a larger or more complex dent, it may be best to consult a professional for repair. Overall, taking the time to clean the area around the dent is an important first step in the repair process.
By ensuring a clean and dry surface, you’ll be setting yourself up for a more successful and effective dent repair. So grab a sponge and some soap, and let’s get your car looking good as new!
Step 2: Heat the dented area (if using heat gun)
In the second step of fixing a dent using a heat gun, we move on to heating the dented area. This step is only necessary if you have a heat gun available. The heat helps to soften the metal, making it more malleable and easier to reshape.
It is important to note that you should always exercise caution when using a heat gun, as excessive heat can cause damage. Start by setting your heat gun to a low or medium heat setting. Hold the heat gun about 6-8 inches away from the dented area and move it in a circular motion.
Be sure to keep the heat gun moving to prevent any damage. After heating for a few minutes, use heat-resistant gloves to feel the dented area. If it feels warm to the touch, it is ready for the next step.
If not, continue heating for a little longer.
Step 3: Apply suction (if using suction cup dent puller)
In this step-by-step guide, we’ll walk you through the process of using a suction cup dent puller to remove dents from your vehicle. Once you’ve cleaned the surface of the dent and secured the suction cup to it, the next step is to apply suction. The suction cup creates a vacuum seal with the surface of the vehicle, allowing you to pull on the dent and gradually restore it to its original shape.
As you apply pressure to the suction cup, remember that patience is key. It may take several attempts before you start to see any noticeable results. To maximize the effectiveness of the suction cup, make sure the surface is clean and free of any dirt or debris.
Additionally, it’s important to choose a suction cup dent puller that is specifically designed for the size and type of dent you are trying to remove. By following these steps and using the proper technique, you can successfully remove dents from your vehicle using a suction cup dent puller.
Step 4: Use mallet and block (if using rubber mallet)
Installing a laminate floor can be a simple process with the right tools and techniques. Step 4 involves using a mallet and block (if using a rubber mallet) to ensure the planks are securely fitted together. This step is crucial to achieving a seamless and professional-looking finish.
To begin, align the short end of the laminate plank with the exposed tongue of the previously installed plank. Then, gently tap the long edge of the plank using a rubber mallet or a regular mallet with a block. By doing this, you create a tight and secure fit between the planks.
Continue this process for each subsequent plank, making sure to fit them tightly together. The mallet and block or rubber mallet provide the necessary force to lock the planks in place. The block or rubber mallet helps distribute the force evenly, preventing any damage to the planks.
Remember to work systematically across the entire floor, row by row, until you reach the end of the installation area. Take your time and ensure each plank is properly locked into place before moving on to the next. Using a mallet and block or a rubber mallet is a crucial step in the laminate floor installation process.
It guarantees a durable and secure connection between planks, preventing any gaps or movement. Taking the time to complete this step correctly will result in an aesthetically pleasing and long-lasting laminate floor.
Step 5: Apply heat and dry ice (if using hairdryer and dry ice)
hairdryer and dry ice, applying heat and dry ice, remove car dents, adapt to different types of dents. If you’re dealing with a stubborn or deep dent that is resistant to the plunger or vacuum method, you may need to step up your game and apply some heat and dry ice. Using a hairdryer, you can heat up the dent, which will in turn make the metal more pliable and easier to manipulate.
It’s important to keep the hairdryer moving to avoid causing any damage to the paint. Once the metal is heated, you can then apply dry ice directly onto the dent. The extreme cold temperature of the dry ice will cause the metal to contract, helping to pop out the dent.
This method works particularly well for dents that are shallow and accessible. However, it may not be as effective for deep or complex dents. It’s important to adapt these techniques to the specific type of dent you’re dealing with in order to achieve the best results.
Step 6: Repeat steps as necessary
In the step-by-step instructions for creating a successful blog, step 6 is all about repeating the previous steps as necessary. Once you have published your first blog post and started promoting it, you’ll need to keep the momentum going by consistently creating high-quality content and engaging with your audience. This means conducting keyword research, brainstorming new topic ideas, and constantly improving your writing skills.
You’ll also need to continue optimizing your blog for SEO, promoting your posts on social media, and building relationships with other bloggers and influencers in your niche. Remember, blogging is a marathon, not a sprint, so it’s important to stay dedicated and consistent in order to see long-term success.
Finishing Touches
If your running board has a dent, don’t panic – there are ways to fix it and have it looking good as new. First, assess the severity of the dent. If it’s a minor dent, you may be able to fix it using household items.
One option is to use a plunger – simply wet the suction cup and place it over the dent. Push and pull the plunger vigorously until the dent pops out. Another option is to use a hairdryer and compressed air.
Heat the dent with the hairdryer for a few minutes, then quickly spray the area with compressed air. This sudden change in temperature could make the dent pop out. If these DIY methods don’t work, you may need to take your running board to a professional repair shop.
They have the tools and expertise to fix more severe dents and have your running board looking like new in no time. So don’t let a dent ruin the appearance of your running board – with a little effort, you can fix it and have it looking great again.
Smoothing out any remaining imperfections
Smoothing out any remaining imperfections in a project is crucial for achieving a polished final result. Just like a painter adding the final strokes to a masterpiece, these finishing touches can make a significant difference in the overall aesthetic appeal. Whether it’s a piece of writing, a design, or a software application, paying attention to the small details can elevate the work to a whole new level.
It’s like ironing out the last few wrinkles on a well-tailored suit or adding the cherry on top of a delicious dessert. These final adjustments ensure that the end product meets the highest standards of quality and leaves a lasting impression on the audience. So, take the time to address any remaining imperfections, smooth out rough edges, and refine the finer details.
Your efforts will be well worth it in the end.
Repainting or touching up the running board
repainting, touching up, running board
Conclusion
And there you have it, folks! A dented running board can be a real eyesore, but with these clever solutions, you can bring it back to its former glory. Remember, a good fix requires a little creativity and resourcefulness, so don’t be afraid to think outside the box. Whether you choose the rubber mallet approach, the boiling water method, or the trusty plunger technique, just know that there’s no dent too stubborn for your determination.
So go forth, my friends, and fix those dents with confidence, knowing that you’ve become a master of running board restoration. And if anyone ever asks how you did it, just smile and say, “Oh, you know, it’s just a little trick I picked up while saving the world.” Happy dent repairing, you brilliant problem solvers!”
Summary of the repair methods and final thoughts
Finishing Touches Now that you’ve tackled the repair process and brought new life to your broken item, it’s time for the finishing touches. This step involves taking a closer look at any remaining imperfections and addressing them to achieve a polished final result. One common issue that may arise is residual scratches or scuffs on the repaired surface.
To fix this, you can use a fine-grit sandpaper to gently smooth out the area, followed by a polishing compound to restore the shine. By taking these extra steps, you can ensure that your repair is not only functional but also visually appealing. Another aspect to consider is the color matching of the repaired area.
Depending on the material you’re working with, you may need to use paint or a similar product to blend the repaired spot with the surrounding surface. This will help create a seamless finish that is virtually undetectable. In addition to these physical repairs, it’s also important to take a step back and assess the overall quality of the repair.
Ask yourself if the item is sturdy and functional, or if there are any other areas that could potentially break in the near future. By addressing these potential weak points now, you can extend the lifespan of your repaired item and prevent further damage down the line. Finally, don’t forget to celebrate your success! You’ve taken the time and effort to fix something that would have otherwise ended up in the landfill, and that’s a commendable achievement.
Whether it’s showing off your repair skills to friends and family or simply enjoying the satisfaction of a job well done, take a moment to appreciate the value you’ve added back into the world by choosing repair over replacement. In conclusion, the finishing touches of a repair are just as important as the initial steps. By paying attention to the details and addressing any remaining imperfections, you can achieve a polished final result that not only functions properly but also looks visually appealing.
Take the time to carefully assess the repaired area, address any color matching issues, and ensure the overall quality of the repair. And most importantly, give yourself a pat on the back for choosing to repair rather than replace, and for contributing to a more sustainable future.
FAQs
Do you have a dented running board on your vehicle? Don’t worry, it happens to the best of us. Fortunately, there are a few steps you can take to fix it yourself. First, make sure you have the right tools for the job.
You’ll need a rubber mallet, a pry bar, some sandpaper, and a can of automotive touch-up paint. Start by using the rubber mallet to gently tap the dented area from the inside, working your way around the perimeter until the dent is as smooth as possible. Next, use the pry bar to carefully lift the edge of the dented area, and then use the mallet again to tap it back into place.
Once the dent is mostly fixed, use the sandpaper to smooth out any rough edges or scratches. Finally, apply a few coats of touch-up paint to blend the repaired area with the rest of the running board. With a little bit of patience and some elbow grease, your dented running board will be looking good as new in no time.
Common questions about fixing dented running boards
One common question that comes up when it comes to fixing dented running boards is, “Can I fix the dent at home myself?” The answer to this question depends on the severity of the dent and your DIY skills. If it’s a minor dent, you may be able to fix it at home using simple tools like a plunger or heat gun. However, if the dent is more significant or if you’re unsure about your abilities, it’s best to leave it to the professionals.
Another question that often comes up is, “How much does it cost to fix a dented running board?” The cost of fixing a dented running board can vary depending on the extent of the damage and the make and model of your vehicle. On average, you can expect to pay anywhere from $100 to $500 for the repair. It’s recommended to get a quote from a professional repair shop to get an accurate estimate for your specific situation.
Resources
Have you ever noticed a dent in your running board and wondered how to fix it? Well, you’re in luck because there are several ways you can tackle this issue. One option is to use a heat gun to apply heat to the dent and then use a plunger to push it out. This method works best for smaller dents and requires patience and precision.
Another option is to use boiling water to soften the plastic of the running board, followed by using a mallet or rubber mallet to carefully pop the dent out. This method is effective for larger dents but requires caution to avoid damaging the running board further. If you’re not confident in your DIY skills, you can also take your vehicle to a professional body shop, where they have the knowledge and tools to fix the dented running board properly.
Remember, it’s important to consider the severity of the dent and your own skill level before attempting any of these methods.
List of recommended tools and materials
When it comes to DIY projects or crafts, having the right tools and materials is essential for success. Whether you’re a beginner or an experienced DIY enthusiast, having a list of recommended tools and materials on hand can make your projects easier and more enjoyable. Some basic tools that you should have in your toolbox include a hammer, screwdrivers, pliers, a tape measure, and a utility knife.
These tools will come in handy for a wide range of projects. Additionally, it’s important to have a variety of materials on hand, such as different types of wood, screws and nails, paint and brushes, and adhesive. Having a well-stocked supply of tools and materials will ensure that you’re always prepared for any project that comes your way.
References
If you find your running board dented, don’t worry, because there are a few steps you can take to fix it. First, assess the severity of the dent. If it’s a minor dent, you can try using a plunger to pop it back into place.
Simply wet the plunger and press it firmly onto the dented area, then pull it back forcefully to create suction. This can often be enough to pop the dent out. If the dent is more severe, you may need to use a heat gun to soften the metal around the dent.
Be sure to use the heat gun on a low setting and move it around the dent in a circular motion to evenly distribute the heat. Once the metal is soft, use a rubber mallet or a wooden block and hammer to gently tap the dent back into place, being careful not to create further damage. If you don’t feel comfortable attempting these repairs yourself, it’s always best to consult a professional for assistance.
In conclusion, fixing a dented running board is a manageable task if you follow the right steps. Remember to assess the severity of the dent and choose the appropriate method of repair. Whether you need to use a plunger or a heat gun, it’s important to be cautious and gentle throughout the process.
And if you’re unsure or uncomfortable with the repairs, it’s always best to seek professional help. With a little time and effort, you can restore your running board to its original condition and get back on the road in no time.
Citations for any external sources used
references. When writing a blog post or any other type of content, it is important to include references or citations for any external sources that have been used. This not only gives credit to the original authors and sources, but it also allows the reader to go back and explore the information further if they are interested.
Additionally, providing references adds credibility to the content and shows that the writer has done their research. References can take various forms depending on the type of source that has been used. For example, if a book has been referenced, the citation should include the author’s name, the title of the book, the publication date, and the page numbers of the specific information that has been used.
If an online article or website has been used, the citation should include the author’s name (if available), the title of the article or webpage, the URL, and the date of access. Including references in a blog post is not only beneficial for the reader, but it is also beneficial for the writer. By including references, the writer can easily keep track of the sources they have used and refer back to them if needed.
This can be particularly helpful if the content needs to be updated at a later date or if the writer wants to explore a specific topic further. Overall, including references is an important aspect of creating high-quality content. Not only does it give credit to the original authors and sources, but it also adds credibility to the content and allows readers to explore the information further if they are interested.
So the next time you are writing a blog post or any other type of content, don’t forget to include references!
FAQs
How did my running board get dented?
Running boards can get dented due to various reasons, such as accidentally hitting a curb, objects falling on them, or even from impacts during off-roading adventures.
Can a dented running board be fixed?
Yes, depending on the extent of the dent, a dented running board can often be repaired. However, if the damage is severe, it may be necessary to replace the running board altogether.
How much does it cost to fix a dented running board?
The cost of fixing a dented running board can vary depending on the make and model of your vehicle, as well as the severity of the dent. It’s best to consult with a professional auto body shop to get an accurate estimate.
Can I fix a dented running board myself?
It is possible to fix a minor dent on a running board yourself, especially if you have some experience with auto body repairs. However, for larger or more complex dents, it is recommended to seek the help of a professional.
How long does it take to repair a dented running board?
The time required to repair a dented running board can vary depending on the extent of the damage and the availability of parts. Minor dents can often be fixed within a few hours, while more severe damage may take a couple of days to repair.
Are there any temporary fixes for a dented running board?
If you need a temporary solution for a dented running board, you can consider using a rubber mallet to tap out the dent gently. However, keep in mind that this is not a permanent fix and should only be done as a temporary solution.
What are the advantages of fixing a dented running board?
Fixing a dented running board not only improves the appearance of your vehicle but also helps maintain its resale value. It also prevents further damage and ensures the running board functions properly.
Can a dented running board affect the vehicle’s performance? A8. While a dented running board itself may not directly affect the performance of the vehicle, it can potentially lead to other issues. For example, if the dent causes misalignment, it may affect the overall handling and stability of the vehicle.
Will insurance cover the cost of repairing a dented running board?
Whether insurance covers the cost of repairing a dented running board depends on your specific insurance policy. It’s best to check with your insurance provider to see if they offer coverage for this type of damage.
Can a dented running board be popped out from the inside?
In some cases, small dents on running boards can be popped out from the inside by accessing the area behind the dent. However, this method may not be possible for all types of dents, especially those that involve complex shapes or structural damage.
How can I prevent my running board from getting dented in the future?
To prevent running board dents, it’s important to be cautious while parking, avoid hitting curbs, and drive carefully, especially in off-road situations. Additionally, using protective accessories like mud flaps or step guards can help minimize the risk of damage.
Can a dented running board affect the vehicle’s safety?
While a dented running board itself may not pose a direct safety risk, it’s essential to ensure that the running board is securely attached and functions properly. If the dent compromises the structural integrity of the running board, it is recommended to have it repaired or replaced to maintain the overall safety of the vehicle.