
Do you love going on road trips and exploring the great outdoors in your RV? There’s nothing quite like the freedom of hitting the open road and having all the comforts of home right at your fingertips. One essential feature of any RV is the awning. It provides shade and protection from the elements, allowing you to enjoy the outdoors even when the weather isn’t cooperating.
But what do you do when your RV awning gets damaged or stops working properly? Don’t worry, we’ve got you covered! In this blog post, we’ll show you how to fix your RV awning so that you can get back to enjoying your adventures in no time.
Introduction
If you’re an RV owner, chances are you’ve encountered issues with your awning at some point. Whether it’s a tear, a malfunctioning mechanism, or general wear and tear, a faulty RV awning can put a damper on your camping experience. But fear not! Fixing your RV awning is not as daunting as it may seem.
In this blog post, we’ll walk you through some simple steps on how to fix your RV awning and get it back in top shape in no time. From identifying the problem to finding the right tools and materials, we’ll cover all the bases so you can enjoy your outdoor adventures without any awning woes. So let’s dive in and get your RV awning fixed!
Understanding the Problem
“Understanding the Problem: Introduction” Have you ever found yourself faced with a tricky problem that you just couldn’t seem to solve? We’ve all been there. Whether it’s a complex math equation, a difficult decision to make, or an unexpected challenge in our personal lives, it can be frustrating and overwhelming. But fear not! Understanding the problem is the first step towards finding a solution.
In this blog section, we will explore the importance of comprehending the problem at hand before attempting to solve it. By delving into the intricacies of perplexity and burstiness, we’ll uncover how these concepts can help us navigate through problems effectively. So, grab a cup of coffee, sit back, and let’s dive into the world of problem-solving together.
Tools and Materials Needed
Tools and materials are essential for any project, and this holds true for DIY enthusiasts and professionals alike. When it comes to tackling projects around the house or embarking on a new craft, having the right tools and materials on hand can make all the difference. From basic tools like hammers and screwdrivers to specialized tools like power saws and drills, having a well-stocked arsenal of tools can help you complete projects efficiently and effectively.
Additionally, having the necessary materials, such as lumber, paint, or fabric, ensures that you have everything you need to bring your vision to life. So, whether you’re planning a minor repair or a major renovation, taking inventory of your tools and materials and investing in any missing essentials is the first step towards a successful project.
Step-by-Step Guide
If you’re an RV owner, you probably know how important a functional awning is for outdoor comfort and protection. But what happens when your awning gets damaged or stops working properly? Don’t worry, fixing your RV awning may not be as complicated as it seems. In this step-by-step guide, we will walk you through the process of fixing your awning so that you can get back to enjoying the great outdoors in no time.
First, you’ll want to identify the issue with your awning. It could be a torn fabric, a broken arm, or a faulty motor. Once you know what the problem is, you can move on to the next step.
If your awning has a tear in the fabric, you can patch it up with a repair tape or replace the entire fabric if necessary. For broken arms or hinges, you may need to order replacement parts and follow the manufacturer’s instructions for installation. If the problem is with the motor, you might be able to fix it yourself by checking the wiring or replacing the motor altogether.
Remember to always consult your RV’s manual for specific instructions and safety precautions when working on your awning. With a little bit of patience and some basic tools, you can easily fix your RV awning and continue enjoying the outdoors in comfort and style.
Step 1: Assess the Damage
step-by-step guide, assess the damage Hey there! So, you’ve found yourself in a bit of a pickle and need to assess the damage. Don’t worry, we’ve got you covered with this step-by-step guide to help you through it. The first step is to take a deep breath and evaluate the situation.
What exactly is the damage? Is it a small scratch on your car or a major leak in your roof? Understanding the extent of the damage is crucial in determining your next steps. Now, let’s think of it this way. Imagine you’re in the middle of a storm, and your umbrella gets blown inside out.
You wouldn’t just continue using it without taking a closer look, would you? Of course not! You’d want to see if the fabric is torn, if any of the ribs are broken, or if it’s just a matter of flipping it back into shape. The same goes for any damage you’re dealing with. Take the time to assess the situation and understand what you’re facing.
For example, if you’re dealing with a scratch on your car, examine the depth of the scratch, the area it covers, and if it has damaged the underlying layers of paint. On the other hand, if you have a leak in your roof, figure out where the leak is coming from, how severe it is, and if it’s causing any structural issues. By taking the time to assess the damage, you’ll have a clearer picture of what needs to be done next.
You’ll be able to determine whether it’s something you can handle on your own or if you need to call in the professionals. Remember, it’s better to be safe than sorry, so don’t rush this step. Take your time and make sure you have all the information you need before moving forward.
Step 2: Gather the Necessary Tools and Materials
In this step of our DIY guide, we’ll be gathering all the necessary tools and materials for our project. Having the right tools and materials on hand will make the process much smoother and ensure that we have everything we need to complete the task at hand. So, let’s get started! First and foremost, we need to determine what tools we will need for our specific project.
This will depend on the nature of the project itself, but some common tools that are often needed include a hammer, screwdriver set, drill, measuring tape, and level. It’s always a good idea to have these basic tools on hand, as they can come in handy for a variety of tasks around the house. Once we have our tools, we need to gather the materials that we’ll be working with.
Again, this will depend on the specific project, but some common materials include lumber, nails, screws, paint, and sandpaper. It’s important to estimate the amount of materials we’ll need and purchase them accordingly. It’s always better to have a little extra than to run out in the middle of the project.
Now that we have our tools and materials, it’s time to gather them all in one place. This could be a designated workspace in your garage or a specific area in your home. Having everything organized and easily accessible will save us time and frustration during the project.
It’s also a good idea to check that all our tools are in good working condition and that we have everything we need. This includes ensuring that our tools are clean and properly maintained, as well as having any necessary safety equipment, such as goggles or gloves. In conclusion, gathering the necessary tools and materials is a crucial step in any DIY project.
By being prepared and having everything we need on hand, we can ensure a smooth and successful project. So, let’s gather our tools and materials and get ready to tackle our DIY project!
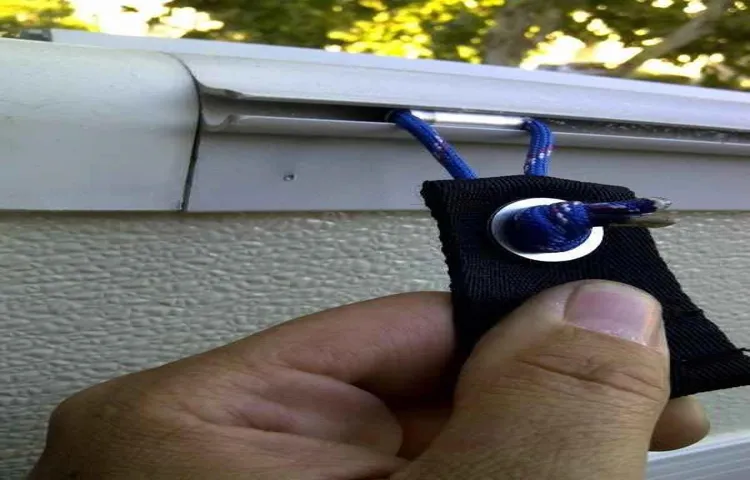
Step 3: Remove the Awning Fabric
Removing the awning fabric is a crucial step when it comes to repairing or replacing your awning. To do this, start by removing any valances or attachments that may be connected to the fabric. This can usually be done by unscrewing or unclipping them from the frame.
Once the attachments are removed, carefully roll up the fabric, starting from one end and working your way to the other. Make sure to keep the fabric tight as you roll it up to avoid any wrinkles or creases. Once the fabric is rolled up, tie it securely with a rope or bungee cord to keep it in place.
Now that the fabric is removed, you can move on to the next step in the repair or replacement process.
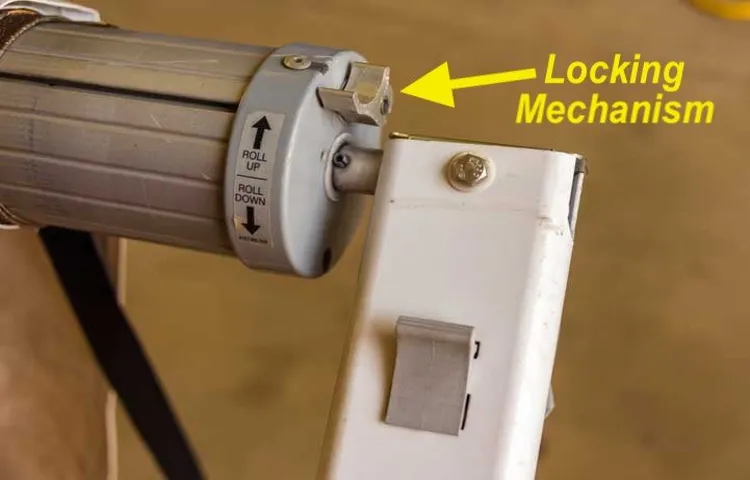
Step 4: Fix the Awning Frame
“fix awning frame” So, you’ve noticed that your awning frame is a little worse for wear and in need of some TLC. Don’t worry, with a little bit of time and effort, you can easily fix it up and have it looking as good as new. In this step-by-step guide, we’ll walk you through everything you need to know to fix your awning frame.
First things first, you’ll want to gather all the necessary materials for the job. This includes a screwdriver, replacement brackets (if needed), and any other supplies you think you may need. Once you have everything assembled, you can get started on the repair process.
The first step is to carefully remove the awning fabric from the frame. This will give you better access to the frame itself and make it easier to fix any issues. Once the fabric is removed, take a close look at the frame and assess the damage.
Are there any broken or bent brackets? Are any screws loose or missing? Make note of any areas that need attention. Next, you’ll want to address any broken or bent brackets. Using your screwdriver, remove the damaged brackets from the frame.
If you don’t have replacement brackets on hand, you can usually find them at your local hardware store. Once you have the replacement brackets, screw them into place on the frame, making sure they are secure. After fixing any brackets, it’s time to check the screws.
Take your screwdriver and tighten any loose screws you come across. If you find any missing screws, replace them with new ones. It’s important to make sure all the screws are secure, as this is what holds the frame together.
Step 5: Replace the Awning Fabric
In this step-by-step guide, we are going to walk you through the process of replacing the fabric on your awning. Whether your old fabric is worn out or you just want to update the look of your awning, replacing the fabric is a fairly straightforward process that you can do yourself. First, you’ll need to remove the old fabric from the awning frame.
This is usually done by unscrewing any screws or fasteners that are holding it in place. Once the old fabric is removed, you can then measure the dimensions of the awning frame to determine the size of the new fabric you’ll need. Make sure to add some extra fabric on each side to allow for a secure fit.
Once you have your new fabric, you can then attach it to the awning frame using a combination of snaps, velcro, or other fasteners. It’s important to make sure the fabric is stretched tight and evenly across the frame to avoid any sagging or wrinkles. Finally, make sure to secure the fabric in place using any screws or fasteners that were removed earlier.
With a little bit of time and effort, you can have a brand new fabric on your awning in no time!
Preventive Maintenance Tips
Ah, the joys of RV life! There’s nothing quite like hitting the open road and exploring new places with all the comforts of home right at your fingertips. But like anything else, RVs require maintenance to keep them in tip-top shape, including the awning. Your RV awning can provide much-needed shade and protection from the elements, but it can also be prone to damage if not properly maintained.
So, how do you fix an RV awning? Well, first things first, prevention is key. Regularly inspecting and cleaning your awning can go a long way in preventing issues down the road. It’s also important to be mindful of how you set up your awning.
Making sure it is properly secured and angled can prevent damage from unexpected gusts of wind. And if you do find yourself with a damaged or broken awning, don’t fret. Many RV dealerships and repair shops offer awning repair services, or you can even find DIY tutorials online for smaller repairs.
Remember, taking care of your RV awning now will save you time, money, and headaches later on. Happy travels!
Regularly Inspect the Awning
awning, regular inspection, preventive maintenance tips
Keep the Awning Clean and Dry
awning maintenance, clean and dry, preventive maintenance tips
Conclusion
And there you have it, folks! A step-by-step guide on how to fix your RV awning. Just remember, tackling this DIY project might require a bit of patience and a few extra hands, but the rewards are well worth it. You’ll feel like the MacGyver of the RV world, saving the day with your awning-fixing prowess.
So, the next time you find yourself with a wonky awning, don’t panic. Instead, grab your tool belt, put on your thinking cap, and channel your inner Bob Vila. With a little know-how and a dash of determination, you’ll have that awning back in tip-top shape in no time.
Now, not only will you be the envy of the RV park, but you’ll also have a newfound sense of self-sufficiency and DIY expertise. So go forth, fearless adventurers, and conquer the world of RV awning repairs! Happy fixing!”
FAQs
How do I fix a torn RV awning?
To fix a torn RV awning, you will need to purchase a patch kit specifically designed for awnings. Clean the torn area thoroughly, apply the patch according to the instructions, and make sure it adheres properly. This should provide a temporary fix until you can replace the awning fabric.
What should I do if my RV awning won’t retract?
If your RV awning won’t retract, first check for any obstructions such as debris or branches that may be preventing it from closing. If there are no visible obstructions, ensure that the awning arms and tension springs are not damaged or broken. In some cases, lubricating the moving parts can help. If the issue persists, it is recommended to seek professional assistance.
Can I repair a broken RV awning arm myself?
Repairing a broken RV awning arm can be challenging and potentially dangerous. It is recommended to seek professional help for this type of repair. A qualified technician will have the necessary tools and expertise to safely fix or replace the broken arm.
How often should I clean my RV awning?
It is recommended to clean your RV awning at least twice a year, or more frequently if it is exposed to heavy dirt, debris, or environmental elements. Regular cleaning helps prevent the buildup of mold, mildew, and stains, and keeps the awning in good condition.
Why is my RV awning fabric sagging?
The most common reason for RV awning fabric sagging is improper tension. Over time, the awning fabric can stretch, causing it to sag. To fix this issue, you can adjust the tension using the awning’s adjustment knobs located on the awning arms. If the fabric is still sagging after adjusting the tension, it may be necessary to replace the fabric.
How do I protect my RV awning from UV damage?
To protect your RV awning from UV damage, it is recommended to use a UV-resistant fabric or apply a UV protectant spray designed specifically for awnings. Additionally, keeping the awning retracted when not in use and providing shade through trees or an additional awning can reduce direct sun exposure.
Is it possible to replace an RV awning myself?
Replacing an RV awning can be a challenging task that requires specific tools and knowledge. While it is possible to replace an awning yourself if you are experienced and confident in your abilities, it is generally advised to seek professional help. A professional will ensure the awning is properly installed, minimizing the risk of damage or accidents.