
Are you having trouble with your RV awning arm? Don’t worry, you’re not alone. It’s a common problem that many RV enthusiasts face. However, with the right tools and a little bit of know-how, fixing your RV awning arm can be a straightforward and stress-free process.
In this step-by-step guide, we’ll take you through the process, helping you get your RV awning arm back to working order and allowing you to hit the road without any further delays. Trust us, once you’ve fixed your RV awning arm, you’ll be glad you did – it’s an essential component of any RV, providing shade and shelter from the elements. So, let’s get started and learn how to fix your RV awning arm!
Table of Contents
Assessing the Damage
If you’re wondering how to fix your RV awning arm, the first step is to assess the damage. You want to make sure you know what you’re dealing with before you start any repairs. This means inspecting the arm for any cracks, bends, or other damage that may have occurred.
You’ll also want to check the fabric of the awning itself to see if there are any tears or holes that need patching. Once you have a good understanding of what needs fixing, you can start researching the best course of action. Depending on the severity of the damage, you may be able to make minor repairs yourself or you may need to seek out professional help.
Either way, taking the time to fully assess the situation is crucial in determining the best approach to fixing your RV awning arm.
Inspect the Awning Arm
When inspecting awning arms, it is important to assess any damage that may have occurred over time. Damage to the arm can be caused by weather or wear and tear. Check the arm for any signs of bending, rust or cracks.
If there are any of these signs, the arm should be replaced as soon as possible to avoid further damage or risk of collapse. It’s important to keep in mind that awning arms that appear to be in good condition can also have hidden damage. Make sure to thoroughly examine the arm from all angles to ensure there are no underlying issues.
The last thing you want is for the arm to unexpectedly break and cause damage. Impressively, by simply assessing the damage on an awning arm, you can avoid potential risks and ensure the safety of your awning.
Identify the Issue
When assessing the damage of any issue, it’s important to take a step back and understand the extent of the problem. Is it something that affects only a few people or is it more widespread? Additionally, how severe is the damage? In cases of natural disasters or accidents, the damage can be physical and visible. However, in cases of social or financial issues, the damage may be more abstract or intangible.
Identifying the root cause of the issue is key to determining how to move forward in addressing the problem. It’s also crucial to consider the impact on those affected and the potential consequences if left unaddressed. By taking the time to assess the damage, we can take the appropriate steps to address the issue and prevent further harm.
Gathering the Right Tools and Materials
When it comes to fixing a damaged RV awning arm, gathering the right tools and materials is crucial. You don’t want to start the repair process only to realize you’re missing a critical piece. First, make sure you have the appropriate replacement arm to fit your specific RV model.
Next, get your hands on a drill, drill bits, screws, and a rivet gun, if needed. You may also need a ladder, pliers, and a screwdriver. It’s always better to have more tools than you need than to discover you don’t have enough.
Finally, consider using a sealant or an adhesive for added security and longevity. With the correct tools and materials on hand, you’ll be ready to tackle the repair with confidence and ease.
Tools You’ll Need
When it comes to any DIY project, gathering the right tools and materials is crucial. For a successful project, you need to make sure you have everything you need before getting started. For a DIY paint job, you will need some basic tools such as a paint roller, tray, brush, and drop cloth.
However, depending on the complexity of the surface and the type of paint you’re using, you may need additional tools such as sandpaper, masking tape, and a paint sprayer. It’s also important to use high-quality supplies such as durable paint, as well as safety gear such as gloves and goggles. Remember, investing in quality tools and materials will save you time and money in the long run.
So, before you start your painting project, make sure you have all the essential tools and materials at hand.
Materials You’ll Need
When embarking on a new project, it’s crucial to gather the right tools and materials. Before beginning, take stock of what you’ll need to ensure you have everything on hand. This will save you time and frustration down the line.
Basic tools, such as a hammer, screwdrivers, pliers, and a measuring tape, are essential for any DIY project. When it comes to materials, it’s important to use high-quality items to ensure the durability of your finished product. Depending on the project’s specific requirements, you may need to purchase wood, paint, screws, nails, or other supplies.
The right materials and tools will help you create a finished product that looks professional and will last for years to come. So, take the time to gather everything you need before beginning. It’s better to be over-prepared than to find yourself running to the store in the middle of your project.
Repairing the Arm
If you’re dealing with a broken or damaged RV awning arm, there’s no need to panic. With a few simple tools and some patience, you can fix the arm and have your awning functioning like new again. The first step is to identify the root cause of the problem.
Is the arm bent or warped? Is a joint or other component broken or damaged? Once you know what you’re dealing with, you can begin to take the necessary steps to repair the arm. This may involve replacing parts, straightening a bent arm, or making other adjustments as needed. With the right approach and a bit of effort, you should be able to get your RV awning back in working order in no time.
So, don’t let a damaged arm keep you from enjoying your outdoor adventures – get started on your repair project today!
Loosen the Tension on the Awning Fabric
When it comes to awning repair, one issue that can arise is a tension problem with the fabric. The fabric may become too tight, causing it to tear or become damaged. To fix this problem, you’ll want to take a look at the arm of the awning.
The arm is what controls the tension of the fabric, and if it’s not functioning properly, it can cause the fabric to be too tight. Inspect the arm for any damage or wear, and if necessary, replace or repair it. Once the arm is back in working order, adjust the tension of the fabric accordingly.
By addressing the problem at the source, you’ll be able to loosen the tension on the awning fabric and prevent any further damage. So, the next time you notice your awning fabric is too tight, take a closer look at the arm to see if it needs any attention.
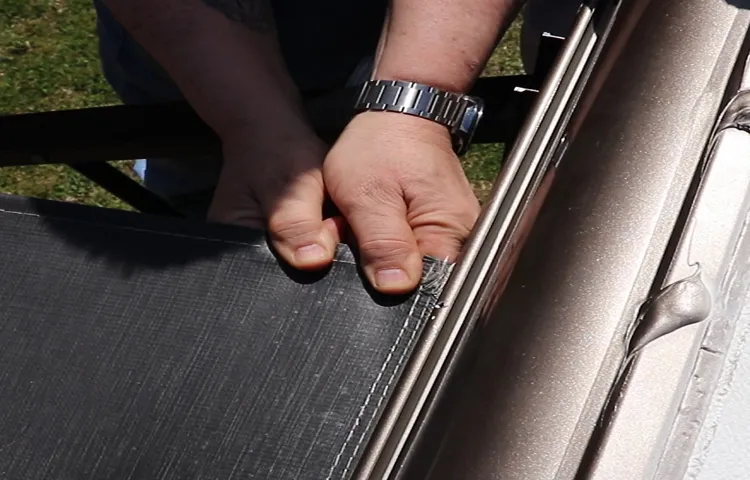
Remove the End Cap on the Damaged Arm
Removing the end cap on the damaged arm is the first step in repairing it. This end cap covers the end of the arm and allows it to attach to other parts of the equipment. To remove it, you will need a specific tool that fits into the end cap and twists it off.
Once removed, you can inspect the arm for any damage or wear and tear. It’s essential to check for any cracks or signs of wear that could impede its performance. If you notice any issues, it’s best to replace the arm entirely rather than try to repair it.
By removing the end cap and examining the arm, you can determine the best course of action and ensure your equipment is operating at optimal performance.
Replace or Repair the Damaged Arm
Repairing the Arm When the arm of your precious chair or sofa becomes damaged, the best solution will depend on the situation. If the arm has minor damages, like small scratches or chips in the wood, repairing it may be the best choice. There are many ways to repair a damaged arm, depending on the material and severity of the damage.
For example, if the wood is only slightly damaged, sanding down the area and applying wood filler and paint or stain can make the damage virtually invisible. For more serious damages, such as broken or split wood, it’s important to consider the structural integrity of the arm before proceeding with any repairs. In cases like this, it’s best to consult with a professional furniture repair specialist to ensure the arm is repaired safely and correctly.
Overall, repairing a damaged arm of a piece of furniture can be a cost-effective and practical solution, but it’s important to assess the damage and consider all options before making a decision.
Re-Install the Awning Fabric and End Cap
If you’re experiencing issues with your awning arm, don’t panic! It’s possible to repair it and get it working again. Start by identifying the problem, such as a bent or broken arm. Once you know what needs to be fixed, remove the fabric and end cap from the damaged arm.
Then, carefully disassemble the arm to access the broken component. Depending on the nature of the damage, you may be able to repair the part or replace it entirely. Reassemble the arm and test it to ensure it’s working properly.
Once the arm is fixed, you can re-install the awning fabric and end cap. By tackling the repair on your own, you’ll save money and ensure your awning is fully functional for years to come. Remember, with a little patience and some handy tools, you can repair almost any awning arm issue.
Additional Tips
If you need to fix your RV awning arm, there are a few additional tips to keep in mind to ensure the process goes smoothly. Firstly, make sure you have all the necessary tools and materials before you begin. This includes a ladder, wrench, silicone spray, and replacement parts if needed.
Secondly, don’t rush the process. Take your time to carefully inspect the awning arm and identify the root cause of the problem before attempting to fix it. Thirdly, double check all the screws and bolts to make sure they’re tightened properly.
Lastly, consider scheduling regular maintenance for your RV awning to prevent issues from arising in the future. By following these tips, you can fix your RV awning arm effectively and efficiently.
Regular Maintenance is Key
Regular maintenance is key to keeping your home in tip-top shape. Not only does it prevent major repairs down the line, but it also helps you save money in the long run. However, there are a few additional tips you can use to ensure that your regular maintenance is as effective as possible.
First and foremost, don’t overlook the power of preventative measures. For example, regularly cleaning your gutters can prevent water damage from occurring in the first place. Additionally, it’s important to prioritize maintenance tasks based on their level of importance.
For example, fixing a leaky roof should take precedence over painting your kitchen cabinets. Lastly, consider investing in professional services for certain tasks. While DIY projects can be satisfying, some repairs require specialized knowledge and equipment to be completed safely and effectively.
By following these additional tips, you can make sure that your regular maintenance efforts are maximizing your home’s longevity and value.
Consider Professional Repairs
When it comes to repairing your broken appliances, it can be tempting to try and fix the issue yourself. However, if you don’t have experience in repairing appliances, it’s best to consider professional repairs. Hiring a professional not only ensures that the repair is done correctly and safely, but it can also save you money in the long run.
Additionally, professionals have access to specialized tools and knowledge that can help them diagnose and fix the issue quickly. When choosing a professional, make sure to do your research and only hire someone reputable and experienced. By choosing professional repairs, you can have peace of mind knowing that your appliance will be back in working order in no time.
Remember, sometimes it’s best to leave it to the experts.
Conclusion – Enjoy Your Fully-Functioning Awning!
In conclusion, fixing an RV awning arm is not rocket science, but it can be a bit tricky. The key is to approach the task with patience and a clear understanding of the components involved. Remember to inspect the arm carefully for any signs of wear or damage and to consult the manufacturer’s instructions for specific guidance.
And as always, if all else fails, don’t be afraid to call in the professionals. With a little bit of know-how and a lot of determination, you’ll have your awning arm back in tip-top shape in no time.”
FAQs
What are the common reasons why an RV awning arm needs fixing?
The most common reasons are wear and tear, rust, and damage from weather or accidents.
How can I tell if my RV awning arm needs fixing?
Signs of a damaged or broken RV awning arm include sagging, tearing, difficulties in extending/retracting the awning, and unusual sounds when moving the arm.
What tools do I need to fix an RV awning arm?
Common tools needed include pliers, screwdrivers, wrenches, drills, hammer, and a ladder.
Can I fix an RV awning arm myself or should I seek professional help?
It depends on the level of damage and your DIY skills. Minor damages can be repaired yourself, but major repairs or replacements require a professional touch.
How long does it take to fix an RV awning arm?
The time required to fix an RV awning arm varies depending on its condition and the complexity of the repair. Simple fixes can be done in a few hours, but major repairs can take up to a day or two.
What should I do if my RV awning arm cannot be fixed?
If the damage to your RV awning arm is beyond repair, you may need to replace it. Contact a professional RV repair service provider to replace the awning arm.
How can I prevent damage to my RV awning arm?
The best way to prevent damage to your RV awning arm is to perform regular inspections, keep it clean, avoid driving with the awning out, and protect it from harsh weather conditions.