Having trouble with your ATV winch switch? Don’t worry, you’re not alone. It can be frustrating when your winch switch stops working properly, leaving you stranded in a sticky situation. But fear not, because in this blog post, we’re going to show you how to fix a worn ATV winch switch and get you back on track.
Just imagine you’re out on an off-road adventure, exploring rugged terrains and conquering obstacles when suddenly, your ATV gets stuck. You reach for the winch switch, hoping it will save the day. But to your disappointment, it’s not responding as it should.
Now what? Well, the first step is to assess the situation and determine if the issue lies with the winch switch itself. Oftentimes, a worn or faulty switch can be the culprit. The constant exposure to dirt, moisture, and rough handling can take a toll on its performance over time.
So, how do you fix it? The good news is that it’s not as complicated as it may seem. In most cases, all you need is some basic tools, a replacement switch, and a little bit of patience. We’ll guide you through the process step by step, making it as simple and straightforward as possible.
Think of it as giving your ATV winch switch a much-needed spa day. Just like how a massage can rejuvenate your tired muscles, fixing a worn switch can breathe new life into your ATV’s winch system. And once it’s working smoothly again, you’ll be able to navigate even the toughest terrains with ease.
So, whether you’re a seasoned ATV enthusiast or a beginner, don’t let a worn winch switch hold you back from enjoying your off-road adventures. With a little bit of know-how and our handy guide, you’ll be able to fix that switch in no time. So, let’s dive in and get you back on the trails!
Table of Contents
Introduction
If you’re having trouble with your WARN ATV winch switch, don’t worry! In this blog post, we’re going to show you how to fix it step-by-step. The first thing you’ll want to do is make sure that the winch switch is properly connected to the control pack. Sometimes, the wiring connection can come loose, causing the switch not to work.
Simply check the connections and tighten them if necessary. If that doesn’t fix the issue, you’ll want to inspect the switch itself for any signs of damage. Look for any broken or corroded parts that may be causing the switch to malfunction.
If you find any damaged components, you may need to replace the switch altogether. However, if the switch appears to be in good condition, the problem may lie with the control pack. In this case, you’ll want to consult the manufacturer’s instructions or seek professional assistance to diagnose and fix the issue.
So, with a few simple checks and troubleshooting steps, you’ll be able to get your WARN ATV winch switch working like new again in no time.
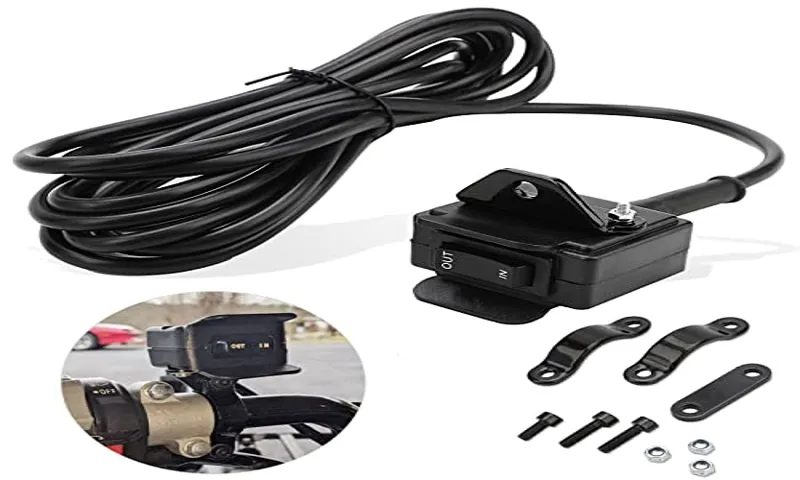
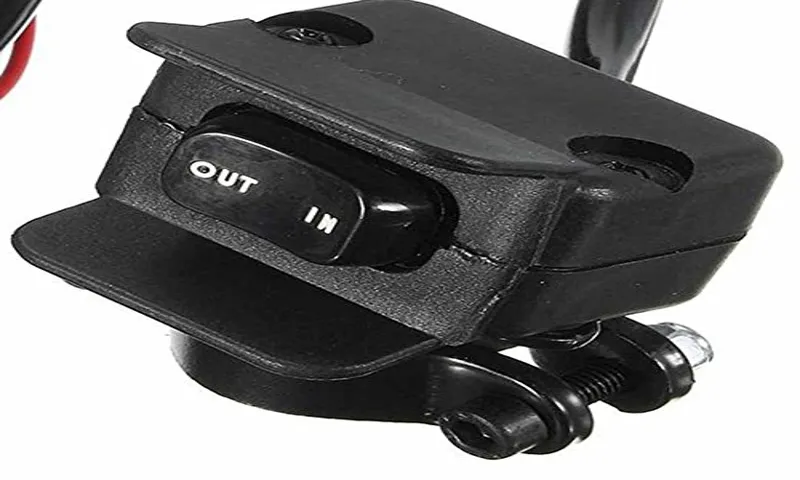
Overview of Warn ATV Winch Switch
Warn ATV winch switch
Common Problems with Warn ATV Winch Switch
Are you experiencing problems with your Warn ATV winch switch? Don’t worry, you’re not alone. Many ATV owners encounter issues with their winch switches, but luckily, there are some simple fixes you can try yourself. One common problem is a switch that is unresponsive or intermittently working.
This could be due to a loose connection or dirt and debris clogging the switch mechanism. To fix this, start by ensuring all the connections are secure and tight. If that doesn’t solve the issue, carefully clean the switch with compressed air or a small brush to remove any dirt or debris.
Another common problem is a switch that gets stuck in one position or is difficult to operate. This could be caused by worn-out contacts or a faulty switch assembly. In this case, you may need to replace the switch altogether.
It’s always a good idea to consult the user manual for specific instructions on troubleshooting and replacing the winch switch. By following these tips, you should be able to get your Warn ATV winch switch back in working order and get back to enjoying all the benefits of your winch.
Switch not responding
If you’ve ever owned an ATV winch, you know how important it is to have a functioning switch. However, sometimes you may encounter a common problem – the switch not responding. This can be frustrating, especially if you’re stuck in a sticky situation and relying on your winch to get you out.
But fear not, there are a few common reasons why your ATV winch switch may not be responding. Firstly, it’s possible that there may be a loose connection somewhere in the switch wiring. Over time, vibrations from off-road use can cause wires to become loose or disconnected.
Take a look at the wiring connections and make sure everything is securely fastened. If you notice any loose wires, tighten them up and see if that solves the issue. Another common issue is a faulty switch.
Like any electrical component, switches are susceptible to wear and tear. If you’ve checked the wiring connections and everything seems to be in order, it may be time to consider replacing the switch. Be sure to get a switch that is compatible with your specific ATV winch model to ensure a proper fit and functionality.
Lastly, it’s also worth checking the winch motor itself. If the motor has seized or is not functioning properly, it can cause the switch to not respond. Inspect the motor for any signs of damage or corrosion.
If you suspect the motor is the issue, it may be best to consult a professional or contact the manufacturer for further assistance. In conclusion, a non-responsive switch on your ATV winch can be a frustrating problem. By checking the wiring connections, replacing a faulty switch, or inspecting the winch motor, you can potentially resolve the issue and get back to enjoying your off-road adventures.
Switch getting stuck
One common problem that ATV owners may encounter with their winch switch is it getting stuck. This can be quite frustrating, especially when you’re trying to use your winch for a recovery or other task. But why does the switch get stuck in the first place? There could be a few reasons for this issue.
One possible reason is that dirt, dust, or debris has gotten into the switch mechanism, making it difficult to move. This can happen if you use your ATV in muddy or dusty conditions. Over time, the accumulation of dirt and debris can cause the switch to become sticky and hard to operate.
Another possible reason for a stuck switch is that it has been damaged or worn out. Over time, the repeated use of the winch switch can cause it to wear down or break. This can result in the switch becoming stuck in one position or not working at all.
So what can you do if your winch switch gets stuck? The first thing you should try is cleaning the switch mechanism. Use a soft brush or compressed air to remove any dirt or debris that may be causing the switch to stick. If this doesn’t solve the problem, you may need to replace the switch altogether.
To prevent your winch switch from getting stuck in the future, make sure to keep it clean and free of dirt and debris. You can also consider using a switch cover or protective case to shield it from environmental factors. In conclusion, a stuck winch switch is a common problem that ATV owners may encounter.
The switch can get stuck due to dirt, dust, or debris getting into the mechanism or due to wear and tear. It’s important to keep the switch clean and consider using protective measures to prevent it from getting stuck in the future.
Switch not working in one direction
One common problem that people may encounter with their Warn ATV winch switch is that it may not work in one direction. This can be frustrating and prevent you from being able to properly operate your winch. There are a few potential reasons why this issue may arise.
One possible cause is a malfunctioning or worn-out switch. Over time, the switch contacts can become dirty or worn, leading to a lack of connection or a poor connection. Another possible cause is a problem with the wiring or connections.
If there is a loose or damaged wire, it may not be able to provide power to the winch motor in one direction. It is also possible that there is an issue with the winch motor itself. If the motor is faulty, it may not be able to operate in one direction.
In any case, it is important to diagnose the issue and address it as soon as possible to ensure that your winch is functioning properly when you need it.
Switch not lighting up
Switch not lighting up Common Problems with Warn ATV Winch Switch Are you having trouble with your ATV winch switch not lighting up? Don’t worry, you’re not alone. This is actually a common problem that many ATV owners face. There are a few possible reasons why your switch isn’t lighting up, and knowing what they are can help you troubleshoot the issue more effectively.
One possible reason for your switch not lighting up is a faulty connection. Over time, the wiring in your ATV can become worn or damaged, leading to a weak or disrupted connection. This can prevent the power from reaching the switch and causing it to malfunction.
Checking your wiring for any signs of damage, such as frayed or exposed wires, can help you identify if this is the issue. Another common culprit for a non-lighting switch is a blown fuse. The fuse is designed to protect the electrical system from overloading, and when it blows, it cuts off the power flow.
If your switch isn’t lighting up, check the fuse box to see if any fuses have blown. If you find a blown fuse, simply replace it with a new one of the same amperage rating. Finally, the switch itself could be defective.
Over time, switches can wear out or become faulty, preventing the flow of electricity. In this case, you may need to replace the switch to fix the issue. It’s always a good idea to consult with a professional or refer to your ATV’s manual for specific instructions on how to replace a switch.
In conclusion, if your ATV winch switch is not lighting up, there are a few possible reasons for this issue. Checking the wiring for any damage, inspecting the fuse box for blown fuses, and considering the possibility of a faulty switch are all helpful troubleshooting steps. By identifying and addressing the underlying cause, you can get your winch switch back to lighting up and working properly again.
Troubleshooting Steps
If you’re having trouble with your WARN ATV winch switch, don’t worry, you’re not alone. Many ATV owners encounter issues with their winch switches at some point. The good news is that there are some troubleshooting steps you can take to try and fix the problem.
Firstly, check the connections between the switch and the winch motor. Make sure they are secure and free from any corrosion or damage. If everything looks good there, the next step is to test the switch itself.
You can do this by using a multimeter to check for continuity when the switch is activated. If there is no continuity, it may be a sign that the switch needs to be replaced. Another possible cause of the problem could be a faulty solenoid.
Test the solenoid to see if it is receiving power and functioning correctly. If none of these steps resolve the issue, it may be time to contact a professional or seek assistance from the manufacturer.
Step 1: Check the power supply
power supply, troubleshooting steps, check the power supply Imagine this scenario: you’re sitting at your desk, ready to use your computer, but when you press the power button, nothing happens. Before you start panicking and thinking of the worst-case scenario, take a deep breath and start with step one of troubleshooting: check the power supply. The power supply is the vital component that provides electricity to all the other parts of your computer.
If there is an issue with the power supply, it could result in your computer not turning on or experiencing intermittent power loss. So, let’s start by checking if the power supply is the culprit behind your computer’s woes. First, make sure that the power cable is securely plugged into both the power supply unit and the wall socket.
Sometimes, the cable can get accidentally unplugged or become loose over time. Give it a gentle wiggle to ensure a secure connection. Next, check if the power socket you’re using is working correctly.
Plug in another electronic device, such as a lamp or a phone charger, to see if it receives power. If the other device doesn’t work, you might have a problem with the electrical outlet or circuit breaker. In that case, consult an electrician to resolve the issue.
If the power socket is working fine, it’s time to inspect the power supply itself. Unplug the power cable from the wall socket and open your computer case. Locate the power supply unit, which is usually a box-shaped component near the top or bottom of the case.
Check if all the cables running from the power supply, such as the ones connected to the motherboard and drives, are securely plugged in. While you’re inside the computer case, take a moment to inspect the power supply itself. Look for any signs of physical damage, such as bulging capacitors or burns.
Step 2: Inspect the switch for dirt or debris
When troubleshooting a switch that is not functioning properly, one of the first steps you can take is to inspect it for dirt or debris. Over time, switches can gather dust, dirt, or other particles, which can interfere with their performance. By carefully examining the switch, you can identify any visible dirt or debris that may be affecting its operation.
This can include anything from loose dirt to small pieces of debris that have become trapped in the switch mechanism. If you notice any dirt or debris, you can gently clean the switch using a soft cloth or compressed air. By doing so, you may be able to eliminate the source of the problem and restore the switch to proper functionality.
Remember, it’s important to handle the switch with care and avoid using excessive force or abrasive cleaning agents, as this could cause further damage.
Step 3: Check the connections
Step 3 in troubleshooting connection issues is to check the connections. Sometimes, the problem is as simple as a loose cable or a disconnected wire. So, take a moment to visually inspect all the connections and make sure everything is securely plugged in.
Check that the Ethernet cable is properly connected to both the modem and your device. If you’re using a wireless connection, make sure your device is within the range of the router and that the wireless adapter is turned on. Also, check if there are any damaged or frayed cables that might be causing the issue.
Poor connections can lead to weak or unstable signals, resulting in slow or intermittent internet connections. So, it’s worth taking the time to ensure all your connections are tight and secure. By doing this, you can eliminate any connection-related issues and move on to troubleshooting other potential causes.
Step 4: Test the winch motor
Testing the winch motor is an important step in troubleshooting any issues with your winch. There are a few simple steps you can follow to determine if the motor is the problem. First, check the power source to ensure it is supplying the correct voltage.
If the power supply is working properly, disconnect the winch motor from the rest of the system and connect it directly to a battery. Turn the winch on and listen for any clicking or humming sounds. If you hear these sounds, it indicates that the motor is working and the issue may lie elsewhere.
However, if the motor does not make any noise or spins slowly, it could be a sign of a malfunctioning motor that needs to be replaced. By testing the winch motor, you can pinpoint any issues and determine the best course of action to fix the problem.
Step 5: Replace the switch if necessary
If you’ve gone through the previous steps and still haven’t resolved the issue with your switch, it might be time to consider replacing it. Switches can wear out over time or suffer from internal damage, which can lead to malfunctions. Before replacing it, though, it’s a good idea to double-check that the problem is indeed with the switch and not with any other component or peripheral.
You can try connecting the problematic device to a different switch or connecting a different device to the same switch to see if the problem persists. If you’ve determined that the switch is indeed the culprit, replacing it with a new one should solve the issue and restore proper functionality to your network. Make sure to choose a switch that meets your specific needs in terms of port count, speed, and features.
Preventive Maintenance Tips
If you have an ATV with a winch, you probably rely on it for various tasks and adventures. But what happens when the winch switch starts to act up or stops working altogether? Don’t worry, you may be able to fix it yourself. One common issue with ATV winch switches is that they can become warn or damaged over time.
This can cause them to malfunction or become unresponsive. To fix this issue, you can start by inspecting the switch for any visible damage or wear. If you notice any worn-out or broken parts, you may need to replace them.
You can find replacement switches online or at your local ATV parts store. If the switch appears to be in good condition, you can try cleaning it with a contact cleaner or some compressed air. Sometimes, dirt and debris can build up on the switch, causing it to malfunction.
Cleaning it may resolve the issue. If neither of these solutions works, you may need to seek professional help or consider replacing the winch switch altogether. Remember, regular maintenance and inspection of your ATV winch switch can help prevent issues from arising in the first place, so make sure to keep it in good condition.
Clean and lubricate the switch regularly
clean and lubricate the switch regularly, preventive maintenance tips When it comes to taking care of our belongings, a little bit of maintenance can go a long way. The same goes for the switches in our homes. Switches are something we use every day, whether it’s turning on the lights or operating appliances.
To keep them in good working order, it’s important to clean and lubricate the switch regularly. This simple preventive maintenance tip can help prolong the life of your switch and prevent any potential issues down the line. Cleaning the switch is the first step in the process.
Over time, dust, dirt, and debris can accumulate on the surface of the switch, which can affect its performance. Using a soft cloth or a brush, gently wipe away any dirt or grime on the switch. Take care not to use any abrasive materials or liquids that could damage the switch.
Once the switch is clean, it’s time to lubricate it. Lubricating the switch involves applying a small amount of lubricant to the moving parts of the switch. This helps to reduce friction and ensure smooth operation.
There are several types of lubricants available, such as silicone-based or graphite lubricants. Check the manufacturer’s recommendations or consult a professional for the best type of lubricant to use for your specific switch. To lubricate the switch, first, turn off the power to the switch at the circuit breaker.
Next, remove the switch plate cover to access the switch itself. Apply a small amount of lubricant to a clean cloth and gently apply it to the moving parts of the switch. Avoid applying too much lubricant, as it can attract dust and debris.
Avoid overloading the winch
winch, overloading, preventive maintenance tips Preventive maintenance is crucial when it comes to ensuring the longevity and efficiency of your winch. One important tip to keep in mind is to avoid overloading the winch. Overloading occurs when you exceed the weight capacity of the winch, which can lead to unnecessary strain and potential damage.
To prevent overloading, it is essential to know the weight limits of your winch and to always use caution when lifting heavy loads. Additionally, regularly inspecting the winch for any signs of wear or damage is essential to catch any issues before they become more serious. By following these preventive maintenance tips, you can ensure that your winch operates smoothly and safely for years to come.
Store the winch in a dry place
One crucial aspect of maintaining your winch is ensuring it is properly stored in a dry place. This is important because winches are often exposed to a variety of weather conditions, and moisture can cause damage to its internal components. If the winch is left outside or stored in a damp area, there is a higher chance of water seeping into the motor or the electrical wiring system, leading to corrosion and electrical shorts.
By storing the winch in a dry place, such as a garage or a shed, you can protect it from the harmful effects of moisture and extend its lifespan. Additionally, storing it in a dry place also helps to prevent the buildup of dirt, dust, and debris, which can also negatively impact the performance of the winch. So, when it comes to maintaining your winch, don’t forget to find a snug and dry spot for it to call home.
Conclusion
And there you have it, my friends! The ultimate guide on how to fix your worn ATV winch switch. We’ve covered all the bases, from diagnosing the issue to providing step-by-step instructions on how to replace the switch. But let’s be honest, fixing a worn winch switch is just the tip of the iceberg when it comes to ATV maintenance.
It’s like trying to fix a broken window on a spaceship while floating in outer space – it’s an accomplishment, but it’s just a tiny part of the grand adventure that is off-roading. So, if you’re an avid ATV enthusiast, don’t stop here – keep exploring, keep tinkering, and keep pushing the boundaries of what your trusty four-wheeler can do. After all, a winch switch is just a small cog in the machine, and it’s the combination of all the parts working together that truly makes an ATV come alive.
Now, go out there and conquer that muddy terrain, climb those treacherous hills, and show the world just what a determined ATV owner can achieve. And who knows, maybe one day you’ll find yourself facing a brand new challenge, with a worn winch switch replaced and a renewed sense of adventure in your heart. But remember, dear readers, as you embark on your journey, always stay safe, respect nature, and be prepared for whatever obstacles may come your way.
And if you ever find yourself in a bind with your trusty winch switch again, just come back to this guide, and I’ll be here waiting to help you through it. So, here’s to the thrill-seekers, the off-road warriors, and the mechanical maestros – may your winches be mighty, your switches be sturdy, and your ATV adventures be never-ending. Happy trails, my friends!”
FAQs
How do I fix a warn ATV winch switch that is not working?
If your warn ATV winch switch is not working, try the following steps to fix it:
– Check the wiring connections to ensure they are secure and not damaged.
– Inspect the switch for any signs of damage or wear, such as loose or broken components.
– Clean the switch contacts with electrical contact cleaner to remove any dirt or debris that may be causing a poor connection.
– Test the switch with a multimeter to verify if it is functioning properly. If not, consider replacing the switch.
How can I troubleshoot a warn ATV winch switch that is unresponsive?
If your warn ATV winch switch is unresponsive, you can try these troubleshooting steps:
– Check the battery voltage to ensure it is sufficient to power the winch. A low battery can cause the switch to be unresponsive.
– Inspect the wiring connections to ensure they are not loose, damaged, or corroded.
– Verify that the winch motor and solenoid are functioning properly by bypassing the switch and directly applying power to the winch.
– If the winch operates fine when bypassing the switch, the issue may be with the switch itself and you may need to replace it.
Why does my warn ATV winch switch get stuck in the on position?
If your warn ATV winch switch gets stuck in the on position, it could be due to several reasons:
– The switch may be physically stuck due to dirt, debris, or corrosion. Try cleaning the switch thoroughly and lubricating it with contact cleaner or electrical grease.
– The internal mechanism of the switch may be worn or faulty. In such cases, replacing the switch is the best solution.
– Wiring issues, such as short circuits or faulty connections, can also cause the switch to become stuck in the on position. Inspect the wiring carefully and fix any issues.
Can I repair a warn ATV winch switch or do I need to replace it?
In some cases, you may be able to repair a warn ATV winch switch, especially if the issue is due to loose wiring or dirt/debris buildup. However, if the switch is faulty or worn beyond repair, it is recommended to replace it with a new one.
How do I choose the right warn ATV winch switch for my vehicle?
To choose the right warn ATV winch switch for your vehicle, consider the following factors:
– Compatibility: Check if the switch is compatible with your winch model and the electrical system of your ATV.
– Quality: Look for a switch made by a reputable brand with good reviews to ensure reliability and longevity.
– Features: Consider the features you require, such as waterproofness, illuminated buttons, or wireless operation.
– Price: Compare prices from different suppliers to get the best value for your money.
Are there any safety precautions I should take when working with a warn ATV winch switch?
Yes, it is important to take certain safety precautions when working with a warn ATV winch switch:
– Turn off the power to the winch before working on the switch to prevent accidental activation.
– Use insulated tools to avoid electrical shock.
– Wear protective gloves and eyewear to protect yourself from any potential hazards.
– Follow the instructions provided by the manufacturer for proper installation and usage of the switch.
How can I prevent future issues with my warn ATV winch switch?
To prevent future issues with your warn ATV winch switch, consider these tips:
– Regularly inspect and clean the switch to remove any dirt or debris that may cause problems.
– Ensure proper wiring connections and secure them tightly.
– Avoid overloading the winch beyond its capacity, as it can put excessive strain on the switch and other components.
– Follow the manufacturer’s guidelines for maintenance and usage of the winch and switch.