
Hey there! Welcome to our blog on the topic of “Introduction.” If you’re curious about what an introduction is and why it holds so much importance, you’ve come to the right place. Think of an introduction as the opening act of a play or the first chapter of a book.
It sets the stage, grabs your attention, and gives you a taste of what’s to come. In the same way, an introduction in writing serves as a guide to the rest of your content. So, why is a good introduction vital? Well, it’s your chance to make a strong first impression on your audience.
It’s the initial opportunity to engage them and persuade them to keep reading. A well-crafted introduction can pique their curiosity, provide them with pertinent information, and make them eager to delve deeper into your content. Imagine you’re at a party, and someone you’ve never met walks up to you and starts telling you a story without any context or preamble.
You’d probably be a bit confused, right? The same goes for writing. An introduction serves to establish the topic, introduce key concepts, and provide some background information. It acts as a roadmap for your readers, guiding them through your content and helping them understand what to expect.
Additionally, an effective introduction can play a role in establishing your credibility and expertise. By showcasing your knowledge and understanding of the subject matter, you can build trust with your audience and position yourself as an authority in your field. To summarize, introductions are the gateways to your content.
They grab your readers’ attention, provide context, and set the stage for what’s to come. So, whether you’re writing an essay, a blog post, or an email, be sure to spend some time crafting a captivating and informative introduction. Trust us, it’s worth the effort!
Table of Contents
- 1 What is a coolant system?
- 2 Why is it important to flush a coolant system?
- 3 Step 1: Gather the necessary tools and materials
- 4 Step 2: Prepare the vehicle
- 5 Step 3: Drain the old coolant
- 6 Step 4: Flush the coolant system
- 7 Step 5: Run the engine
- 8 Step 6: Drain and fill with new coolant
- 9 Step 7: Check for leaks
- 10 Step 8: Dispose of the old coolant
- 11 Regularly flushing your coolant system is important for maintaining the health and performance of your vehicle’s engine. By following these step-by-step instructions, you can ensure that your coolant system is clean and functioning properly, helping to prevent overheating and engine damage.
- 12 Conclusion
- 13 FAQs
What is a coolant system?
Flushing a coolant system may sound daunting, but it’s actually a straightforward process that can help keep your car running smoothly. A coolant system is an essential part of your vehicle’s engine, and it helps regulate the temperature to prevent overheating. Over time, the coolant in your system can become contaminated with dirt, rust, and other debris, which can hinder its ability to cool the engine effectively.
Flushing the system involves draining the old coolant and replacing it with fresh coolant. This not only helps maintain the cooling efficiency of your engine but also helps prevent corrosion and prolongs the lifespan of your system. So, if you notice that your vehicle is overheating or the coolant has become dirty or discolored, it’s time to flush your coolant system.
Don’t worry, with the right tools and a little bit of time, you can easily perform this maintenance task and keep your engine running smoothly.
Why is it important to flush a coolant system?
Flushing a coolant system is an essential maintenance task for vehicles, and it’s important to understand why. Over time, the coolant in a car’s radiator can become contaminated with dirt, rust, and other debris. This buildup can lead to clogs and blockages in the cooling system, reducing its efficiency and potentially causing the engine to overheat.
Flushing the coolant system involves draining the old coolant and replacing it with fresh coolant, along with a cleaning agent that helps remove any residue. By doing this, you can ensure that the cooling system is running at its best, preventing any potential damage or breakdowns. So, if you want to keep your engine cool and running smoothly, don’t forget to flush your coolant system regularly.
Have you ever wondered how to flush a coolant system in your car? Your vehicle’s coolant system plays a crucial role in keeping the engine cool and preventing it from overheating. Over time, the coolant can become contaminated with dirt, rust, and other particles, causing it to lose its effectiveness. Flushing the coolant system is a simple yet essential maintenance task that can help prolong the life of your engine and ensure optimal performance.
Think of your car’s coolant system as a vital organ, like the heart, that keeps everything running smoothly. Just like the heart pumps blood to nourish the body, the coolant system circulates coolant to absorb heat from the engine and transport it to the radiator, where it is released into the air. However, if the coolant becomes dirty or degraded, it can hinder this process, leading to potential engine damage.
Flushing the coolant system involves draining the old coolant and flushing the system with a mixture of water and a specially formulated coolant cleaner. This helps remove any deposits or contaminants that may have accumulated over time. Once the system is flushed, fresh coolant can be added, restoring its cooling properties and allowing the engine to operate at the optimal temperature.
Performing a coolant system flush is relatively straightforward, but it requires attention to detail and following the manufacturer’s guidelines for your specific vehicle. It is essential to know the type of coolant recommended for your car and the proper mixture ratio. Additionally, you will need basic tools such as a drain pan, a wrench or pliers for removing the drain plug, and a funnel for refilling the system.
Regularly flushing your coolant system is a preventative maintenance task that can save you from costly repairs down the road. By keeping the coolant clean and free from contaminants, you can help prevent engine overheating, corrosion, and premature wear. So, if you notice your engine running hotter than usual or if it’s been a while since your last coolant system flush, it may be time to give your car’s cooling system the attention it deserves.
In conclusion, knowing how to flush a coolant system is an essential skill for any car owner. It not only helps maintain the overall health of your engine but also ensures that your car performs optimally. So, don’t wait until a cooling system failure leaves you stranded on the side of the road.
Step 1: Gather the necessary tools and materials
If you want to learn how to flush a coolant system, the first step is to gather all the necessary tools and materials. This will ensure that you have everything you need to complete the job efficiently and effectively. Some of the tools you may need include a socket set, a drain pan, a coolant tester, and a hose clamp pliers.
Additionally, you will need some materials such as a new coolant, distilled water, a funnel, and some rags or towels to clean up any spills. Having all these items ready before you begin will make the process much smoother and prevent any delays or frustration. So, take a few moments to gather everything you need, and let’s get started on flushing your coolant system!
Tools: drain pan, adjustable wrench, funnel
When it comes to changing your car’s oil, having the right tools and materials is essential. To get started, gather the necessary tools and materials, including a drain pan, adjustable wrench, and funnel. A drain pan is used to catch the old oil as it is drained from the engine, preventing it from spilling onto the ground.
An adjustable wrench is needed to loosen the oil filter and drain plug, allowing the old oil to be removed. Lastly, a funnel is used to pour the new oil into the engine without making a mess. By having these tools on hand, you’ll be well-prepared to tackle the oil change process and keep your car running smoothly.
Materials: coolant, distilled water, coolant flush solution
When it comes to performing a coolant flush on your vehicle, it’s important to gather all the necessary tools and materials before you begin. This will ensure that you have everything you need and can complete the task efficiently. One of the main materials you will need is coolant, which is a mixture of water and antifreeze.
This helps to regulate the temperature of your vehicle’s engine and prevent it from overheating. It’s important to use the correct type of coolant for your specific vehicle, so be sure to check your owner’s manual or consult a professional if you’re unsure. You will also need distilled water for the flush.
Distilled water is free from impurities and minerals, which can cause buildup and damage to your vehicle’s cooling system. It’s important to use distilled water rather than tap water to ensure the best results. Lastly, you will need a coolant flush solution.
This is a chemical solution that helps to remove any buildup or debris from your cooling system. It’s important to choose a flush solution that is compatible with your vehicle’s cooling system and follow the instructions provided. By gathering these tools and materials before you start the coolant flush process, you can ensure that you have everything you need to complete the task effectively and maintain the health of your vehicle’s cooling system.
So gather your coolant, distilled water, and coolant flush solution, and let’s get started!
Step 2: Prepare the vehicle
Now that you’ve gathered the tools and materials you’ll need for the job, it’s time to prepare the vehicle for the coolant flush. First, make sure the engine is cool to avoid any potential burns. Park the car on a flat surface and apply the parking brake for added safety.
Next, locate the radiator and the coolant reservoir. The radiator is usually at the front of the engine bay, while the coolant reservoir is usually a smaller plastic tank connected to the radiator. It’s important to identify both because the flushing process will involve draining and refilling both.
Once you’ve located them, you can proceed to the next step of the coolant flush process.
Park the vehicle on a flat surface and let the engine cool down
Preparing your vehicle properly before working on the engine is crucial for safety and efficiency. Step 2 of this process includes parking the vehicle on a flat surface and allowing the engine to cool down. Why is this important? Well, parking on a flat surface ensures stability and prevents any potential accidents or mishaps while you’re working on the engine.
It’s vital to have a stable and secure environment to avoid any accidents. Furthermore, letting the engine cool down allows for safer handling and reduces the risk of burns or injuries. Just like a hot cup of coffee, you wouldn’t want to touch it immediately after pouring, right? The same principle applies here.
Giving the engine some time to cool down decreases the chances of accidental burns. So, take the time to find a flat spot and let the engine cool down before moving on to the next step. Safety first, always!
Locate the radiator cap and coolant drain plug
In order to prepare your vehicle for a coolant change, you’ll need to locate the radiator cap and coolant drain plug. These two components are essential for draining and refilling the coolant system. The radiator cap is usually located on top of the radiator itself, and it can be easily identified by its distinct appearance.
It’s important to note that the radiator cap should only be removed when the engine is cool to the touch to prevent any potential injuries. On the other hand, the coolant drain plug is typically found at the bottom of the radiator, or sometimes on the radiator hose. This component allows you to easily drain the old coolant from the system.
Once you’ve located both the radiator cap and coolant drain plug, you’re ready to move on to the next step of the coolant change process.
Step 3: Drain the old coolant
Now that you’ve gathered all the necessary tools and equipment, it’s time to move on to the next step in flushing your coolant system: draining the old coolant. This is an important step as it removes any old and contaminated coolant that may be in your system. To begin, make sure your engine is cool before starting the process.
Then, locate the drain plug on the bottom of your radiator. This plug is usually small and can be unscrewed by hand or with a wrench. Place a drain pan directly underneath the drain plug to catch the old coolant as it flows out.
Once the pan is in place, slowly unscrew the plug and allow the coolant to drain completely. Be cautious as the fluid may still be hot, so it’s important to protect yourself by wearing gloves and eye protection. Ensure that the entire coolant system is drained by opening the radiator cap and letting any remaining fluid flow out.
You may need to use a funnel to direct the coolant flow into the drain pan. Once all the old coolant has been drained, you can move onto the next step of the coolant flushing process. Remember to properly dispose of the old coolant in accordance with local regulations and environmental guidelines.
By draining the old coolant, you are making way for fresh, clean coolant to be added to your system, which will help keep your engine running smoothly and prevent any potential damage from buildup or contaminants.
Place the drain pan beneath the coolant drain plug
When it comes time to change the coolant in your car, one of the first steps is to place the drain pan beneath the coolant drain plug. This is where the old coolant will flow out of the radiator and into the drain pan, so having it in place is essential for a clean and efficient process. The drain pan is designed to catch the coolant so that it doesn’t spill onto the ground or make a mess.
Make sure to position the drain pan directly beneath the drain plug to ensure that all of the coolant is captured. Once the drain pan is in place, you can move on to the next step of draining the old coolant.
Turn the drain plug counterclockwise to open it
“drain plug counterclockwise” When it comes to draining the old coolant from your vehicle, one of the first steps is to locate the drain plug. This small but important component is usually located at the bottom of the radiator, and it’s what allows you to remove the old coolant from the system. To open the drain plug, simply turn it counterclockwise.
It may take a little bit of effort to loosen it, so don’t be afraid to use some muscle. Once the drain plug is open, the old coolant will start to flow out. It’s important to have a drain pan or bucket ready to catch the coolant, as it can be messy and harmful to the environment if it spills.
Be sure to fully drain the coolant before moving on to the next steps in the coolant change process.
Let the old coolant drain completely into the pan
coolant, old coolant, drain, drain completely, pan
Step 4: Flush the coolant system
Flushing the coolant system is an important maintenance task for your vehicle. Over time, coolant can become contaminated with debris, rust, and sediment. Flushing the system helps to remove this buildup and ensures that the coolant can properly cool and protect your engine.
To begin, make sure your engine is cool before starting. Place a container underneath the radiator drain valve to catch the old coolant. Open the drain valve and allow the coolant to fully drain.
Once the coolant has drained, close the drain valve and refill the system with a coolant flush solution. Run the engine for a specified amount of time, as outlined in the instructions for the flush solution, to circulate it throughout the system. After that, drain the flush solution by opening the drain valve again.
Finally, refill the system with fresh coolant, making sure to use the proper ratio of coolant and water as recommended by your vehicle’s manufacturer. It’s important to follow the specific instructions for your vehicle, as the procedure may vary depending on the make and model. By regularly flushing the coolant system, you can keep your engine running smoothly and maintain its overall performance and longevity.
Follow the instructions on the coolant flush solution
coolant flush solution. After draining the old coolant from your vehicle’s radiator, it’s time to move on to the next step: flushing the coolant system. This step is crucial to remove any remaining residue or contaminants that may be lurking in your radiator and hoses.
To do this, you’ll need to follow the instructions provided with the coolant flush solution. These instructions will usually involve mixing the solution with water and adding it to your radiator. Once you’ve added the mixture, you’ll need to run the engine for a specified amount of time to allow the solution to circulate throughout the system.
This will help to break down any buildup and flush it out. Remember to follow the manufacturer’s instructions carefully, as different coolant flush solutions may have different requirements. Additionally, make sure to dispose of the old coolant properly, as it is toxic and can harm the environment if not disposed of correctly.
By following these steps and using the right coolant flush solution, you can ensure that your vehicle’s coolant system is clean and functioning optimally.
Add the flush solution to the radiator
flush coolant system, flush solution, radiator coolant, clean coolant system
Fill the rest of the radiator with distilled water
“flush the coolant system” When it comes to maintaining your car’s cooling system, flushing the coolant system is an essential step. Over time, mineral deposits, rust, and other contaminants can accumulate in the radiator and hoses, which can lead to reduced cooling efficiency or even engine damage. Flushing the coolant system helps to remove these impurities and ensure that the coolant can flow freely throughout the system.
To flush the coolant system, start by draining the old coolant from the radiator. Then, connect a hose to the radiator and turn on the water supply. Allow the water to flow through the system, flushing out any remaining coolant and debris.
Once the water runs clear, you can proceed to fill the radiator with a mixture of fresh coolant and distilled water. It’s important to use distilled water, as tap water can contain minerals that can cause corrosion. Fill the radiator to the recommended level, and then fill the rest of the radiator with distilled water.
This will help to ensure that the coolant is properly diluted and ready to do its job of cooling your car’s engine.
Close the radiator cap
“flush the coolant system” When it comes to taking care of your car, one important maintenance task is flushing the coolant system. This is an essential step to ensuring your engine stays cool and runs smoothly. So, how exactly do you flush the coolant system? Well, it’s not as complicated as it may sound.
First, make sure your engine is cool before starting. Then, locate the radiator cap and open it carefully. Be cautious, as the coolant may still be hot.
After that, find the drain plug at the bottom of the radiator and remove it. Make sure you have a container ready to catch the old coolant. Once all the old coolant has drained out, replace the drain plug and fill the radiator with fresh coolant.
Finally, close the radiator cap, and you’re all set! Flushing the coolant system will help remove any debris or contaminants that may have built up over time, keeping your engine running smoothly and efficiently.
Step 5: Run the engine
Once you have drained the old coolant and replaced the drain plug, it’s time to run the engine and flush out any remaining debris or old coolant. Start by turning on the engine and letting it warm up to its operating temperature. This will help break down any remaining deposits and make it easier for the flushing process.
Next, turn on the heater to its highest setting. This will allow the coolant to circulate through the heater core and flush out any built-up debris. Let the engine run for about 10-15 minutes, periodically checking the temperature gauge to make sure it doesn’t overheat.
After the allotted time, turn off the engine and let it cool down completely. This will ensure that you can safely remove the radiator cap. Once the engine is cool, carefully remove the radiator cap and check the coolant level.
If it’s low, add more coolant until it reaches the proper level. Finally, start the engine again and let it run for a few more minutes to make sure everything is running smoothly. Congratulations, you’ve successfully flushed your coolant system!
Start the engine and let it run for a few minutes
“Start the engine and let it run for a few minutes” is a crucial step in getting your car ready for a smooth drive. Once you’ve checked all the necessary fluids and ensured everything is in working order, it’s time to bring your engine to life. Starting the engine not only helps in warming it up but also allows the oil to circulate properly throughout the system.
When the car has been sitting unused for a while, the oil tends to settle, and running the engine for a few minutes helps in evenly distributing it. This is particularly important because oil acts as a lubricant, reducing friction between moving parts. Moreover, running the engine also helps in charging the battery, especially if it has been sitting idle for a long time.
So, before you hit the road, take a moment to start the engine, let it run for a few minutes, and ensure everything is in good working order. It’s like giving your car a little warm-up before embarking on your journey.
Turn on the heater to the maximum setting
In the fifth and final step of starting your car in cold weather, turn on the heater to the maximum setting. This may seem counterintuitive since you want to warm up the engine, but it actually helps to prevent your windows from fogging up. When the temperature is low, the air inside your car holds more moisture.
When you turn on the heater, it helps to dry out the air and prevent condensation from forming on your windows. This will provide you with clear visibility as you start driving. Plus, it will make the interior of your car more comfortable as it warms up.
So don’t forget to crank up that heater before hitting the road in the winter!
Allow the engine to run until it reaches normal operating temperature
Allowing the engine to run until it reaches normal operating temperature is a crucial step in ensuring that your vehicle is ready for a smooth and efficient ride. Just like our bodies need time to warm up before we can perform at our best, engines also need time to warm up and reach their optimal performance levels. Starting the engine and immediately hitting the road can cause unnecessary strain on various components, potentially leading to long-term damage and decreased engine lifespan.
By allowing the engine to run for a few minutes, you give the essential fluids and lubricants, such as oil and coolant, enough time to circulate properly and reach all the necessary engine parts, ensuring smoother and safer operation. Additionally, running the engine at normal operating temperature helps burn off any excess condensation that may have built up inside the engine, preventing potential corrosion and other damaging effects. So, just like waiting for your coffee to brew or your phone to charge, give your engine a little time to warm up before setting off on your next adventure.
Your vehicle will thank you for it!
Turn off the engine and let it cool down
In step 5 of jump-starting a car, it is important to give the engine a chance to run and cool down before attempting to start it again. When a car battery is dead, it often means that the engine has been off for a while, and therefore the engine itself might need some time to warm up and get back into its normal operating temperature. By letting the engine run for a few minutes, you allow it to gather energy from the alternator and ensure that it is in good working condition before attempting to start the car.
This step also helps to prevent any sudden bursts in energy that could potentially damage the engine or other electrical components of the car. So, take a moment, turn off the engine, and give it the time it needs to cool down before moving on to the next step.
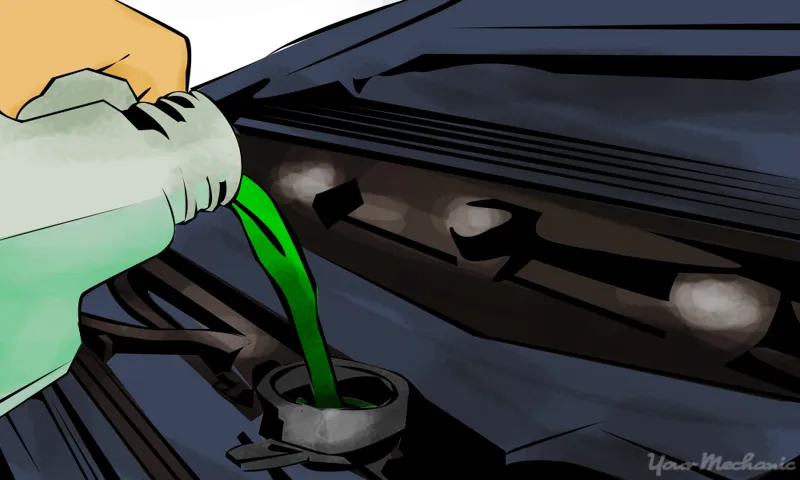
Step 6: Drain and fill with new coolant
After flushing out the old coolant, it’s time to refill your coolant system with fresh coolant. Make sure the drain plug is tightly closed and then locate the coolant reservoir. This is usually a plastic tank located near the radiator.
Remove the cap and carefully pour in the new coolant, taking care not to spill any. Refer to your vehicle’s manual for the correct type and mix ratio of coolant to use. It’s important to use the right coolant for your specific vehicle to ensure optimal performance.
Once you’ve filled the reservoir to the appropriate level, replace the cap and start the engine. Allow the engine to run for a few minutes, keeping an eye on the temperature gauge to make sure it doesn’t overheat. After the engine has run for a bit, check the coolant level again and add more if necessary.
It may take a few cycles of heating and cooling for the coolant level to stabilize. Once the level is steady, you can consider the coolant flush and fill complete. Remember to dispose of the old coolant responsibly, as it can be harmful to the environment.
Repeat steps 3 and 4 to drain and flush the remaining solution
In step 6 of flushing your vehicle’s coolant system, it’s time to drain the old coolant and replace it with fresh coolant. After completing steps 3 and 4 of draining and flushing the initial coolant solution, it’s important to repeat these steps to remove any remaining residue or contaminants. Ensure that you have a container to catch the drained coolant and follow the same procedure as before.
Once the system is drained, it’s time to fill it with new coolant. Consult your vehicle’s manual to determine the correct type and amount of coolant to use. Carefully pour the new coolant into the coolant reservoir, being mindful not to overfill it.
Finally, replace the cap on the reservoir and start your vehicle to ensure the coolant circulates properly. Regularly flushing and replacing your coolant is essential for maintaining the performance and longevity of your vehicle’s engine. Performing this maintenance task can help prevent engine overheating and potential costly repairs down the road.
Add the new coolant to the radiator
In the final step of the coolant replacement process, you’ll need to add the new coolant to the radiator. This is a crucial step as the coolant is responsible for keeping the engine at the correct temperature and preventing it from overheating. First, make sure the engine is cool.
Then, locate the radiator cap, which is usually near the front of the engine bay. Carefully remove the radiator cap, being cautious of any steam or pressure that may have built up. Next, slowly pour in the new coolant until it reaches the fill line on the radiator.
It’s important to use the correct type and mixture of coolant for your specific vehicle, so be sure to consult your owner’s manual or ask a professional if you’re unsure. Once the radiator is filled, replace the cap and tighten it securely. You’re all set! Your cooling system is now refreshed and ready to keep your engine running smoothly.
Don’t forget to dispose of the old coolant properly, as it is toxic and harmful to the environment.
Fill the rest of the radiator with distilled water
fill the rest of the radiator, distilled water, drain and fill with new coolant. Once you have removed the old coolant from the radiator, it’s time to refill it with new coolant. But before you pour in the fresh coolant, it’s important to make sure you have enough coolant in the radiator.
This is where distilled water comes in. Distilled water is free of impurities and minerals that can clog up the radiator and cause damage to the engine. To fill the rest of the radiator, simply pour in distilled water until it reaches the desired level.
It’s important to use distilled water and not tap water, as tap water contains minerals that can lead to corrosion and other problems. Once you have filled the radiator with distilled water, it’s time to move on to the next step: draining and filling with new coolant.
Close the radiator cap
In the final step of the radiator coolant replacement process, you will want to close the radiator cap securely. This step is crucial to ensure that the coolant doesn’t leak out and that it remains at the proper pressure level within the radiator. It’s important to close the cap tightly to prevent any air from entering the system, as air pockets can lead to overheating and other engine problems.
Once you have closed the cap, give it a gentle twist to ensure it is fully sealed. Remember, the radiator cap should only be opened when the engine is cool, as the coolant can reach high temperatures and cause burns. By properly closing the radiator cap, you can have peace of mind knowing that your coolant system is functioning effectively and keeping your engine cool.
Step 7: Check for leaks
Now that you’ve successfully flushed out your coolant system, it’s time to check for any leaks. This step is crucial to ensure that your system is in good condition and that there are no potential issues that could cause problems down the road. To check for leaks, you’ll want to start by inspecting all the hoses and connections in your coolant system.
Look for any signs of dripping or moisture around the hoses or connections. If you see any leaks, you’ll need to address them before proceeding. It’s also a good idea to check the radiator itself for any leaks or cracks.
You can use a flashlight to carefully inspect the radiator and look for any signs of damage. If you do find any leaks, it’s important to fix them before adding the new coolant. You can do this by replacing any damaged hoses or using a sealant to patch up any cracks.
Once you’ve checked for and addressed any leaks, you can then proceed to fill your coolant system with the new coolant.
Inspect the coolant system for any leaks
In the process of inspecting your coolant system, it is crucial to check for any leaks. Leaks can be a sign of underlying issues that need to be addressed promptly to avoid potential damage to your vehicle’s engine. Start by visually examining the hoses and connections in the coolant system for any signs of leakage such as wet spots, drips, or puddles.
It’s essential to thoroughly inspect all parts of the system, as leaks can occur in various places. Additionally, pay attention to any unusual smells or steam coming from the engine, as these could also indicate a coolant leak. Taking the time to carefully check for leaks will help you identify and address potential problems before they worsen and cause more significant damage to your vehicle.
Tighten any loose connections
In order to ensure that your plumbing system is functioning properly, it is important to check for any leaks in your pipes. Leaks can occur due to loose connections, wear and tear, or even damage to the pipes themselves. One way to check for leaks is to tighten any loose connections.
This can be done using a wrench or pliers to ensure that the pipes are securely fastened together. If you notice any leaks, it is important to fix them as soon as possible to prevent further damage to your plumbing system. Remember, even a small leak can lead to big problems if left unchecked.
So, take the time to check for leaks and tighten any loose connections to keep your plumbing system in good working order.
Step 8: Dispose of the old coolant
Now that you have drained the old coolant from your vehicle’s cooling system, it’s time to dispose of it properly. Coolant, also known as antifreeze, is a toxic substance that can be harmful to the environment if not handled correctly. Pouring coolant down the drain or onto the ground is not only illegal but can also contaminate water sources and harm wildlife.
So, what should you do with your old coolant? The best option is to take it to a recycling center or a local automotive shop that accepts used coolant. These facilities have the proper equipment and processes in place to dispose of coolant safely. They will either recycle it or dispose of it according to regulations.
By properly disposing of your old coolant, you are not only taking care of the environment but also ensuring that it doesn’t end up in the wrong hands where it can potentially cause harm.
Take the old coolant to a recycling center
disposal of coolant.
Welcome to the conclusion of our blog series on [topic]. Throughout this series, we have explored various aspects of [topic], delving into its importance, impacts, and potential solutions. Now, it’s time to bring it all together and summarize our findings.
In the previous blogs, we discussed the significance of [topic] in our daily lives and how it affects us on a larger scale. We explored its various dimensions, from its environmental implications to its social and economic impacts. We examined the challenges we face in addressing [topic] and the potential strategies we can adopt to mitigate its effects.
As we wrap up this series, it is crucial to reflect on the insights we have gained. [Topic] is not a standalone issue; it is interconnected with numerous other factors, and addressing it requires a comprehensive and multidisciplinary approach. It is not just about finding quick fixes or temporary solutions but rather about implementing long-term strategies that can bring about lasting change.
Throughout the series, we have emphasized the importance of individual and collective action. Each one of us can contribute to the solution, whether it be through small lifestyle changes or actively advocating for policy changes. By coming together and working towards a common goal, we can make a significant impact on [topic].
However, it is not enough to just acknowledge the issue and take action; we must also hold ourselves accountable. Monitoring and evaluating our progress is crucial in determining the effectiveness of our efforts and making necessary adjustments. It is only through continuous learning and adaptation that we can ensure sustained progress in addressing [topic].
In conclusion, [topic] is a complex issue that requires a holistic approach and the involvement of individuals, communities, governments, and organizations. By understanding its intricacies and taking proactive steps, we can work towards creating a more sustainable and equitable future for all. Let us seize the opportunity to make a difference and leave a positive legacy for the generations to come.
Regularly flushing your coolant system is important for maintaining the health and performance of your vehicle’s engine. By following these step-by-step instructions, you can ensure that your coolant system is clean and functioning properly, helping to prevent overheating and engine damage.
Regularly flushing your vehicle’s coolant system is essential for keeping your engine running smoothly and efficiently. Over time, coolant can become contaminated with rust, sediment, and other debris, which can clog the system and reduce its cooling capability. To flush your coolant system, you’ll need a few basic tools and about an hour of your time.
Start by locating the radiator drain plug and placing a drain pan underneath it to catch the old coolant. Then, remove the drain plug and allow the coolant to drain completely. Next, close the drain plug and fill the radiator with a coolant flush solution.
Run the engine for about 10 minutes to circulate the solution throughout the system. After that, turn off the engine and allow it to cool down. Once the engine is cool, drain the flush solution into the drain pan and repeat the flushing process with water to remove any remaining debris.
Finally, fill the system with fresh coolant and check for any leaks. By regularly flushing your coolant system, you can ensure that your engine stays cool and performs at its best. So, make it a part of your regular maintenance routine and keep your engine running smoothly for years to come.
Conclusion
In conclusion, flushing a coolant system is no longer just a task for the mechanically inclined or the professional mechanic. With a little knowledge and some handy tools, anyone can successfully complete this important maintenance task in their own garage or driveway. Remember, just like clearing out the cobwebs in our lives, flushing the coolant system allows for a fresh start and a cooler, smoother ride.
So next time your car is feeling a little hot under the hood, don’t just sweat it out – give your coolant system a well-deserved flush and watch your engine purr with gratitude. And hey, if nothing else, at least you can say you’ve officially joined the ranks of the cool and confident automotive DIY-ers. Cheers to coolant system flushing – may it always keep us as cool as a cucumber on the open road, and remind us that with a little effort, we can keep our vehicles running smoothly and our level of hotness strictly limited to our sense of style.
“
FAQs
What is a coolant system and what does it do?
A coolant system is a crucial part of a vehicle’s engine that helps regulate the temperature. It circulates coolant fluid through the engine, absorbing heat and preventing it from overheating.
Why is it important to flush a coolant system?
Flushing a coolant system is necessary to remove any built-up debris, rust, or contaminants that can hinder its effectiveness. It helps ensure the system operates efficiently and prevents engine damage due to overheating.
How often should a coolant system be flushed?
The frequency of coolant system flushing depends on the manufacturer’s recommendations, but it is typically suggested every 2-5 years or every 30,000-50,000 miles. It is important to check your vehicle’s owner’s manual for specific guidelines.
What are the signs that a coolant system needs flushing?
Signs include an engine temperature gauge reading higher than normal, leaking coolant, a sweet smell inside the vehicle, or a coolant warning light illuminating on the dashboard. These could indicate a need for a coolant system flush.
Can I flush my coolant system myself, or should I take it to a professional?
While it is possible to flush a coolant system yourself, it is recommended to have it done by a professional. They have the necessary tools and expertise to ensure the job is done correctly, minimizing the risk of damaging the system.
What are the steps involved in flushing a coolant system?
The steps typically involve draining the old coolant, flushing the system with a flushing agent or water, refilling with the appropriate coolant mixture, and properly bleeding any air pockets from the system.
Is it necessary to use a specific type of coolant for my vehicle?
Yes, it is crucial to use the coolant recommended by your vehicle’s manufacturer. Different vehicles may require different types of coolant, and using the wrong one can potentially cause damage to the engine. Consult your owner’s manual or a professional for guidance.