
Are you experiencing overheating issues with your vehicle? One possible culprit could be a faulty coolant system. The coolant system plays a crucial role in maintaining your engine’s temperature and preventing it from overheating. If your coolant system is not functioning properly, it can lead to engine damage and costly repairs.
That’s why it’s essential to know how to flush your coolant system regularly. In this blog, we will guide you through the process of flushing your coolant system and provide you with some useful tips along the way. So, buckle up and get ready to give your vehicle’s engine the TLC it deserves.
Table of Contents
Why Flush Your Coolant System
Flushing your coolant system is an essential maintenance task that should be done regularly to keep your vehicle running smoothly. Over time, coolant can become contaminated with dirt, rust, and other debris, which can cause problems such as overheating and engine damage. By flushing the coolant system, you can remove these harmful contaminants and ensure that your engine stays cool and protected.
So, how do you flush your coolant system? Well, first, let the engine cool down completely. Then, locate the radiator drain valve and place a container underneath to catch the old coolant. Open the valve and let the coolant drain out completely.
Next, close the drain valve and fill the radiator with a coolant flushing solution. Start the engine and let it run for about 10 minutes to circulate the solution throughout the system. After that, turn off the engine and let it cool down again.
Finally, open the radiator drain valve once more to drain out the flushing solution, and then close the valve. Refill the radiator with fresh coolant, making sure to mix it with the right amount of water if required. And there you have it – a successfully flushed coolant system that will keep your engine running smoothly for miles to come.
So, don’t forget to give your coolant system some love and attention – your vehicle will thank you!
Preventative Maintenance
Flush Coolant System
Improves Cooling Efficiency
flush, coolant system, improves cooling efficiency. When it comes to keeping your vehicle’s engine running smoothly, one component you shouldn’t overlook is the coolant system. Over time, the coolant in your system can become contaminated with debris and sediment, which can lead to clogs and reduced cooling efficiency.
That’s where flushing your coolant system comes in. By flushing the system and replacing the old coolant with fresh, clean fluid, you can improve the overall efficiency of your cooling system. Think of it like cleaning out the pipes in your house – when they’re free of debris, the water flows more easily and efficiently.
The same principle applies to your vehicle’s coolant system. By flushing out the old coolant and contaminants, you allow for better circulation and cooling, which can help prevent overheating and prolong the life of your engine. So if you want to keep your engine running cool, don’t forget to give your coolant system a good flush.
Tools and Materials Needed
If you’re wondering how to flush your coolant system, don’t worry, it’s not as complicated as it sounds. The first thing you’ll need is a few basic tools and materials. You’ll need a pair of pliers, a socket wrench set, a drain pan or bucket, and a garden hose.
In addition to these tools, you’ll also need coolant and distilled water for the flushing process. It’s important to use distilled water instead of tap water, as tap water may contain minerals that can damage your coolant system. By gathering these tools and materials beforehand, you’ll have everything you need to successfully flush your coolant system and keep your engine running smoothly.
Safety Glasses and Gloves
Safety glasses and gloves are essential tools and protective gear for a wide range of activities. Whether you’re working in a construction site, performing experiments in a laboratory, or even just doing some DIY projects at home, safety glasses and gloves are crucial for ensuring your safety. When it comes to safety glasses, it’s important to choose a pair that provides proper eye protection.
Look for glasses that are impact-resistant and designed to shield your eyes from debris, chemicals, and other hazards. They should fit snugly to prevent any particles from getting in, and they should also have built-in side shields for added protection. As for gloves, they come in many different materials, each suited for specific tasks.
Nitrile gloves, for example, are ideal for handling chemicals, as they provide excellent resistance to oils, solvents, and other substances. On the other hand, leather gloves are great for protecting your hands from cuts, abrasions, and punctures. Wearing safety glasses and gloves may seem like a hassle, but they’re crucial for your safety.
They provide a barrier between you and potential hazards, reducing the risk of injury or damage. Think of safety glasses and gloves as a shield that protects you from harm, just like a knight’s armor protects them in battle. So, don’t overlook the importance of these tools and materials, and make sure to wear them whenever necessary.
Your eyes and hands will thank you!
Drain Pan
drain pan, tools and materials needed. When it comes to working with a drain pan, having the right tools and materials can make the job much easier. One essential tool you’ll need is a wrench or pliers to remove the old drain pan and install the new one.
It’s important to have a wrench or pliers that are the right size for the job, so be sure to check the requirements before you start. In addition to a wrench or pliers, you’ll also need some rags or towels to clean up any spills or drips that may occur during the process. A bucket or container to catch any water or other liquids that may drain out of the old pan is also a good idea.
Lastly, don’t forget to have a new drain pan on hand to replace the old one. Make sure you have the correct size and type of drain pan for your specific needs. With the right tools and materials, you’ll be well-prepared to tackle any drain pan replacement or repair project.
Coolant
coolant, engine coolant, coolant system, radiator coolant, antifreeze coolant. The coolant system in your vehicle is crucial to maintaining optimal engine temperature and preventing overheating. To keep your engine running smoothly, it’s important to regularly check and replace the coolant.
But before you get started, you’ll need a few tools and materials to complete the job. One of the most important items you’ll need is the engine coolant itself. Engine coolant, also known as antifreeze, is a specially formulated liquid that helps regulate the temperature of your engine.
It’s typically a mixture of water and ethylene glycol, along with additives that provide extra protection against rust, corrosion, and cavitation. It’s important to choose the right coolant for your vehicle, as different vehicles may require different types of coolant. Consult your vehicle’s owner’s manual or check with an automotive professional to make sure you’re using the correct coolant.
In addition to coolant, you’ll also need a few basic tools to complete the coolant replacement process. One tool you’ll need is a drain pan to catch the old coolant as it drains out of the radiator. This will help prevent any spills or leaks and make the process much neater.
You’ll also need some type of wrench or socket set to loosen the radiator drain plug and remove the radiator cap. The specific size of the wrench or socket will depend on your vehicle, so be sure to check your owner’s manual for the correct size. Another handy tool to have is a funnel.
This will help you pour the new coolant into the radiator without making a mess. Make sure the funnel you use is clean and free of any contaminants that could potentially contaminate the coolant. Additionally, having a clean rag or towel on hand can help clean up any spills or wipe down any parts that may have come into contact with coolant.
Radiator Flush
Radiator Flush When it comes to maintaining your car’s cooling system, a radiator flush is an essential task. Over time, debris and contaminants can build up in your radiator, resulting in reduced performance and potential overheating. To perform a radiator flush, you’ll need a few tools and materials to get the job done right.
Firstly, you’ll need protective gloves and goggles to keep yourself safe from any harmful chemicals or hot fluids. Safety should always be a top priority when working on your car. Next, you’ll need a drain pan to catch the old coolant as it is being drained from the radiator.
This will prevent any spills or messes and make clean-up easier. A wrench or pliers will be needed to remove the drain plug on the radiator. This plug allows you to release the old coolant from the system.
To remove any built-up debris or deposits in the radiator, you’ll need a radiator flush solution. This solution is specifically formulated to break down and remove any accumulated contaminants. Once the radiator flush solution has been added, you’ll need a garden hose to flush out the system.
The hose should be connected to the radiator cap and the water should be turned on. This will allow the water to circulate through the system and flush out any remaining debris. Finally, you’ll need a new coolant to refill the radiator once the flush is complete.
Make sure to check your vehicle’s specifications to ensure you are using the correct type and amount of coolant. By having the necessary tools and materials on hand, you can easily perform a radiator flush and keep your car’s cooling system in optimal condition. Remember to always follow the manufacturer’s instructions and take safety precautions when working with coolant and other chemicals.
Distilled Water
“distilled water” Distilled water is a type of purified water that has gone through a process of distillation to remove impurities. It is often used in various applications, such as in medical laboratories, automotive cooling systems, and even in household appliances like steam irons and humidifiers. To make distilled water at home, you will need a few tools and materials.
First, you will need a source of water, such as tap water, which you will pour into a large pot or container. Next, you will need a heat source, such as a stove or a hot plate, to heat the water. You will also need a condenser, which can be a copper coil or a glass tube, to collect the steam and convert it back into liquid form.
Lastly, you will need a collection container, such as a glass jar or a bottle, to store the distilled water once it has been produced. By following these steps and using the right tools and materials, you can easily make your own distilled water at home.
Step-by-Step Guide to Flushing Your Coolant System
Are you wondering how to flush your coolant system? Flushing your coolant system is an important maintenance task that helps to keep your engine running smoothly and prevents overheating. Over time, coolant can become dirty and contaminated with debris, which can lead to clogs and reduced cooling efficiency. Flushing the system involves draining the old coolant, cleaning out the radiator and hoses, and then refilling it with fresh coolant.
To begin, make sure your engine is cool and locate the radiator drain valve or coolant reservoir. Open the valve or remove the reservoir cap to drain the old coolant into a container. Once the coolant is drained, close the valve or replace the cap and refill the system with a mixture of fresh coolant and distilled water.
Be sure to follow the manufacturer’s recommendations for the correct coolant mixture and to bleed any air bubbles from the system. Regularly flushing your coolant system will help to maintain optimal engine performance and prevent costly repairs. So don’t wait, follow these steps and keep your engine cool and happy!
Step 1: Gather all necessary tools and materials
Now that you’ve decided to flush your coolant system, it’s important to gather all the necessary tools and materials before you begin. This will ensure that you have everything you need and can complete the task efficiently. So, what exactly do you need? You’ll need a few basic tools such as a wrench, pliers, and a drain pan to catch the old coolant.
Additionally, you’ll need the appropriate coolant for your vehicle, which can typically be found at any auto parts store. It’s also a good idea to have some gloves and safety goggles on hand to protect yourself from any potential spills or splashes. By having all of these tools and materials ready to go, you’ll be well-prepared to tackle the next steps in flushing your coolant system.
Step 2: Prepare the vehicle
One important step in flushing your coolant system is to prepare your vehicle. This ensures that the process goes smoothly and helps prevent any mishaps along the way. First, make sure your vehicle is parked on a flat surface and the engine is cool.
Flushing the coolant system requires access to the radiator, so it’s important to open the hood of your car and locate the radiator cap. Before opening the cap, you may want to lay a towel or some paper towels around the cap area to catch any spills that may occur. Once you’ve done that, you can remove the radiator cap by turning it counterclockwise.
It’s important to note that the radiator cap should only be removed when the engine is cool to avoid any risk of burning yourself. With the radiator cap removed, you’re now ready to move on to the next step of flushing your coolant system.
Step 3: Drain the old coolant
coolant, flush, drain, old coolant, coolant system
Step 4: Add radiator flush
radiator flush, coolant system, car maintenance Adding a radiator flush to the process of flushing your coolant system is an important step that should not be skipped. Over time, sediment and rust can build up in your radiator, causing it to become less efficient and potentially leading to overheating. By performing a radiator flush, you can remove this buildup, ensuring that your coolant system is clean and functioning properly.
To add a radiator flush to the process, you will need to purchase a radiator flush solution. These solutions are designed to break up and remove any buildup in your radiator. To begin, make sure your engine is cool and then locate the radiator drain plug.
This plug is typically located at the bottom of the radiator, on the side or bottom tank. Place a container underneath the radiator to catch the coolant that will drain out. Once the container is in place, remove the radiator cap and open the drain plug.
Allow the coolant to fully drain out of the radiator. Next, close the drain plug and pour the radiator flush solution into the radiator. Be sure to follow the instructions on the packaging for the appropriate amount to use.
With the radiator flush solution added, fill the rest of the radiator with distilled water. Then, replace the radiator cap and start your engine. Let the engine run for about 10-15 minutes, allowing the radiator flush solution to circulate through the coolant system and break up any remaining buildup.
After the allotted time, turn off the engine and let it cool down again. Once cool, open the radiator drain plug and let the radiator flush solution and water drain out. Finally, refill the radiator with a fresh mixture of coolant and water in the appropriate ratio for your vehicle.
Step 5: Run the engine
In this next step, we’ll finally get to run the engine and complete the coolant system flush. Before you start, make sure all the hoses and connections are secure. Then, with the radiator cap off, start the engine and let it run for about 10-15 minutes.
This will allow the coolant mixture to circulate throughout the system and flush out any remaining old coolant or debris. While the engine is running, keep an eye on the temperature gauge to make sure it doesn’t get too hot. If it starts to rise, turn off the engine immediately and let it cool down before continuing.
Once the time has passed, turn off the engine and let it cool down completely. This will ensure that you can safely work on the coolant system without burning yourself. With the engine off, carefully remove the drain plug from the radiator and allow all the coolant to drain out completely.
Be sure to catch the coolant in a pan or bucket and dispose of it properly. Once all the coolant has drained, replace the drain plug and tighten it securely. Congratulations! You have successfully flushed your coolant system.
Now all that’s left to do is to refill the system with fresh coolant and water in the correct ratio as specified in your vehicle’s owner’s manual. Finally, double-check all the connections, fill the radiator with the coolant mixture, and replace the radiator cap. Start the engine again and let it run for a few minutes to allow the coolant to circulate throughout the system.
Keep an eye on the temperature gauge to make sure it stays within the normal range. And that’s it! You’re done. Your coolant system is now flushed, and your engine is ready to run smoothly and efficiently.
Step 6: Drain the radiator flush
“drain the radiator flush” As you continue with the coolant system flush, it’s time to move on to the next step: draining the radiator flush. This crucial step ensures that any old or contaminated coolant is completely removed from your system, making way for fresh coolant to be added. To do this, locate the drain plug at the bottom of the radiator.
Place a catch pan underneath to collect the coolant that will drain out. Before opening the drain plug, make sure the engine is cool to avoid any burns from hot coolant. Once you’re ready, carefully open the drain plug, allowing the old coolant to flow into the catch pan.
Be prepared for a sudden flow and use caution not to spill any coolant on yourself or the ground. Once all the coolant has drained out, you can move on to the next step in the coolant flush process. Remember, it’s important to properly dispose of the old coolant according to environmental regulations in your area.
Don’t skip this important step in the flushing process, as it ensures the old coolant is completely removed from the system, allowing for a fresh start with clean coolant.
Step 7: Refill with coolant
coolant system, flushing, refill, step-by-step guide
Step 8: Bleed the air from the system
In the final step of flushing your coolant system, it’s time to bleed the air from the system. This is an important step because any air pockets in the system can cause your engine to overheat. To bleed the air, start by opening the radiator cap and checking the coolant level.
If it’s low, add more coolant until it reaches the recommended level. Then, start the engine and let it run for a few minutes. This will allow the coolant to circulate and push out any remaining air pockets.
While the engine is running, keep an eye on the temperature gauge to make sure it stays within the normal range. If it starts to rise, turn off the engine immediately and let it cool down before continuing. Once the engine has cooled down, restart it and repeat the process until the temperature gauge stays steady.
Once the air has been successfully bled from the system, you can replace the radiator cap and consider the coolant flushing process complete. By following these steps, you can ensure that your coolant system is free of air pockets and your engine is protected from overheating.
When to Flush Your Coolant System
Are you wondering when to flush your coolant system? Well, the answer depends on a few factors. Generally, it’s recommended to flush your coolant system every two to five years or around 30,000 to 50,000 miles. However, if you notice any signs of coolant system issues, such as the engine running hot, a sweet smell in the cabin, or visible coolant leaks, it’s crucial to flush the system as soon as possible.
Flushing your coolant system helps remove any built-up debris, rust, or contaminants that can hinder its performance. So, if it’s been a while since your last coolant system flush or if you’re experiencing any signs of trouble, it’s time to give your engine the TLC it needs to stay cool and efficient.
Manufacturer’s recommendation
coolant flush, maintenance schedule, car manufacturer, recommended interval, engine overheating, extended lifespan One important maintenance task that car owners often overlook is flushing the coolant system. Flushing the coolant system involves replacing the old coolant with fresh coolant to prevent engine overheating and ensure the proper functioning of the radiator. But when is the right time to flush your coolant system? Well, it’s important to refer to your car manufacturer’s recommendation to determine the recommended interval for a coolant flush.
The recommended interval can vary depending on the make and model of your car, as well as other factors such as your driving habits and the climate you live in. Some car manufacturers may recommend a coolant flush every 30,000 miles, while others may recommend it every 50,000 miles or more. Following the manufacturer’s recommendation is crucial in maintaining your car’s coolant system and ensuring the extended lifespan of your engine.
So, check the maintenance schedule in your car’s manual or consult with your mechanic to find out when it’s time for a coolant flush. Remember, neglecting this important maintenance task can lead to costly repairs and unnecessary engine damage.
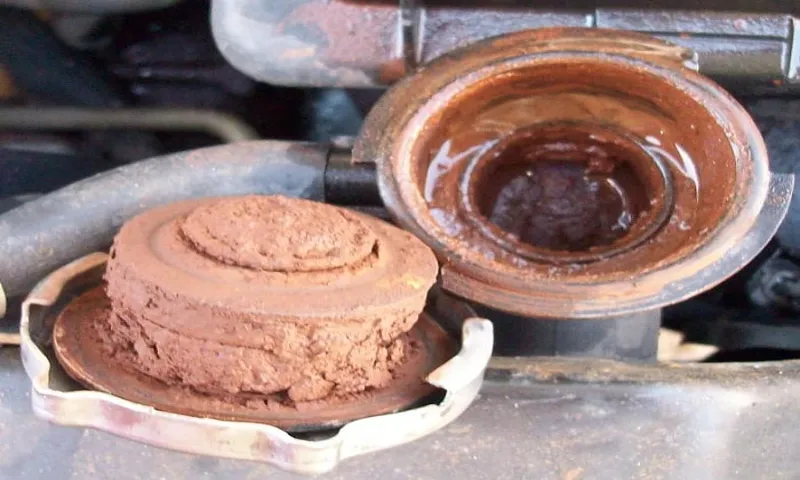
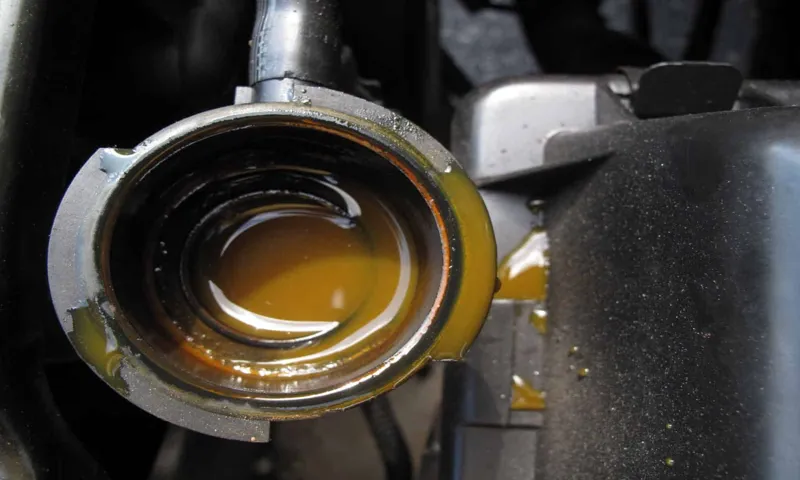
Visible signs of coolant issues
coolant issues, flush coolant system
Overheating
flush coolant system, overheating, coolant flush, coolant maintenance. Overheating can be a major problem for your vehicle, causing engine damage and breakdowns if not addressed promptly. One way to prevent overheating is by regularly flushing your coolant system.
But when should you do this? Well, there are a few signs that indicate it’s time for a coolant flush. First, if you notice that your engine temperature is consistently running hotter than normal, that could be a sign of a buildup of debris and contaminants in your coolant system. Another telltale sign is the appearance of rust or sediment in your radiator or coolant reservoir.
This can indicate that your coolant has become contaminated over time and needs to be replaced. Additionally, if you’ve had your vehicle for a few years and have never had a coolant flush, it’s a good idea to have one done as a preventative measure. Over time, coolant can lose its effectiveness and become less efficient at dissipating heat, putting your engine at risk of overheating.
So, if you’re experiencing any of these issues or if it’s been a while since your last coolant flush, it’s time to take your vehicle to a professional to have the coolant system cleaned and refilled. It’s a relatively simple process that can prevent costly repairs down the road and keep your engine running cool.
Conclusion
So, there you have it. Flushing your coolant system is like giving your car’s body a detox. It’s a bit like flushing out all the bad stuff and replacing it with a fresh, vibrant blend of coolant goodness.
Just imagine your car standing tall, all sparkly and new, with a coolant system that’s ready to take on the world. But remember, dear friend, safety always comes first. Don’t embark on this adventure without all the necessary tools and protective gear – we don’t want you to end up looking like a sad, soggy radiator.
So go forth and conquer that coolant system. Feel proud as you turn that flushed knob and watch the old coolant trickle down, a symbol of the past being washed away. And when you pour in the new coolant, imagine your car giving you a nod of appreciation, saying, “Thank you for taking good care of me.
” After all, a cool and regulated engine is a happy engine. And a happy engine means more adventures, smooth rides, and ensuring you won’t be caught with a steamy situation (pun absolutely intended). Now, grab that wrench, put on your superhero cape, and get ready to save the day, one coolant flush at a time.
Happy flushing, my coolant connoisseur!”
FAQs
Why is it important to flush my coolant system?
Flushing your coolant system helps to remove built-up debris and contaminants, ensuring optimal performance and preventing engine damage.
How often should I flush my coolant system?
It is generally recommended to flush your coolant system every 2 to 5 years, or according to your vehicle manufacturer’s guidelines.
Can I flush my coolant system myself, or should I take it to a professional?
While it is possible to flush your coolant system yourself, taking it to a professional ensures a thorough and proper flush that eliminates all contaminants.
What are the signs that my coolant system needs to be flushed?
Signs that your coolant system needs to be flushed include overheating, a sweet smell from the engine, coolant leaks, or the presence of rust or debris in the coolant.
How long does a coolant system flush take?
The duration of a coolant system flush can vary depending on the condition of your system, but it generally takes around 1 to 2 hours.
What type of coolant should I use after flushing my system?
It is important to use the correct type and mixture of coolant recommended by your vehicle manufacturer. This information can usually be found in your owner’s manual.
Can I use water to flush my coolant system?
While water can be used to flush the system, it is recommended to use a coolant system flush solution to ensure complete removal of contaminants and to prevent corrosion.
What are the benefits of flushing my coolant system? A8. Flushing your coolant system helps to improve cooling efficiency, prevent engine overheating, extend the life of your engine components, and maintain optimal performance.
Can a coolant system flush fix an overheating engine?
In some cases, a coolant system flush can resolve an overheating engine by removing blockages and improving coolant flow. However, it is important to also check for any other underlying issues causing the overheating.
What precautions should I take when flushing my coolant system?
It is important to let the engine cool completely before attempting to flush the coolant system and to wear protective gloves and eyewear. Additionally, proper disposal of used coolant is essential to protect the environment.
How much does it cost to flush a coolant system?
The cost of flushing a coolant system can vary depending on factors such as the type of vehicle and the location, but it typically ranges from $100 to $200.
Can a mechanic inspect other parts of my vehicle during a coolant system flush?
Yes, many mechanics offer additional inspections while performing a coolant system flush, such as checking belts, hoses, and other fluid levels. This can help identify any potential issues and ensure your vehicle is in top condition.