Are you noticing that your car’s engine is overheating, or your heater isn’t blowing hot air like it used to? These might be signs that you have air trapped in your coolant system. The coolant system in your car plays a crucial role in keeping the engine at the right temperature, so it’s important to address any issues with it promptly. But don’t worry, getting air out of the coolant system is not as complicated as it may seem.
In this blog post, we will guide you through the steps to effectively remove air from your coolant system and get your car running smoothly again. Let’s dive in!
Table of Contents
Understanding the Issue
If you’re wondering how to get air out of your coolant system, don’t worry, you’re not alone. Air can sometimes get trapped in the coolant system, causing it to overheat or not work properly. Getting the air out of the system is important to ensure that your engine stays cool and performs at its best.
One way to do this is by burping the coolant system. This involves opening the radiator cap and letting any trapped air escape. Another method is to use a coolant funnel, which allows you to add coolant while simultaneously releasing air.
It’s important to do this when the engine is cool to avoid any burns. By taking these steps, you can ensure that your coolant system is free of air and your engine stays cool under pressure.
Symptoms of Air in the Coolant System
air in the coolant system One common issue that car owners may encounter is the presence of air in their coolant system. This can cause a range of problems and can be indicative of an underlying issue. Understanding the symptoms of air in the coolant system is essential in order to address the problem promptly.
Some signs to look out for include overheating of the engine, fluctuating temperature gauge readings, and coolant leaks. The bubbling or gurgling sound coming from the engine and the presence of air bubbles in the coolant reservoir are also warning signs. When air is trapped in the coolant system, it can prevent the proper flow of coolant, leading to insufficient cooling of the engine and a potential breakdown.
It’s important to have the issue diagnosed and resolved by a professional mechanic to prevent further damage and costly repairs.
Causes of Air in the Coolant System
coolant system, air in coolant system, causes of air in coolant system, understanding the issue
Preparation
Is your car’s coolant system giving you trouble? Maybe you’ve noticed that your engine is overheating or your heater isn’t working properly. One possible culprit could be air trapped in the coolant system. Air pockets can prevent the coolant from doing its job of regulating the engine’s temperature.
So, how do you get the air out of your coolant system? The good news is that it’s a relatively simple process. First, make sure your car has cooled down completely before you attempt to remove the air. Once it’s cool, locate the radiator cap and remove it.
Be careful, as the coolant may still be hot. Next, start your car and let it idle for about 15 minutes. This will help circulate the coolant and force any air bubbles out of the system.
Finally, replace the radiator cap and make sure it’s tight. It’s always a good idea to check for any leaks after performing this procedure. If you’re still experiencing issues with your coolant system, it may be time to consult a professional.
Tools and Materials Needed
“Tools and Materials Needed for Preparation” To get started with your project, it’s important to have the right tools and materials on hand. Here are some essentials that you will need for preparation. First and foremost, you will need a measuring tape to accurately measure the dimensions of your project area.
This will ensure that you have the correct measurements when cutting materials or purchasing supplies. Additionally, a level is crucial to ensure that everything is straight and evenly aligned. You don’t want your project to look slanted or uneven! Another important tool is a pencil or marker for marking measurements and lines on your materials.
This will help you stay organized and ensure precision in your work. In terms of materials, you may need a variety of options depending on your project. For example, if you’re working with wood, you will need a saw for cutting pieces to the correct length.
If you’re painting, you’ll need brushes and rollers for applying the paint. It’s always a good idea to have a variety of screws, nails, and fasteners on hand in case you need to attach pieces together. Lastly, don’t forget about safety equipment! Depending on your project, you may need safety goggles, gloves, or a mask to protect yourself.
With these tools and materials, you’ll be well prepared to tackle your project with confidence!
Safety Precautions
“Preparation for Safety: Ensuring a Secure Environment” When it comes to safety precautions, preparation is key. Just like a captain plotting the course before setting sail, we must take the time to plan and prepare for potential risks and hazards in order to create a secure environment. Think of it this way – you wouldn’t start a road trip without checking your oil, filling up the gas tank, and making sure your tires are in good condition, right? The same goes for safety.
We need to take the necessary steps to ensure that we have everything we need to handle any situation that may arise. So, where do we start? First and foremost, it’s essential to assess the potential risks and hazards in our environment. Are there any potential dangers or hazards in the area? Are there any specific safety measures that need to be in place? By identifying these risks, we can then create a plan to mitigate them.
Next, we need to equip ourselves with the necessary tools and knowledge. This might involve having safety equipment on hand, such as fire extinguishers or first aid kits, as well as knowing how to use them effectively. It’s important to familiarize ourselves with emergency procedures and protocols, ensuring that we know what to do in case of an emergency.
Furthermore, training plays a crucial role in our preparedness for safety. Whether it’s undergoing safety training courses or participating in drills and exercises, training can give us the skills and confidence we need to respond effectively in the face of a crisis. It’s like practicing a dance routine – the more we rehearse, the better we become at performing the steps correctly and confidently.
Additionally, communication is key. Establishing clear lines of communication and ensuring that everyone knows how to report potential risks or emergencies is vital to maintaining a safe environment. It’s like a team of musicians playing in harmony – when everyone is on the same page and communicating effectively, the result is a beautiful symphony of safety.
In conclusion, preparation is an essential aspect of ensuring a secure environment. By assessing risks, equipping ourselves with the necessary tools and knowledge, undergoing training, and establishing effective communication, we can create an environment where safety is a top priority. Just like a well-prepared road trip, the journey to a safe and secure environment starts with thorough preparation.
Step-by-Step Instructions
If you find that there is air in your coolant system, it’s important to address the issue promptly to prevent any further damage. Luckily, getting air out of the coolant system is a relatively simple process that you can do yourself. Here’s a step-by-step guide on how to properly remove air from your coolant system.
First, make sure your engine is completely cool before you start. This is important to avoid any burns or injuries. Next, locate the coolant reservoir.
It is typically a translucent plastic tank with a cap that is labeled “coolant” or “antifreeze.” Open the cap and check the coolant level. If it’s low, you may need to add more coolant.
Once you’ve checked the coolant level, start the engine and let it run for a few minutes. This will help warm up the coolant and circulate it throughout the system. While the engine is running, keep an eye on the coolant reservoir.
If you see any air bubbles or frothing, it means there is still air in the system. To remove the air, gently squeeze the coolant hoses to help release any trapped air. Be careful not to squeeze too hard or you could damage the hoses.
You can also tap on the hoses with a screwdriver or a wrench to help dislodge any air bubbles. If squeezing the hoses doesn’t remove all the air, you can try raising the front of the vehicle slightly. This will help any trapped air bubble rise to the highest point in the coolant system and be released.
Step 1: Park and Cool Down the Vehicle
In order to properly cool down a vehicle, the first step is to find a safe place to park. Whether you’re driving on a long road trip or just heading home from work on a hot summer day, it’s important to give your car a chance to rest and cool off. Look for a shady spot if possible, as this will help prevent the car from getting too hot.
Once you’ve found a suitable place to park, turn off the engine and take a moment to cool down yourself. This is a great opportunity to stretch your legs, grab a drink of water, or just take a few deep breaths. It’s important to remember that the process of cooling down a vehicle takes time, so be patient and allow the car to rest before moving on to the next step.
By taking these initial steps, you can ensure that your vehicle stays in good condition and operates efficiently, even in the heat of summer.
Step 2: Locate the Coolant Reservoir
In order to properly maintain your vehicle’s cooling system, it’s important to know where the coolant reservoir is located. This step-by-step guide will help you locate the coolant reservoir and ensure that your vehicle stays cool and running smoothly. First, open the hood of your vehicle and secure it in place.
Take a look around the engine compartment until you locate the coolant reservoir, which is typically a translucent plastic container with a cap. The coolant reservoir is usually located near the radiator or close to the firewall. It may also have markings indicating the appropriate levels of coolant.
Once you have located the coolant reservoir, it’s a good idea to familiarize yourself with the markings and ensure that the coolant level is within the recommended range. Remember to always check the coolant level when the engine is cool to avoid any risk of burns. By knowing where the coolant reservoir is located and regularly checking the coolant levels, you can help prevent overheating and keep your vehicle running smoothly.
Step 3: Empty the Reservoir
empty the reservoir
Step 4: Fill the Reservoir with Coolant
Step 4: Fill the Reservoir with Coolant Now that you have properly flushed and cleaned your cooling system, it’s time to fill it up with fresh coolant. This step is crucial in ensuring that your engine stays cool and functions optimally. Here’s a step-by-step guide on how to fill the reservoir with coolant:
Locate the coolant reservoir: The coolant reservoir is usually a plastic tank located near the radiator. It’s important to note that some vehicles may have a pressurized coolant system, so make sure to consult your owner’s manual for the specific location of the reservoir.
Open the reservoir cap: Before pouring in the coolant, make sure the engine is cool. Never attempt to open the cap when the engine is hot, as the coolant can be extremely pressurized and cause severe burns. Once you’re sure the engine is cool, carefully remove the reservoir cap.
Mix the coolant: It’s important to check the owner’s manual to determine the correct coolant mixture for your specific vehicle. Most coolants come pre-mixed with water, but some may require dilution.
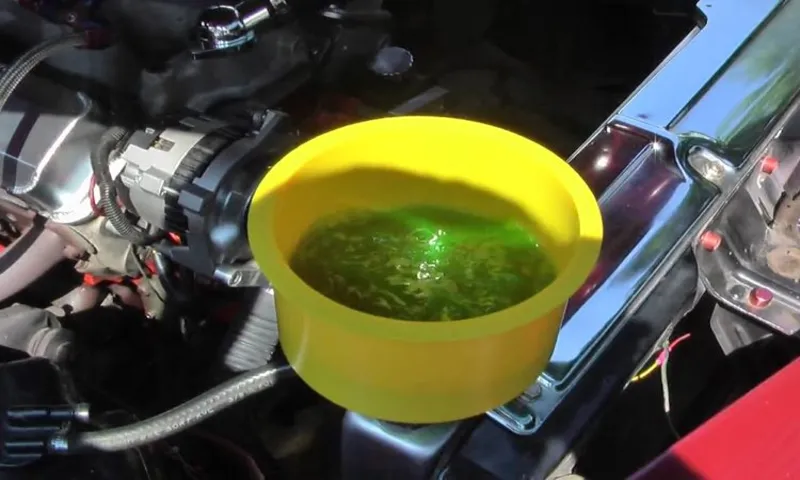
Follow the instructions on the coolant bottle to ensure the correct ratio. Slowly pour in the coolant: Using a funnel to avoid spills, slowly pour the coolant into the reservoir.
Make sure not to overfill the reservoir, as this can cause coolant to overflow and potentially damage your engine. It’s a good idea to check the level periodically and top it off if necessary.
Step 5: Bleed the Coolant System
coolant system, bleed coolant, coolant level, air pockets, radiator cap, thermostat, overheating issue. Step 5 of the process of changing the coolant in your car’s cooling system is to bleed the coolant system. This step is essential to ensure that there are no air pockets in the system, which can cause your engine to overheat.
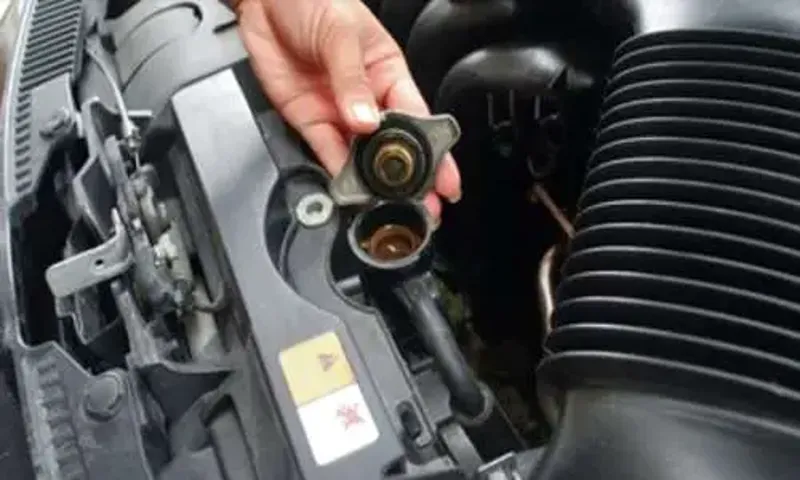
To begin, make sure that the coolant level in your radiator is topped off. Next, locate the radiator cap. It’s usually located near the front of the engine compartment.
Carefully remove the cap and set it aside. Then, start your engine and let it run for a few minutes. As the engine warms up, the thermostat will open, allowing the coolant to flow.
This will help to release any air pockets in the system. While the engine is running, keep a close eye on the coolant level in the radiator. You may need to add more coolant as the air pockets are released.
Once you no longer see any air bubbles or pockets in the coolant, it’s time to replace the radiator cap. Make sure it is securely fastened to prevent any coolant from escaping. Bleeding the coolant system is an important step in maintaining the proper functioning of your car’s cooling system and preventing any potential overheating issues.
Tips and Tricks
Have you noticed air bubbles in your coolant system? Don’t panic! This is a common issue that can be easily fixed. Air in the coolant system can cause overheating and potential damage to your engine, so it’s important to get rid of it as soon as possible. The first step is to locate the air bleed valve, which is typically found on the top of the radiator or near the thermostat housing.
Once you’ve found it, open the valve and let the air escape. Be careful as the coolant may be hot! You may also need to fill the radiator with coolant to replace any that has been lost. Finally, start the engine and let it run for a few minutes, checking the coolant level and temperature gauge to ensure everything is functioning properly.
With these simple steps, you can easily get air out of your coolant system and keep your engine running smoothly.
Using a Coolant System Air Purge Kit
coolant system, air purge kit, tips and tricks
Checking for Leaks
Checking for Leaks: Tips and Tricks One of the most frustrating things about owning a home is dealing with leaks. They can cause damage to your property and lead to expensive repairs if not caught early. That’s why it’s important to regularly check for leaks in your home.
Here are some tips and tricks to help you in your quest for leak detection. First, start by visually inspecting your home for any signs of leaks. Look for water stains on the walls or ceilings, as well as any bulging or discolored areas.
Check under sinks and around toilets for any signs of dripping or pooling water. Don’t forget to also check outside your home for any excessive moisture or damp spots. Next, listen for any sounds of running water.
Turn off all the faucets and appliances in your home and listen for any running water. If you hear water flowing when everything is turned off, it could be a sign of a hidden leak. Another trick is to check your water meter.
Take a reading of your water meter and then make sure no water is being used in your home for a couple of hours. After the two hours, check the meter again. If the dial has moved, it could be an indication of a leak.
You can also use food coloring to check for leaks in your toilet tank. Simply drop a few drops of food coloring into the tank and wait for about 15 minutes. If you see the colored water in the toilet bowl, it means there is a leak that needs to be fixed.
Regular Coolant Maintenance
Regular Coolant Maintenance: Tips and Tricks Maintaining the coolant in your vehicle is essential for keeping the engine running smoothly and preventing overheating. Here are some tips and tricks to help you with regular coolant maintenance. First and foremost, it’s important to check your coolant levels regularly.
This can be done by simply lifting the hood and locating the coolant reservoir. Ensure that the coolant level is between the minimum and maximum markings. If it’s too low, you can top it up with a mixture of coolant and water.
Additionally, it’s important to check the condition of the coolant. Over time, coolant can become dirty and lose its effectiveness. If you notice that the coolant is discolored or has a foul smell, it’s time to flush and replace it.
This can be done using a coolant flush kit, which can be easily purchased from an auto parts store. Remember, regular coolant maintenance is crucial for the longevity of your engine. By following these tips and tricks, you can keep your engine running smoothly and prevent any costly repairs down the line.
Conclusion
And there you have it, my ingenious solution to getting air out of your coolant system! By following these simple steps and tapping into your inner MacGyver, you can conquer any air bubbles and ensure optimal engine performance. So next time you find yourself with a sneaky air bubble causing havoc in your coolant system, don’t fret. Remember, you have the power of knowledge and a trusty screwdriver on your side.
Just don’t forget to refill your coolant afterward; we wouldn’t want your car to overheat while you’re busy patting yourself on the back for a job well done. Happy driving, my fellow coolant conquerors!”
FAQs
Why is it important to remove air from the coolant system?
It is important to remove air from the coolant system to ensure proper circulation and cooling of the engine. Air pockets can disrupt the flow of coolant, leading to overheating and engine damage.
How do I know if there is air in my coolant system?
Common signs of air in the coolant system include fluctuating temperature gauge, coolant overflow or leakage, and gurgling noises from the radiator. You may also notice reduced cooling efficiency.
What causes air to get into the coolant system?
Air can enter the coolant system due to a variety of reasons, including coolant leaks, improper bleeding after maintenance, or a blown head gasket. It can also occur during radiator or hose replacement if proper procedures are not followed.
Can I continue driving with air in the coolant system?
It is not recommended to drive with air in the coolant system as it can lead to engine overheating and potential damage. It is best to address the issue and remove the air before continuing to drive.
How can I remove air from the coolant system?
To remove air from the coolant system, start by allowing the engine to cool down. Then, locate the coolant reservoir or radiator cap (depending on your vehicle) and carefully open it. Next, run the engine until it reaches operating temperature while keeping the cap open. This will allow the air to escape. Finally, top up the coolant level as needed and close the reservoir or radiator cap.
Are there any precautions I should take when removing air from the coolant system?
When removing air from the coolant system, it is important to exercise caution to prevent burns from hot coolant or steam. Make sure to wear protective gloves and use a rag or towel to cover the cap when opening it. Additionally, follow your vehicle manufacturer’s recommendations and guidelines for bleeding the coolant system.
What if removing air from the coolant system doesn’t solve the issue?
If removing air from the coolant system does not solve the problem, it could indicate a more serious issue such as a coolant leak, faulty thermostat, or a blown head gasket. In such cases, it is recommended to consult a professional mechanic for further diagnosis and repair.